Measuring for a sliding barn door can seem simple, but small mistakes can lead to doors that don’t fit, leave gaps, or scrape the floor. If you want a barn door that looks great and works perfectly, accurate measurement is critical.
Whether you’re adding a rustic touch to your home or need a space-saving solution, knowing exactly how to measure will save you time, money, and frustration.
This guide will walk you through every step. You’ll learn what tools you need, where to start, and how to avoid common measurement errors. You’ll also discover how your wall type, hardware, and existing trim can affect your measurements—and what to do if your opening isn’t standard size.
Even if you’ve never installed a door before, by the end, you’ll be confident about getting the right numbers for your sliding barn door project.
Why Proper Measurement Matters
Getting the measurements right is more than just following instructions. A barn door that’s too small will leave gaps and may not cover the opening, reducing privacy and energy efficiency. One that’s too large could scrape the wall, block switches, or look out of place. Precise measurements are essential to ensure your door:
- Completely covers the opening
- Slides smoothly without hitting obstacles
- Looks balanced on your wall
- Works well with your chosen hardware
A survey by the National Association of Home Builders found that improper door installation is a top complaint among homeowners doing DIY projects. The main cause? Incorrect measurements at the start. Taking time to measure carefully prevents these headaches.
Tools And Materials You’ll Need
Before you begin, gather the right tools. This will make the process smoother and help you avoid mistakes. For most barn door measurement tasks, you’ll need:
- Tape measure (at least 25 feet)
- Level (4 feet or longer is best)
- Notepad and pencil (or phone/tablet for notes)
- Stud finder (for wall hardware placement)
- Ladder or step stool (for high measurements)
- Laser measure (optional, for extra-long or tall openings)
- Masking tape (to mark spots if needed)
- Camera (to record the space for reference)
Don’t rush. Check your tape measure for accuracy before you start, especially if it’s older or well-used.
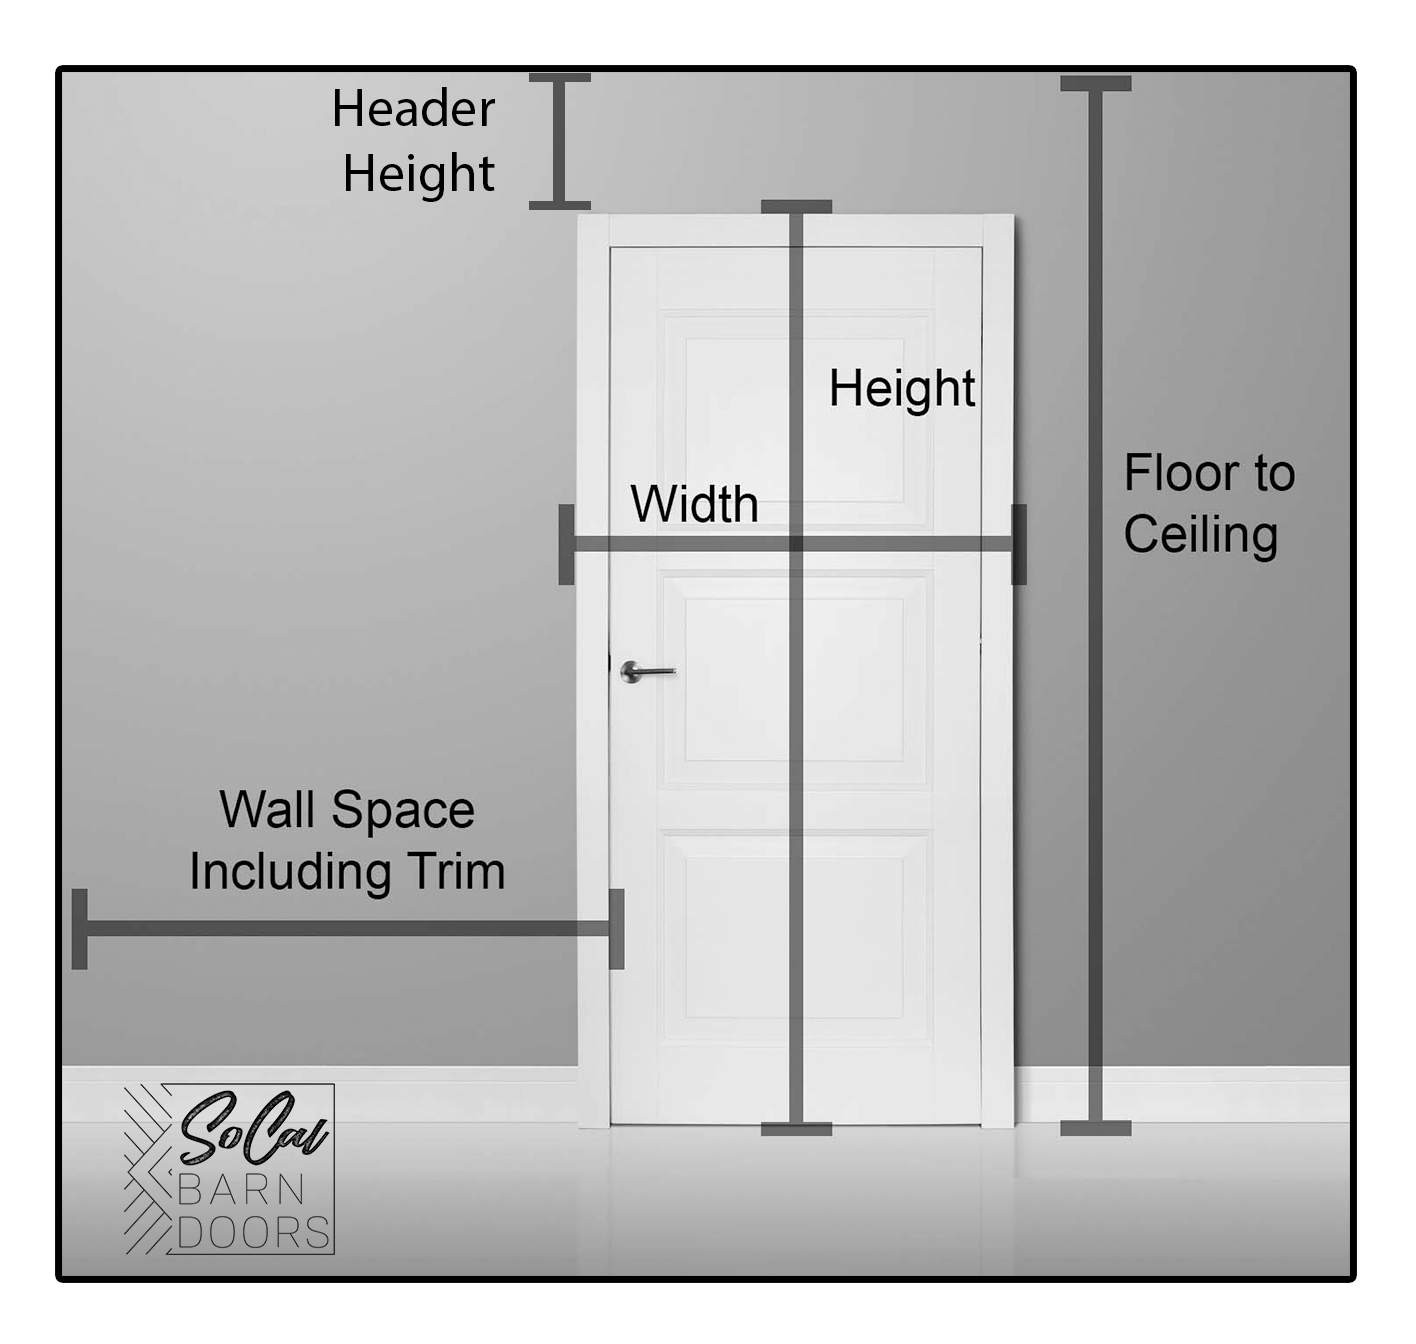
Credit: socalbarndoors.com
Understanding Your Doorway And Space
Every opening is different. Before measuring, study your wall and opening. Key factors to check:
- Wall type: Is it drywall, plaster, brick, or concrete? This can affect hardware options.
- Trim and molding: Does your opening have trim around it? Will you keep or remove it?
- Obstacles: Are there switches, outlets, vents, or light fixtures near the opening?
- Ceiling height: Is there enough space above the opening for the track and hardware?
- Floor material: Is the floor even, or does it slope? This can affect door height.
Take photos and make a quick sketch of the wall. Note anything unusual. These details will help you later, especially if you plan to order a custom door.
Step-by-step: How To Measure For A Sliding Barn Door
Now, let’s break down the process into clear steps, so you don’t miss anything.
Step 1: Measure The Door Opening Width
Place your tape measure horizontally across the widest part of the opening. Measure from one side of the opening to the other—usually from the inside edge of one side of the trim to the inside edge of the other. If you have trim, measure both the inside (between trims) and the outside (edge to edge of trims).
Pro tip: Walls are often not perfectly straight. Measure at the top, middle, and bottom. Use the largest number for your calculations.
Step 2: Measure The Door Opening Height
Measure from the floor to the top edge of the opening (usually the top of the trim or the frame). Take measurements on the left, center, and right sides. Sometimes floors are uneven, so use the tallest measurement to ensure your door fully covers the opening.
If you have thick carpet or a high threshold, include it in your measurement. A barn door should have a small gap at the bottom (usually about 1/2 inch) so it glides smoothly.
Step 3: Check For Level And Plumb
Use your level to check if the opening sides (vertical) and top (horizontal) are straight. If the opening or floor is not level, note which side is higher or lower. This can affect door hang and appearance.
Step 4: Determine Door Size
A sliding barn door should be wider and taller than the opening to ensure full coverage and privacy. The typical guidelines are:
- Width: Add 2 to 4 inches to the opening width. For example, if your opening is 36 inches wide, your door should be 38–40 inches wide.
- Height: Add 1 to 2 inches above the opening height. If your opening is 80 inches tall, your door should be 81–82 inches tall.
For doors with large trim or baseboards, add enough to cover these as well. If you want a more dramatic look, you can go wider, but make sure the wall has space for the door to slide open fully.
Step 5: Measure Wall Space For Door Travel
The door needs to slide completely out of the way for full access. Measure the wall space next to the opening (on the side where the door will slide). The space should be at least as wide as the door, and clear of light switches, outlets, or art.
Example: If your door is 40 inches wide, you need at least 40 inches of clear wall space for it to slide open.
Step 6: Measure For Hardware Clearance
Barn door hardware (track and hangers) require space above the opening. Most kits need at least 6 inches between the top of the opening and the ceiling (sometimes more for soft-close systems or thicker tracks).
Measure from the top of the opening (including trim, if keeping it) to the ceiling. If you have less than 6 inches, look for low-profile hardware.
Step 7: Check For Obstructions
Carefully check for anything that could block the door or hardware, such as:
- Light switches
- Thermostats
- Outlets
- Wall art
- Vents
Mark their positions. If they can’t be moved, you may need to adjust your door size or placement.
Step 8: Double-check Everything
Write down all final numbers clearly. Double-check each measurement. Even small errors can cause big problems when ordering or installing your barn door.
Table: Common Door Opening Sizes Vs. Recommended Barn Door Sizes
To help visualize, here’s how standard openings match up with recommended barn door sizes:
| Opening Width (inches) | Recommended Door Width (inches) | Opening Height (inches) | Recommended Door Height (inches) |
|---|---|---|---|
| 28 | 30–32 | 80 | 81–82 |
| 32 | 34–36 | 80 | 81–82 |
| 36 | 38–40 | 80 | 81–82 |
| 42 | 44–46 | 84 | 85–86 |
Remember, these are guidelines. Always adjust based on your wall and hardware needs.
Special Situations And Custom Openings
Not every doorway is standard. Sometimes, you’ll face unique challenges—arched openings, extra-wide spaces, or walls with little clearance. Here’s how to handle them.
Measuring For Double Barn Doors
For extra-wide openings, double barn doors are a great solution. Each door covers half the opening.
- Measure the full opening width.
- Divide by two for each door’s width.
- Add 2–4 inches to each door so they overlap in the center.
- Measure the height as normal, adding 1–2 inches for coverage.
Measuring For Non-standard Or Arched Openings
If your opening has an arch, measure the widest part for width. For height, measure from the floor to the highest and lowest points. Use the tallest measurement for your door height, so it fully covers the arch.
Measuring For Bypass Barn Doors
Bypass systems let multiple doors slide in front of or behind each other, great for closets or wide wall spaces.
- Measure the total opening width.
- Divide by the number of doors (usually two or three).
- Add 2–4 inches to each panel for full overlap.
- Measure height as with a single door.
Measuring For Doors Without Trim
If there’s no trim, measure from edge to edge of the rough opening. Add enough width and height for full coverage and privacy.
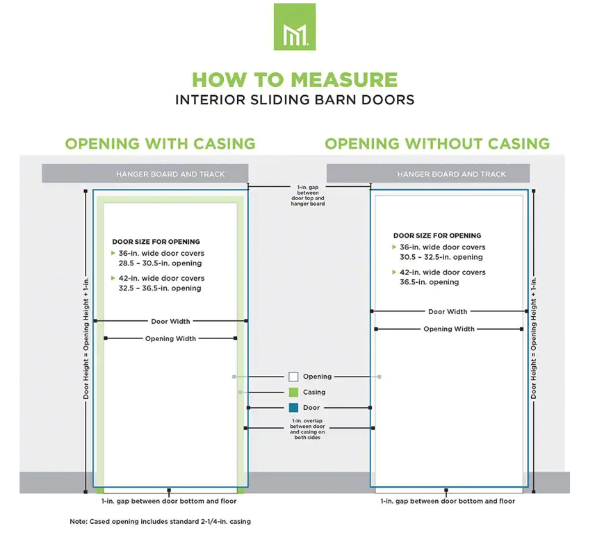
Credit: www.masonite.com
Table: Door Size Adjustments For Different Opening Types
Here’s a quick reference for adjusting door size based on your opening style.
| Opening Type | Width Adjustment | Height Adjustment |
|---|---|---|
| Standard (with trim) | +2 to 4 inches | +1 to 2 inches |
| Without trim | +4 to 6 inches | +2 to 3 inches |
| Double doors | Each: (opening ÷ 2) + 2 to 4 inches | +1 to 2 inches |
| Bypass doors | Each: (opening ÷ number of doors) + 2 to 4 inches | +1 to 2 inches |
| Arched opening | Widest part + 2 to 4 inches | Tallest point + 1 to 2 inches |
Adjust based on your specific needs and always check your hardware requirements.
Accounting For Floor And Ceiling Issues
It’s easy to forget the condition of your floors and ceilings, but these can impact the installation and final appearance of your barn door.
What To Do If Your Floor Is Uneven
If the floor slopes, measure the height at the highest point (usually one side of the opening) and use this as your door height reference. The bottom gap may be larger on one side, but it ensures the door will open and close freely.
Low Ceilings
If you have less than 6 inches between the top of your opening and the ceiling, look for low-profile barn door hardware. Some brands offer tracks and rollers that need as little as 4 inches of clearance.
Accounting For Baseboards And Door Guides
Baseboards and floor guides are often overlooked, but they can affect door height and swing.
- If you have thick baseboards, measure from the top of the baseboard, not the floor.
- For floor guides (which keep the door from wobbling), check their height and width. Make sure your door will clear them.
Some guides mount to the wall, others to the floor. Choose one that fits your situation.
Table: Hardware Clearance Requirements
Different barn door hardware needs different amounts of space above the opening. Here’s a quick comparison.
| Hardware Type | Minimum Clearance Needed (inches) | Best For |
|---|---|---|
| Standard flat track | 6–8 | Most homes |
| Low-profile track | 4–6 | Low ceilings |
| Soft-close systems | 8–10 | Heavy doors, quiet closing |
| Bypass track | 8–12 | Closets, wide spaces |
Always check the specs for your specific hardware before finalizing your measurements.
Common Mistakes And How To Avoid Them
Even experienced DIYers make measurement errors. Here are some pitfalls to watch for:
- Not adding enough overlap: If you only match the door to the opening, you’ll have gaps on the sides. Always add at least 2 inches on each side.
- Forgetting about trim: If you measure just the opening and ignore thick trim, your door may not cover it.
- Ignoring wall obstacles: Switches or outlets can block the door’s path. Always map the wall.
- Ordering before checking hardware specs: Some doors need more clearance than others.
- Not double-checking measurements: Always measure twice (or more) before buying.
- Overlooking floor unevenness: A sloped floor can make your door look crooked if not accounted for.
- Using rough estimates: Don’t guess. Even a 1/4 inch mistake can cause problems.
Two Non-obvious Insights For Accurate Measurement
- Measuring from Finished Surfaces, Not Studs or Unfinished Openings: Many people measure from the rough framing, but this doesn’t account for drywall, trim, or baseboards. Always measure from the finished wall and trim surfaces for the most accurate results.
- Planning for Future Changes: If you’re remodeling, decide if you’ll add or remove trim, change flooring, or paint. These changes affect final measurements. Measure as the space will be, not as it is now.
Example Walkthrough: Measuring A Typical Opening
Imagine you have a hallway opening with the following:
- Inside trim to trim: 36 inches wide
- Outside trim to trim: 40 inches wide
- Height from floor to top of trim: 82 inches (left), 81.5 inches (center), 81.75 inches (right)
- Wall space to left of opening: 50 inches
- Ceiling to top of trim: 8 inches
- No major obstacles on the wall
Your ideal door size:
- Width: 40 inches (outside trim) + 2 inches = 42 inches
- Height: 82 inches (tallest point) + 1 inch = 83 inches
There’s plenty of wall space and ceiling clearance for most tracks. You’d order a 42 x 83 inch barn door.
What If Your Opening Isn’t Standard?
If your opening is very tall, wide, or has uneven sides, you might need a custom barn door. Many companies offer custom sizing. Provide the exact measurements, and consider sending photos and sketches for clarity.

Credit: www.aubarndoor.com.au
How To Communicate Your Measurements When Ordering
When ordering a custom barn door, be specific:
- List all measurements (width, height, wall space, hardware clearance).
- State if measurements include or exclude trim.
- Include notes about obstacles or uneven floors.
- Attach photos or sketches when possible.
Clear communication prevents costly mistakes or returns.
Useful Tips For A Perfect Barn Door Fit
- Use masking tape to mark the door size on your wall. This helps you visualize the final look and catch any issues.
- Check manufacturer recommendations for door and hardware sizing. Some brands have unique requirements.
- Consider privacy needs. For bathrooms, go wider to prevent gaps. For closets, standard overlap is enough.
- Order hardware and door together if possible. This ensures a perfect match.
- Keep records of all measurements and notes. You may need them for future repairs or upgrades.
When To Get Professional Help
If your opening is very large, oddly shaped, or you’re unsure about your wall’s structure, consult a professional. A carpenter or door installer can spot issues you might miss and ensure everything fits perfectly. This is especially smart for heavy or expensive custom doors.
Trusted Resources For More Information
For more detailed instructions and inspiration, the Family Handyman website offers step-by-step guides and photos.
Frequently Asked Questions
How Much Wider Should A Sliding Barn Door Be Than The Opening?
A sliding barn door should be 2 to 4 inches wider than the opening on each side. This overlap ensures full coverage and privacy, preventing gaps that let sound or light through.
What If My Wall Doesn’t Have Enough Space For The Door To Slide Open Fully?
If the wall space is limited, consider a bypass barn door system (where doors slide over each other), a smaller door (if total coverage isn’t critical), or a pocket door that slides into the wall. Always check for wall obstacles before choosing.
How Much Space Is Needed Above The Opening For Barn Door Hardware?
Most barn door hardware needs 6 to 8 inches of clearance above the opening. Low-profile hardware can require as little as 4 inches, while bypass systems may need more. Always check your hardware’s specifications before buying.
Can I Install A Barn Door On A Wall With Light Switches Or Outlets Nearby?
You can, but make sure the door does not block access to switches or outlets when open or closed. Measure carefully, and consider moving obstacles if possible. Sliding barn doors need a clear path to function well.
What Should I Do If My Measurements Are Between Standard Door Sizes?
If your size falls between standard options, it’s best to order a custom barn door. Custom doors may cost more but ensure a perfect fit. Never order a smaller door hoping it will work—it will leave gaps and reduce privacy.
Getting barn door measurements right takes time, but the reward is a door that looks great, works smoothly, and adds value to your space. With these steps, you’ll be ready to measure with confidence and avoid common pitfalls. Your sliding barn door project will get off to the perfect start.