Bringing a rustic white look to furniture is one of the most popular trends in home decor today. Whether you want to give a new piece some character or transform an old favorite, the rustic white finish adds warmth, charm, and a sense of history to any space.
But achieving this look isn’t just about slapping on some white paint. It’s about understanding the right materials, techniques, and details that create that authentic, lived-in feel.
Many people think rustic white simply means “old and white,” but the real magic lies in subtle layering, distressing, and protecting the final piece. Done right, your furniture will not only look stunning but also last for years. This guide walks you through everything you need to know—from choosing the right materials and prepping your furniture, to painting, distressing, sealing, and even styling your finished piece.
You’ll also learn common mistakes beginners make, and get expert tips to bring out the best in every project.
Let’s dive in and help you create that perfect rustic white furniture you’ve been dreaming of.
What Is Rustic White Furniture?
Rustic white furniture combines a distressed, time-worn look with a clean, light finish. It often shows visible brush strokes, chipped edges, or areas where wood peeks through. This style is inspired by country cottages, French farmhouses, and vintage pieces found in old barns or flea markets.
Unlike plain white furniture, rustic white emphasizes imperfection. The goal is to make your piece look naturally aged, as if it has been loved and used for generations. This look fits well in homes with farmhouse, shabby chic, coastal, or even modern decor styles, thanks to its versatility and warmth.
Why Choose The Rustic White Look?
There are several reasons people love rustic white furniture:
- Timeless appeal: Rustic white never goes out of style.
- Brightens spaces: White reflects light, making rooms look bigger and fresher.
- Hides wear and tear: The distressed look disguises small nicks or scratches.
- Easy to match: Rustic white works with almost any color, wood tone, or decor style.
Plus, it’s a fun and creative way to personalize your furniture, whether you’re updating a thrift store find or reviving an old family piece.
Credit: angelamariemade.com
Choosing The Right Furniture Piece
Not all furniture is ideal for a rustic white makeover. Some pieces work better than others. Here’s what to consider:
- Solid wood is the best choice, as it holds up well to sanding and distressing. Veneer or laminate can work, but needs extra care.
- Avoid furniture with heavy gloss or plastic finishes—they are harder to prep and paint.
- Pieces with details, like carved legs or paneling, show off the rustic look best.
- Consider the piece’s function. For example, a rustic white coffee table may get more daily wear than a decorative cabinet.
Non-obvious insight: Heavily used surfaces, like tabletops, may require more durable sealers or frequent touch-ups. Also, drawers and doors with simple hardware are easier to update with a rustic finish.
Materials And Tools You’ll Need
Before starting, gather all necessary materials. The right tools make the job smoother and help you get the look you want.
Basic supplies:
- Sandpaper (medium and fine grit, 120–220)
- Sanding block or electric sander (for large pieces)
- Cleaning cloths (lint-free)
- Screwdriver (for removing hardware)
- Painter’s tape
- Drop cloth or old sheets
- Paint brushes (natural bristle for chalk/mineral paint, synthetic for latex/acrylic)
- Small foam roller (optional, for flat surfaces)
Paint and finishes:
- White chalk paint, milk paint, or matte furniture paint
- Wood stain (optional, for darker distressed areas)
- Clear wax or water-based polyurethane
- Dark wax or glaze (for aging effect, optional)
Other helpful items:
- Putty knife (for scraping or distressing)
- Old candle or beeswax (for resist technique)
- Steel wool or fine sandpaper (for smoothing)
- Gloves
- Respirator mask (for sanding/painting in closed spaces)
Practical tip: Buy sample pots of white paint to test on a hidden area first. Whites can vary—some look yellow, blue, or gray under home lighting.

Credit: www.youtube.com
Prepping Your Furniture
Preparation is key to a beautiful, long-lasting finish. Don’t rush this step.
1. Clean Thoroughly
Remove dust, grease, and old polish with a gentle cleaner. Warm soapy water or a mix of vinegar and water usually works. Avoid harsh chemicals, which can react with paint.
Example: A thrifted nightstand may have years of furniture polish buildup. Clean until the cloth wipes clean—dirt can ruin your paint adhesion.
2. Remove Hardware
Take off drawer pulls, knobs, and hinges. Store them in a labeled bag. Painting over hardware not only looks messy, it can cause chipping later.
3. Sand The Surface
Even if you’re using chalk paint, which claims to stick to anything, a light sanding helps paint grip better. Use 120–180 grit for the first pass. Sand in the direction of the wood grain.
If your piece has a glossy finish, don’t skip this. Focus on corners and edges if you plan to distress them later.
4. Repair Damage
Fill deep scratches or holes with wood filler. Let it dry, then sand smooth. Small imperfections add character, but big gouges should be fixed.
5. Tape And Protect
Use painter’s tape to cover areas you don’t want painted, such as glass panels or inside drawers. Lay a drop cloth under your work area.
Non-obvious insight: If your piece has an odor, set it outside in the sun for a few hours before painting. Sunlight can help remove musty smells.
Choosing The Right White Paint
There are many kinds of white paint, but not all give the same rustic look. Here’s how they compare:
| Paint Type | Finish | Pros | Cons |
|---|---|---|---|
| Chalk Paint | Matte, velvety | Easy to distress, sticks to most surfaces | Needs sealing, can scratch if unprotected |
| Milk Paint | Soft matte, sometimes streaky | Natural, creates authentic chippy look | Requires practice, sometimes unpredictable |
| Latex/Acrylic | Satin, eggshell, or matte | Durable, wide variety of whites | Harder to distress, may look too “new” |
Quick tip: For a true farmhouse look, chalk or milk paint is the best choice. If you want a smoother, more modern rustic finish, matte latex works well.
Color matters. Not all whites are the same. “Pure white” is very bright and modern, while “antique white” or “ivory” gives a softer, aged effect. Test a few shades against your wall or flooring before committing.
Painting Techniques For A Rustic White Finish
How you apply the paint makes a big difference. Here are the main rustic techniques:
1. Classic Dry Brushing
Dip the tip of your brush in paint, then wipe most off on a rag. Lightly drag the brush across the surface. This leaves some wood showing through, creating a weathered effect.
Best for: Subtle, streaky texture
2. Layering Colors
Start with a dark base coat (like gray or brown), then add white on top. Sand lightly in spots to let the base color peek through.
Best for: Deep, authentic wear patterns
3. Chippy Paint
Use milk paint or a resist (like wax or petroleum jelly) to create areas where the white paint flakes off naturally. This simulates old, peeling paint.
Best for: Super-aged, barn wood look
4. All-over Matte Paint
Apply one or two solid coats of white, then distress edges and corners after drying. This is simpler and gives a cleaner, farmhouse style.
Best for: Beginners, or when you want less “busy” texture
Pro tip: Always let paint dry fully between coats (usually 1–2 hours). Rushing leads to smudges and uneven color.
5. Using A Roller
For large, flat surfaces like tabletops, a small foam roller can speed things up and prevent brush marks. But for the rustic look, always finish with a brush on edges and details.
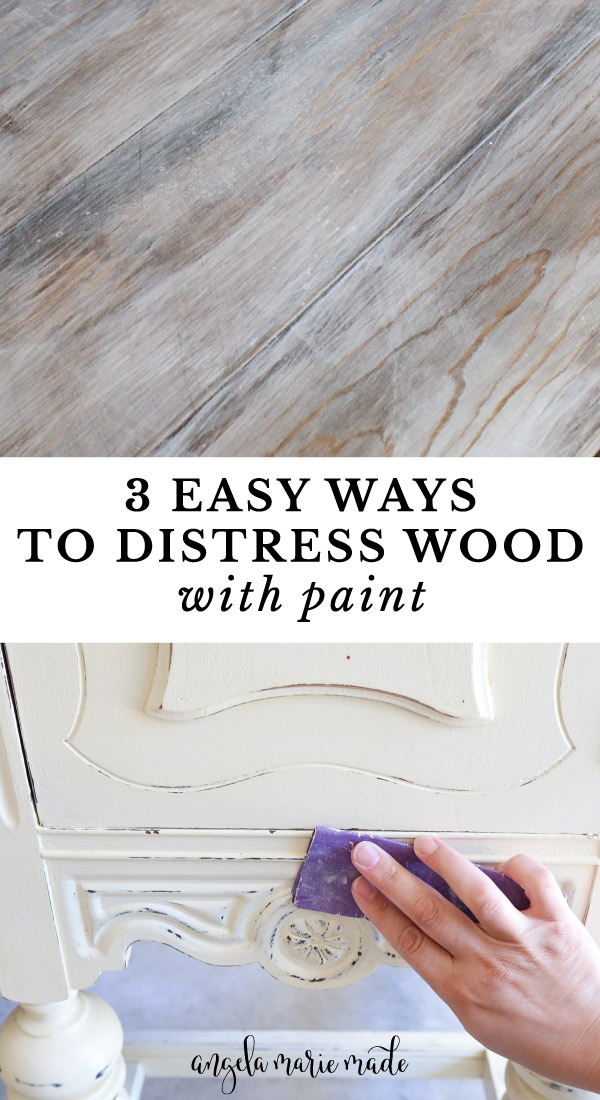
Distressing: Creating Authentic Wear
Distressing is what makes rustic white furniture unique. It’s about making the piece look naturally aged, not just painted. Here’s how to do it:
1. Sandpaper Distressing
After the paint dries, use fine or medium sandpaper to gently rub edges, corners, and raised details. Focus on spots that would wear naturally—like drawer fronts, handles, and legs.
Example: Lightly sanding the edge of a cabinet door reveals the wood beneath, simulating years of use.
2. Wax Resist
Rub a candle or beeswax on areas before painting. After painting and drying, sand those spots to reveal the wood or base color below.
Best for: Creating chipped paint spots
3. Layered Distress
Apply a base coat of a darker color. Once dry, rub wax on select areas. Paint white over the whole piece, then sand the waxed spots to show the color underneath.
Pro tip: Less is more. Start with gentle distressing; you can always add more, but you can’t undo heavy sanding.
Non-obvious insight: Don’t distress in even patterns. Real wear is random—focus on edges, corners, and places where hands or objects would naturally rub.

Credit: www.woodcraftblueprint.com
Aging And Antiquing Your Piece
While distressing exposes layers, aging adds depth and warmth to the white finish.
1. Dark Wax
After your final coat of paint dries, rub dark wax over the surface using a soft cloth or brush. Wipe away excess, leaving some in grooves and corners.
Effect: Adds an old-world patina, makes details pop
2. Glaze
Brush or wipe on a tinted glaze (brown or gray), then quickly wipe off with a clean cloth. This tones down the bright white and gives a subtle aged look.
Tip: Glaze is more forgiving than wax. If you don’t like the look, wipe it off with a damp cloth before it dries.
3. Stain Wash
Dilute wood stain with water and brush lightly over the white paint, then wipe back. This “dirty” effect works well for farmhouse tables.
Caution: Practice on a scrap piece first. Stain can soak in fast and darken the finish.
Sealing And Protecting Rustic White Furniture
White paint, especially chalk and milk paint, needs sealing for durability. Otherwise, it can chip or show stains easily.
Here’s a comparison of popular sealers:
| Sealer Type | Look | Durability | Use For |
|---|---|---|---|
| Clear Wax | Soft sheen, slightly matte | Medium (needs re-coating) | Low-traffic pieces |
| Water-based Polyurethane | Matte or satin, clear | High (long-lasting) | Tabletops, cabinets |
| Oil-based Polyurethane | Amber tint, glossy | Very high | Rustic floors, heavy-use |
Practical tip: For a true rustic look, use matte or satin finishes. Glossy sealers look modern and can spoil the aged effect.
How to seal:
- Wait until paint is completely dry (overnight is best).
- Apply wax with a cloth, or brush/roll on polyurethane in thin, even coats.
- Let the sealer cure fully before using the furniture (up to a week for poly).
Common mistake: Skipping the sealer or using too much. Thick layers can yellow over time or hide your distressing.
Styling And Decorating With Rustic White Furniture
Your rustic white piece can be the star of the room or a subtle accent. Here’s how to style it for maximum impact:
- Pair with natural wood, metal, or neutral fabrics for a true farmhouse look.
- Add vintage hardware (glass knobs, iron handles) for extra charm.
- Display with woven baskets, greenery, or old books for a cozy feel.
- Use rustic white dining chairs with a solid wood table to balance warmth and brightness.
- Layer with soft throws or pillows in linen, cotton, or burlap.
Pro tip: Don’t overdo the rustic look. One or two whitewashed pieces per room is often enough. Too many can feel forced or theme-y.
Non-obvious insight: Rustic white works well as a backdrop for colorful art or decor. The neutral color makes other items pop.
Common Mistakes And How To Avoid Them
Even experienced DIYers make mistakes. Here are some to watch for:
- Skipping prep: Not cleaning or sanding leads to peeling paint.
- Wrong paint: Glossy paint is hard to distress; use chalk or milk for best results.
- Over-distressing: Too much sanding can look fake. Focus on edges and handles.
- Poor sealing: No sealer means easy stains and chips.
- Choosing the wrong white: Test your paint in the room—lighting changes everything.
Practical tip: Always paint in a well-lit area. Shadows can hide drips and missed spots until it’s too late.
Advanced Techniques For A Unique Rustic White Look
Once you’re comfortable with the basics, try these pro-level ideas:
1. Two-tone Effect
Paint the body white and leave the top natural wood, or vice versa. This adds contrast and highlights the furniture’s design.
2. Color Underlayer
Use a bright or bold color (like teal or red) as a base, then paint white on top and distress. When you sand, hints of color peek through.
3. Stenciling Or Transfers
Add vintage numbers, French script, or patterns before sealing. This gives a one-of-a-kind, custom look.
4. Bleached Wood
Instead of paint, use a wood bleach to lighten natural wood, then seal with clear wax. This gives a softer, more Scandinavian rustic style.
5. Raised Texture
Apply spackle or texture paste in patterns (like faux wood grain), let dry, then paint and distress. This works best on flat drawer fronts.
Pro tip: Don’t try advanced techniques on your main piece first. Practice on a scrap or thrifted item.
Real-life Examples And Inspiration
Many designers and DIYers have created stunning rustic white furniture. Here are some inspiring examples:
- A rustic white dresser with glass knobs, styled with a vintage mirror and eucalyptus branches.
- A farmhouse dining table with white legs and a stained wood top, paired with mismatched chairs.
- A whitewashed bookshelf filled with colorful pottery and baskets.
- An old trunk painted rustic white and used as a coffee table, with distressed corners and rope handles.
Check out interior design sites or social media for more ideas. You’ll see how versatile and beautiful the rustic white style can be in different settings.
Caring For Rustic White Furniture
Good care keeps your finish looking fresh for years:
- Wipe spills quickly—white paint shows stains.
- Dust with a soft, dry cloth.
- Avoid harsh cleaners; use mild soap and water if needed.
- Touch up chips or scratches with leftover paint.
- Reapply wax or sealer as needed (every 6–12 months for high-use areas).
Non-obvious insight: Use felt pads under decor or hardware to prevent scratching the paint.
Environmental And Health Considerations
Some paints and sealers contain VOCs (volatile organic compounds) that can be harmful if used in closed spaces. Always:
- Work in a well-ventilated area.
- Wear a mask when sanding or painting.
- Choose low-VOC or water-based products when possible.
For more on safe paint options, see this EPA resource.
Practical tip: Pregnant women, children, and pets should avoid freshly painted or sealed furniture until fully cured.
Comparing Store-bought Vs Diy Rustic White Furniture
Should you buy a ready-made piece or DIY it? Here’s a quick comparison:
| Option | Cost | Customization | Durability | Time Invested |
|---|---|---|---|---|
| Store-bought | High | Low (fixed design) | Varies | None |
| DIY | Low to medium | High (your style) | Can be higher with good prep | Moderate to high |
If you enjoy hands-on projects and want a unique look, DIY is often more rewarding (and affordable).
Frequently Asked Questions
How Long Does It Take To Finish A Rustic White Furniture Project?
Most projects take 2–4 days from start to finish. Cleaning, sanding, and painting can be done in a day, but paint and sealer need drying time between coats. Rushing can ruin the finish, so always allow for proper drying.
Can I Use Regular Wall Paint For Rustic White Furniture?
You can, but it’s not ideal. Wall paint may not adhere well and is harder to distress. Use chalk, milk, or matte latex paint made for furniture for best results. If you do use wall paint, add a bonding primer first.
How Do I Prevent Yellowing On White Painted Furniture?
Yellowing happens when using oil-based sealers or low-quality paints. Use a water-based polyurethane or clear wax to seal your piece. Keep furniture out of direct sunlight, which can also cause yellowing over time.
What’s The Best Way To Clean Rustic White Furniture?
Use a soft, dry cloth for dusting. For sticky spots, use a damp cloth and mild soap. Avoid abrasive cleaners and too much water, as these can damage the paint and sealer.
Can I Get The Rustic White Look On Laminate Or Veneer Furniture?
Yes, but it takes extra prep. Lightly sand the surface, clean well, and use a good bonding primer before painting. Distress gently—laminate can chip easily compared to solid wood.
Bringing the rustic white look to your furniture is more than just a paint job. It’s a creative process that lets you add personal history, warmth, and beauty to your home. With the right steps, materials, and a little patience, even beginners can achieve professional results.
Enjoy the transformation and the compliments your new rustic white piece will surely bring.