Making your own door hangers is a creative way to add personality to your home, office, or business. Whether you want to welcome guests, share a reminder, or advertise a service, door hangers are simple yet powerful tools. Many people think making them is complicated or expensive, but with the right steps, anyone can craft professional-looking hangers at home.
This guide will show you how to make door hangers from start to finish, offering tips, ideas, and practical advice that even beginners can follow.
Door hangers are more than just small decorations. They can help you communicate a message without saying a word. For businesses, they serve as effective marketing tools. In homes, they add a friendly touch or help organize daily life. Schools and churches use them to share important information.
Even in hotels, door hangers play a big role in privacy and service requests.
You do not need fancy equipment or expensive materials to get started. In fact, many supplies are already in your home or office. This article will walk you through everything you need to know: choosing the right materials, designing your hanger, cutting and assembling, and adding finishing touches. You will also learn how to make your door hangers last longer, avoid common mistakes, and use them for different purposes. If you want to sell your hangers or make them for a special event, you will find helpful advice here too.
Let’s explore how you can make unique and practical door hangers easily, even if you have never done a craft project before.
Why Door Hangers Matter
Door hangers are more than simple pieces of paper or plastic. They have a long history in communication, marketing, and organization. Their unique shape allows them to hang on doorknobs, making them hard to miss. For businesses, door hangers can increase sales by reaching customers directly at their homes.
For families, they provide reminders and greetings in a fun way.
A 2019 marketing survey found that door hangers have a response rate of up to 5%, much higher than email or social media ads. This is because people notice and touch them, making the message more memorable. In homes, children love colorful hangers with their names or favorite characters. In offices, simple hangers can help with privacy or signal meetings.
Types Of Door Hangers
Before you start making your own, it helps to know the most common types. Each type has its own use and style.
- Standard Rectangle: The most common shape, usually a vertical rectangle with a hole at the top.
- Rounded Top: Similar to the standard, but with a rounded or arched top for a softer look.
- Custom Shapes: Stars, hearts, animals, or company logos for special occasions or branding.
- With Pockets: Extra space to hold brochures, coupons, or small notes.
- Double-sided: Messages or designs on both sides, so they are seen from inside and outside.
- Die-cut Hangers: Special cut-outs or edges for a unique appearance.
- Writable Surface: Made with a dry-erase or chalkboard finish for changing messages.
- Magnetic Hangers: Include a magnet to stick on metal doors or surfaces.
- Oversized: Larger than normal, for extra attention or detailed information.
- Mini Hangers: Small, often used for decorative purposes or party favors.
Choosing the right type depends on your goal and audience. For example, a real estate agent might use a standard rectangle with a pocket for business cards, while a child may enjoy a brightly colored heart-shaped hanger for their bedroom.
Materials Needed
You do not need many supplies to make door hangers, but the right materials make a big difference in quality and durability. Here are the most common options:
- Cardstock: Thick paper, easy to cut and decorate. Good for most home projects.
- Plastic sheets: Waterproof and durable. Best for outdoor use or repeated handling.
- Foam sheets: Soft, lightweight, and colorful. Popular for children’s crafts.
- Corrugated cardboard: Very sturdy, but harder to cut. Good for oversized hangers.
- Magnetic sheets: For making hangers that stick to metal surfaces.
- Laminating sheets: Protect your design and add shine.
- Adhesive vinyl: For custom designs or waterproof finishes.
Other supplies you might need:
- Scissors or craft knife
- Hole punch or circle cutter
- Ruler
- Pencil
- Markers, colored pencils, or paint
- Glue or double-sided tape
- Stickers, gems, or decorations
If you are making many hangers, consider using a cutting machine like Cricut or Silhouette, but it is not required. Most projects can be done with basic tools.
Planning Your Design
A good door hanger starts with a clear plan. Think about the message, colors, and images you want to use. Here are some steps to help you design:
1. Define The Purpose
Ask yourself what you want your door hanger to do. Is it for a party, a reminder, a marketing message, or just for fun? Your goal will shape the design.
2. Choose Your Shape And Size
The standard size is about 4 x 9 inches, but you can go bigger or smaller. Remember, the hole at the top should fit over the doorknob—about 2 inches wide is common.
3. Pick Your Colors
Bright colors attract attention, but softer colors may be better for home or office use. Use colors that match your message or brand.
4. Add Images Or Graphics
You can draw by hand, print from a computer, or use stickers and stamps. Make sure your images are clear and easy to see from a distance.
5. Write Your Message
Keep text short and easy to read. Use large, bold letters for the main message. If you include contact information, make sure it is accurate.
Non-obvious tip: Test your design by holding it at arm’s length. If you cannot read the message or see the images, make them larger or clearer.
Step-by-step Guide To Making Door Hangers
Now, let’s go through the process of making a door hanger from start to finish.
Step 1: Sketch Your Design
Draw your hanger shape on a piece of scrap paper. Plan where the hole will go and where you will put your message and images. This first sketch helps you avoid mistakes on your final material.
Step 2: Cut Out The Base
Place your sketch over your chosen material (cardstock, plastic, etc. ). Trace around it with a pencil, then cut out the shape carefully with scissors or a craft knife. Use a ruler for straight lines.
Pro tip: If making more than one, stack several sheets and cut them together to save time.
Step 3: Make The Doorknob Hole
Mark a circle at the top center, about 2 inches wide. Cut out the circle with scissors or a hole punch. To make it easy to hang, add a small slit from the top edge to the hole.
Step 4: Decorate Your Hanger
Add color, images, or text. Use markers, colored pencils, paints, or print designs from your computer. Attach stickers, gems, or other decorations as desired.
Step 5: Laminate Or Seal (optional)
If you want your hanger to last longer, use a laminating machine or self-adhesive sheets to cover both sides. For outdoor use, sealing with clear tape or adhesive vinyl helps protect from water and dirt.
Step 6: Add Special Features
- For writable hangers, glue a piece of dry-erase or chalkboard material to the base.
- For magnetic hangers, stick a thin magnetic sheet to the back.
- For hangers with pockets, fold and glue an extra piece of paper or plastic to the front.
Step 7: Double-check And Test
Make sure the hanger fits over your doorknob and hangs flat. Check spelling and design details.
Beginner insight: Always test one hanger before making many. Small changes can make a big difference in the final look.
Digital Design And Printing
If you want a professional look or need many hangers, designing on a computer can save time. Free tools like Canva, Adobe Express, or Microsoft Word let you create printable door hangers with custom shapes and colors.
- Choose a template or make your own.
- Add your text and images.
- Print on thick cardstock for best results.
- Cut out using scissors or a paper trimmer.
You can also take your digital file to a print shop for higher quality or larger quantities. Some shops offer die-cutting for custom shapes.
Using Cutting Machines
A cutting machine (like Cricut or Silhouette) makes the process faster and neater, especially for detailed shapes or many copies. These machines connect to your computer and cut designs from cardstock, vinyl, or even thin plastic.
Benefits:
- Perfect, repeatable shapes
- Easy to cut complicated designs
- Can write or draw messages with built-in pens
Downside: Cutting machines are an investment and require some learning, but they are not required for small projects.
Adding Special Features
Door hangers can do more than just hang on a door. Here are some ways to make yours more useful:
- Writable surface: Attach a piece of dry-erase sheet or chalkboard paint.
- Magnet: Add a magnetic strip for metal doors or fridges.
- Pockets: Fold and glue an extra piece of material for holding notes or coupons.
- Scented hangers: Glue a scented sachet inside for a fresh smell.
- QR codes: Print a code that links to your website or contact info.
Advanced insight: Adding interactive features (like a pull tab or window) can make your hanger stand out, especially for marketing.
Common Mistakes And How To Avoid Them
Even simple projects can go wrong. Here are mistakes beginners often make, and how to fix them:
- Hole too small or off-center: Always measure the doorknob and mark the center before cutting.
- Message too small or crowded: Keep text short and use large, readable fonts.
- Weak material: Thin paper bends or tears. Use cardstock or reinforce with tape or lamination.
- Decorations falling off: Use strong glue and avoid heavy decorations.
- Printing errors: Test print on plain paper before using expensive materials.
Creative Ideas For Different Uses
Door hangers are not just for bedrooms or marketing. Here are some creative uses:
- Birthday party invitations: Hand out unique, themed hangers instead of cards.
- Holiday greetings: Hang festive messages on neighbors’ doors.
- Homework reminders: Help kids remember assignments.
- Pet warnings: Let visitors know about pets in the home.
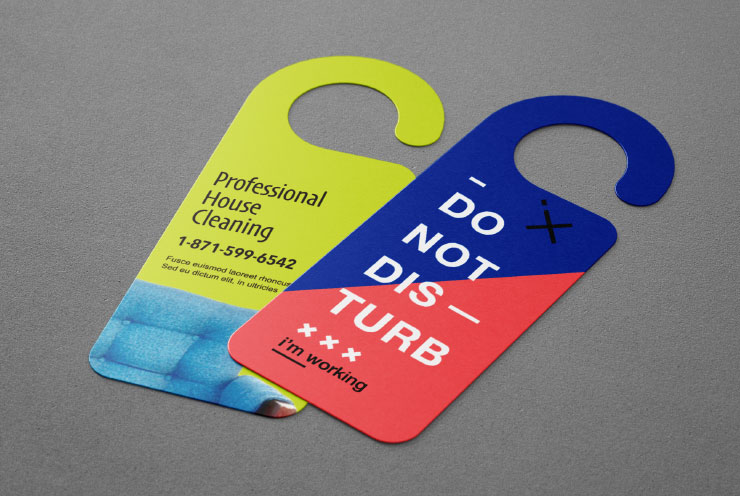
- Quiet hours: Use in dorms or offices to signal “Do Not Disturb.”
- Real estate promotions: Agents use them to introduce themselves to neighborhoods.
- Church events: Share service times or community messages.
- Hotel room service: Classic “Make Up Room” or “Do Not Disturb” hangers.
Unexpected idea: Use door hangers as event tickets by adding a detachable stub.

Credit: www.youtube.com
Table: Material Comparison For Door Hangers
Here’s a quick look at common materials for door hangers and how they compare:
| Material | Durability | Cost | Ease of Use | Waterproof |
|---|---|---|---|---|
| Cardstock | Medium | Low | Easy | No |
| Plastic Sheets | High | Medium | Medium | Yes |
| Foam Sheets | Medium | Low | Easy | No |
| Corrugated Cardboard | High | Low | Hard | No |
| Magnetic Sheets | High | High | Medium | Yes |
How To Make Door Hangers For Special Events
Making door hangers for events adds a personal touch guests will remember. Here’s how to adapt your project for different occasions:
Weddings
- Use elegant colors like gold, silver, or pastels.
- Add the couple’s names, date, and a thank-you message.
- Decorate with ribbons or lace.
- Print on thick, glossy paper for a premium look.
Children’s Parties
- Choose bright colors and cartoon images.
- Add each child’s name.
- Use foam sheets for a soft, safe hanger.
- Include a small pocket for candy or a toy.
Business Promotions
- Use your logo and contact details.
- Keep the message simple and direct.
- Choose durable, waterproof materials.
- Consider adding a coupon or QR code.
Holidays
- Use seasonal colors and symbols (pumpkins for Halloween, trees for Christmas).
- Add a fun greeting or invitation.
- Use glitter or metallic pens for extra sparkle.
Pro tip: Plan ahead and make a few extra hangers in case of last-minute guests.
Credit: www.swiftpublisher.com
Table: Door Hanger Size Guide
Different door types may require different hanger sizes. Here’s a quick reference:
| Hanger Size (inches) | Common Use | Best Door Type | Notes |
|---|---|---|---|
| 3.5 x 8.5 | Bedroom/Office | Standard doorknobs | Most popular size |
| 4 x 9 | Marketing/Hotels | All door types | Fits more text |
| 5 x 11 | Events/Custom | Large doors | Extra visibility |
| 2 x 6 | Mini/Decorative | Small handles | Party favors |
Making Door Hangers With Kids
Crafting with children is fun and helps develop creativity. Door hangers are safe projects with simple steps.
- Use foam sheets or thick paper for easy cutting.
- Let kids choose their own shapes and colors.
- Supervise when using scissors or glue.
- Add stickers, drawings, or foam shapes.
- Write their name or a message like “Keep Out!” or “Welcome.”
Educational tip: Making door hangers teaches planning, measuring, and following instructions.
Door Hangers For Small Businesses
If you run a local business, door hangers are a cost-effective marketing tool. Here’s how to get the most out of them:
- Target the right area: Deliver hangers where your customers live or work.
- Keep the message clear: Focus on one offer or service.
- Include a call to action: Invite people to visit your website or call you.
- Use high-quality material: Durability makes your business look more professional.
- Check local rules: Some neighborhoods have regulations about door-to-door marketing.
A well-designed hanger can bring in new customers and increase brand awareness. For more on direct marketing, check resources like the American Marketing Association.
Table: Diy Vs. Professional Printing
If you are deciding between making hangers at home or using a print shop, compare these options:
| Factor | DIY | Professional Printing |
|---|---|---|
| Cost | Low for small batches | Cheaper for large quantities |
| Customization | Unlimited, hands-on | Template-based, but high quality |
| Time | Immediate | May take days |
| Finish | Homemade look | Professional, glossy or matte |
| Effort | High for large numbers | Low after design is set |
Tips For Making Door Hangers Last Longer
To keep your door hangers looking good:
- Laminate or cover with clear tape.
- Use waterproof markers to prevent smudging.
- Store extras flat to avoid bending.
- Avoid heavy decorations that can fall off.
- Hang indoors if using delicate materials.
Smart tip: If you want reusable hangers, make them from plastic or laminate both sides. Write with dry-erase markers so you can change the message.
Selling Your Door Hangers
If you enjoy making door hangers, you can sell them online or at craft fairs. Here’s how to get started:
- Take clear photos of your best designs.
- Offer personalized options (names, colors, messages).
- Price based on material, time, and size.
- Package hangers in clear sleeves to protect them.
- Use social media and marketplaces like Etsy to reach customers.
Beginner mistake: Underpricing your work. Factor in your time and all materials.

Credit: mommybytrade.com
Frequently Asked Questions
How Do I Make A Door Hanger Template?
You can draw your own on paper or download free templates from craft websites. Standard sizes are easy to trace. If you use a computer, tools like Canva have ready-made door hanger shapes.
What Is The Best Material For Durable Door Hangers?
For most uses, plastic sheets or laminated cardstock last the longest. Foam sheets are good for kids, while magnetic sheets are best for metal doors. Choose based on where you will use the hanger.
Can I Print Door Hangers On A Home Printer?
Yes, but use cardstock or thick paper to prevent bending. Make sure your printer supports heavier paper. After printing, cut out the shape and hole with scissors or a craft knife.
How Can I Make My Door Hanger Weatherproof?
Laminate your hanger or cover it with clear adhesive vinyl. Use waterproof markers and avoid decorations that will fall off in the rain. For outdoor use, start with plastic sheets.
Are Door Hangers Effective For Marketing?
Yes. Studies show door hangers have a high response rate because people see and touch them directly. They are more memorable than many digital ads, especially for local businesses. For best results, keep your message clear and offer a reason to respond.
Making door hangers is a simple way to express creativity or promote a message. Whether for fun, business, or events, these small projects can have a big impact. With the right materials and a little planning, anyone can create door hangers that are both useful and unique.