Moving, decluttering, or just running out of space? You’re not alone. Every year, millions of people face the challenge of storing their belongings—at home, in offices, or in storage units. One thing that makes a huge difference but often gets ignored is how you label boxes for storage. If you’ve ever searched through a pile of boxes for that one winter coat or old tax file, you know the frustration. Proper labeling turns chaos into order, saves time, and even protects your items. But while the idea sounds simple, most people make basic mistakes or miss important steps.
This guide will walk you through everything you need to know about how to label boxes for storage—from choosing the right materials to using smart labeling systems. You’ll also find non-obvious tips, real examples, and solutions to common problems. Whether you’re planning a big move, organizing your attic, or running a business warehouse, you’ll learn how to do it right, avoid stress, and maybe even enjoy the process.
Why Labeling Boxes Matters
Labeling is more than just writing a word on a box. It’s about clear communication and future-proofing your storage. Here’s why you should care:
- Saves time: Searching is stressful and wastes hours.
- Reduces damage: You know what’s fragile and what needs gentle handling.
- Prevents loss: Boxes are less likely to disappear or be thrown out by mistake.
- Helps others: Family, movers, or staff can help without guessing.
- Keeps things organized: You can set up a logical system that grows with your needs.
Statistically, the Self Storage Association found that 57% of people struggle to find items in storage without a clear labeling system. That’s a lot of wasted time!
Choosing The Best Materials For Labeling
Not all labels are created equal. If you use the wrong marker or sticker, it could fade, peel off, or smudge. Here’s how to pick the right tools for every scenario.
Markers And Pens
The most common choice is a permanent marker. It should be:
- Waterproof
- Smudge-proof
- Dark (black or blue shows up best on boxes)
- Medium or thick tip for visibility
Avoid ballpoint pens or pencils—they fade and are hard to read.
Label Stickers
If you want a cleaner look or need color-coding, label stickers are ideal. Look for:
- Adhesive strength (should stick to cardboard, plastic, or fabric)
- Writable surface (matte is better than glossy)
- Size (large enough to read from a distance)
Some people use mailing labels, but specialized box labels are more durable.
Tape Options
Clear packing tape can protect your labels from water or dust. Just write on the label, then cover it with a strip of tape. Don’t write on the tape itself—it smears.
Digital Label Makers
For the tech-savvy, label makers create neat, uniform labels. They’re great for offices, long-term storage, or anyone with bad handwriting. Just remember that label tape can get expensive.
Color-coding Tools
Colored markers, stickers, or washi tape help with sorting. For example, use red for kitchen, blue for bedroom, green for office.
Pro Insight: Some people try to use sticky notes—they fall off easily and fade. Always use something designed for long-term use.
Where And How To Place Labels
Label placement is almost as important as the label itself. If you put your label on the wrong side, you’ll have to move boxes just to read them.
Top, Side, Or Both?
- Top only: Good for stacked boxes that will not be moved often.
- Side only: Best if boxes are stacked side-by-side on shelves.
- Top and side: Most practical. If a box gets rotated, you can always see one label.
Write or stick your labels on the same place for every box. Consistency is key.
Visibility
Labels should be large and high enough to see at a glance. Avoid writing near the corners, where tape or other boxes might cover your label.
Multiple Labels
For very large boxes, consider labeling two or more sides. This is vital in storage units where boxes often get moved or turned around.
Non-Obvious Tip: For very valuable or private items, use a code or number system instead of listing contents directly. This adds a layer of security.
What To Write On Each Label
The actual words on your label matter. You want enough information to identify the contents, but not so much that it gets confusing.
Basic Information
Every label should have at least:
- Room or area (e.g., Kitchen, Garage, Office)
- Main contents (e.g., Winter clothes, Holiday decorations)
- Date packed (helps with long-term storage)
Example: “bedroom – Books – Jan 2024”
Detailed Itemization
For high-value or important boxes, add a short list of key items. For example: “Kitchen – Pots, pans, blender.”
Special Instructions
If the box is fragile, heavy, or this side up, include that clearly on the label. Use bold or colored text for warnings.
Numbering System
For big moves or business storage, use a numbering system. Each box gets a number, and you keep a master list (on paper or in your phone) with full details.
Example: Box #17 – Living Room – Board games, puzzles, photo albums.
Pro Insight: Never list valuables like “jewelry” or “electronics” openly. Use a code or keep these items with you.

Credit: www.iheartorganizing.com
Labeling Systems: Which One Is Right For You?
There’s no single way to label boxes. The best system depends on your needs, the number of boxes, and how long you plan to store things.
Simple Room-based System
Each box is labeled with its destination room and contents. Works best for moves and home organization.
- Example: “Bathroom – Towels & toiletries”
Color-coding System
Assign each room or category a color. Use colored labels, markers, or tape.
- Kitchen: Red
- Bedroom: Blue
- Living Room: Green
This system is great for quick visual sorting, especially if multiple people are helping.
Numbered Inventory System
Each box gets a unique number. You keep a spreadsheet with what’s inside each box. This is best for:
- Large moves
- Business storage
- When privacy is needed
- Example: Box 23 – Documents – Tax returns 2015-2020
Qr Code Or Digital System
For techies, print a QR code label for each box. Scan the code to see a digital list of contents on your phone. This is popular for long-term or professional storage.
- Tools: Free QR code generators and spreadsheet apps
- Extra cost: Printing QR stickers
Hybrid Systems
Combine methods for complex needs. For example, color-code by room and number each box for inventory.
Non-Obvious Tip: For seasonal items (like Christmas décor), add a “Season” field to your label. This makes finding holiday items quick and stress-free.
Creating A Master Inventory List
If you have more than 10 boxes or need long-term storage, a master list is a lifesaver. Here’s how to do it:
- Assign each box a number.
- Write that number on the box and on your list.
- List main contents, room, and any special notes.
- Keep the list in two places—printed and digital (email it to yourself for backup).
Here’s a simple example:
| Box Number | Room | Main Contents | Notes |
|---|---|---|---|
| 1 | Kitchen | Pots, pans, blender | Heavy |
| 2 | Bedroom | Winter clothes | Vacuum-sealed |
| 3 | Garage | Tools, extension cords | Fragile |
This list helps you find things fast, especially if you store boxes in different places.
Color-coding: How And Why To Use It
Color-coding is one of the fastest ways to sort and find boxes, especially during a move or in big storage spaces. Here’s how to do it well.
How To Set Up Color-coding
- Pick a color for each room or category (e.g., red for kitchen, blue for bedroom).
- Use colored labels, tape, or markers.
- Stick or draw the color on at least two sides of each box.
- Make a key and share it with everyone helping you.
Example Color Code Key
| Color | Room/Category |
|---|---|
| Red | Kitchen |
| Blue | Bedroom |
| Green | Living Room |
| Yellow | Garage |
| Purple | Office |
Advantages
- Easy to sort boxes at a glance
- Perfect for moves with many helpers (even non-English speakers)
- Reduces mistakes (like kitchen boxes ending up in the garage)
Pro Insight: Avoid colors that look similar in low light. Red, blue, and green are safest. For people with colorblindness, add symbols or big letters.
Labeling For Different Storage Types
Not all storage situations are the same. Here’s how to adapt your labeling system for various needs.
Home Storage
- Use clear, large labels
- Add photos for children’s toys or seasonal items
- Keep a digital list for attic or basement boxes
Self-storage Units
- Number every box for quick reference
- Add your name or unit number if using shared storage
- Use weather-resistant labels and cover with tape
Office Or Business Storage
- Use a numbering or barcode system
- List department or project (e.g., “HR – 2022 Files”)
- Keep records both on paper and digitally
Moving Houses
- Color-code by room
- Add “Unpack First” to priority boxes
- Mark boxes with fragile or heavy items in large letters
Non-Obvious Tip: For items you won’t need for a year or more, add a “Do Not Open Until” date. This prevents accidental unpacking.
Common Labeling Mistakes And How To Avoid Them
Even with the best intentions, many people make mistakes when labeling. Here are the top ones to watch for—and how to do better.
1. Writing Too Small
Small writing is hard to read, especially in dim storage units. Use big, bold letters—at least 1 inch tall.
2. Only Labeling One Side
Boxes get moved, turned, and stacked. Always label at least two sides.
3. Using Weak Adhesives
Cheap labels or low-quality tape peel off. Test your materials before labeling dozens of boxes.
4. Listing Every Item
A label like “Kitchen – All utensils, plates, cups, knives, forks, pans, blender, toaster, spices, towels, mugs…” is too much. Stick to main categories and keep details on your master list.
5. Forgetting Special Instructions
If a box is fragile, heavy, or must stay upright, say so on the label.
6. Not Updating Labels
If you reuse boxes, old labels can cause confusion. Remove or cover old labels before relabeling.
7. Using Fading Ink
Sunlight and time can fade some inks. Test your marker or pen for long-term durability.
Pro Insight: For cardboard boxes, always label after the box is packed and sealed. This avoids confusion if you change your mind or add items.
Examples Of Labeling In Real Life
To make things clearer, here are a few real-world scenarios showing the value of good labeling.
Family Moving To A New House
The Smith family packed 50+ boxes for their move. They used colored labels (red for kitchen, blue for bedrooms) and numbered each box. Their master list told them what was in each box. When they arrived, unloading was fast—no more searching for the coffee maker!
Small Business Archiving Files
A law firm needed to store old files in a warehouse. They used a barcode system for each box, with a digital inventory. Boxes were labeled with client codes and year. When a document was needed, they found it in minutes instead of hours.
Diy Storage Room
Jane cleared out her garage and stored seasonal decorations, tools, and camping gear. She labeled each box by category and added a photo label for her kids’ toy boxes. Now, her family can grab what they need without asking her every time.
Non-Obvious Tip: For children’s toys or clothing, add a photo of the contents or a picture symbol. Kids and helpers will thank you!
Advanced Labeling Tips
Ready to take your labeling to the next level? These tips are used by professional organizers and moving companies.
Use Pre-printed Labels
You can buy pre-printed labels with common room names or warnings (“Fragile,” “This Side Up”). These save time and are easy to spot.
Laminate For Durability
If you’re storing items for years, laminate your labels or use waterproof pouches. This keeps your information safe from moisture, dust, and fading.
Include Contact Information
For storage units or shared spaces, add your name and phone number on at least one label per box.
Keep A Photo Inventory
Take a quick photo of each box with its label and contents before sealing. Store these photos in a folder on your phone or cloud. If you forget what’s in a box, just check the photo.
Use Apps And Digital Tools
Apps like Sortly or Google Sheets help you track box numbers, contents, and storage locations. You can even share your inventory with family or coworkers.
Plan For Easy Access
If you need to retrieve items often, label boxes with “Front” or “Back” to show which side should face out on the shelf.
Labeling For Special Items
Certain items need special labeling care.
Fragile Items
Label with “FRAGILE” in big, bold letters on multiple sides. Use red marker for extra visibility.
Electronics
List the type (e. g. , “TV cables,” “Laptop charger”) without using the word “electronics” openly. Mark with a code if you’re worried about theft.
Documents
Include the year and type (e. g. , “Tax Returns 2020”). For sensitive information, use a number or code and keep details on your master list.
Sentimental Items
Add a star or special symbol to remind yourself to handle with care.
Pro Insight: For boxes that must remain upright, use arrows and write “This Side Up” in large letters.

Credit: moving.tips
Comparing Labeling Systems
Not sure which system is best for you? Here’s a quick comparison.
| System | Best For | Pros | Cons |
|---|---|---|---|
| Room-Based Labels | Small moves, home use | Simple, easy | Not ideal for large storage |
| Color-Coding | Large moves, team projects | Quick sorting | Requires color key |
| Numbered Inventory | Business, long-term | Very organized | Takes more setup |
| QR/Digital Codes | Tech-savvy users | Full digital records | Needs tech tools |
Choose what fits your situation, budget, and comfort with technology.
Safety And Security Considerations
Labeling is helpful, but sometimes you need to think about privacy and safety.
- Don’t label boxes with valuables openly (e.g., “Jewelry,” “Cash”).
- Use codes for sensitive items or documents.
- In public storage, include your contact info but not your full address.
- For chemicals or tools, add safety warnings (e.g., “Keep Away from Children”).
If you’re storing in a shared space, consider locking important boxes and keeping records of who has access.
Credit: thehomesihavemade.com
When To Update Or Replace Labels
Labels aren’t forever. Over time, items move, boxes get reused, and information changes. Update your labels when:
- You add or remove items from a box
- Labels fade, peel, or become unreadable
- You repurpose a box for a new use
Remove old labels fully to avoid confusion. If you use tape, replace it if it yellows or loses stickiness.
Pro Insight: Set a yearly reminder to check your labels, especially for long-term storage or business files.
Getting Others Involved
If you’re moving with family, friends, or a team, share your labeling system. Print out the color key or a sample label, and stick it on the wall. Assign one person to double-check labels before boxes go into storage.
For businesses, train staff on the system and keep instructions in your storage area.
Labeling Boxes For Storage: Step-by-step Summary
Let’s wrap up the process in clear steps:
- Choose your labeling system (room-based, color, number, digital).
- Gather materials (markers, labels, tape, digital tools).
- Pack and seal each box.
- Write clear, large labels on at least two sides.
- Add special instructions for fragile, heavy, or upright-only boxes.
- Create a master inventory list.
- Color-code or number boxes as needed.
- Protect labels with tape for long storage.
- Share your system with helpers or family.
- Update labels as items change.
By following these steps, you’ll never lose track of your belongings again.
Frequently Asked Questions
How Can I Label Boxes For Storage If I Have Bad Handwriting?
If your handwriting is hard to read, try using printed labels or a label maker. You can also ask a friend or family member to write labels for you. For a quick fix, print out typed labels from your computer and tape them to boxes. Large, clear fonts work best.
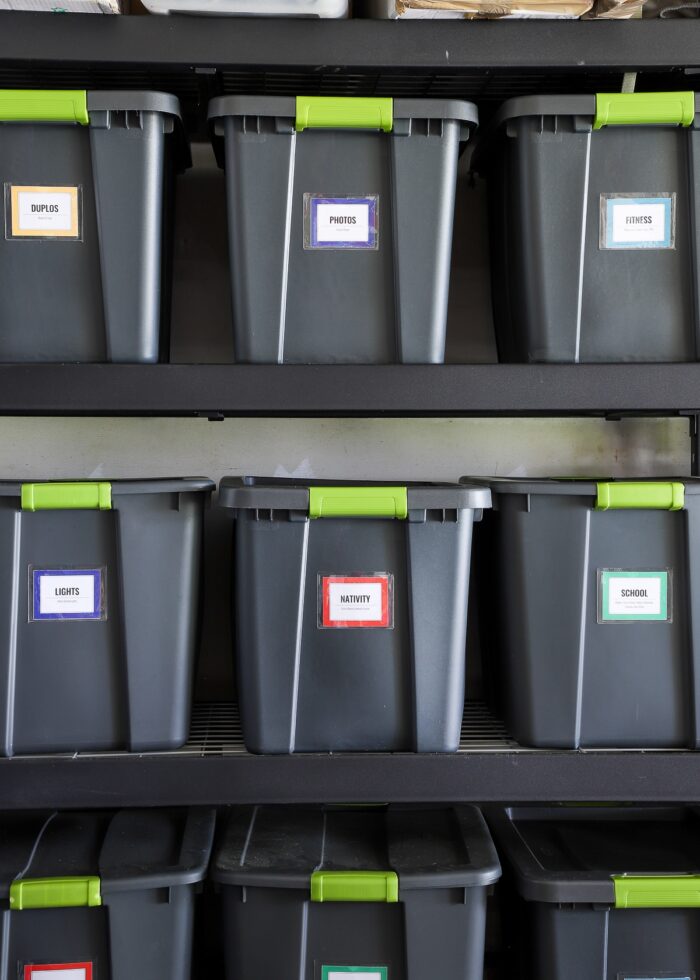
What’s The Best Way To Label Plastic Storage Bins?
Use waterproof labels or permanent markers made for plastic. Regular stickers may peel off over time. If you want to reuse the bins, stick your label on a card inside the bin facing out. Always cover labels with clear tape for protection.
How Can I Label Boxes For Long-term Storage?
Choose fade-resistant markers and durable labels. Cover every label with clear packing tape to prevent fading or peeling. For very long-term storage (years), consider laminated labels or even a digital inventory system with photos.
Should I Label Boxes With Valuable Items Differently?
Yes. For security, do not write “valuables” or name expensive items on the label. Instead, use a code or number and keep a private list with details. You can also mark these boxes with a special symbol only you understand.
What If I Need To Find A Box Quickly In A Large Storage Unit?
Use a numbered inventory system or color-coded labels. Keep a master list of box numbers and their locations. Place labels on multiple sides of each box. Map out your storage unit and keep the map near the entrance for fast reference.
For more in-depth tips on storage and organization, visit NYTimes Wirecutter’s Guide.
Careful labeling makes storage simple, safe, and stress-free. With the right approach, you’ll always know where everything is—no matter how long it stays packed away.