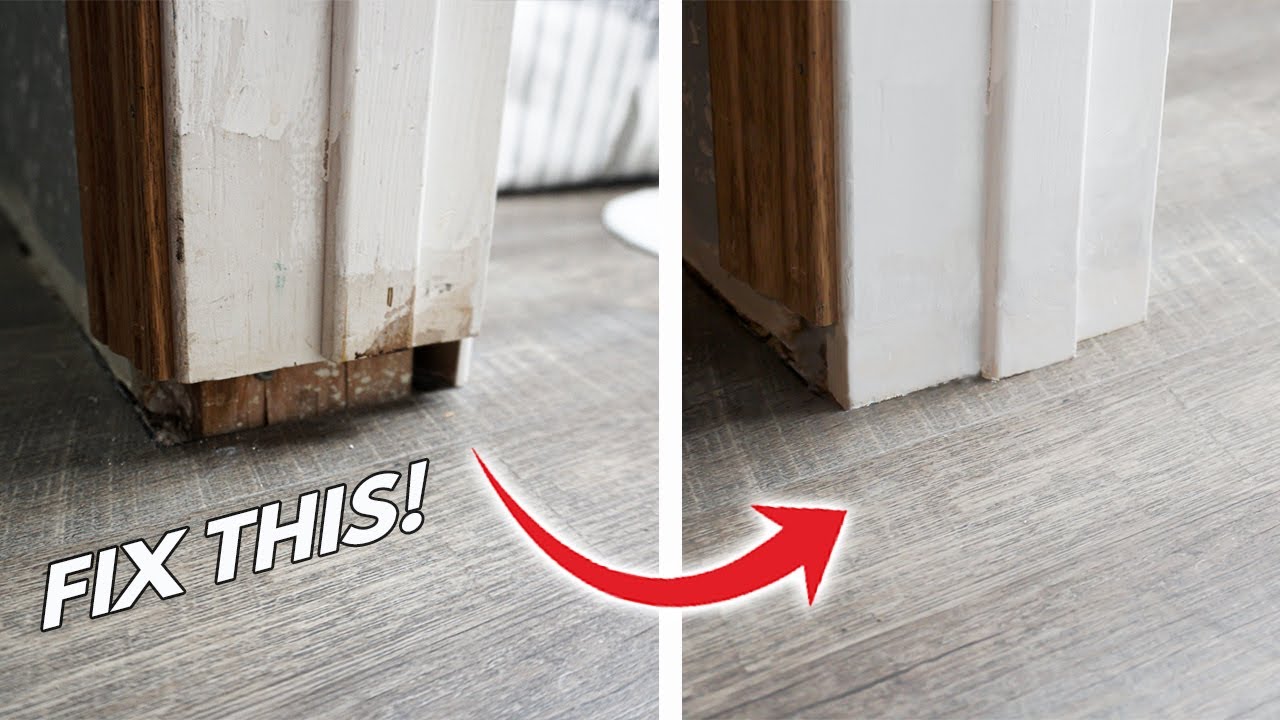
If you notice a gap between your door jamb and the floor, you’re not alone. This small space can cause several problems—drafts, bugs coming in, loss of privacy, and even energy waste. It’s a detail that is easy to overlook, but fixing it can make your home more comfortable and efficient.
Whether you live in a new apartment or an old house, knowing how to handle this issue is a practical skill. In this article, you’ll learn why these gaps happen, the best ways to fix them, what tools you need, and common mistakes to avoid.
If you want your door to look and work its best, keep reading—you’ll find all the answers here.
Why Gaps Appear Between Door Jamb And Floor
Many people are surprised when they notice a visible gap under or beside their door jamb. There are several reasons this happens, and understanding them helps you choose the right fix.
Settling of the house is a common reason. Over time, most houses shift slightly, causing frames and floors to move. This can pull the jamb away from the floor, creating a gap.
Moisture changes also play a role. Wood expands and contracts with humidity. If the jamb was installed during a dry season, it might shrink when it gets wetter, leaving space.
Poor installation is another cause. Sometimes, the jamb is not set flush against the floor during construction, or the floor isn’t level. In older homes, past repairs or changes might have left the jamb not sitting tightly on the floor.
Flooring upgrades can create gaps, too. If you replace thick carpet with thinner tile or laminate, a space might appear where the old flooring filled the gap.
Wear and tear over years can even cause the jamb to warp or the floor to sink, both making gaps more likely.
No matter the cause, you can fix it with the right approach. Before you start, it’s important to identify the reason for your specific gap, as the solution may vary.
Inspecting And Measuring The Gap
Before jumping into repairs, you need to know exactly what you’re dealing with. This step is often skipped, but it can save you time and prevent mistakes.
- Close the door and look at the gap from inside and outside the room. Is the space under the door, beside the jamb, or both?
- Use a ruler or tape measure to check the width and length of the gap. Write these numbers down—you’ll need them when buying materials.
- Check for drafts by holding a piece of tissue paper near the gap. If the paper moves, air is coming through.
- Look for signs of bugs or dust. If insects get in, you’ll see trails or dust lines near the gap.
- Tap the jamb and the floor gently. If they feel loose, you might have a bigger structural issue.
Pay attention to the gap size and the material of your floor (wood, tile, carpet). This will help you choose the right method and products.
Tools And Materials You’ll Need
Having the right tools makes the job easier and gives better results. Here’s a list of the most common items you might need:
- Tape measure for accurate measurements
- Level to check if the floor and jamb are straight
- Caulk gun and caulk (paintable or silicone, depending on the area)
- Door sweep or door bottom for larger gaps under the door
- Quarter round molding or shoe molding for side gaps
- Hammer and finishing nails (if adding trim)
- Wood filler for small wood gaps
- Utility knife or handsaw
- Screwdriver (if adjusting hinges)
- Paint and brush for finishing touches
You don’t need all these for every fix—pick what matches your situation. If you’re not sure, take a photo of your gap and show it to a hardware store employee for advice.
Choosing The Best Fix For Your Gap
Not all gaps are the same. The best solution depends on the gap’s size, location, and your floor type. Here’s a comparison to help you decide:
| Gap Size | Best Solution | Estimated Cost | Skill Level |
|---|---|---|---|
| Less than 1/8 inch | Caulk or wood filler | Low ($5–$10) | Beginner |
| 1/8 to 1/2 inch | Quarter round or shoe molding | Medium ($10–$25) | Beginner to Intermediate |
| 1/2 inch or more | Door sweep, threshold, or jamb adjustment | Medium to High ($15–$50) | Intermediate |
Small gaps can be filled easily, but large gaps may need more work or even professional help. If you aren’t sure, start with the simplest method and test if it works before moving on to bigger fixes.
Credit: www.youtube.com
Method 1: Filling Small Gaps With Caulk Or Wood Filler
This is the quickest and cheapest way to close minor gaps between the door jamb and floor, especially if the space is less than 1/8 inch.
Steps:
- Clean the gap. Vacuum or brush out dust and debris so the caulk or filler sticks well.
- Apply painter’s tape along the edges to keep the work neat.
- Cut the tip of the caulk tube or open your wood filler container.
- Squeeze caulk smoothly into the gap, or use a putty knife for wood filler.
- Smooth the surface with your finger or a damp cloth.
- Let it dry as the instructions say—usually a few hours.
- Remove the tape and touch up with paint if needed.
Tip: Choose caulk that matches your trim or is paintable. For wood jambs, wood filler makes an invisible repair.
Method 2: Installing Quarter Round Or Shoe Molding
If the gap is a bit larger or you want a more professional look, add a thin strip of molding at the base of the jamb. This method is common in homes with hardwood or laminate floors.
How To Install:
- Measure the length of the jamb where the gap is visible.
- Buy quarter round or shoe molding to match your trim and floor style.
- Cut the molding to length with a handsaw or miter saw for a neat edge.
- Test fit the molding to check the fit.
- Apply a bead of construction adhesive or use finishing nails to attach the molding along the jamb’s base.
- Fill nail holes with wood filler and smooth it out.
- Paint or stain the molding to match your trim.
This method hides gaps up to 1/2 inch and gives a finished look. It’s also easy to remove if you change flooring later.
Method 3: Adding A Door Sweep Or Door Bottom
For gaps under the door that go from jamb to jamb, a door sweep is a practical solution. It’s a long strip (rubber, vinyl, or bristle) that attaches to the bottom of your door.
Steps:
- Measure the width of your door.
- Buy a sweep slightly longer than the door’s width (you can cut it to fit).
- Mark the position on the inside or outside of the door, depending on the sweep type.
- Screw or stick the sweep in place, following the instructions.
- Test the door to make sure it closes smoothly and the sweep touches the floor but doesn’t drag.
Tip: For tile floors, a flexible rubber sweep works best. For carpets, use a bristle type.
Non-obvious insight: Some sweeps create noise if installed too low. Adjust for a tight seal without scraping.
Method 4: Installing Or Adjusting A Threshold
If there’s a large gap under the door, especially at entryways, you may need a threshold—a raised strip that the door closes against.
How To Do It:
- Measure the doorway’s width.
- Buy a threshold (wood, metal, or vinyl) that matches your floor.
- Cut it to fit the width.
- Place the threshold on the floor, pushing it against the jamb.
- Mark screw holes, pre-drill, and then screw it down.
- Check the door operation. Adjust as needed to prevent sticking.
Thresholds block drafts and bugs and can even help with uneven floors.
Method 5: Raising Or Lowering The Door Jamb
In some cases, especially with old homes, the jamb itself sits too high off the floor. You can sometimes lower it, but this is more advanced and may require removing trim.
Steps:
- Remove the base trim around the jamb.
- Loosen the jamb from the wall using a pry bar or screwdriver.
- Slide shims (thin wood pieces) out from under the jamb.
- Press the jamb down to meet the floor.
- Reattach with nails or screws.
- Replace the trim and touch up with paint.
Non-obvious insight: Sometimes, the floor itself is uneven. You may need to add new shims instead of removing them to level things out.
This fix is best for experienced DIYers. If you’re unsure, call a carpenter.
Method 6: Installing A Door Shoe
A door shoe is a U-shaped cover that wraps around the bottom of the door, with a flexible seal that touches the floor. It is used when the gap is too large for a sweep alone.
Installation:
- Measure the door thickness and width.
- Buy a door shoe that matches your measurements.
- Remove the door from its hinges for easier installation.
- Slide the shoe onto the bottom edge.
- Secure with screws (often provided).
- Rehang the door and check the fit.
This method gives strong protection against drafts and water, especially for exterior doors.
Credit: www.reddit.com
Method 7: Using Weatherstripping
Weatherstripping is a flexible material (foam, rubber, or felt) that seals gaps around doors. It can be used along the bottom of the jamb or even the floor if the gap is small.
Steps:
- Clean the area where you’ll apply the strip.
- Cut the weatherstripping to fit the gap length.
- Peel and stick the strip in place, pressing firmly.
- Close the door and test for a tight seal.
Weatherstripping is cheap and easy to install. It’s best for interior doors or areas with mild drafts.
Method 8: Filling With Backer Rod And Caulk
If the gap is deep and wide, a backer rod (foam rope) can be pressed into the space before caulking. This saves caulk and gives a firmer seal.
How To Use:
- Push the backer rod into the gap with a putty knife.
- Cut it so it sits just below the surface.
- Apply caulk over the rod and smooth it out.
- Let it dry before painting.
This method is used for wide, shallow gaps that are too big for caulk alone but too small for trim.

Credit: diy.stackexchange.com
Common Mistakes To Avoid
Even simple fixes can go wrong if you’re not careful. Here are mistakes beginners often make:
- Skipping cleaning: Dust and dirt stop caulk or adhesives from sticking.
- Using the wrong materials: For example, using indoor caulk outside, or wood filler on metal jambs.
- Not measuring the gap: Guessing can lead to buying the wrong size sweep or threshold.
- Installing too tightly: Door sweeps or thresholds that press hard against the floor can make the door hard to open.
- Ignoring drafts: Even if the gap looks small, test with a tissue for air movement.
- Forgetting to paint or seal: Exposed filler or wood can soak up moisture and cause future gaps.
Taking time to do it right saves you trouble and money later.
Advanced Tips For A Lasting Repair
If you want your fix to last for years, consider these advanced tips:
- Prime and paint all wood parts before installation to prevent moisture absorption.
- Use exterior-grade materials for outside doors or wet areas.
- Check the floor’s level with a long level. If the floor slopes, you may need a custom threshold or to sand the door’s bottom edge.
- Seal both sides of exterior doors—inside and out—for best draft protection.
- Regularly check your repair after a few months. Wood and caulk can shrink over time, especially in changing seasons.
These extra steps are what make professional repairs last longer.
Comparing Fixes: Pros, Cons, And Best Uses
To help you choose the best fix for your situation, here’s a comparison:
| Method | Best For | Pros | Cons |
|---|---|---|---|
| Caulk/Wood Filler | Small gaps, wood jambs | Cheap, quick, invisible | Not strong for large gaps |
| Quarter Round/Shoe Molding | Medium gaps, aesthetic finish | Looks professional, easy to remove | Requires tools and paint |
| Door Sweep | Gaps under door | Blocks drafts and bugs | May wear out, visible |
| Threshold | Large under-door gaps | Durable, covers uneven floors | Can be a tripping hazard |
| Door Shoe | Extra large gaps, exterior doors | Strong seal, weatherproof | Needs door removal |
| Weatherstripping | Small, irregular gaps | Very easy, cheap | Wears out, not for big gaps |
When To Call A Professional
Most small and medium gaps can be fixed by a homeowner with basic tools. However, some situations need expert help:
- The door or jamb is twisted or damaged
- There are structural issues with the floor or wall
- The gap is more than 1 inch
- You see signs of termites, rot, or mold
- The door won’t close or lock after repair attempts
In these cases, a carpenter or contractor can fix the root problem. For serious gaps, it’s safer and can save money long-term.
Preventing Future Gaps
Once you’ve fixed the gap, you’ll want to prevent it from coming back. Here’s what you can do:
- Control humidity in your home with a dehumidifier, especially in basements.
- Check your doors and jambs every year, especially after wet seasons.
- Keep gutters and drains clear to avoid water pooling around doorways.
- Replace worn sweeps and weatherstripping every few years.
- Avoid slamming doors, which can shake jambs loose.
Regular maintenance keeps your doors tight and efficient.
Real-world Example
Imagine a family in a 20-year-old house noticing cold air blowing into their living room. They find a 3/8 inch gap between the door jamb and the new laminate floor. After measuring the gap, they choose to install quarter round molding, matching the floor color.
The fix takes one afternoon, costs under $20, and stops drafts immediately.
Another case: An apartment dweller sees bugs coming in under the front door. They install a door sweep in 10 minutes and solve the problem with no tools except a screwdriver.
These examples show that the right solution doesn’t need to be expensive or difficult.
Frequently Asked Questions
Why Is There A Gap Between My Door Jamb And Floor?
A gap can appear because of house settling, changes in humidity, poor installation, or after changing flooring. Sometimes, floors are not level or the jamb was set too high. Identifying the cause helps you pick the best fix.
What Is The Best Material To Fill A Small Gap?
For small gaps (less than 1/8 inch), paintable caulk or wood filler works best. They create a smooth, invisible line and are easy to apply. Make sure you pick the right product for your floor and jamb type.
Will Filling The Gap Affect My Door’s Operation?
If you use caulk, filler, or trim along the jamb or floor, the door should work as before. But if you add a sweep or threshold, test to make sure the door still opens and closes smoothly. Adjust if the door drags or sticks.
Can I Fix A Large Gap Without Removing The Door?
Yes, in most cases. You can install a door sweep, add a threshold, or apply quarter round molding without removing the door. Only for a door shoe or when adjusting the jamb itself would you need to take the door off.
Where Can I Find More Information On Door And Jamb Repairs?
For more details and step-by-step guides, you can visit Family Handyman, a trusted source for home improvement projects.
Fixing the gap between your door jamb and floor is a straightforward project that can save you energy, improve comfort, and make your home look better. With a careful inspection, the right materials, and some patience, you can handle most repairs yourself.
If you run into trouble, don’t hesitate to ask a pro for help. Your door will look and function better—making your living space safer and more welcoming for years to come.