Blotchy stain on wood can ruin the look of any woodworking project. Many people spend hours choosing wood, sanding, and applying stain, only to see uneven color appear as the stain dries. This is frustrating, especially if you wanted a smooth, professional finish.
The good news is, you can fix blotchy stain, and even prevent it from happening next time. This guide will walk you through everything you need to know—why stains turn blotchy, how to correct problems on new or old projects, and the best ways to avoid these issues in the future.
Most guides focus only on sanding or re-staining. This article covers much more. You’ll learn how wood grain, stain type, and preparation all play a role. We’ll also cover advanced fixes like bleaching, toning, and even using gel stains. By the end, you’ll know how to rescue your project and get a beautiful, even finish.
Why Does Wood Stain Turn Blotchy?
Stains bring out the natural beauty of wood, but sometimes the result is patchy, with dark and light spots. This is called blotching. Most often, softwoods like pine, fir, or birch are affected, but even hardwoods can show this problem.
The main reasons for blotchy stain are:
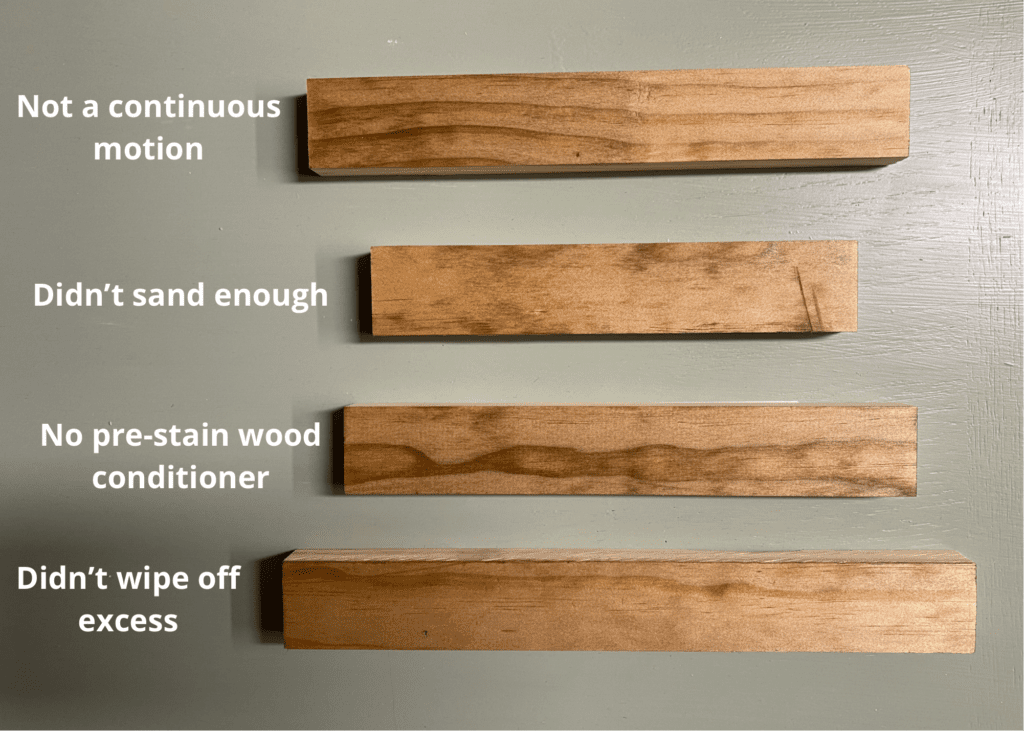
- Uneven wood density: Softwoods often have tight and loose grain. The loose grain soaks up more stain and turns darker, while tight grain stays lighter.
- Poor sanding: Skipping grits or sanding unevenly leaves rough patches that absorb more stain.
- Lack of pre-stain conditioner: Some woods need a conditioner to help stain absorb evenly.
- Over-wiping or under-wiping: Leaving too much or too little stain on the surface changes the color.
- Stain dries too quickly: In hot or dry environments, stain can dry before you wipe it off, leaving uneven patches.
Knowing these causes helps you choose the right fix. Before you start, look closely at your wood. Is the blotching minor or severe? Is the wood already finished with a clear topcoat, or is it just stained? The answers will guide your repair method.
Assessing The Blotchy Stain: How Bad Is It?
Before you fix anything, take a good look at the wood. The repair process depends on the type and severity of blotching.
- Mild blotching: Small, light patches on a large surface, often visible in certain light.
- Moderate blotching: Noticeable dark and light areas that distract from the wood’s beauty.
- Severe blotching: Large, dark blotches or streaks, sometimes with sharp edges.
Also, check if there’s a clear finish (like polyurethane or lacquer) on top of the stain. If yes, you’ll need to remove it before fixing the stain.
Quick Test For Finish
Rub a small spot with a rag dampened with rubbing alcohol. If the surface gets sticky, it’s likely shellac or lacquer. If nothing happens, it’s probably polyurethane or varnish. This matters because some finishes are easier to remove than others.

Credit: www.reddit.com
Essential Tools And Materials
Before you start, gather these items:
- Sandpaper (grits 80, 120, 180, 220)
- Tack cloth or vacuum
- Pre-stain wood conditioner (for softwoods)
- Wood bleach (optional, for severe blotching)
- Gel stain or oil-based stain
- Clean lint-free rags
- Foam or bristle brushes
- Mineral spirits or paint thinner
- Scrapers or chemical stripper (if removing finish)
- Protective gloves, mask, and goggles
Having everything ready saves time and prevents mistakes. Working in a well-ventilated space is also important for safety.
Fixing Blotchy Stain: Step-by-step Solutions
There are several ways to fix blotchy stain, depending on the situation. The approach can range from simple blending to fully stripping and refinishing.
1. Blending With More Stain
If the blotching is mild, you may be able to blend the color using more stain.
- Lightly sand the surface with 220-grit sandpaper. This opens the wood pores but doesn’t remove all the stain.
- Wipe clean with a tack cloth to remove dust.
- Apply stain to the lighter areas only. Use a small brush or rag for control.
- Wipe off excess after 1-2 minutes, feathering the edges to blend with the surrounding wood.
- Let dry for several hours. Check if the blotches are less visible.
- Repeat if needed, but avoid over-darkening the wood.
This method works best for small projects or when blotching is not severe.
2. Using Gel Stain To Even Out Color
Gel stain sits on top of the wood rather than soaking in. It can help mask uneven absorption.
- Scuff-sand the surface with 220-grit sandpaper.
- Clean thoroughly to remove all dust.
- Apply gel stain evenly with a foam brush or rag. Work in the direction of the grain.
- Let sit for 3-5 minutes, then wipe off with a clean rag.
- Repeat layers if needed, allowing each to dry fully.
Gel stain gives more control and can cover up blotching without removing the original stain.
3. Toning With A Colored Finish
You can tone the wood by adding a small amount of stain or dye to a clear finish (like polyurethane).
- Mix a little stain into your clear finish (test on scrap wood first).
- Apply thin coats over the blotchy surface.
- Let dry, then check the color.
- Repeat until the color is even.
Toning can blend light and dark areas, but it’s best for moderate blotching. Be careful not to build up too much finish.
4. Bleaching Out Severe Blotches
For very dark blotches, wood bleach can lighten uneven spots.
- Remove any clear finish with a chemical stripper if present.
- Apply wood bleach (usually oxalic acid) to the blotchy areas.
- Let sit as directed, then neutralize and rinse.
- Dry thoroughly before sanding.
- Re-stain as needed.
Bleaching is a strong solution and should be used with care. It can change the wood’s color, so test first.
5. Stripping And Starting Over
If all else fails, or the blotching is extreme, the best option is to remove everything and start again.
- Apply chemical stripper to remove the finish and stain.
- Scrape and clean the wood thoroughly.
- Sand through several grits, finishing with 220.
- Apply wood conditioner (especially for softwoods).
- Stain and finish using proper technique.
This method takes time but ensures a uniform, high-quality finish.
Preventing Blotchy Stain On Future Projects
Fixing a blotchy stain is hard, but preventing it is much easier. Here’s how to get an even color every time.
1. Sanding Properly
Always sand wood in steps—start with coarse grit and finish with fine grit. Skipping grits or using dull sandpaper leaves scratches that catch more stain.
A good sanding sequence:
- 80-grit (to remove roughness)
- 120-grit (to smooth)
- 180-grit (for most woods)
- 220-grit (for softwoods and before staining)
Tip: Sand with the grain, not across it. This reduces scratch marks that absorb excess stain.
2. Using Pre-stain Conditioner
Pre-stain wood conditioner helps wood absorb stain evenly. It’s essential for softwoods and blotch-prone hardwoods.
- Apply conditioner evenly with a brush or rag.
- Wait 5-15 minutes, then wipe off excess.
- Stain within 2 hours for best results.
Some people skip this step, but it’s the most effective way to avoid blotching.
3. Choosing The Right Stain
Different stains work in different ways:
- Oil-based stains penetrate deeply and give rich color, but can blotch on softwoods.
- Gel stains sit on top, reducing blotching.
- Water-based stains dry quickly and can raise the grain, but sometimes lead to uneven absorption.
Here’s a quick comparison:
| Stain Type | Penetration | Blotch Risk | Dry Time |
|---|---|---|---|
| Oil-based | Deep | High (on softwoods) | 4-8 hours |
| Gel | Surface | Low | 6-8 hours |
| Water-based | Moderate | Medium | 1-2 hours |
For blotch-prone woods, gel stain is often the safest choice.
4. Testing Stain On Scrap Wood
Always test your stain and finish on a piece of scrap from the same batch. This shows you how the wood will react and lets you adjust your method before working on the real project.
5. Applying Stain Correctly
Apply stain evenly with a brush or rag. Work in small sections, and wipe off excess after 5-10 minutes. Don’t let stain puddle or dry on the surface.
Tip: If the wood is very absorbent, wipe stain off sooner. If it’s dense, leave it a bit longer.
Advanced Techniques For Fixing Blotchy Stain
Sometimes basic fixes aren’t enough. Here are some advanced ways to even out blotchy stain.
1. Glazing
Glaze is a translucent color layer applied between coats of finish.
- Mix glaze with a clear finish for slow drying.
- Brush on glaze, then wipe off with a rag, leaving more in lighter areas.
- Seal with another coat of clear finish.
Glazing lets you “paint” color where needed and is used by many professionals.
2. Toner Sprays
You can buy or make toner sprays by mixing dye with lacquer. A spray gun applies a thin, colored mist over the surface.
- This is best for large, flat surfaces.
- Requires practice for even results.
- Not ideal for beginners, but gives a perfectly even color.
3. Wood Bleaching
If sanding or re-staining doesn’t work, bleaching can lighten the darkest blotches.
- Use two-part wood bleach (sodium hydroxide and hydrogen peroxide).
- Apply as directed, wear gloves and goggles.
- Rinse well and let dry before re-staining.
Bleaching changes the wood’s natural color, so only use if necessary.
4. Layering Stains
Apply a light coat of one color, let dry, then add another thin coat of a different color. This can help blend blotchy areas and create a richer look.
- Use thin coats to avoid muddying the color.
- Test on scrap wood before using on your project.
Credit: www.thehandcraftedhaven.com
Common Mistakes When Fixing Blotchy Stain
Many people make the same errors when trying to fix or prevent blotchy stain.
- Skipping sanding steps: Not sanding enough or using the wrong grit leaves rough spots.
- Not using conditioner: Especially on pine or birch, skipping conditioner almost guarantees blotching.
- Applying stain too heavily: Thick layers don’t soak in evenly and are hard to wipe off.
- Not wiping off excess: Leaving stain to dry on the surface causes sticky, uneven patches.
- Trying to fix with more stain: Sometimes, more stain just makes blotches darker.
Recognizing and avoiding these mistakes saves time and frustration.
Case Study: Fixing Blotchy Pine Table
Let’s look at a real example. Say you stained a pine table and it turned out blotchy.
Problem: Dark patches in the soft grain, lighter areas in the hard grain.
Solution:
- Sand the surface lightly with 220-grit.
- Apply a gel stain in a matching color, working it into the lighter areas first.
- Wipe off after 3-5 minutes.
- Let dry, then apply a second thin coat if needed.
- Apply a clear finish to protect.
Result: The gel stain evens out the color, and the table looks much more professional.
Table: Popular Woods And Their Blotch Risk
Some woods are much more likely to blotch than others. This chart can help you choose the right approach.
| Wood Species | Blotch Risk | Needs Conditioner? | Best Stain Type |
|---|---|---|---|
| Pine | High | Yes | Gel stain |
| Birch | High | Yes | Gel stain |
| Maple | High | Yes | Gel or oil-based stain |
| Cherry | Medium | Optional | Oil-based stain |
| Oak | Low | No | Oil-based stain |
Professional Secrets For A Perfect Stain
Here are some non-obvious tips that even experienced woodworkers sometimes miss:
- Control humidity and temperature: Stain dries faster in hot, dry weather, leading to more blotching. Work in a cool, humid environment if possible.
- Wipe with water before staining: For water-based stains, wetting the wood first helps open the grain for more even absorption.
- Stain both sides of the wood: If possible, stain both faces of a board. This helps prevent warping and uneven absorption.
Essential Safety Tips
Staining and finishing wood involves chemicals that can be harmful if inhaled or touched.
- Always work in a well-ventilated area.
- Wear gloves and eye protection.
- Dispose of oily rags properly (they can catch fire if left in a pile).
When To Call A Professional
If your project is valuable or you’ve tried several fixes without success, it may be time to consult a professional finisher. They have tools and products (like spray toners and advanced bleaches) not available to most DIYers.
A pro can often save a project you thought was ruined, but this service comes at a cost. Consider this for antique furniture or large built-in pieces.
:max_bytes(150000):strip_icc()/blotch-0e39c5e4839c47ceba6bc1ea8b90c84f.jpg)
Credit: www.woodmagazine.com
Quick Reference: Fixing Blotchy Stain
Here’s a summary of solutions and when to use them:
| Blotch Severity | Best Fix | Skill Level | Time Needed |
|---|---|---|---|
| Mild | Blend with more stain | Beginner | 1-2 hours |
| Moderate | Gel stain or toning | Intermediate | 3-4 hours |
| Severe | Bleaching or stripping | Advanced | 6-8 hours |
Frequently Asked Questions
What Causes Wood Stain To Look Blotchy?
Blotchy stain happens when different parts of the wood absorb stain unevenly. This is common in softwoods like pine and birch, and can be caused by uneven sanding, skipping wood conditioner, or applying stain incorrectly.
Can You Fix Blotchy Stain Without Sanding Everything Off?
Yes, sometimes you can fix mild blotching by blending with more stain or using a gel stain over the top. For moderate to severe blotching, you may need to sand or strip and start over.
Do All Woods Need A Pre-stain Conditioner?
Not all woods need pre-stain conditioner. Softwoods like pine and fir, and some hardwoods like maple and birch, benefit most. Hardwoods like oak and walnut usually do not need it.
How Long Should I Wait Between Applying Conditioner And Stain?
After applying pre-stain conditioner, wait 5 to 15 minutes (follow the label), then wipe off any excess and stain within 2 hours. Waiting longer can reduce effectiveness.
Is Gel Stain Better For Blotchy Woods?
Gel stain is often better for blotch-prone woods because it sits on the surface and colors more evenly. It’s easier to control and can cover up minor imperfections.
If you want to explore more about wood finishing, you can visit Popular Woodworking’s Finishing Techniques for additional professional advice.
Blotchy stain doesn’t have to ruin your woodworking project. With the right tools, a bit of patience, and the methods in this guide, you can fix most problems and create a finish you’ll be proud of. The key is preparation—good sanding, using a conditioner, and choosing the right stain.
If things go wrong, now you know how to rescue your wood, and next time, you’ll get it right the first time.