Cleaning a HVLP spray gun might seem like a simple task, but doing it properly can make a huge difference in your painting results. A clean spray gun gives you a smooth, even finish, prevents annoying clogs, and helps your equipment last much longer. If you skip steps or rush, your next project could be ruined by splatters or uneven spray. Many beginners overlook small details that matter a lot. This guide will show you how to clean your HVLP spray gun the right way, with practical steps, expert tips, and advice from real experience. Whether you’re a hobbyist or a professional, you’ll learn everything you need to keep your spray gun working like new.
Why Proper Cleaning Matters
A HVLP spray gun (High Volume Low Pressure) is a precision tool. Even tiny amounts of dried paint can block the fine passages inside, making the gun spit or spray unevenly. Over time, paint build-up can ruin seals, damage needles, and make the gun impossible to repair. Proper cleaning after every use keeps your gun reliable and accurate. It also saves you money, since replacement parts and repairs can be expensive.
Many users don’t realize that different paint types (like water-based, oil-based, or lacquer) need different cleaning methods. Using the wrong solvent can damage seals or leave residue. Also, some cleaning mistakes—like soaking the gun too long—can harm delicate parts. This guide covers all these details, so you’re never caught off guard.
Another reason to clean regularly is to avoid paint contamination. Old paint or solvent left in the gun can mix with new paint, causing unwanted colors or texture problems. This is especially important if you work with high-gloss finishes or metallic paints, where even a small amount of residue can ruin the look.
If you’re using your spray gun for commercial work, poor cleaning can hurt your reputation. Clients expect a flawless finish, and word spreads quickly if you deliver patchy or uneven results. Regular, proper cleaning is a simple way to protect your professional image and avoid costly callbacks.
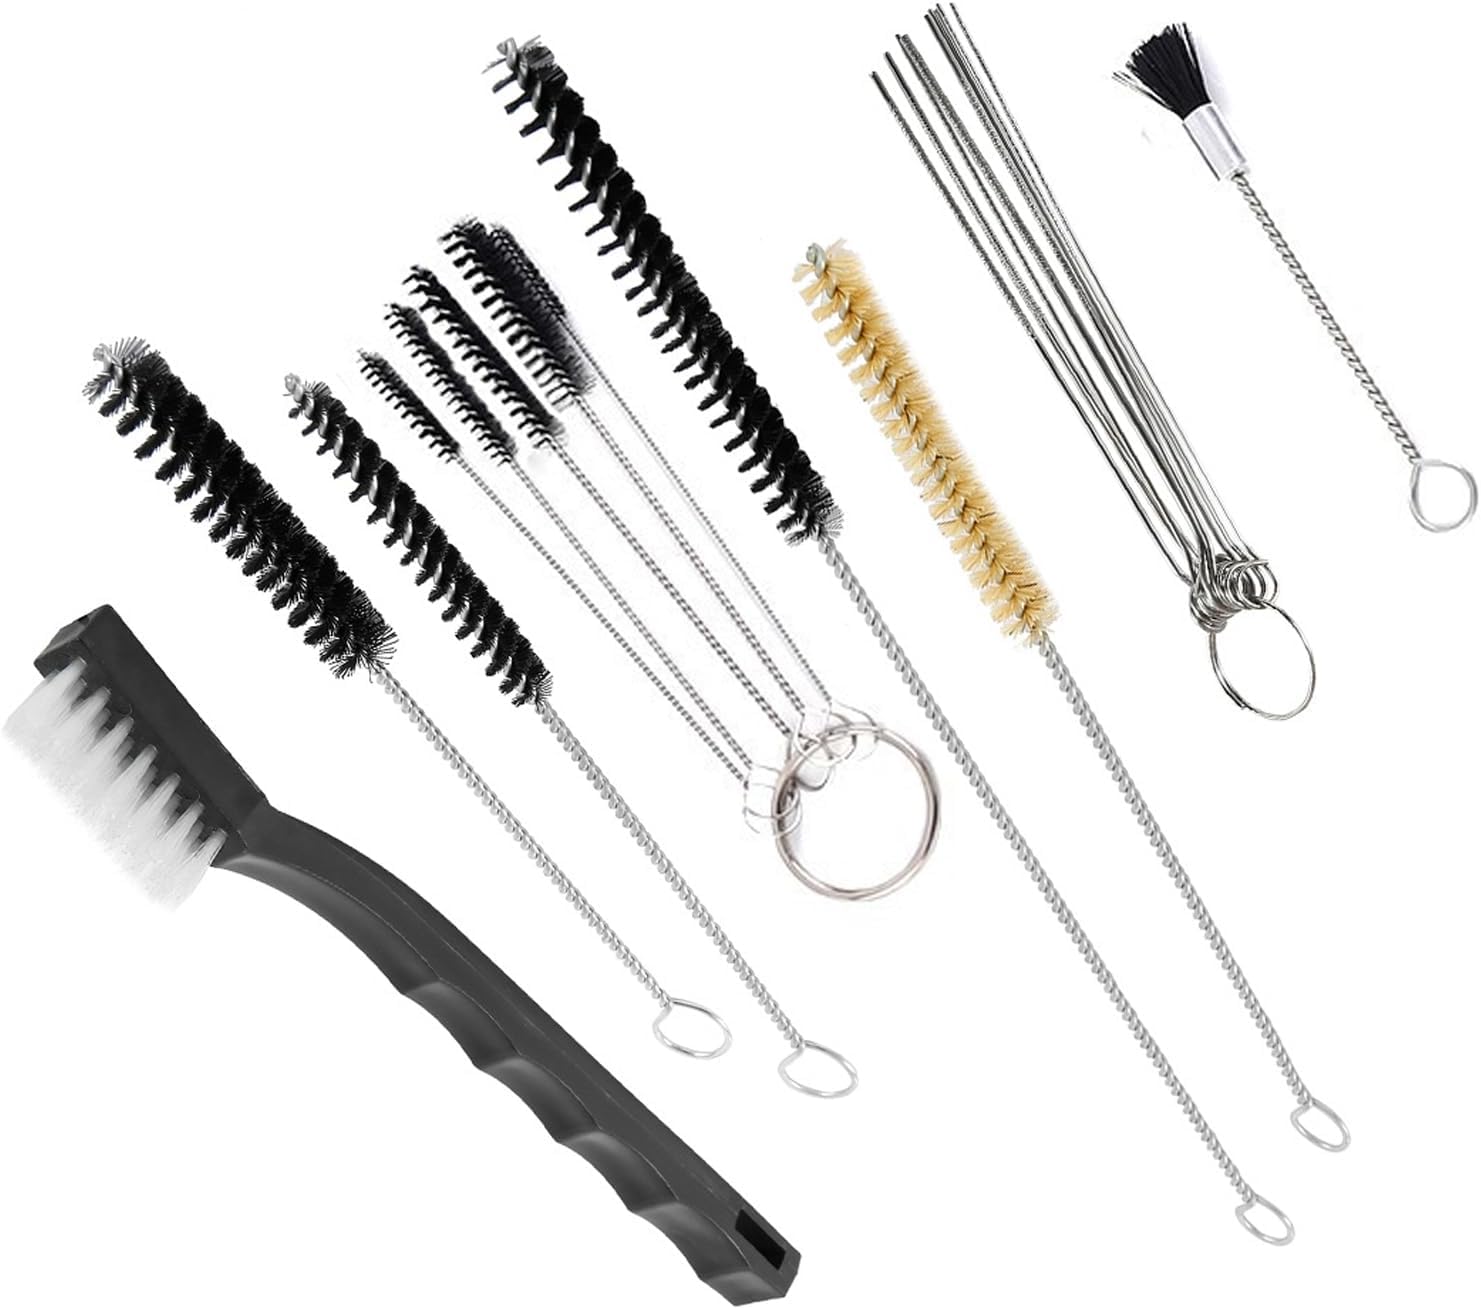
Tools And Supplies You Need
Before you start, gather everything you need. Having the right tools makes cleaning faster and safer.
- Solvent or cleaner: Use water for latex, mineral spirits for oil-based, or lacquer thinner for lacquer.
- Spray gun cleaning kit: Usually includes brushes, picks, and cleaning needles.
- Wrenches: For removing the nozzle and air cap.
- Soft cloths or rags: For wiping parts clean.
- Disposable gloves: Protect your skin from chemicals.
- Compressed air: For drying and blowing out passages.
- Plastic container: To hold small parts and solvent.
- Toothpicks or cotton swabs: For tiny crevices.
- Owner’s manual: Always handy for model-specific advice.
Pro tip: Don’t use metal brushes or harsh tools. They can scratch the gun’s interior and cause leaks later.
If you don’t have a cleaning kit, you can buy inexpensive ones online or at most hardware stores. Even a basic kit with a few small brushes and picks will help you reach tight spots that a cloth can’t touch.
Some experienced painters keep extra O-rings and seals in their kit, as these wear out faster if you clean frequently.
For cleaning solvent, always check the paint manufacturer’s label. Some paints have unique cleaning needs, and using the wrong solvent—even one time—can damage internal coatings or plastic parts. Never substitute household cleaners or degreasers; these often leave residue or create sticky surfaces.
Step-by-step Guide: How To Clean Your Hvlp Spray Gun
Cleaning a spray gun isn’t just about running water through it. Each part needs special attention. Let’s break down the process.
1. Empty And Flush The Cup
First, remove any leftover paint from the paint cup. Pour excess paint back into its container—save money and avoid waste.
- Flush the cup: Add a small amount of the correct solvent or water to the cup, swirl, and spray into a waste container until mostly clear.
- Repeat until the spray is almost colorless.
This step helps remove most of the paint from the fluid passages before you take the gun apart. If you skip flushing, you’ll have more mess and more work later. If you’re changing colors, flushing with the right solvent also ensures no old color will mix with the new one, which is important when working with light colors or clear coats.
2. Disassemble The Spray Gun
Next, take the gun apart carefully.
- Remove the air cap, fluid nozzle, needle, and paint cup.
- Lay out parts on a clean towel in order, so you remember where each piece goes.
- Check your manual for any special disassembly steps.
Non-obvious insight: Some models have tiny seals or springs that pop out. Watch closely and don’t lose them.
If it’s your first time, take a photo of the disassembled parts. This can be a lifesaver if you forget the order or orientation of small components. Use gentle pressure when removing parts—never force anything. If a part sticks, try wiggling it gently or soaking it briefly in solvent.
3. Clean Each Part Separately
Now focus on each part:
- Soak metal parts (like the nozzle and air cap) in the recommended solvent for a few minutes.
- Use a soft brush from your kit to scrub away residue.
- For the body of the gun, never soak—wipe with a damp cloth instead.
- Clean the needle carefully; it’s fragile and bends easily.
For the paint cup, use a bottle brush or a soft rag to scrub the inside, making sure to remove all paint, especially around the threads and seal. If you have a plastic cup, avoid strong solvents—these can crack or cloud the plastic over time.
Don’t forget about the threads on each part. Paint buildup here can make reassembly hard and cause leaks later. Use a cotton swab or small brush to clean inside threaded areas.
4. Clean Passages And Air Channels
Spray guns have tiny air and fluid passages that clog easily.
- Use cleaning needles or picks from your kit to clear these passages.
- Run a small brush or pipe cleaner through the fluid tip and air holes.
- For stubborn clogs, spray a little solvent through the passage.
Example: If the spray fan is uneven or has “fingers,” a blocked air hole is often the cause.
Another trick is to hold the part up to the light and look through the passage. If you see any blockage or don’t see light through, keep cleaning. Never use toothpicks or metal wires in aluminum passages, as these can scratch and cause permanent spray problems.
If you notice any white or chalky deposits, this could be dried latex paint or hard water residue. For these, soak the part a bit longer and gently scrub with a nylon brush.
5. Rinse And Dry All Parts
After scrubbing:
- Rinse all parts with clean solvent or water.
- Dry with a lint-free cloth or use compressed air to blow out moisture.
- Make sure no solvent remains, as it can thin your next batch of paint.
Be careful with compressed air—hold small parts tightly so they don’t blow away. If you don’t have compressed air, simply air-drying in a warm spot works, but always check for any moisture before reassembly.
Extra advice: Never store parts wet. Even stainless steel can develop spots or rust if left damp, especially in humid climates.
6. Reassemble And Lubricate
Once all parts are dry:
- Reassemble your spray gun in reverse order.
- Apply a drop of spray gun lubricant to the needle and moving parts (never use regular oil; it can ruin paint jobs).
- Check for smooth movement and a tight seal.
Use only a tiny amount of lubricant—just enough for a thin film. Too much can drip into the air or fluid passages and contaminate your next paint job. Move the trigger and needle several times to spread the lubricant evenly.
Non-obvious insight: Some spray guns have special lubrication points. Check your manual for these locations, as missing them can cause premature wear.
7. Final Test And Storage
Before putting away:
- Fill the cup with a little clean solvent or water and spray to test for clogs.
- Wipe the outside of the gun.
- Store in a dust-free area, ideally in its case.
Non-obvious insight: Always leave the needle slightly open if storing for a long time. This prevents sticking.
If you don’t have a case, wrap the gun in a clean towel or plastic bag to keep dust out. Dust in the air cap or fluid tip can cause blockages next time you use the gun.
Cleaning Different Types Of Paint
Not all paints clean up the same way. Using the right solvent is key.
Water-based Paints
- Use warm water and a little dish soap.
- Rinse thoroughly to prevent rust.
Sometimes, water-based paints can dry very quickly in warm conditions. If you notice a sticky residue, soak the part a bit longer in soapy water and gently scrub with a soft brush. Always rinse with clean water to remove any soap.
Oil-based Paints
- Use mineral spirits or paint thinner.
- Avoid getting solvent on plastic parts.
Oil-based paints take longer to dry, but once dried, they can be very hard to remove. Work in a well-ventilated area—fumes from solvents can be strong. Wear gloves to protect your skin from irritation.
Lacquers
- Use lacquer thinner.
- Work quickly; lacquer dries fast and can gum up passages.
Lacquer thinner is strong and evaporates quickly. Always close the bottle when not in use. For stubborn lacquer buildup, repeated short soaks and gentle scrubbing are better than one long soak, which can damage delicate parts.
Common mistake: Mixing solvents can damage seals or make cleanup harder. Stick with what the paint manufacturer recommends.
If you’re unsure, test the solvent on a small hidden part first. If it softens or discolors the material, stop and check your manual or contact the manufacturer.
How Often Should You Clean Your Hvlp Spray Gun?
- After every use: Full cleaning is a must.
- Between color changes: Flush with the correct solvent until clear. No need for full disassembly.
- During long breaks: Clean thoroughly before and after storage.
Data point: Industry surveys show that 90% of spray gun failures are due to poor cleaning.
For professionals who use their spray gun daily, a quick flush at lunch and a deep clean at day’s end is common. If you only spray occasionally, always deep clean before putting the gun away—paint left inside will harden and become nearly impossible to remove.
Troubleshooting: Signs Your Hvlp Spray Gun Needs Cleaning
If you notice any of these, it’s time to clean:
- Uneven spray pattern or spitting
- Paint dripping from the nozzle
- Hard trigger pull or sticky needle
- Hissing sounds when spraying
Ignoring these signs can lead to permanent damage.
Other warning signs include difficulty adjusting the spray fan or a sudden change in paint flow. If cleaning doesn’t fix the issue, check for worn or damaged parts.
Practical tip: Keep a log or checklist of your cleaning routine. If the gun starts acting up, you can quickly see if cleaning has been missed.
Credit: www.amazon.com
Comparison: Quick Clean Vs. Deep Clean
Understanding the difference helps you decide which method to use.
| Aspect | Quick Clean | Deep Clean |
|---|---|---|
| When to Use | Between colors or short breaks | After full session or storage |
| Time Required | 5–10 minutes | 20–30 minutes |
| Disassembly | Minimal (just flush) | Full disassembly |
| Tools Needed | Solvent, rag | Full cleaning kit |
| Effectiveness | Removes fresh paint only | Removes all residue and buildup |
A quick clean is fast and easy, but won’t remove dried or built-up paint. Deep cleaning takes more time but is necessary for long life and perfect results. Don’t skip deep cleaning, especially after heavy use.
Cleaning Mistakes To Avoid
Many beginners ruin their spray guns by making simple errors.
- Using the wrong solvent: This can swell seals or leave residue.
- Soaking the whole gun: Only soak metal parts. Soaking the body can damage seals and trigger assemblies.
- Skipping needle cleaning: Dried paint on the needle causes leaks.
- Forcing parts back together: Tighten gently—overtightening can strip threads.
- Not drying parts: Moisture can cause rust or sticky triggers.
- Reusing dirty solvent: Always use fresh solvent for the final rinse.
Insider advice: If you’re in a hurry, at least flush the gun with solvent after each use. Never let paint dry inside.
Another error is using high-pressure water or air to blast out clogs. This can drive paint deeper into passages or force debris into seals. Use gentle cleaning tools and solvents for best results.
Comparing Hvlp Spray Gun Cleaning Kits
Choosing the right cleaning kit can make the job much easier. Here’s a simple comparison.
| Kit Feature | Basic Kit | Pro Kit | Deluxe Kit |
|---|---|---|---|
| Brushes | 2–3 sizes | 6 sizes | 10+ specialty brushes |
| Needles/Picks | None | Several | Full range |
| Lubricant | No | Sample tube | Full-size tube |
| Storage Case | No | Basic | Deluxe |
| Price | Low | Medium | High |
Tip: For hobbyists, a basic kit is enough. Professionals should invest in a pro or deluxe kit for better tools and faster cleaning.
Some kits include extra items like small bottles for mixing solvent, or special magnetic trays to keep tiny parts from getting lost. These aren’t essential, but they do make the job easier, especially if you clean often or handle several guns at once.
Maintenance Tips For Long-lasting Performance
Cleaning is only part of the story. Regular maintenance keeps your HVLP spray gun in top shape.
- Inspect seals and O-rings: Replace if worn or swollen.
- Lubricate moving parts: Use only spray gun-safe lubricants.
- Check for leaks: After each cleaning, spray plain solvent to check for leaks.
- Store properly: Keep the gun dry and dust-free.
- Keep spare parts: Needles and nozzles wear out over time.
Non-obvious tip: Never use silicone-based lubricants. They can cause fish-eye defects in paint.
It’s also wise to periodically check the trigger spring and other moving parts for wear. If the trigger feels soft or doesn’t return smoothly, replace the spring or consult your manual for adjustments. Keep a small log of maintenance and repairs, especially if you use your gun frequently or rely on it for work.
If you notice any change in spray pattern or pressure, don’t wait—inspect and service the gun right away. Early attention can prevent bigger, costlier problems.
Credit: www.youtube.com
When To Replace Hvlp Spray Gun Parts
Even with perfect cleaning, some parts will wear out.
- Needle: If bent or pitted, replace immediately.
- Nozzle: If cleaning doesn’t restore spray pattern, it may be worn.
- Seals/O-rings: If they feel soft or loose, replace. Old seals can cause air leaks and drips.
Most manufacturers sell rebuild kits for common spray gun models.
If you spray abrasive paints (like primers or metallics), your needle and nozzle will wear faster. Keep spares on hand to avoid downtime. Always buy genuine parts—cheap imitations can fit poorly and cause leaks or uneven spray.
Pro tip: If you notice leaking at the air cap or cup, check the seal first. Most leaks are due to worn or incorrectly installed seals, not the main body.
Safe Disposal Of Solvents And Paint Waste
Never pour solvent or paint down the drain or on the ground. It’s illegal and harms the environment.
- Store used solvent in a sealed container and take to a hazardous waste facility.
- Wipe up spills with rags and dispose of them safely.
- For small amounts of water-based paint, let it dry out before tossing in the trash.
Helpful resource: Check the EPA’s advice on paint and solvent disposal at EPA Paint Wastes.
If you use a lot of solvent, consider a solvent recycling system. These filter and reuse solvent, reducing waste and saving money over time. Always label waste containers clearly and keep out of reach of children and pets.
Advanced Cleaning: Dealing With Dried Or Clogged Paint
Sometimes paint dries inside your gun, especially if you forget to clean it. Here’s what to do:
- Disassemble the gun completely.
- Soak metal parts in the recommended solvent for several hours, even overnight for stubborn clogs.
- Use a pick or fine needle to carefully remove paint from passages.
- Never use wire or drill bits; these scratch and ruin the gun.
- For really tough buildup, consider ultrasonic cleaning (available at many repair shops).
Pro insight: If a passage stays blocked, it’s better to replace the part than risk damaging the gun.
Ultrasonic cleaning uses sound waves to shake loose dried paint from small passages. It’s very effective for deep cleaning, especially after a long project or if the gun was neglected. Some hobbyists buy small ultrasonic cleaners for home use—they’re also great for cleaning airbrushes and small tools.
Real-world Example: Cleaning After A Big Project
Imagine you’ve just finished spraying a large cabinet. There’s paint in the cup, nozzle, and some has even dried on the outside.
- First, empty the cup and flush with solvent.
- Disassemble and soak metal parts.
- Scrub every part, paying attention to the air holes and fluid passages.
- Wipe the body clean, paying attention to areas where paint may have dripped.
- Rinse, dry, and reassemble.
After a big project, a deep clean is vital. Otherwise, leftover paint will harden and ruin your next job.
If you notice paint stuck to the outside of the gun, use a soft rag with a little solvent to wipe it off. Letting paint build up on the exterior can cause the trigger to stick or make it hard to adjust controls next time.
Helpful tip: Make cleaning part of your post-project routine. A little extra time now saves hours of frustration later.
Table: Paint Type Vs. Recommended Cleaner
Understanding which cleaner to use for each paint saves time and prevents damage.
| Paint Type | Cleaner/Solvent | Notes |
|---|---|---|
| Latex (Water-Based) | Warm water, mild soap | Rinse thoroughly to avoid rust |
| Oil-Based | Mineral spirits, paint thinner | Ventilate area; avoid plastics |
| Lacquer | Lacquer thinner | Clean quickly; dries fast |
| Enamel | Enamel reducer | Check paint label for best choice |
If you use specialty paints (like two-part epoxies), always follow the manufacturer’s cleaning instructions. Some require special neutralizing agents, and skipping them can ruin your equipment.
Frequently Asked Questions
How Long Does It Take To Clean A Hvlp Spray Gun?
A full cleaning usually takes 20 to 30 minutes, depending on how dirty the gun is and whether the paint has started to dry. Quick flushes between colors can take as little as 5–10 minutes.
If you’re new to spray guns, allow a little extra time at first. With practice, you’ll get faster and more efficient.
Can I Use Acetone To Clean My Spray Gun?
Acetone is strong and works for most lacquers and some urethanes, but it can damage seals and O-rings over time. Only use acetone if your gun’s manual allows it, and never soak the gun body in acetone.
It’s always safer to start with the mildest recommended solvent. If you must use acetone, rinse with clean water afterward to remove any residue.
What Happens If I Don’t Clean My Hvlp Spray Gun Right Away?
If you leave paint to dry inside the gun, it can clog passages and ruin delicate parts like the needle and nozzle. Dried paint is much harder to remove and may require special tools or replacement parts.
Even a few hours can make a difference, especially with fast-drying paints. Clean your gun as soon as you finish spraying.
How Do I Know If My Spray Gun Is Really Clean?
After cleaning, spray clean solvent or water through the gun. The spray should be clear, with no color or residue. Also, check that all parts move smoothly and the spray pattern is even.
If you see bubbles, streaks, or a change in pattern, repeat cleaning or check for hidden clogs.
Is It Safe To Clean Hvlp Spray Guns Indoors?
You can clean indoors if you use proper ventilation and wear gloves, especially with strong solvents. Always follow safety guidelines to avoid inhaling fumes or risking fire.
Open windows and use a fan if possible. Never smoke or use open flames near solvents.

Credit: www.amazon.com
Bringing It All Together
A well-maintained HVLP spray gun is the key to flawless finishes and smooth painting jobs. By following these cleaning steps, you not only protect your investment but also make every project easier and more professional. Remember, details matter: use the right solvent, clean every part, and never rush the process. With the right habits, your spray gun will deliver perfect results for years to come. If you’re ever unsure, check your owner’s manual or seek advice from trusted sources like the EPA. Clean tools mean clean work—make cleaning your spray gun a top priority every time.