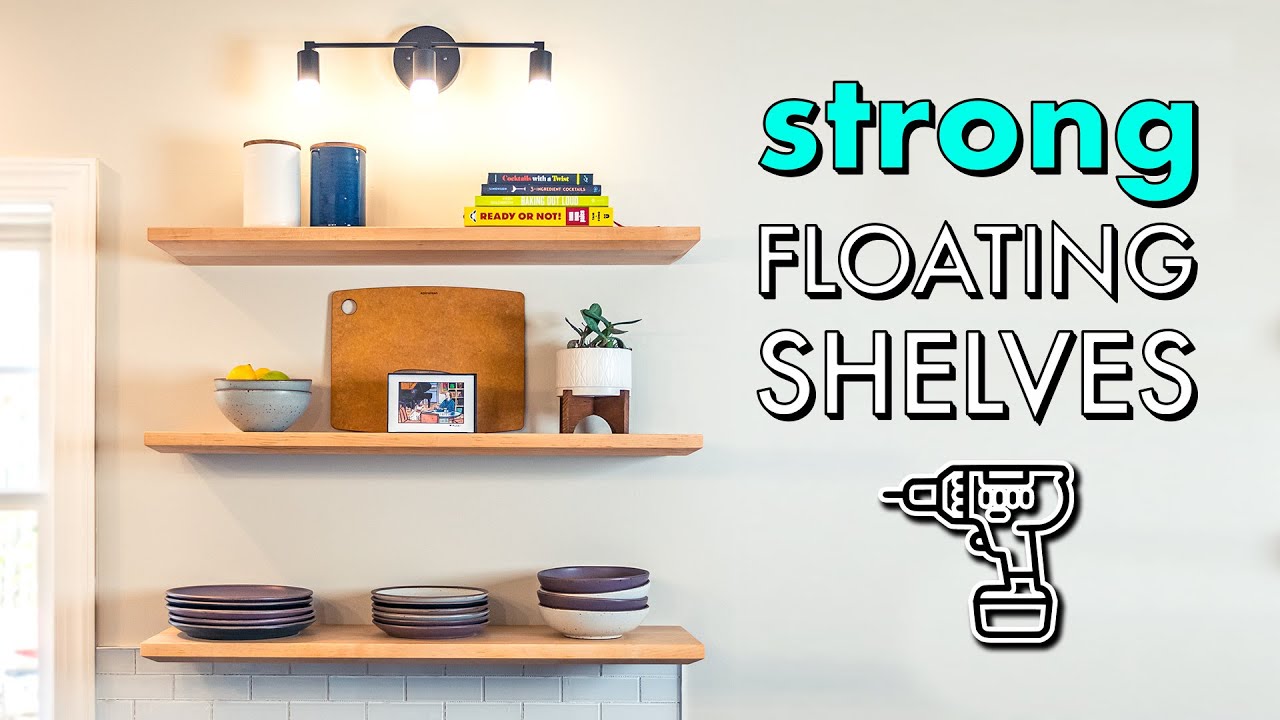
Building floating shelves in your kitchen is a smart way to add style and storage without making the space feel crowded. These shelves look modern, help you organize daily essentials, and make your kitchen feel more open. Many people think this is a difficult job, but with the right tools, materials, and a step-by-step approach, you can do it yourself—even if you are not an expert.
You can also customize the shelves to match your kitchen’s design and your storage needs.
This guide explains everything you need to know about building floating shelves in your kitchen. From choosing the best materials to installing the shelves safely, you will learn each step in detail. You will also discover tips, common mistakes to avoid, and how to finish your shelves for a professional look.
If you want to upgrade your kitchen’s storage and style, keep reading.
Why Choose Floating Shelves For Your Kitchen
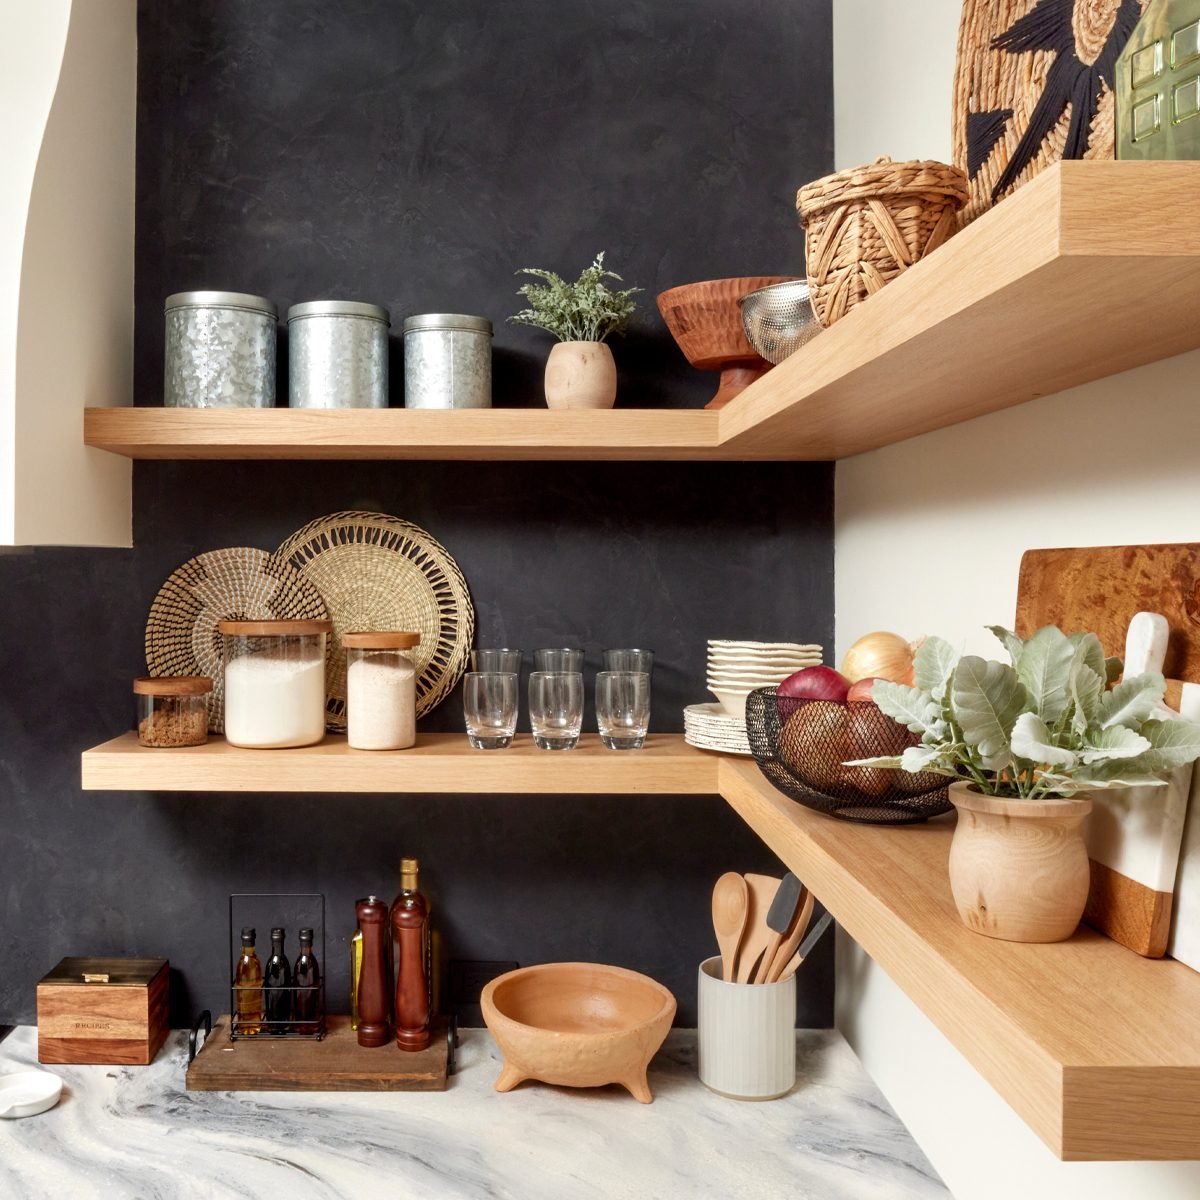
Floating shelves are very popular in modern kitchen design. Their simple look makes your kitchen feel bigger and less cluttered. Since there are no visible brackets, they seem to “float” on the wall. This gives a clean appearance and offers flexible storage for dishes, spices, or even decorative items.
Floating shelves are also easy to clean and can be placed almost anywhere, from above the sink to beside the stove. They can fit into tight spaces where regular cabinets do not work. With so many styles and finishes available, you can find a design that matches your kitchen perfectly.
Many homeowners also choose floating shelves because they are cheaper than installing new cabinets. If you have basic tools and some free time, you can build them yourself and save money on labor costs.
Planning Your Floating Shelves
Good planning is key to a successful project. Before you start, think about:
What Will You Store?
Ask yourself what you want to keep on your floating shelves. Dishes, glasses, spices, or cookbooks? The weight and size of these items will affect your design. For example, heavy dishes need thicker, stronger shelves and better wall supports.
Where Will You Install The Shelves?
The position of your shelves is important for both function and looks. Common spots include:
- Above the countertop for easy access
- Next to the stove for spices and oils
- Above the sink for drying dishes or showing off plants
Measure the space carefully to avoid blocking windows, outlets, or kitchen appliances.
How Many Shelves Do You Need?
Decide if you want just one shelf or several stacked vertically. Multiple shelves can give more storage, but too many may look crowded. Leave enough space between shelves for tall items and for easy cleaning.
Choosing The Right Size
Standard kitchen floating shelves are usually 8–12 inches deep and 24–48 inches long. Deeper shelves hold more, but they should not stick out so far that you bump into them or that they feel unstable.
Style And Finish
Think about your kitchen’s style. Do you want simple white shelves, rustic wood, or bold colors? The finish should match your cabinets, countertops, or other kitchen features for a coordinated look.
Tools And Materials Needed
Gathering the right tools and materials before you start will save time and help you work safely. Here is a typical list for most kitchens:
Basic Tools
- Drill and drill bits (for making holes)
- Level (to keep shelves straight)
- Tape measure
- Stud finder (to locate wall studs)
- Screwdriver (manual or electric)
- Pencil
- Saw (circular saw or hand saw)
- Sandpaper (medium and fine grit)
- Safety glasses and gloves
Materials
- Wood boards (for shelves; common choices include pine, oak, or plywood)
- Floating shelf brackets or supports (hidden types for a clean look)
- Wood screws (size depends on bracket and wall type)
- Wall anchors (for drywall, if no studs are available)
- Wood stain, paint, or sealer (to finish the shelves)
- Painter’s tape (optional, for marking)
If you want a quick comparison of popular shelf materials, see below:
| Material | Pros | Cons | Best For |
|---|---|---|---|
| Solid Wood | Strong, natural look, easy to refinish | Can warp if not sealed well | Heavy items, classic kitchens |
| Plywood | Stable, affordable, easy to paint | Exposed edges need finishing | Modern or budget projects |
| MDF | Very smooth, low cost | Weak to water, less strong | Light items, painted shelves |
Measuring And Marking The Wall
Accurate measuring is one of the most important steps. Even small mistakes can lead to uneven shelves or weak support.
- Measure Shelf Length: Use a tape measure to mark the exact length you want for your shelves. Mark both ends lightly with a pencil.
- Mark Height: Decide how high you want the shelf. Most kitchen shelves are 16–20 inches above the counter. Use a level to draw a straight line at this height.
- Find Wall Studs: Use a stud finder to locate studs behind the wall. Mark each stud’s center along your line. It’s best to mount shelf brackets into studs for strength.
- Plan Shelf Spacing: If you want more than one shelf, measure the space between them (usually 12–16 inches). Mark each shelf’s position.
Pro tip: Double-check all measurements before drilling. Mistakes are easier to fix with an eraser than with a power tool.

Credit: www.megleonard.co
Cutting And Preparing The Shelves
Once you have your measurements, it’s time to prepare the shelves.
Cutting The Boards
- Mark your wood boards for the length you need.
- Use a saw to cut straight along the lines.
- For perfectly smooth edges, clamp the board and cut slowly.
Sanding
- Sand all surfaces with medium-grit sandpaper to remove splinters and rough spots.
- Finish with fine-grit sandpaper for a smooth touch, especially on edges and corners.
Finishing
- Wipe off any dust with a clean cloth.
- Apply stain, paint, or sealer as desired. Let each coat dry fully before the next.
- If you want a natural wood look, use a clear sealer.
- For a bold look, paint the shelves in a color that matches your kitchen.
Non-obvious insight: Sealing the bottom and back of the shelf is important too. This prevents moisture from warping the wood—especially in kitchens where steam and spills are common.
Choosing And Installing Shelf Brackets
The strength of your floating shelves depends on the quality of the brackets and how well they are installed.
Types Of Floating Shelf Brackets
There are two main types:
- Internal (hidden) brackets: These slide into holes drilled into the back of the shelf. They are completely invisible.
- External (surface-mount) brackets: These are sometimes visible but can also look stylish if chosen carefully.
For a true “floating” look, choose internal brackets. Here’s a quick comparison of common bracket types:
| Bracket Type | Strength | Visibility | Installation Difficulty |
|---|---|---|---|
| Internal Rod | Very strong | Completely hidden | Medium to high |
| L-Bracket | Strong | Visible under shelf | Easy |
| Box Bracket | Very strong | Hidden | Medium |
How To Install Internal Floating Shelf Brackets
- Align Bracket Locations: Hold the brackets against the wall where the shelf will go. Mark where each bracket will enter the wall and shelf.
- Drill Into Wall Studs: Use a drill bit that matches the bracket diameter. Drill deep enough for a secure fit.
- Install Brackets: Screw each bracket into the wall studs. Make sure each is level.
- Drill Shelf Holes: On the back of each shelf, measure and drill holes to slide over the brackets.
- Test Fit: Slide the shelf onto the brackets to check fit. Adjust holes if needed.
Non-obvious insight: Test the brackets’ strength before placing anything on the shelf. Hang from the shelf gently, or add a heavy object, to make sure the brackets do not move or loosen.
Mounting The Floating Shelves
This is where your work comes together. Take your time to make sure everything is level and secure.
- Slide Shelves Onto Brackets: Carefully push each shelf onto the brackets. The fit should be snug but not forced.
- Check Level: Use a level across the top of each shelf. Adjust by removing and re-drilling holes if needed.
- Secure in Place (if required): Some brackets allow a small screw from underneath to lock the shelf in place. If so, add this screw for extra safety.
- Repeat for Additional Shelves: If you have more shelves, repeat the steps, checking spacing and level each time.
Tip: If your wall is not perfectly flat, use small wood shims behind the shelf to help it sit level.
Weight And Safety Considerations
Floating shelves look delicate, but they can be very strong if built correctly. However, many people make mistakes that lead to sagging or even collapsed shelves.
How Much Weight Can Floating Shelves Hold?
A well-installed floating shelf (with strong brackets into wall studs) can usually hold 30–50 pounds. Shorter, thicker shelves with more brackets can hold more.
Common mistakes:
- Using drywall anchors instead of screwing into studs (less safe for heavy items)
- Overloading shelves with heavy items like cast iron pots
- Choosing thin or weak wood that bends under weight
If you plan to store heavy dishes, always use solid wood and screw brackets into at least two studs.
Safety For Kids And Pets
For households with children or pets, consider the height and location of your shelves. Do not place fragile or sharp items on lower shelves. Make sure all fasteners are tight and check the shelves regularly for signs of loosening.
Credit: www.youtube.com
Styling And Organizing Your Floating Kitchen Shelves
Once your shelves are installed, you can enjoy the fun part—organizing and decorating them.
Practical Organization Tips
- Store everyday items (plates, glasses) on the lowest shelves for easy reach.
- Use baskets or bins for small items like tea bags or snacks.
- Group similar items together for a neat look.
Decorating For Style
- Add a few decorative items such as plants, candles, or cookbooks.
- Mix materials (wood shelves, glass jars, ceramic dishes) for interest.
- Leave some empty space to avoid a crowded look.
Example: A floating shelf above the sink with glass jars for pasta, a small plant, and a stack of white bowls is both useful and stylish.
Seasonal Changes
You can change the look of your shelves with the seasons. Switch out items like mugs or decorations for a fresh feel.
Maintenance And Cleaning
Floating shelves in the kitchen can collect dust, grease, and splashes. Regular cleaning and care will keep them looking great for years.
Cleaning Tips
- Wipe shelves with a damp cloth weekly.
- For stubborn grease, use a mild kitchen cleaner.
- Dry wood shelves right after cleaning to prevent water damage.
Regular Checks
- Every few months, check that the shelves are still level and secure.
- Tighten screws if needed.
- Re-apply sealer or paint if you notice wear.
Common Mistakes To Avoid
Even with good instructions, some errors are easy to make. Here are mistakes that beginners often overlook:
- Not using wall studs: Shelves installed only into drywall will be weak and may fall.
- Poor measuring: Small errors can lead to crooked or uneven shelves.
- Skipping sanding or sealing: Rough wood and unsealed surfaces do not last long in kitchens.
- Overloading shelves: Even strong shelves have a limit.
- Ignoring shelf thickness: Thin shelves may sag over time.
- Choosing the wrong finish: Some paints and stains do not resist kitchen moisture or heat.
- Rushing installation: Take your time to check every measurement and level.
Customizing Your Floating Shelves
Floating shelves do not have to be plain or boring. Here are ways to make them unique:
Add Undershelf Lighting
Small LED strips or puck lights under the shelves can brighten your workspace and add style. Choose battery-powered or plug-in models for easy installation.
Use Decorative Edges
Instead of square edges, you can round or bevel the shelf edges for a softer look. This is easy to do with sandpaper or a router.
Mix Materials
Combine wood shelves with metal brackets for an industrial style. Or use glass shelves for a modern, airy look.
Paint Or Stain For Contrast
If your kitchen cabinets are white, try dark wood shelves for contrast. Or paint the shelves a bright color to add a pop of personality.
Advanced Tips For A Professional Finish
If you want your floating shelves to look truly built-in, try these advanced steps:
Hide Bracket Holes
After sliding the shelf onto the brackets, fill any visible gaps with wood filler. Sand smooth and touch up with paint.
Add A Backsplash
A short backsplash behind the shelf can protect your wall from spills and make cleaning easier. Use tile, glass, or even metal sheets for style.
Integrate Power Outlets
If you plan to use the shelf for small appliances, install an outlet nearby. This requires electrical work—consider hiring a pro for safety.
Cost Breakdown And Budgeting
Many homeowners wonder how much floating shelves will cost. Here’s a rough estimate for a set of two 36-inch wood shelves:
- Wood boards: $20–$50 (depends on type)
- Brackets: $20–$40
- Screws/anchors: $5–$10
- Paint or stain: $10–$20
- Tools (if you don’t own): $50–$200
Total cost: $55–$120 (not including tools you may already have)
Compared to custom cabinets (which can cost $500+), floating shelves are a budget-friendly option.
When To Call A Professional
While most people can build floating shelves with basic tools, some situations call for professional help:
- Installing into tile, brick, or concrete walls (requires special tools)
- Very heavy shelves or items
- Electrical work for lighting or outlets
- Large or complicated designs
If you are unsure about any part of the job, it is safer to ask a pro. Many carpenters or handymen offer floating shelf installation for a reasonable price.
Real-world Examples
Many kitchens use floating shelves in creative ways:
- Small kitchens: A single wood shelf above the sink holds mugs and bowls, freeing up cabinet space.
- Family kitchens: Three long shelves beside the fridge store cookbooks, jars, and baskets for snacks.
- Modern kitchens: Floating shelves in glossy white hold glassware and colorful dishes for a sleek look.
If you want more inspiration, check out these design ideas on the Houzz website.
Credit: www.familyhandyman.com
Frequently Asked Questions
How Do I Know If My Wall Can Hold Floating Shelves?
Use a stud finder to locate studs in your wall. For heavy or long shelves, always mount brackets into studs. If you have only drywall, use strong anchors, but remember these are less safe for heavy items.
What Is The Best Wood For Kitchen Floating Shelves?
Solid hardwoods like oak, maple, or walnut are best for strength and long life. Plywood is also good for painted shelves. Avoid MDF in kitchens with lots of steam or water.
Can I Install Floating Shelves On Tile Or Brick Walls?
Yes, but you need special drill bits and anchors made for masonry. Drilling into tile or brick is harder and may require professional help.
How Do I Keep My Floating Shelves From Sagging?
Use thick, strong wood (at least 1. 5 inches thick), and always install brackets into wall studs. Do not overload shelves. If you notice sagging, add more brackets.
Are Floating Shelves Safe For Storing Heavy Dishes Or Appliances?
They can be, if built and installed correctly. Use strong brackets, thick wood, and screw into studs. For very heavy items, consider traditional shelves with visible brackets for extra support.
Building floating shelves in your kitchen is a project that adds both function and beauty. By planning carefully, using the right materials, and following these steps, you can enjoy stylish, sturdy shelves for years. Take your time, pay attention to details, and your kitchen will look more open, organized, and inviting.