As an Amazon Associate I earn from qualifying purchases.
Building a dresser inside a closet can transform your space, making it more organized and functional. Whether your closet is small or walk-in, a custom dresser provides storage for clothing, accessories, or anything you want to keep out of sight.
Many people think this is a complex project, but with the right plan and careful steps, you can create a built-in dresser that looks great and lasts for years.
This guide explains, step by step, how to build a dresser in a closet—even if you have limited woodworking experience. You’ll learn what tools and materials are needed, how to measure your space, create a design that fits your closet, and assemble everything securely.
Along the way, you’ll find practical tips that save time and money, plus solutions for common challenges. By the end, you’ll not only have a dresser but also a deeper understanding of home improvement.
Understanding Your Closet Space
Before you pick up a tool or buy any wood, you need to know exactly what you’re working with. Every closet is different. Some are narrow and deep, others wide and shallow. Some have sloped ceilings or odd corners. Taking time to analyze your closet helps you avoid mistakes and wasted materials.
Start by emptying your closet completely. Remove clothes, boxes, and anything else inside. This gives you a clear view and makes it easier to measure. Use a flashlight if your closet is dim.
Key measurements to take:
- Width: Measure from wall to wall at the spot where you want the dresser.
- Depth: Measure from the back wall to the closet door or opening.
- Height: Measure from the floor to any shelves, rods, or the ceiling.
Write these numbers down. Measure at least twice to ensure accuracy. Walls in older homes aren’t always perfectly straight, so measure at several points (top, middle, bottom).
Check for obstacles like:
- Baseboards
- Electrical outlets
- Heating or AC vents
- Closet rods or shelves
If any are in the way, consider how you’ll work around them. For example, you may need to notch the back of your dresser to fit over a baseboard or cut a hole for an outlet.
Planning Your Dresser Design
A custom dresser is all about making the most of your closet. Think about what you want to store. Will it be mostly folded clothes, shoes, or miscellaneous items? Your answer shapes the size and number of drawers, shelves, and even the dresser’s height.
Sketching Your Ideas
Grab graph paper or use a free online design tool. Draw the closet space to scale. Sketch different dresser layouts. Try:
- Tall and narrow units for small closets
- Wide, low dressers for walk-in closets
- Units with both drawers and open shelves
Label where you want each feature. This simple step helps you visualize your project and spot problems before you start building.
Choosing Drawer Sizes And Layout
Most built-in dressers have 3-6 drawers. Here’s a typical layout:
- Top drawers: Shallow (4–6 inches tall) for socks, underwear, or accessories
- Middle drawers: Medium (6–8 inches tall) for t-shirts, shorts
- Bottom drawers: Deep (8–12 inches tall) for jeans, sweaters, or bulkier items
If you want to store shoes, leave an open shelf at the bottom. If you need a jewelry tray, plan for a small, shallow drawer at the top.
Determining Materials
The most common materials are:
- Plywood: Durable, affordable, and easy to paint or stain. 3/4-inch thickness is standard for dresser boxes.
- Solid wood: More expensive but offers a classic look.
- MDF: Smooth and easy to paint, but heavier and less strong than plywood.
Drawer fronts can be fancier—consider solid wood, painted MDF, or plywood with edge banding.
For drawer slides, full-extension ball-bearing slides are best. They allow drawers to open all the way and hold more weight. Soft-close slides are a nice upgrade but cost more.
Example Dresser Dimensions
Let’s look at a practical example. For a standard 36-inch wide closet, your dresser might be:
- Width: 34 inches (leave a 1-inch gap on each side)
- Depth: 18 inches (fits folded clothes, leaves room for doors to close)
- Height: 30–36 inches (3–4 drawers stacked)
These measurements can be adjusted to fit your space. Always leave at least 1/2 inch on each side so you can slide the dresser in and out if needed.
Gathering Tools And Materials
Having the right tools saves frustration and leads to better results. Here’s a list of what you’ll need for most dresser builds:
Essential tools:
- Circular saw or table saw (for straight cuts)
- Drill and driver bits
- Tape measure
- Level
- Square (speed square or carpenter’s square)
- Clamps (4–6, for holding parts together)
- Screwdriver
- Sander (orbital or block)
- Pencil
Optional but helpful tools:
- Miter saw (for precise crosscuts)
- Pocket hole jig (for hidden joints)
- Brad nailer (for attaching trim)
Materials:
- 3/4-inch plywood (for dresser sides, top, bottom, shelves)
- 1/4-inch plywood (for drawer bottoms, back panel)
- Drawer slides
- Wood screws (1 1/4-inch and 1 3/4-inch)
- Wood glue
- Drawer pulls or knobs
- Edge banding (for a smooth look)
- Paint or stain (plus primer if painting)
- Sandpaper (120, 150, 220 grit)
Buy a little extra wood in case of mistakes. Good plywood is worth the investment—cheaper wood can warp or split.
Cutting And Preparing Your Pieces
Accurate cuts are crucial. Before you cut, double-check your measurements. Mark each cut line with a pencil and label the pieces as you go.
Typical pieces to cut:
- 2 dresser sides
- 1 top panel
- 1 bottom panel
- 1–2 shelf panels (if needed)
- 1 back panel (thin plywood)
- 3–6 drawer boxes (each with a front, back, two sides, and a bottom)
If you don’t have a table saw, most home improvement stores will cut plywood to size for you. Request precise cuts to save time.
When cutting, use a sharp blade to prevent chipping. Support the plywood fully to avoid splinters. Sand all edges after cutting—they should feel smooth to the touch.
Label each piece as soon as you cut it (e.g., “left side,” “drawer front 1”). This keeps you organized during assembly.
Assembling The Dresser Box
The dresser box is the main structure. It needs to be strong and square, since everything else attaches to it.
Dry Fitting
Before using glue or screws, assemble the sides, top, and bottom panels loosely. This helps you check for fit and make adjustments.
Joining The Panels
Most dresser boxes are simple rectangles. Use wood glue and screws for strong joints. Drill pilot holes to prevent splitting. If you have a pocket hole jig, you can hide screws on the inside.
Assembly order:
- Attach the bottom panel to both sides.
- Attach the top panel.
- Add shelf panels (if any), spaced evenly.
- Attach the back panel (nail or screw thin plywood to the back for stability).
Use a square to check that corners are 90 degrees. Clamp panels together as you work. Let glue dry before moving the box.
Pro tip: If you want the dresser to look “built-in,” leave the back panel off and anchor the box directly to the closet wall.
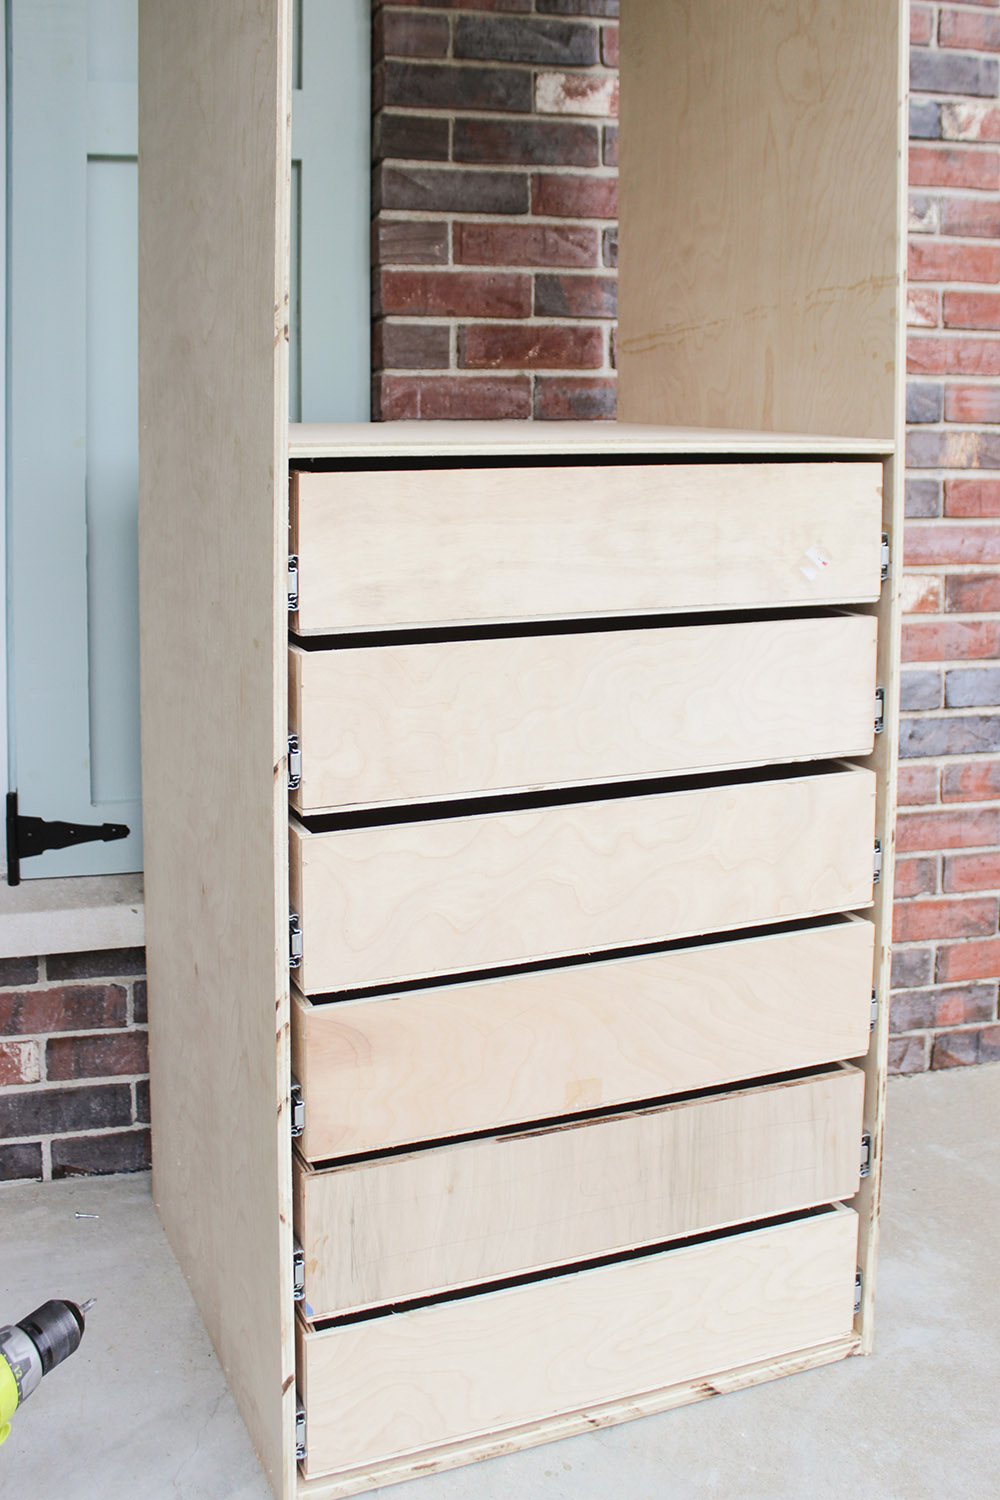
Building And Installing Drawers
Drawers are the heart of your dresser. They can be tricky, but planning ahead prevents problems.
Cutting Drawer Parts
Each drawer has:
- 2 sides (length equals drawer depth)
- 1 front and 1 back (width equals dresser width minus drawer slide allowance—usually 1 inch total)
- 1 bottom (thin plywood, fits into grooves or sits under the box)
Cut all the parts for each drawer before assembling. Sand edges smooth.
Assembling Drawer Boxes
The simplest method is a “butt joint”: glue and screw the sides to the front and back pieces. For stronger drawers, use pocket hole screws or dado joints.
Slide the bottom piece into a groove (if you cut one), or attach it with nails or glue at the bottom. Check for square before the glue dries.
Non-obvious insight: Mark the top edge of each drawer before assembling—this helps you install the slides on the correct side.
Installing Drawer Slides
Drawer slides come in pairs. Follow the instructions—they usually mount 1/2 inch from the bottom of the drawer side.
Key steps:
- Attach one side of the slide to the dresser box, level and parallel.
- Attach the other side to the drawer box.
- Slide the drawer in, adjust as needed for smooth movement.
Install one drawer at a time, starting with the bottom. Make sure each drawer opens and closes easily before adding the next.
Common mistake: Failing to level slides, which causes drawers to jam or tilt. Use a level for every slide.

Credit: www.youtube.com
Attaching Drawer Fronts And Hardware
Drawer fronts are what you see when the dresser is finished. Take your time with this step—it makes the project look professional.
Sizing And Placing Drawer Fronts
Drawer fronts should be slightly larger than the drawer boxes to cover gaps. Typical overlaps are 1/8 to 1/4 inch on each side.
Hold each front in place with double-sided tape, then open the drawer and screw from the inside. This lets you adjust the position before fixing it permanently.
Check that gaps between fronts are even (usually 1/8 inch). Adjust as needed.
Installing Handles Or Knobs
Mark the center of each drawer front. Drill holes for handles or knobs before attaching the fronts. Use a template for perfectly aligned hardware.
Tip: If you’re painting, drill hardware holes and sand before painting to avoid chipping the finish.
Securing The Dresser In The Closet
Now it’s time to move the dresser into the closet. This step is more important than many people realize—an unsecured dresser can tip over, especially if you have children.
Positioning The Dresser
Slide the dresser box into the closet. Make sure it’s centered and straight. There should be a small gap on each side.
Check the dresser is level front to back and side to side. If your floor is uneven, use shims (small wood wedges) under the corners.
Anchoring To The Wall
For safety and a built-in look, anchor the dresser to wall studs. Use 2 1/2-inch screws through the back panel into studs. If you removed the back panel, use L-brackets inside the dresser.
Non-obvious insight: Attaching to studs, not just drywall, prevents the dresser from coming loose over time. Use a stud finder to locate the best spots.
If your closet has baseboards, the dresser may not sit flush against the wall. Notch the back corners of the dresser box to fit over the baseboard, or fill the gap with trim.
Credit: www.homedepot.com
Finishing Touches: Painting, Staining, And Trimming
A great finish makes your dresser look custom-made. Choose paint or stain based on your closet’s style.
Sanding And Priming
Sand all surfaces with 150 or 220-grit sandpaper. Wipe with a damp cloth to remove dust. If painting, apply a wood primer for a smooth finish.
Painting Or Staining
Use a small roller or brush. Two coats of paint or stain are usually enough. Let each coat dry fully before the next.
For extra durability, add a clear polyurethane topcoat, especially on drawer fronts.
Adding Trim Or Edge Banding
Edge banding covers plywood edges for a finished look. Iron-on banding is easy to apply—just trim the excess with a utility knife.
For a classic look, add simple trim (like 1×2 boards) around the dresser front. Attach with wood glue and a brad nailer.
Cleaning Up
Clean up drips and dust. Reinstall closet rods or shelves above the dresser if you removed them. Put your clothes and items back in place.
Comparing Built-in Dresser Vs. Freestanding Dresser
Here’s a quick look at the differences between a custom built-in and a typical store-bought dresser:
| Feature | Built-In Dresser | Freestanding Dresser |
|---|---|---|
| Space Efficiency | Uses every inch; custom fit | May waste side gaps |
| Style | Matches closet perfectly | Limited choices |
| Cost | DIY is often lower | Can be expensive for quality |
| Flexibility | Permanent installation | Easy to move or replace |
A built-in dresser gives you more storage in the same space, but it’s a permanent upgrade. Freestanding dressers are easier to move if your needs change.
Common Mistakes And How To Avoid Them
- Not measuring accurately. Always measure twice—walls and floors are rarely perfectly square.
- Using cheap materials. Low-quality wood warps and drawers stick. Invest in good plywood or solid wood.
- Forgetting to leave side gaps. Built-ins need a little breathing room. Leave at least 1/2 inch on each side.
- Ignoring wall anchors. Dressers must be attached to studs, not just drywall.
- Skipping sanding. Rough edges look bad and catch on clothes.
- Rushing the finish. Paint and stain need time to dry between coats.
- Misaligning drawer slides. Uneven slides make drawers bind or tilt.
- Not planning for baseboards or outlets. Cut notches or holes before assembly.
- Overloading drawers. Know the weight limit of your slides—usually 50–100 lbs per drawer.
- Not using clamps. Clamps keep boxes square and joints tight while glue dries.
Estimating Time And Budget
Building a dresser in a closet takes time, but it’s manageable for most DIYers.
Time breakdown for an average project:
- Planning and measuring: 2–3 hours
- Buying materials: 1–2 hours
- Cutting and prep: 3–4 hours
- Assembly: 4–6 hours
- Painting/staining: 4–8 hours (including drying time)
- Installation: 2–3 hours
Total: 16–26 hours, usually spread over a weekend or two.
Budget estimate for a 3-drawer dresser:
| Item | Estimated Cost (USD) |
|---|---|
| 3/4″ Plywood (2 sheets) | $90–$120 |
| Drawer slides (3 sets) | $30–$60 |
| Drawer pulls/knobs | $15–$30 |
| Paint/stain & supplies | $25–$50 |
| Wood screws, glue, sandpaper | $15–$25 |
| Edge banding/trim | $15–$25 |
| Total | $190–$310 |
Non-obvious insight: You can reduce costs by reusing drawer slides or handles from old furniture, or by cutting your own trim.

Credit: lovelyindeed.com
Customizing Your Built-in Dresser
Your built-in dresser doesn’t have to be plain. Here are ways to make it unique:
- Add open shelves above drawers for shoes or baskets.
- Install lighting (LED strips) inside the closet for better visibility.
- Use glass or mirrored drawer fronts for a modern touch.
- Paint in bold colors to match your room’s style.
- Add soft-close hardware for a luxury feel.
- Include hidden outlets inside a drawer for charging devices.
Pro tip: Measure baskets or bins before building, if you want them to fit on shelves.
Maintenance And Longevity
A well-built dresser can last for decades with simple care.
- Clean with a soft, damp cloth. Avoid harsh chemicals that damage finish.
- Tighten hardware once a year—screws can loosen over time.
- Check drawer slides for wear. Replace if they become noisy or loose.
- Touch up paint or finish as needed to keep the dresser looking new.
If you ever want to remove the dresser, unscrew it from the wall and patch screw holes with spackle.
When To Call A Professional
DIY isn’t for everyone. If you lack tools, time, or confidence, consider hiring a carpenter. Professionals can handle tricky closets (angled walls, tiny spaces) and create a flawless finish.
Signs you might need help:
- Your closet has complex shapes or wiring.
- You want a custom look with fancy trim or inlays.
- You need the project done quickly.
You can find qualified carpenters through local home improvement stores or trusted online services. For more on hiring pros, check the This Old House custom closet guide.
Frequently Asked Questions
How Deep Should A Dresser In A Closet Be?
Most built-in dressers are 16 to 20 inches deep. This fits folded clothes and lets closet doors close easily. Measure your closet before deciding—don’t assume all closets are the same depth.
What Kind Of Wood Is Best For A Built-in Dresser?
3/4-inch plywood is the best choice for most people. It’s strong, stable, and easy to finish. If you want a high-end look, use solid wood for drawer fronts. MDF is an option if you plan to paint everything.
Can I Build A Dresser If I Only Have Basic Tools?
Yes. You can have most wood cut at the store, and you only need a drill, screwdriver, and sander for assembly. Borrow or rent other tools if needed. The most important thing is to measure and plan carefully.
How Do I Make Sure My Dresser Is Level In An Old Closet?
Use a carpenter’s level when installing. If the floor is uneven, place wood shims under the corners until the dresser is level. Always anchor the dresser to wall studs for safety.
How Do I Fix Sticky Drawers?
Sticky drawers are usually caused by misaligned slides or wood swelling. Check that slides are parallel and level. Sand any rough spots, clean slides, and apply a little wax or silicone spray for smoother movement.
Building a dresser in your closet is a big project, but it’s also a rewarding one. With patience and careful planning, you’ll create storage that fits your life perfectly—and you’ll feel proud every time you open a drawer.
