Breathing new life into old cabinets can transform any kitchen, bathroom, or laundry room. Many people think they need to buy new cabinets or spend a fortune on professional refacing. But there’s a more affordable, hands-on solution: bleaching cabinets. This method removes dark stains, lightens wood, and gives cabinets a fresh, modern look. If you’re curious about how to bleach cabinets at home, you’re not alone. Homeowners often want to brighten up their space but feel uncertain about the steps, safety, or the real results.
Let’s explore everything you need to know to bleach cabinets like a pro. From choosing the right materials to applying the bleach, and from safety tips to aftercare, this guide walks you through every detail. Whether you want to restore antique cabinets or update a modern kitchen, you’ll find practical guidance, expert tips, and clear warnings about common mistakes.
Let’s get started and help your cabinets look their best.
Understanding Cabinet Bleaching
Bleaching cabinets means using special chemicals to lighten the wood. It’s not the same as painting or staining. Bleaching works by removing the natural or stained color, so the wood looks brighter and more natural. This method is popular for oak, maple, cherry, walnut, and other hardwood cabinets.
Some homeowners use bleach to get rid of dark water stains, age spots, or yellowing. Others simply want a lighter, more open look. Not all woods react the same way, so understanding your cabinet material is important.
Why Bleach Cabinets?
- Restores color to faded or stained wood
- Removes water marks or dark spots
- Prepares wood for a new stain or finish
- Brightens spaces by reflecting more light
- Modernizes old cabinets without full replacement
Bleaching is especially useful for homes with limited natural light or for anyone wanting a Scandinavian or farmhouse style.
What Types Of Cabinets Can Be Bleached?
Solid wood cabinets respond best. Veneer and laminate cabinets generally cannot be bleached because the surface is not real wood. If you’re not sure about your cabinet type, check inside doors or drawers for exposed wood grain.
- Oak: Lightens well, grain stays visible
- Maple: Becomes even lighter, very smooth look
- Cherry: Red tones fade, but results can vary
- Walnut: Dramatic change, natural patterns can “pop”
- Birch/Pine: Can be bleached, but softwoods may blotch
If your cabinets have a heavy clear coat, you’ll need to remove it before bleaching for best results.
Tools And Materials Needed
Gathering the right tools is essential for safety and results. Here’s what you’ll need to bleach cabinets at home:
- Protective gloves (chemical-resistant)
- Safety goggles
- Breathing mask (rated for fumes)
- Plastic sheeting (for floors, counters)
- Painter’s tape
- Screwdriver (to remove hardware)
- Drop cloths or old towels
- Sandpaper (120, 180, and 220 grit)
- Tack cloth
- Wood bleach (oxalic acid, two-part bleach, or household bleach)
- Plastic container (for mixing bleach)
- Foam brushes or paint brushes (chemical-resistant)
- Vinegar (to neutralize bleach)
- Clean rags
- Mild soap and water
- Wood finish (oil, polyurethane, wax, or stain)
- Stir sticks
Types Of Wood Bleach
There are three main types of bleach used for cabinets:
- Oxalic Acid: Good for removing dark stains and water marks.
- Two-Part Bleach (A/B Bleach): Strongest, used for overall lightening.
- Chlorine Bleach (Household Bleach): Mildest, can lighten some stains.
Tip: Do not use hair bleach or laundry bleach powder. These are not designed for wood and can damage surfaces.
Preparing Your Cabinets
Preparation makes the biggest difference. Skipping steps here can lead to patchy results or even damaged wood.
1. Clear The Area
Remove everything from cabinets, including food, dishes, and small appliances. Move furniture, cover counters and floors with plastic or drop cloths. Bleach can ruin fabric and discolor countertops.
2. Remove Hardware And Doors
Take off handles, knobs, and hinges with a screwdriver. Place hardware in labeled bags so you remember where everything belongs. Removing doors and drawers makes it easier to bleach every surface evenly.
3. Clean Thoroughly
Cabinets gather grease, dust, and fingerprints. Mix mild soap with warm water and use a sponge to clean all surfaces. Rinse with clean water and dry completely. Grease will block the bleach and cause uneven results.
4. Sand The Surfaces
Most cabinets have a finish (varnish, lacquer, polyurethane) that must be removed so bleach can reach the wood. Use 120-grit sandpaper to remove the top layer, then 180-grit to smooth the surface. Always sand with the wood grain. Wipe dust with a tack cloth.
Non-obvious insight: Many people skip sanding in corners or detailed moldings. Use a sanding sponge or folded sandpaper for these spots, or the bleach may not work evenly.
5. Mask Off Areas
Use painter’s tape to protect walls, glass, or areas you don’t want to bleach. Double-check that all surfaces are covered.
Bleaching Process: Step By Step
Bleaching cabinets is not difficult, but patience and care are vital. Each type of bleach has a unique process. Let’s focus on the most effective options.
Step 1: Choose Your Bleach
Oxalic Acid is best for dark stains (like water or rust). Two-part bleach is ideal for overall wood lightening. Household bleach works for minor yellowing or spot treatment.
When To Use Each Bleach
| Bleach Type | Best For | Strength | Drawbacks |
|---|---|---|---|
| Oxalic Acid | Water/rust stains | Medium | May need multiple applications |
| Two-Part Bleach | Overall lightening | Strong | Can over-lighten or damage if misused |
| Household Bleach | Mild stains | Low | May not work on all woods |
Pro tip: For a full kitchen, most professionals use two-part bleach for speed and evenness.
Step 2: Mix And Test
Read the instructions on your bleach product. Always wear gloves, goggles, and a mask. Mix the bleach in a plastic container, not metal.
Test the bleach on a hidden area (like the back of a cabinet door). Wait for 15-30 minutes to see the reaction. This test helps you avoid surprises on visible surfaces.
Step 3: Apply The Bleach
Use a foam brush or chemical-resistant brush to apply the bleach evenly with the wood grain. Work in small sections to avoid dry lines. Keep the wood wet with bleach, but not puddled.
If using two-part bleach, apply part A, let it sit (as directed), then add part B over the same area. The reaction happens quickly, so don’t rush.
Non-obvious insight: Overlapping wet and dry bleach can cause uneven results. Always feather out the edges and keep a “wet edge” as you go.
Step 4: Wait And Watch
Let the bleach work. Most products require 15 to 60 minutes to lighten wood. Some stains may need a second application. Check the manufacturer’s recommendations and don’t leave bleach on longer than suggested.
The wood will look lighter as it dries. If you want more lightening, repeat the process after the wood is dry.
Step 5: Neutralize The Bleach
This step is often forgotten, but it’s crucial. Bleach left in wood fibers can prevent stains or finishes from sticking later.
Mix a solution of equal parts vinegar and water. Wipe the entire surface with a clean rag dampened with this mix. The vinegar neutralizes the bleach. Then wipe with plain water and let dry.
Step 6: Sand Again (if Needed)
Lightly sand the surface with 220-grit sandpaper after bleaching. This smooths any raised wood grain and prepares the surface for finishing. Wipe away dust with a tack cloth.
Step 7: Inspect And Repeat (if Necessary)
Look closely at the cabinets. If some areas are still dark, repeat the bleaching process. For stubborn stains, oxalic acid can be applied directly to the spot.
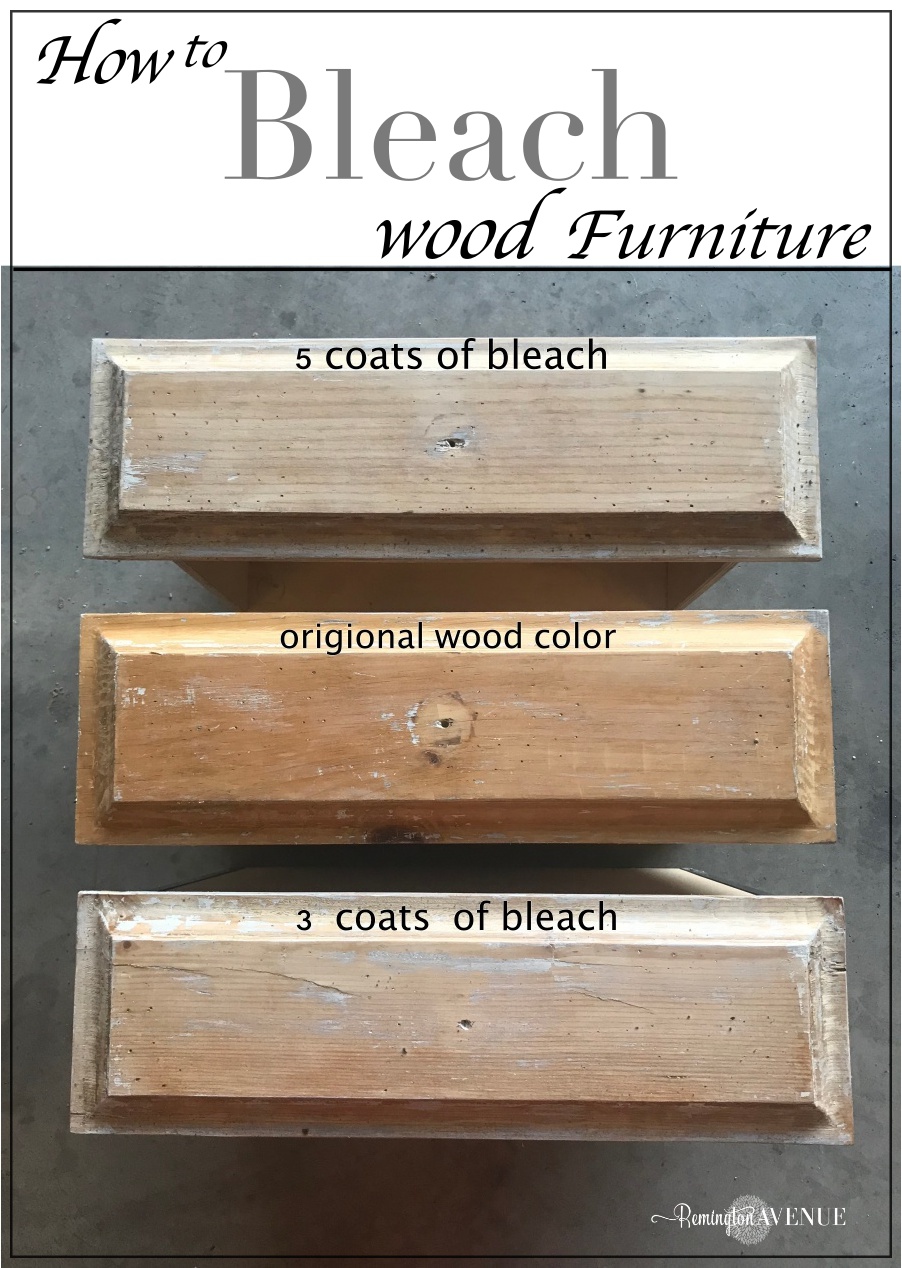
Credit: remingtonavenue.com
Aftercare: Sealing And Finishing
Bleached wood is more open and absorbent. If you leave it unfinished, it will stain quickly and may feel rough. Sealing protects the look and keeps cabinets easy to clean.
Choosing A Finish
- Clear polyurethane: Durable, easy to clean, and keeps the color bright
- Water-based polyurethane: Won’t yellow over time (great for light woods)
- Oil finish: Brings out grain but may darken wood slightly
- Paste wax: Soft sheen, but needs regular reapplication
Never skip the finish. Even clear finishes protect your work and prevent fingerprints or water damage.
Applying The Finish
- Stir (don’t shake) the finish to avoid bubbles.
- Apply thin coats with a clean brush or rag, following the wood grain.
- Wait for each coat to dry fully.
- Lightly sand with 320-grit paper between coats for a smooth finish.
- Apply 2–3 coats for best protection.
Let cabinets cure for at least 24–48 hours before reinstalling hardware and using them.
Safety Tips And Precautions
Working with bleach requires attention to health and safety. Here are the most important tips:
- Always work in a well-ventilated area. Open windows, use fans, or work outdoors if possible.
- Wear chemical-resistant gloves and goggles. Bleach can burn skin and eyes.
- Use a mask rated for chemical fumes, especially with two-part bleach.
- Keep children and pets away from the workspace.
- Never mix different types of bleach together.
- Store chemicals in their original containers, away from food or heat.
- Dispose of rags and unused bleach safely, following your local rules.
Experience-based tip: If you spill bleach, immediately dilute with lots of water and blot with a rag. Never let bleach dry on wood or skin.

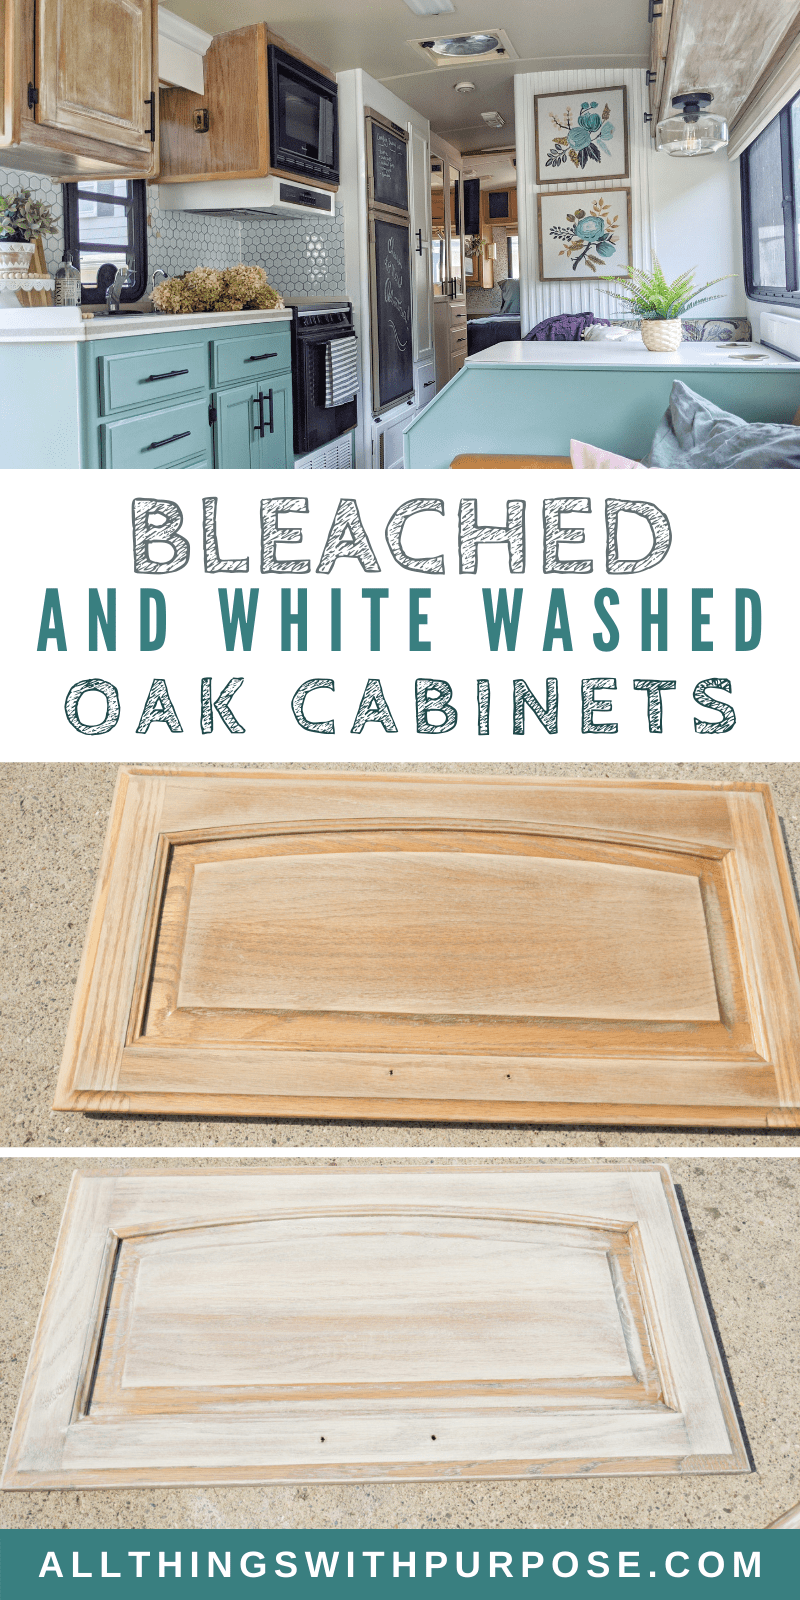
Credit: www.allthingswithpurpose.com
Common Mistakes And How To Avoid Them
Bleaching cabinets can go wrong if you rush or skip steps. Here are common errors and how to prevent them:
- Skipping sanding: The most frequent cause of uneven results. Sand all areas thoroughly.
- Not testing bleach: Always test on a hidden spot before doing the full cabinet.
- Using the wrong bleach: Only use wood-safe bleach, not household cleaners.
- Over-bleaching: Leaving bleach on too long can damage wood fibers. Watch the clock.
- Forgetting to neutralize: Always wipe with vinegar and water after bleaching.
- Not sealing after bleaching: Unfinished wood stains and gets dirty fast.
Pro tip: If you see white “fuzz” on your cabinets after bleaching, it’s raised wood grain. Light sanding removes this easily.
How Long Does Bleaching Take?
The overall project can be finished in a weekend, but the timeline depends on your space and cabinet size.
| Step | Time Needed | Details |
|---|---|---|
| Preparation | 2-3 hours | Cleaning, sanding, removing hardware |
| Bleaching | 3-5 hours | Application, waiting, possible second coat |
| Neutralizing & Drying | 2-4 hours | Vinegar wipe and air drying |
| Finishing | 4-8 hours | Multiple coats, sanding, curing |
You can bleach and finish a small bathroom vanity in a single day. A full kitchen will take longer, especially if you have lots of doors and drawers.
What To Expect: Before And After Results
Many homeowners are surprised by how much lighter and newer their cabinets look after bleaching. The wood grain often becomes more noticeable and the overall effect is brighter.
However, the exact result depends on your starting wood type, how many bleaching cycles you use, and the finish you choose.
Some woods, like red oak or cherry, may lose their reddish tones and look nearly white. Maple and birch can become pale and modern, but the grain stays subtle. Darker woods like walnut can turn to a soft gray or tan.
Real-life example: One homeowner bleached 30-year-old oak cabinets and was able to remove years of yellowing and water marks, making the kitchen look twice as large and much more modern.
Maintenance And Long-term Care
Bleached cabinets are easy to maintain with a few simple habits:
- Wipe spills quickly to avoid stains.
- Clean with a damp cloth and mild soap—never harsh chemicals.
- Avoid placing hot pans or wet towels directly on the wood.
- Reapply a protective finish every 1–3 years, or as needed.
- Use cabinet liners or shelf paper to protect the inside surfaces.
If you notice fading or dark spots returning, touch up with a small amount of bleach and refinish as needed.
When To Call A Professional
Bleaching cabinets is a DIY project for most people, but it’s not for every situation. You may want to hire a pro if:
- Your cabinets are antique or valuable (professional restoration protects their worth)
- The cabinets are laminate or veneer (most cannot be bleached)
- You have severe mold or water damage
- You are sensitive to strong chemicals
Professional refinishers have commercial-grade products and ventilation equipment. They can often achieve more dramatic changes with less risk.
Bleaching Cabinets Vs. Painting Or Staining
Many people wonder if bleaching is better than painting or staining. Here’s a quick comparison to help you decide:
| Method | Look | Durability | Skill Level | Cost |
|---|---|---|---|---|
| Bleaching | Light, natural, visible grain | High (with proper finish) | Intermediate | Low to moderate |
| Painting | Solid color, hides grain | High (if prepped well) | Beginner to intermediate | Low to moderate |
| Staining | Richer color, enhances grain | High | Intermediate | Low to moderate |
Bleaching is the best option if you want to lighten wood but keep its natural look. Painting is for a complete color change, while staining is for deepening or changing the tone without hiding the grain.
Eco-friendly Bleaching Options
Traditional wood bleach is strong, but there are greener options for those concerned about chemicals.
- Hydrogen peroxide: Milder, less toxic than chlorine bleach
- Sunlight: Place small pieces in direct sun to naturally lighten wood (slow process)
- Natural wood soap: Removes some stains and brightens, but not as dramatic as chemical bleach
Eco-friendly methods work best on minor stains or light woods, but results are slower and less intense.
Real-world Success Stories
Homeowners often share their cabinet bleaching journeys online. One family in Oregon used two-part bleach on their 1980s oak cabinets. After two applications, their dark, orange cabinets turned a fresh, pale blonde. They sealed with water-based polyurethane and found the finish held up for years, even with kids and pets.
Another DIYer tackled a small bathroom vanity. Using oxalic acid, she erased black water stains, then finished with a clear wax. The cabinet looked brand new and matched her white tile perfectly.
You can find more before-and-after inspiration at This Old House.
Credit: www.allthingswithpurpose.com
Frequently Asked Questions
What’s The Difference Between Wood Bleach And Household Bleach?
Wood bleach (like oxalic acid or two-part bleach) is made for wood and removes deep stains or overall color. Household bleach (chlorine) is mostly for cleaning, but can lighten some woods. Always use the correct product for your project.
Will Bleaching Cabinets Damage The Wood?
If used correctly and neutralized after, bleaching does not harm most hardwoods. Over-bleaching, skipping neutralization, or using the wrong chemicals can weaken wood fibers or cause blotching.
Can I Bleach Cabinets Without Removing Them?
Yes, but it’s harder to reach every surface and protect surrounding areas. Removing doors and drawers gives the best, most even results. Protect walls and floors carefully if working in place.
How Soon Can I Use My Cabinets After Bleaching?
Wait until the finish is fully cured—usually 24–48 hours. Avoid heavy use, water, or heat until then. Handles and items can go back once the final coat is dry to the touch.
Is Bleaching Cabinets Safe For Kitchens With Kids Or Pets?
Bleaching is safe if you keep kids and pets away during the process, ventilate well, and store chemicals out of reach. Once finished and cured, bleached cabinets are as safe as any other wood surface.
Giving cabinets a new life with bleach is a rewarding project. With the right tools, patience, and care, you can achieve a fresh, modern look without the expense of a full remodel. If you follow these steps and use the best products for your cabinet type, you’ll enjoy brighter, cleaner, and more stylish cabinets for years to come.