Adding doors to cube storage is a simple way to turn open shelving into a neater, more stylish solution. Maybe you want to hide clutter, protect your things from dust, or just want a different look. Cube storage units are popular for their flexibility, but they often leave everything on display.
The good news is, you can upgrade them with doors—even if you have little DIY experience. This guide will show you several methods, key materials, and smart tips, so you can confidently add doors to cube storage at home.
Many people think adding doors to cube shelves is only for experts. In fact, it’s a project you can do with basic tools and clear instructions. You will learn not just the “how,” but also which materials work best, mistakes to avoid, and creative ideas to personalize your storage.
Whether your cubes are from IKEA, Target, or another brand, the process is similar. There are small details that make the difference between a door that works well and one that causes frustration. Let’s explore everything you need to know to get practical, attractive results.
Understanding Cube Storage: Types And Materials
Before you start, it’s important to know what cube storage you have. Not all units are the same. Some are made from particle board, others from solid wood, and some from metal or plastic. The material affects how you attach doors and which fasteners you should use.
Common Cube Storage Brands
Many homes have cube storage from brands like IKEA KALLAX, ClosetMaid, or Better Homes & Gardens. These have standard sizes, usually between 11 to 13 inches per cube. Knowing your brand helps when buying accessories or replacement parts.
Types Of Cube Storage Units
- Standalone cube organizers (single or multi-cube)
- Wall-mounted cubes
- Stackable cubes
- Closet systems with cube sections
Each type may need a different approach for adding doors. Wall-mounted cubes, for example, need lighter doors to avoid pulling off the wall.
Materials And Their Impact
- Particle board: Common, but can chip. Use gentle drilling.
- Solid wood: Strong and holds screws well.
- Metal/plastic: Often need special hinges or adhesives.
Knowing your material helps you pick the right screws, hinges, and door weight.
Why Add Doors To Cube Storage?
Adding doors does more than improve looks. Here are some real benefits:
- Clutter control: Hide things you don’t want on display.
- Dust protection: Doors help keep dust off stored items.
- Child safety: Doors with locks keep dangerous items away from kids.
- Style boost: A door can match your room or be a design feature.
- Versatility: Turn open cubes into cabinets, toy storage, or even nightstands.
One non-obvious benefit: doors can reduce fading of books or fabrics from sunlight if your cube storage is near a window.
Credit: kaylasimonehome.com
Planning Your Project
A good result starts with a good plan. Don’t skip this step—it saves time and money.
Measure Carefully
Use a tape measure for each cube’s opening. Measure width, height, and depth. Don’t trust the box or website sizes—they can be off by a fraction of an inch.
- Measure at the top, middle, and bottom. Cubes can be slightly out of square.
Decide Which Cubes Get Doors
You may not want doors on every cube. Some people add doors only to the bottom row or every other cube for a patterned look.
Choose The Door Style
There are several types of doors you can add:
- Hinged doors: Open like a cabinet.
- Sliding doors: Move side to side (good for wide units).
- Flip-down or flip-up doors: Open with a hinge at the top or bottom.
- Fabric doors or panels: Use Velcro or magnets for a softer look.
- Acrylic or glass doors: For display cubes.
Each style has pros and cons. Hinged doors are easiest for most people, but sliding doors are best if space is tight.
Select Materials For Doors
You have many options:
- MDF (medium-density fiberboard): Affordable, easy to paint.
- Plywood: Strong, can be stained or painted.
- Solid wood: More expensive, very sturdy.
- Acrylic sheets: Modern, lightweight.
- Fabric panels: Inexpensive and easy to change.
- Pre-made doors: Some brands sell doors made for their units.
Your choice affects the tools and hinges you’ll need.
Tools And Materials Needed
You don’t need a workshop for this project. Here are the basics:
- Tape measure
- Pencil
- Drill with small bits
- Screwdriver (manual or powered)
- Hinges (usually two per door, see tips below)
- Screws (match to your cube material)
- Doors (pre-cut or DIY)
- Handles or knobs (optional, but helpful)
- Magnetic catches or latches (to keep doors shut)
- Sandpaper (for smoothing edges)
- Level (optional but helps keep doors straight)
- Paint or finish (if desired)
If you use sliding doors, you’ll also need tracks. For fabric panels, you may need Velcro or magnetic tape.
Table: Door Material Comparison
Here’s a quick look at how different door materials compare.
| Material | Cost | Ease of Cutting | Paint/Stain Options | Durability | Weight |
|---|---|---|---|---|---|
| MDF | Low | Easy | Paint only | Medium | Medium |
| Plywood | Medium | Easy | Paint or stain | High | Light/Medium |
| Solid Wood | High | Medium | Paint or stain | Very High | Heavy |
| Acrylic | Medium | Hard | Cannot paint | High | Light |
| Fabric Panel | Very Low | Easy | Many colors | Low | Very Light |
Step-by-step: How To Add Hinged Doors
Most people choose hinged doors because they’re simple, practical, and easy to use. Here’s how to add them:
1. Measure And Cut The Door
- Measure the inside of the cube opening. If you want the door to overlap a bit, add ¼ inch to each side.
- Mark your measurements on your door material.
- Cut using a circular saw or have the hardware store cut it.
- Sand edges until smooth.
Tip: If you want multiple doors, cut all at once to keep sizes identical.
2. Paint Or Finish The Door (optional)
- Paint or stain before installing hinges.
- Let dry completely.
Painting first avoids mess on the cube frame.
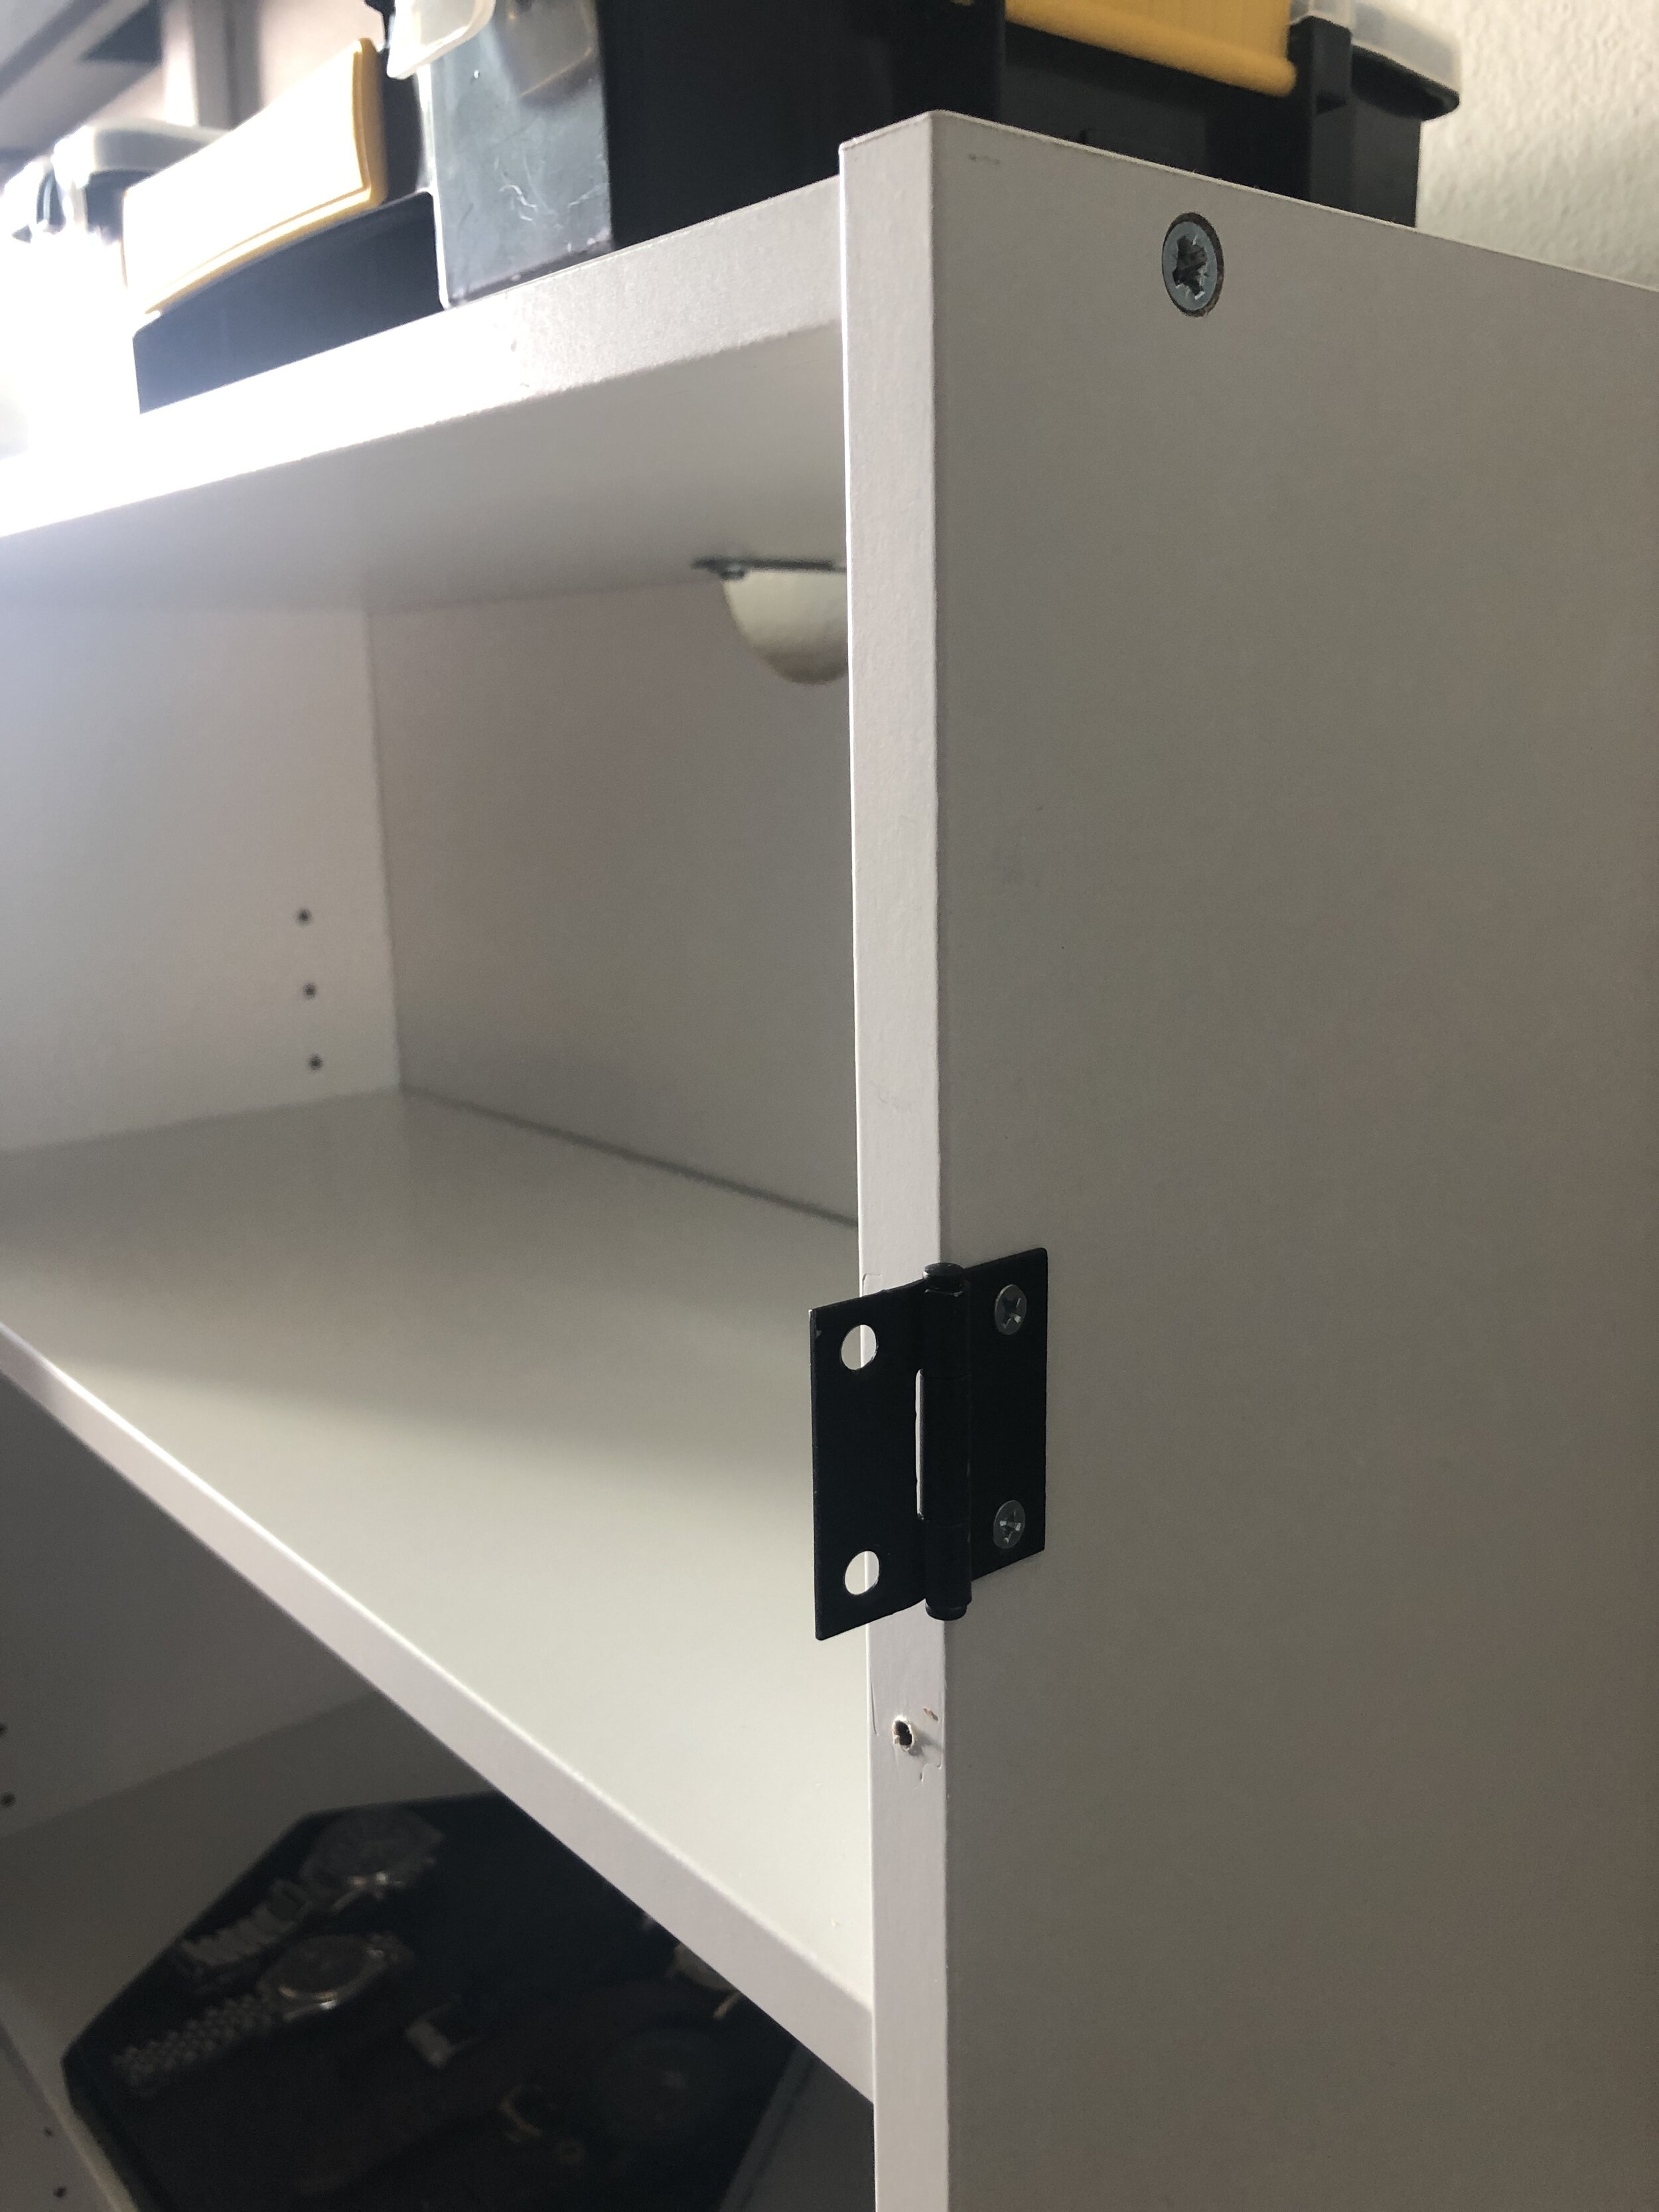
3. Position And Attach Hinges
- Most cubes need two small butt hinges or concealed cabinet hinges.
- Mark spots for hinges, about 2-3 inches from top and bottom edges.
- Pre-drill small holes to avoid splitting the material.
- Attach hinges to the door first, then align with the cube frame.
- Use a level to keep doors straight.
Non-obvious insight: For particle board, use special “Euro” screws—they grip better and prevent stripping.
4. Attach The Door To The Cube
- Hold the door in place and mark where the hinges touch the cube.
- Pre-drill again.
- Screw the hinges into the cube frame.
It helps to have a helper hold the door, or use painter’s tape to temporarily secure it.
5. Add Magnetic Catch Or Latch
- Install a magnetic catch or push-to-open latch inside the cube.
- This keeps the door closed and prevents sagging.
6. Add Knob Or Pull (optional)
- Drill a small hole where you want the knob or handle.
- Attach with the screw provided.
7. Test The Door
- Open and close several times.
- Adjust hinges if the door isn’t level.
- Tighten any loose screws.
Pro tip: If the door rubs, sand the edge slightly or adjust the hinge screws.
Sliding Doors For Cube Storage
If your cubes are wide or you want a modern look, sliding doors are a great choice. They’re also good for spaces where doors can’t swing open.
Materials Needed
- Two thin panels (wood or acrylic)
- Sliding door tracks (top and bottom)
- Screws or adhesive
How To Install
- Cut panels to size: Each should be slightly taller than the cube opening and half as wide as the unit.
- Attach the top and bottom tracks inside the cube frame.
- Insert the panels into the tracks.
- Add stoppers to keep doors from sliding out.
Beginner’s mistake: Not leaving enough room for the doors to overlap. Measure twice!
Table: Hinged Vs. Sliding Doors
Here’s a quick comparison to help you choose.
| Feature | Hinged Doors | Sliding Doors |
|---|---|---|
| Space Needed to Open | More (needs swing room) | Less (slides side to side) |
| Installation Difficulty | Easy | Medium |
| Maintenance | Low | Tracks need cleaning |
| Modern Look | Classic | Yes |
| Cost | Low | Medium/High |
Flip-down Or Flip-up Doors
These doors open by pulling the top or bottom outwards. They’re perfect for cubes used as desks or TV stands.
How To Install
- Attach a piano hinge (runs the length of the door) to the top or bottom edge.
- Secure the other side to the cube.
- Add a support arm or chain to hold the door when open.
- Install a catch or magnet to keep closed.
Non-obvious insight: Flip-down doors can double as small desks or play surfaces for kids.
Fabric Doors And Soft Panels
For a lighter look, consider fabric panels. They’re especially popular in kids’ rooms or for renters.
Installation Options
- Velcro: Stick Velcro on the cube frame and fabric edge.
- Magnetic tape: Similar to Velcro but uses magnets.
- Tension rods: Hang fabric like a curtain.
Example: Use patterned fabric to add color or match your décor. Easy to wash or change.
Beginner’s mistake: Choosing fabric that’s too heavy or stiff—this makes it hard to open and close.
Acrylic And Glass Doors
Acrylic or glass doors are for people who want to display items but still protect them from dust.
What To Know
- Acrylic is safer and lighter than glass.
- Use special hinges for glass or acrylic.
- Consider soft-close catches to avoid slamming.
Pro tip: Add LED strip lights inside cubes with clear doors for a high-end look.
Ready-made Doors: When To Buy Instead Of Diy
Some brands (especially IKEA) sell doors made for their cube units. This is the fastest way, but not always cheapest.
Advantages
- Perfect fit
- Easy instructions
- Matching colors
Disadvantages
- Limited styles
- Sometimes expensive
Non-obvious insight: Check if your unit has pre-drilled holes for doors—you may not need to drill at all.
For brands that don’t offer doors, third-party sellers on Etsy or specialty hardware stores often have options.
Advanced Tips For A Professional Look
Even if you’re a beginner, these tips will help your doors last longer and look better:
- Use a template for drilling hinge holes—this keeps them even.
- Edge banding: Add thin strips to cover raw edges of plywood or MDF.
- Soft-close hardware: Prevents doors from slamming.
- Paint the inside edge of the door for a finished look.
- Check for sagging: If your doors are heavy, add a third hinge.
Expert tip: For units that flex or aren’t perfectly square, use “adjustable” concealed hinges so you can fine-tune the door position.
Common Mistakes And How To Avoid Them
- Wrong measurements: Always measure the cube opening, not just the outside.
- Overtightening screws: This can strip holes, especially in particle board.
- Too heavy doors: Check the weight limit of your unit.
- Skipping sanding or finishing: Unfinished edges can chip and look messy.
- Not testing fit before painting: Dry-fit doors to make sure they open and close smoothly.
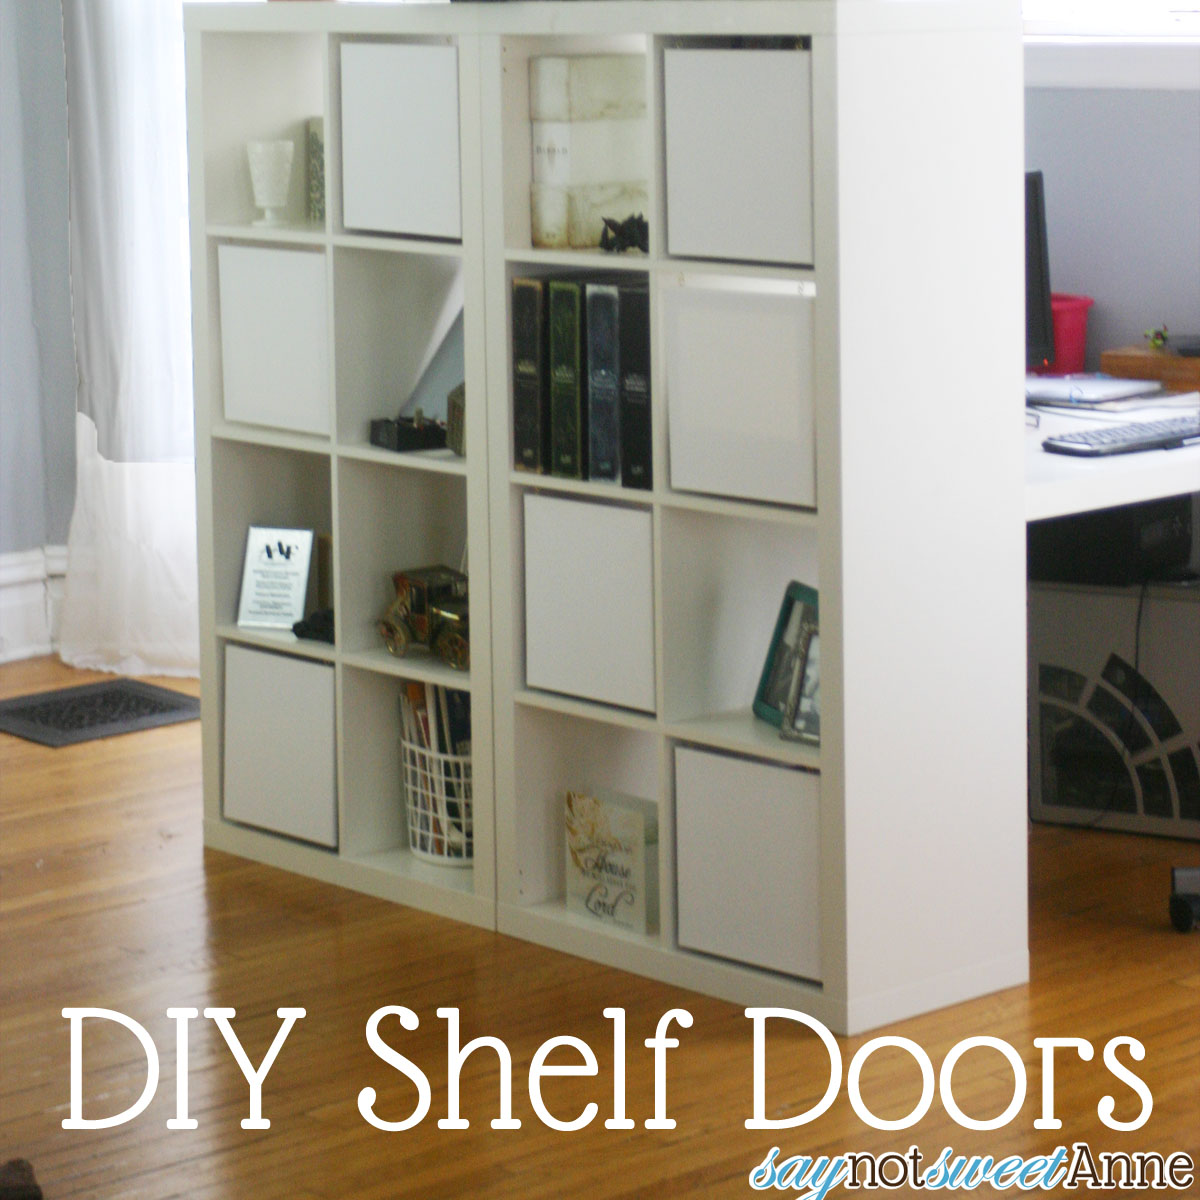
Credit: saynotsweetanne.com
Personalizing Your Cube Storage Doors
You can do more than just add a plain door. Here are ways to make your cube storage unique:
- Chalkboard paint: Great for kids’ rooms or notes.
- Wallpaper or contact paper: Add patterns or faux wood grain.
- Stencils: Paint numbers, letters, or shapes.
- Decorative knobs: Try vintage or colorful handles.
- Photo frames: Attach a frame to the door to display pictures.
Example: A cube shelf in the entryway with chalkboard doors lets you leave messages for family.
When To Hire A Professional
Most people can add basic doors with patience and careful measuring. But consider hiring help if:
- The unit is built into a wall or very expensive.
- You want glass doors with precise cuts.
- You need custom sliding tracks.
- You have limited mobility or tools.
Extra note: Some local hardware stores offer installation for a small fee if you buy doors there.
Maintenance And Longevity
Once your doors are installed, a little care goes a long way:
- Tighten hinge screws every few months.
- Clean tracks if you have sliding doors.
- Wipe with a damp cloth—avoid harsh cleaners, especially on painted doors.
- Check for warping—especially with thin wood or MDF.
Non-obvious insight: If you live in a humid area, seal the edges of MDF or plywood to prevent swelling.
Real-world Example: Upgrading An Ikea Kallax
Let’s look at a popular unit, the IKEA KALLAX. Adding doors here is a common project.
- KALLAX cubes are about 13” x 13”.
- IKEA sells door kits, but you can also use third-party or DIY doors.
- Use concealed hinges for a clean look.
- If your KALLAX is stacked, add doors only to the lower cubes for stability.
People often combine both drawers and doors to customize their KALLAX. It turns a basic shelf into a sideboard, TV stand, or office storage.

Credit: designingparkside.com
Table: Tools Needed For Different Door Types
Here’s a quick guide to which tools you need for each door style.
| Door Type | Essential Tools | Optional Tools |
|---|---|---|
| Hinged | Drill, screwdriver, tape measure | Level, paintbrush |
| Sliding | Saw, screwdriver, tracks | Drill, adhesive |
| Flip-down/up | Drill, piano hinge, screwdriver | Support arm, chain |
| Fabric | Scissors, Velcro/magnetic tape | Staple gun |
| Acrylic/Glass | Special hinges, drill (for acrylic only) | Soft-close catch |
Sustainability And Safety Considerations
- Low-VOC paints: Choose environmentally friendly finishes.
- Child safety: Use soft-close or magnetic catches to avoid finger pinching.
- Avoid lead-based paint: Especially for vintage units.
- Recycling: Many cube units and doors are recyclable or can be repurposed.
Extra tip: For a safer home, always check for sharp edges after installation.
Where To Find Materials
You can buy most supplies at home improvement stores like Home Depot or Lowe’s. Online retailers like Amazon or specialty hardware shops have many options for hinges, tracks, and handles. For unique fabric or acrylic, try craft stores.
For detailed guides or inspiration, the Family Handyman website offers step-by-step advice on hardware installation.
Frequently Asked Questions
How Do I Know If My Cube Storage Can Support Doors?
Most cube storage units can hold lightweight doors, especially if made from wood, MDF, or sturdy plastic. Check if the unit feels stable and doesn’t wobble. For very thin or flimsy cubes, use lightweight doors like fabric or acrylic, and avoid heavy solid wood.
What’s The Easiest Type Of Door To Install?
Fabric panels with Velcro or magnetic tape are the simplest—no drilling or special tools needed. For solid doors, hinged MDF panels are usually easiest for beginners.
Can I Add Doors To Wall-mounted Cube Shelves?
Yes, but use lightweight materials and strong anchors. Avoid heavy doors, which can pull the shelf from the wall. Use short screws to prevent damage and always check the wall mount’s strength.
How Do I Keep Doors From Sagging Over Time?
Use two or three hinges per door, and don’t make the doors too heavy. Tighten screws regularly and avoid slamming the doors. For large doors, a third hinge in the center adds strength.
Are There Pre-made Doors For All Cube Storage Brands?
No, but popular brands like IKEA and ClosetMaid offer compatible doors. For other brands or custom sizes, you can buy panels at hardware stores or have them cut to your measurements.
Adding doors to cube storage is a practical upgrade that makes your shelves more flexible, stylish, and functional. With careful planning, the right tools, and a few smart tips, you can complete this project in a weekend. The best part?
You get a custom result that’s both useful and unique to your space.