When you host a party or a family gathering, serving hot food is always a challenge. Many people worry about their dishes turning cold before everyone gets a chance to enjoy them. This is where a chafing dish becomes your secret weapon. If you want to keep food warm for hours without drying it out, learning how to use a chafing dish is a must. But not everyone knows how to set one up, use it safely, and get the best results. This guide will walk you through every detail, from picking the right dish to cleaning up afterward. Whether you’re a first-time host or a caterer looking to up your game, you’ll find everything you need here.
What Is A Chafing Dish?
A chafing dish is a special container designed to keep food warm for serving. It uses gentle, indirect heat to maintain the temperature of cooked dishes without burning them. Most chafing dishes are made of stainless steel, but you can also find glass, ceramic, or even copper models.
You’ll often see them at buffets, weddings, and hotel breakfasts.
A typical chafing dish has three main parts:
- The water pan at the bottom
- The food pan that sits on top
- The heat source (often a small can of fuel or an electric element)
The heat warms the water, and the steam keeps the food at a safe, appetizing temperature. This method is called bain-marie, and it’s been used for centuries.
Types Of Chafing Dishes
Before you start, it’s important to know the different types of chafing dishes. Each has its own pros and cons depending on your needs.
| Type | Best For | Heat Source | Capacity |
|---|---|---|---|
| Rectangular Chafing Dish | Buffets, Large Events | Fuel/Electric | 8-10 Qt |
| Round Chafing Dish | Soups, Sauces | Fuel/Electric | 4-6 Qt |
| Drop-In Chafing Dish | Permanent Setups | Electric | Varies |
| Coffee Urn Chafing Dish | Hot Beverages | Fuel/Electric | 3-5 Gal |
Rectangular Chafing Dishes
These are the most common and hold the most food. They’re great for main dishes like pasta, rice, and roasts.
Round Chafing Dishes
Perfect for soups, stews, and side dishes. They’re easier to fit on smaller tables and usually have a ladle slot in the lid.
Drop-in Chafing Dishes
These are built into counters or buffet tables. They use electricity and are common in hotels and restaurants.
Coffee Urn Chafing Dishes
Used for hot drinks like coffee, tea, and hot chocolate. These keep beverages hot for hours without boiling them.
Choosing The Right Chafing Dish
Picking the right chafing dish can save you time, effort, and money. Here’s what to consider:
1. Size And Capacity
Think about how much food you want to serve. For a party of 20 people, an 8-quart rectangular dish is usually enough. For sauces or dips, smaller round dishes are better.
2. Material
Stainless steel is durable and easy to clean. Glass and ceramic look elegant but can be heavy and breakable.
3. Lid Type
Hinged lids are convenient for quick serving. Roll-top lids are popular at buffets because they stay attached to the dish. Removable lids are simple but need space to set aside.
4. Heat Source
Fuel-based chafers are portable and work anywhere. Electric models offer more temperature control but need an outlet.
5. Budget
Basic chafing dishes start at around $25, but high-end models can cost $200 or more. Consider how often you’ll use it.
Many beginners forget to check if replacement pans or parts are available. If a pan gets lost or bent, it’s best to buy from a brand that sells extras.
How A Chafing Dish Works
Understanding the basics helps you use your chafing dish safely and effectively.
- The heat source warms the water in the bottom pan.
- The water pan holds about an inch or two of hot water.
- The food pan sits above the water, not touching the heat directly.
- Steam from the water gently heats the food and keeps it from drying out.
The food stays at a safe serving temperature (usually 140°F or above) for several hours. This method prevents burning and keeps the texture and moisture of your dishes.
Setting Up Your Chafing Dish
Let’s break down the setup step by step. This is where many first-timers make mistakes—especially with water levels and lighting the fuel.
Step 1: Assemble All Parts
Lay out the frame, water pan, food pan, lid, and fuel holders. Make sure everything is clean and dry.
Step 2: Place The Water Pan
Set the large pan into the frame. It should sit flat and steady. Don’t add water yet.
Step 3: Fill The Water Pan
Add hot water (not cold). This helps the chafing dish heat up faster and uses less fuel. For most dishes, 1 to 2 inches of water is enough. Don’t overfill—water can spill when it starts to boil.
Step 4: Insert The Food Pan
Place the food pan inside the water pan. Make sure it sits above the water, not floating in it.
Step 5: Add The Food
Only put cooked food into the chafing dish. These are not for cooking raw food. The chafing dish will keep your food hot but won’t raise it from refrigerator-cold to steaming. Warm your food in the oven or on the stove first.
Step 6: Prepare The Heat Source
If you’re using fuel (like Sterno), place the cans under the water pan but don’t light them yet. If you’re using an electric model, check the cord and outlet.
Step 7: Light The Fuel
After everything is set up, carefully light the fuel with a long lighter or match. Many people forget to remove the fuel can’s lid—always open it first. Adjust the flame if the can allows.
Step 8: Cover With The Lid
Place the lid on top to keep heat and moisture in. Open the lid only to serve or stir the food.
Step 9: Monitor Water And Food
Check the water level every hour. Add more hot water as needed to prevent the pan from drying out. Stir the food occasionally so it heats evenly.
How To Serve Food From A Chafing Dish
Serving from a chafing dish is simple, but there are a few tips to keep things neat and safe.
- Use serving utensils with long handles to prevent burns.
- Only open the lid briefly to avoid heat loss.
- If serving multiple dishes, label each one to avoid confusion.
- For soups or sauces, use a ladle and keep napkins nearby for drips.
- If the food level gets low, move the remaining food to a smaller pan so it stays warm.
Many hosts forget to check the fuel. If you run out, replace the can immediately to keep food safe.
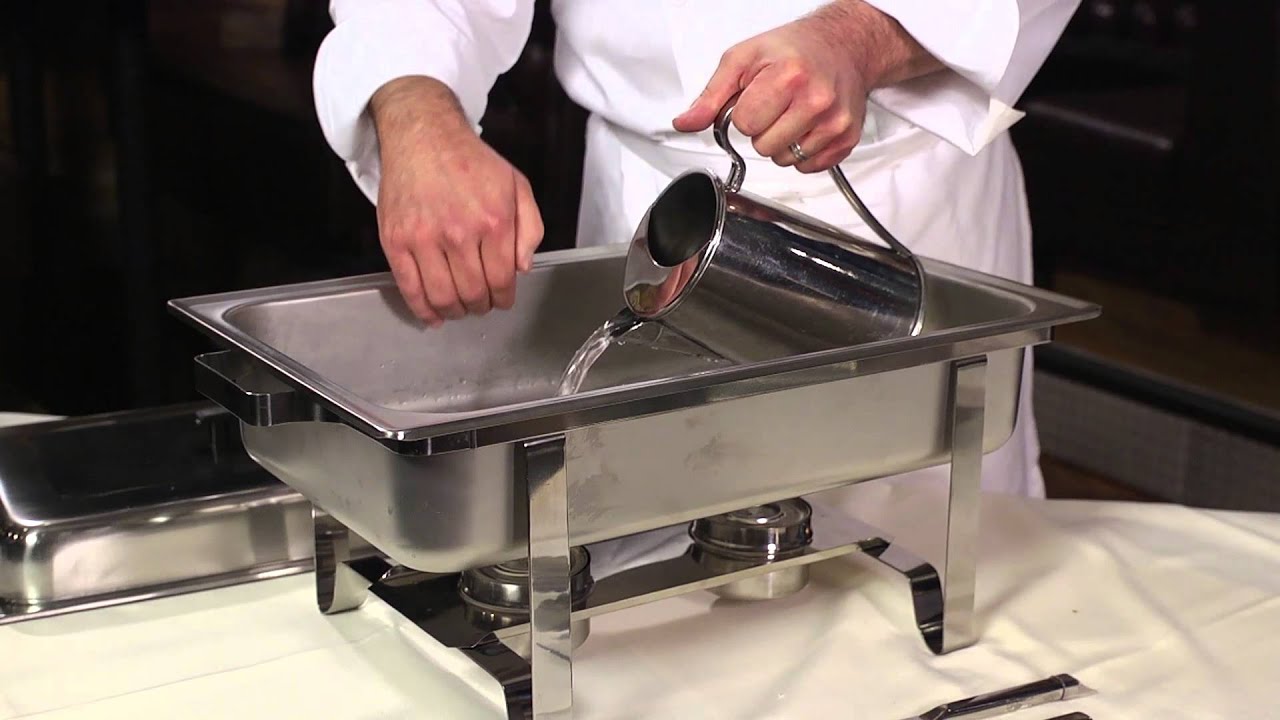
Credit: www.youtube.com
Tips For Keeping Food Safe And Delicious
Chafing dishes are safe if used correctly, but there are some rules you should always follow.
- Never put raw food in a chafing dish. It won’t cook properly and can be dangerous.
- Keep food above 140°F (60°C). Use a food thermometer to check.
- Stir food every 30 minutes. This prevents hot spots and keeps texture even.
- Don’t leave food out too long. Four hours is usually the maximum. After that, bacteria can grow.
- Refill water as needed. An empty water pan can damage the dish and dry out your food.
- Use two pans for big events. If one runs low or gets cold, you can swap it out quickly.
A common beginner mistake is adding cold water to refill the pan. Always use hot water to avoid cooling your food.
Cleaning And Storing A Chafing Dish
Proper cleaning keeps your chafing dish looking new and working well for years.
Cleaning Steps
- Let the chafing dish cool completely before touching it.
- Remove all food and pour out any water left in the pan.
- Wash the pans and lid with hot, soapy water. Stainless steel is usually dishwasher safe, but check your manual.
- Wipe the frame and fuel holders with a damp cloth.
- Dry everything thoroughly to prevent rust.
Storing Tips
- Store all parts together so nothing gets lost.
- If you use fuel, keep extra cans in a cool, dry place away from children.
- Stack pans inside each other to save space.
Most people forget to dry the fuel holders. If they stay wet, they can rust and become unsafe.

Credit: www.wikihow.com
Chafing Dish Fuel: What You Need To Know
The fuel you use matters for both safety and performance. Here’s a comparison of common options:
| Fuel Type | Burn Time | Temperature | Best For | Safety |
|---|---|---|---|---|
| Sterno (Gel) | 2-2.5 hours | Medium | Most events | Safe if handled carefully |
| Liquid Wick | 4-6 hours | Medium | Long events | Needs careful storage |
| Electric | Unlimited | Adjustable | Indoor buffets | Very safe |
Sterno/gel Fuel
This is the most popular choice. It’s easy to light, cheap, and burns clean. One can lasts about two hours. Always keep the can upright, and never touch it when hot.
Liquid Wick
These burn longer—up to six hours—but can spill if tipped over. They’re best for all-day events. Store them away from kids and pets.
Electric Heat
Electric chafing dishes need an outlet but offer the most control. You can adjust the temperature for different foods. They’re also safer since there’s no open flame.
One thing most people miss: Always check the expiration date on fuel cans. Old fuel can burn unevenly or not at all.
Common Mistakes When Using A Chafing Dish
Even experienced hosts can slip up when using chafing dishes. Here are mistakes to avoid:
- Adding too much water—Can spill over and put out the flame.
- Forgetting to preheat food—The dish keeps food hot, but won’t heat cold food.
- Letting the water pan run dry—Can warp the pan and ruin your food.
- Using the wrong fuel—Some fuels burn too hot or too cold for certain foods.
- Touching hot parts without gloves—Lids and pans can cause burns.
- Leaving the lid off too long—Food cools quickly and may become unsafe.
- Not checking fuel regularly—Running out means cold food and unhappy guests.
- Not labeling allergens—Always mark dishes with nuts, dairy, or gluten for safety.
Dishes That Work Best In A Chafing Dish
Not every food is perfect for chafing dishes. Here’s what works well:
- Pasta dishes (lasagna, baked ziti)
- Rice and grains (pilaf, fried rice)
- Braised meats (beef stew, chicken curry)
- Vegetable sides (roasted veggies, mashed potatoes)
- Buffet-style breakfasts (scrambled eggs, sausage)
- Soups and stews
Foods that don’t work well:
- Crispy fried items (they go soggy)
- Delicate pastries (can dry out)
- Salads or cold dishes (better served chilled)
Surprisingly, chafing dishes are also good for desserts like bread pudding or hot fruit compote, which stay moist with the steam.
How To Transport And Set Up A Chafing Dish For Events
If you need to take your chafing dish to a different location, preparation is key.
1. Pack The Pans And Frame Separately.
Wrap glass or ceramic parts for safety.
2. Bring Extra Fuel And Matches.
Venues may not have these.
3. Preheat Food Before You Leave.
Transfer it hot into the food pan at the site.
4. Arrive Early.
Set up at least 30 minutes before guests arrive.
5. Double-check The Water And Fuel.
Spills and empty fuel cans are common on the road.
A common pro tip: Bring a spare chafing dish if you have one. If something breaks or you need more food space, you’ll be glad you did.
How To Troubleshoot Chafing Dish Problems
Sometimes things go wrong. Here’s how to handle common issues:
Food Not Staying Hot
- Check if the fuel can is still burning.
- Make sure the water pan has enough water.
- Use hot water to refill.
- Stir the food more often.
Water Pan Running Dry
- Refill with hot water, not cold.
- Lower the flame if the water is evaporating too fast.
Food Drying Out
- Stir regularly.
- Keep the lid on as much as possible.
- Add a little extra sauce or broth if needed.
Uneven Heating
- Stir food from the sides to the center.
- Don’t overfill the food pan—spread food evenly.
Chafing Dishes Vs. Other Food Warmers
It’s easy to confuse chafing dishes with other warming tools. Here’s a quick comparison:
| Device | Heating Method | Portability | Best Use |
|---|---|---|---|
| Chafing Dish | Steam (water bath) | High | Buffets, parties |
| Slow Cooker | Direct electric heat | Medium | Cooking and keeping warm |
| Food Warming Tray | Direct electric heat | High | Appetizers, finger foods |
| Oven | Dry electric/gas heat | Low | Baking, reheating large trays |
Chafing dishes are best for keeping already-cooked food hot and moist, while slow cookers and ovens are better for cooking food from raw.
Creative Ways To Use A Chafing Dish
You don’t need a special occasion to use a chafing dish. Here are a few creative ideas:
- Taco bar: Keep taco meat, beans, and rice warm for a build-your-own taco party.
- Brunch buffet: Serve eggs, pancakes, and breakfast meats at the perfect temperature.
- Chocolate fondue: Use a small chafing dish to melt chocolate and keep it smooth for dipping.
- Outdoor events: Chafing dishes work well for picnics and BBQs when electricity isn’t available.
Many people don’t realize that a chafing dish can double as a temporary hot plate for warming sauces or gravies at the dinner table.
Maintenance And Longevity Tips
A well-cared-for chafing dish can last for years. Here’s how to keep yours in top shape:
- Clean after every use. Even small bits of food can stain or cause odors.
- Check for dents and warping. Replace bent pans so they sit flat.
- Inspect fuel holders. Rust or cracks can be dangerous—replace as needed.
- Polish stainless steel. Use a non-abrasive cleaner to keep it shiny.
- Store with lids off. This prevents moisture buildup and mold.
- Tighten screws and handles. Loose parts can cause accidents.
One little-known tip: If you have hard water stains, soak the pan in vinegar and water, then scrub gently.

Credit: www.wikihow.com
Environmental And Cost Considerations
Chafing dishes use fuel, water, and sometimes electricity. Here’s what to keep in mind:
- Fuel cans are single-use. Recycle the metal cans when finished.
- Electric models use less waste but require power.
- Reusable pans and lids reduce waste compared to disposable trays.
Hosting a party for 40 people? Using two chafing dishes and fuel cans for 4 hours will cost about $12–$20, including fuel and water. Electric models may cost less over many uses.
If you’re interested in more about the history and technology of chafing dishes, the Wikipedia entry on chafing dishes offers a deep dive.
Frequently Asked Questions
What Is The Best Way To Keep Food Moist In A Chafing Dish?
The best way is to keep the lid on as much as possible and stir the food every 30 minutes. If your dish starts to dry out, add a bit of broth, water, or sauce. Using the right amount of water in the pan also helps create enough steam to keep things moist.
How Long Can Food Be Kept Warm In A Chafing Dish?
Food can stay warm for up to 4 hours, as long as the temperature stays above 140°F (60°C). After that, it’s safer to cool and refrigerate leftovers. Always check the water and fuel levels so the dish doesn’t cool down.
Can I Cook Raw Food In A Chafing Dish?
No, chafing dishes are only for keeping cooked food warm. They do not reach high enough temperatures to safely cook raw meat or other raw foods. Always use your oven or stove to cook first, then transfer to the chafing dish.
What Kind Of Fuel Is Safest For Indoor Use?
Sterno (gel fuel) and electric models are both safe for indoor use. Always use fuel in a well-ventilated area, and follow the manufacturer’s safety instructions. Never use outdoor-only fuels like charcoal indoors.
How Do I Prevent Rust And Stains On My Chafing Dish?
Dry all parts thoroughly after washing. If you see hard water stains, soak in a vinegar-water mix and scrub gently. Store with the lid off or slightly open to prevent moisture buildup that can cause rust.
Using a chafing dish can turn your next gathering into a smooth, enjoyable event. With these tips and insights, you’ll keep your food hot and your guests happy, every time.