Transforming your wood floor with epoxy can create a dramatic change in both appearance and durability. Many people imagine epoxy as a finish for garage floors or industrial spaces, but epoxy wood flooring is becoming popular in homes, offices, and studios. It offers a glossy, seamless look and long-lasting protection. However, applying epoxy to wood requires careful planning and proper technique. If you want your floor to look professional and last for years, you need to follow the right steps, avoid mistakes, and use quality materials.
This guide covers everything you need to know about how to epoxy wood floor surfaces. Whether you’re updating an old hardwood floor or want to protect new boards, you’ll learn the process from start to finish. You’ll also understand the challenges, discover expert tips, and find out why epoxy might be the right choice for your wood floor.
Why Choose Epoxy For Wood Floors?
Epoxy flooring isn’t just for concrete. In the past decade, more homeowners and designers have used epoxy coatings on wood because of their unique benefits.
- Durability: Epoxy creates a tough, scratch-resistant layer. It’s ideal for high-traffic areas where wood alone might wear down. For example, busy entryways, kitchens, and commercial hallways benefit from this extra strength. Families with children or pets often choose epoxy for this reason.
- Waterproofing: Wood is sensitive to moisture. Epoxy seals the surface, protecting against spills, pet accidents, and humidity. This is especially important in kitchens, bathrooms, or basements where water damage is a concern. Even in humid climates, epoxy helps prevent warping or swelling.
- Aesthetic options: You can choose clear epoxy to highlight natural wood grain, or colored/metallic epoxies for a modern look. Designers love using metallic pigments to create unique patterns that look like marble or flowing water. You can even embed small objects or graphics under the epoxy for a custom touch.
- Easy cleaning: Epoxy floors are seamless. No cracks for dirt or dust to hide, so cleaning is simple. A damp mop and mild soap are enough to keep the floor looking new. This is a major advantage for allergy sufferers, as dust and allergens have fewer places to collect.
However, some beginners miss a key fact: wood is flexible and expands/contracts with humidity. Unlike concrete, wood can move slightly, which means you must prepare it carefully before adding a rigid epoxy layer. If you skip this, the epoxy might crack or peel later. For example, in climates with strong seasonal changes, wood floors expand in summer and contract in winter. Epoxy won’t flex, so a poorly prepared floor can show cracks after just a few months.
When Should You Epoxy A Wood Floor?
Not every wood floor is a good candidate for epoxy. Here’s when it makes sense:
- Old, worn floors: If your wood floor has scratches or stains, but is still structurally sound, epoxy can cover imperfections and give a new finish. Many people use epoxy to “save” an old floor that would otherwise need replacement.
- Creative projects: Epoxy is popular for art studios, kids’ rooms, or spaces where you want a unique look—like a river table effect or colored swirls. You can create one-of-a-kind designs that can’t be achieved with traditional finishes.
- Commercial spaces: Offices, retail shops, and restaurants use epoxy for its durability and easy maintenance. Spills and heavy foot traffic are less of a worry, and businesses can customize colors to match branding.
But don’t epoxy over floors that are rotten, have active water damage, or serious movement (loose boards). Epoxy will not solve these problems—it will only cover them for a short time. If you notice a musty smell, soft spots, or visible mold, address these issues before considering epoxy. Otherwise, the damage will continue under the surface and eventually ruin your new floor.
Tools And Materials Needed
Before you start, gather all the tools and materials. Missing items can lead to rushed work and mistakes. Planning ahead saves time and reduces stress during the project.
Main materials:
- Two-part epoxy resin: Choose a product designed for wood floors. Read the label for recommended uses.
- Epoxy primer: Special primers help epoxy bond to wood. Without it, the epoxy may not adhere well, especially on porous or old wood.
- Color pigments (optional): For custom colors or effects. Metallic or pearlescent pigments create depth and interest.
- Decorative chips or flakes (optional): For texture and design. These also add slip resistance.
Tools:
- Orbital sander or floor buffer with sanding pads. A floor buffer saves time on large areas.
- Vacuum (shop vac preferred) to remove all dust after sanding.
- Tack cloths or microfiber cloths for final cleaning.
- Paint roller (high-quality, lint-free). Cheap rollers can shed fibers and ruin the finish.
- Paintbrushes (for corners/edges). Angle brushes help with detail work.
- Mixing buckets (graduated) to measure resin and hardener accurately.
- Drill with mixing paddle (for large batches). Manual mixing can introduce bubbles.
- Putty knife or floor scraper to remove old residue or spread filler.
- Painter’s tape and plastic sheeting (for masking off areas). This protects walls and cabinets from accidental drips.
- Spiked shoes (optional, for walking on wet epoxy). These let you move across the floor to fix spots without leaving footprints.
- Protective gloves, goggles, and respirator. Epoxy chemicals can irritate skin and eyes, and fumes can be strong.
- Moisture meter (for wood) to ensure the floor is dry enough.
It’s smart to buy 10-15% more epoxy than the calculated area, in case of spills or thick spots. Leftover epoxy can sometimes be used for minor touch-ups later, but it’s best to mix only what you need for each coat.
How To Prepare Your Wood Floor
Preparation is the most important step. Skipping or rushing here causes most failures. The difference between a long-lasting, beautiful floor and a failed one usually comes down to careful prep.
1. Check Moisture Content
Wood must be dry before applying epoxy. Use a moisture meter—aim for moisture content below 12%. If wood is too wet, epoxy will not stick or may bubble. For example, in basements or new constructions, wood can hold more moisture than you think. If you’re not sure, wait a few days with a fan running to lower the moisture. Testing in several spots, especially near windows or doors, gives a better picture of overall dryness.
2. Fix Loose Boards And Damage
Nail down any squeaky or loose boards. Repair cracks or holes with wood filler. Sand flush when dry. If you see rot or water damage, replace those boards. Don’t try to “hide” structural problems under epoxy—they will get worse over time.
Look for black stains, crumbling wood, or boards that move when stepped on.
3. Sand The Surface
Epoxy needs a rough surface to grip. Use an orbital sander with 60-80 grit sandpaper. Sand evenly until the finish is dull and smooth. Remove all wax, oil, or old varnish. Areas with leftover finish can cause the epoxy to separate or peel later. Check corners and edges, where old finish often hides.
4. Clean Thoroughly
Vacuum all dust, then wipe with a tack cloth. Repeat until the surface is spotless. Even tiny dust can show under clear epoxy. For best results, vacuum twice—once after sanding, then again just before priming. Dust left in seams or cracks will show up as bumps or dark spots after the epoxy cures.
5. Mask Off Edges
Use painter’s tape to protect walls, baseboards, and any areas you don’t want coated. Lay plastic sheeting over doorways to stop dust. Remember to press tape firmly, especially at the floor line, to prevent leaks. Cover vents and registers so dust doesn’t blow back onto your wet epoxy.
6. Prime The Wood
Most epoxy products recommend a primer. This helps the epoxy stick and stops air bubbles from rising out of the wood. Roll on a thin, even coat and let it dry according to directions (usually 2–6 hours). Some primers are tinted to show coverage; others are clear. Don’t rush this step—if the primer is still tacky, wait longer before moving on.
7. Plan Your Work
Epoxy sets fast. Once mixed, you have 20–40 minutes (depending on product and room temperature). Plan your starting point, exit path, and breaks. Set up all your tools, buckets, and rollers before mixing. It’s wise to do a “dry run” (no epoxy) to make sure you can work smoothly and reach every corner.
Mixing And Applying Epoxy
Applying epoxy is straightforward if you follow the product instructions. However, attention to detail makes the difference between a pro and amateur finish. Temperature and humidity can affect curing, so check the forecast before starting.
1. Measure And Mix Carefully
Epoxy comes in two parts: resin and hardener. Measure precisely, using graduated buckets. If the mix is off, the epoxy may stay sticky or not cure properly. For example, if you add extra hardener, hoping for a faster cure, you may actually make the epoxy brittle and prone to cracks.
Pour Part A (resin) and Part B (hardener) into your bucket. Mix slowly with a paddle mixer (1–2 minutes) to avoid air bubbles. Scrape the sides and bottom. If you see streaks, keep mixing until the color is uniform. If adding color or effects, mix them in now.
Some metallic pigments need extra stirring to dissolve fully.
2. Pour And Spread
Pour epoxy in a line on the floor (called a “ribbon”). Use a roller or notched squeegee to spread it evenly. Work in sections, starting furthest from the door. Don’t pour all the epoxy in one spot—spread it out to avoid pooling.
For edges and corners, use a brush. For large floors, work with a partner—one rolls, one cuts in edges. Keep a “wet edge” so new epoxy blends into the last area without lines.
3. Remove Bubbles
After spreading, quickly run a spiked roller or blow lightly with a heat gun to pop surface bubbles. This step is easy to forget but prevents a “pitted” look. Move slowly and watch for areas where bubbles appear—corners and seams need extra attention.
4. Apply Multiple Coats
Most wood floors need at least two coats for strength and depth. Wait for the first coat to cure (often 12–24 hours), then lightly sand with 120-grit sandpaper. Clean dust, then apply the next coat. Sanding between coats helps the next layer stick and removes tiny imperfections.
For a mirror finish, up to three coats may be used. Each coat adds depth and smoothness. Too many coats (over three or four) can look plastic and may hide wood grain, so judge by your taste.
5. Add Texture Or Chips (optional)
If you want a non-slip finish, sprinkle decorative chips or sand on the first coat while it’s wet. For a smooth, glassy look, skip this step. For creative designs, you can use stencils or tape between coats to add colored stripes or patterns.
Curing And Aftercare
Curing is often misunderstood by beginners. Epoxy feels dry after a few hours, but full strength takes days.
- Touch-dry: 6–12 hours (depends on product)
- Light foot traffic: 24–36 hours
- Heavy furniture/vehicles: 5–7 days
Keep pets and people off the floor until cured. Avoid cleaning with water or harsh chemicals for at least a week. Placing heavy furniture too soon can leave permanent dents or marks. For the first month, avoid using rubber mats, as some types can react with fresh epoxy.
Common Mistakes And How To Avoid Them
Even handy people make errors with epoxy wood flooring. Here’s what to watch for:
- Skipping primer: Wood soaks up epoxy. Without primer, you get bubbles and poor adhesion. Some people think primer isn’t needed, but even new wood can cause problems without it.
- Applying epoxy too thick: Thick layers trap bubbles, cure unevenly, and may not harden. It’s better to use two thin coats than one thick one.
- Not cleaning well: Dust, hair, or oil under the epoxy will show forever. Wipe with a clean, damp cloth just before pouring the epoxy.
- Mixing errors: Too much or too little hardener leads to sticky or brittle spots. Always follow the manufacturer’s ratio.
- Wrong temperature/humidity: Epoxy cures best between 60–80°F (15–27°C), humidity below 80%. Too cold, and it cures slowly. Too humid, and you get a cloudy finish. If you live in a humid climate, use a dehumidifier for 24 hours before and after application.
- Not sealing edges: Epoxy can run under baseboards or into gaps, causing a mess. Always check for gaps along walls and fill them with caulk or tape before starting.
A non-obvious tip: always check the product’s technical data sheet. Many brands look similar, but cure times, mix ratios, and coverage can vary. Some require a specific primer or topcoat for warranty.
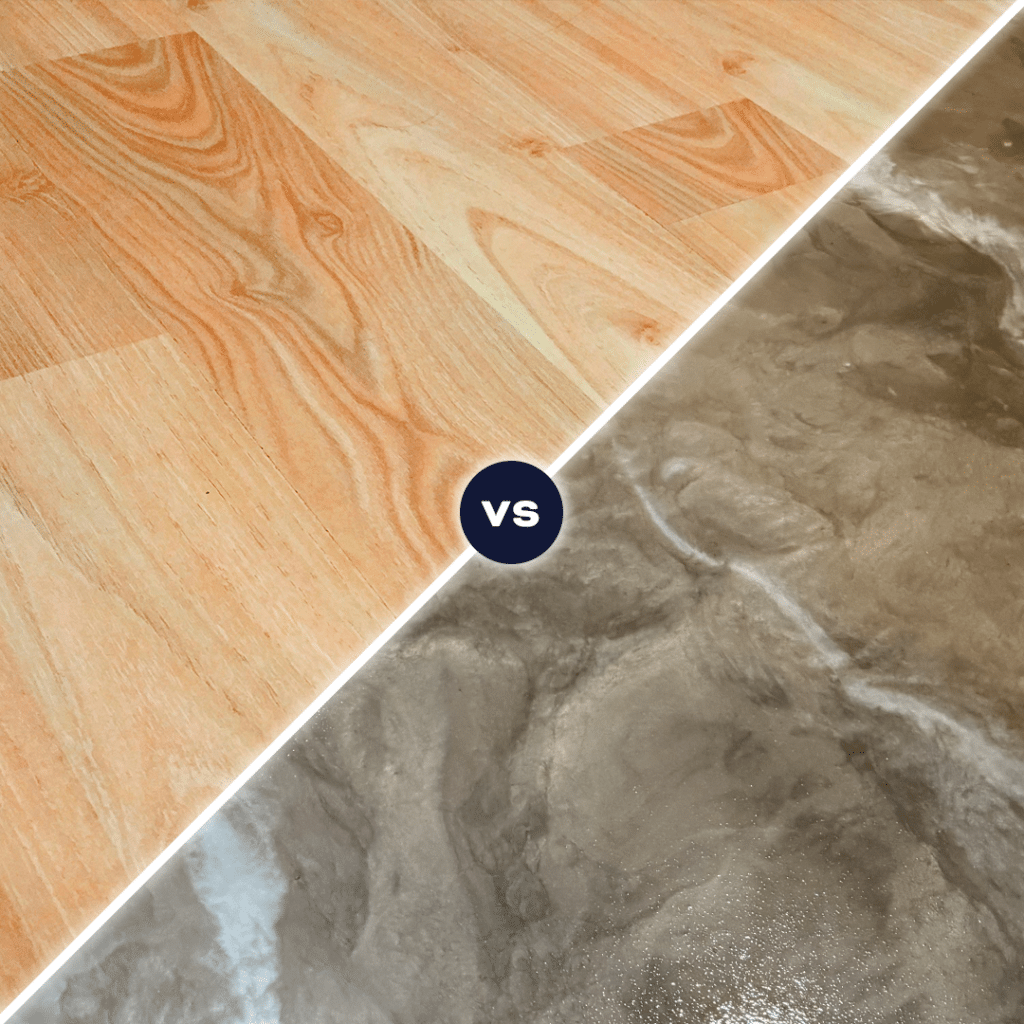
Epoxy Vs. Other Wood Floor Finishes
How does epoxy compare to more traditional wood floor finishes, like polyurethane or varnish? Here’s a side-by-side look.
| Finish Type | Durability | Water Resistance | Appearance | Ease of Repair |
|---|---|---|---|---|
| Epoxy | Very high | Excellent | Glossy, seamless, options for color | Difficult (requires sanding & full re-coat) |
| Polyurethane | High | Good | Glossy, satin, or matte; highlights grain | Easier (can spot repair scratches) |
| Varnish | Medium | Moderate | Natural wood look, often matte | Easier |
Epoxy wins for industrial strength and modern looks, but it’s harder to repair if damaged. Polyurethane is more flexible and easier for small fixes. If you want a traditional wood feel, polyurethane or varnish may be better, but for a statement floor or heavy use, epoxy stands out.

Credit: www.youtube.com
Cost And Time Estimates
You might wonder if epoxy is affordable compared to other finishes. Let’s break it down:
| Project Element | DIY Cost (per sq. ft.) | Pro Cost (per sq. ft.) | Time Required (for 300 sq. ft.) |
|---|---|---|---|
| Materials (epoxy, primer, tools) | $3–$6 | — | 4–8 hours (prep + application) |
| Professional Installation | — | $8–$15 | 2–4 hours (plus cure time) |
| Total (DIY) | $900–$1800 | — | 2–3 days (including cure) |
| Total (Pro) | — | $2400–$4500 | 2–3 days (including cure) |
DIY is cheaper, but mistakes can be costly. A professional ensures a flawless finish, but at a higher price. If you want custom effects or have a large area, hiring a pro is often worth the investment. Remember to ask for references and see examples of previous work before hiring.
Design Ideas And Effects
Epoxy isn’t just practical—it’s creative. Here are a few ways people use epoxy on wood floors:
- Clear epoxy: Shows off natural wood grain, adds depth. This works especially well on exotic woods or parquet patterns.
- Metallic pigments: Create swirls and 3D effects for a modern or artistic look. You can mimic stone, water, or abstract art.
- Embedded objects: Some embed coins, pebbles, or graphics in the epoxy (great for restaurants or shops). For homes, you might add a family crest or a favorite photo printed on special paper.
- Colored epoxy: Match your decor with any shade; bold colors make a room stand out. For example, a deep blue or emerald green can turn a floor into a statement piece.
- Non-slip finishes: Add sand or texture for bathrooms or kitchens. Choose fine or coarse additives based on how much grip you need.
A non-obvious insight: clear epoxy can amplify wood color, making dark woods look even richer. But it can also highlight imperfections, so prep is key. If you want a subtle effect, try a lightly tinted epoxy that warms up the wood without overpowering its grain.
Credit: swaydepoxy.com
Step-by-step Summary: How To Epoxy Wood Floor
For quick reference, here’s a step-by-step summary:
- Check moisture content—must be under 12%
- Fix and sand floor—fill gaps, sand smooth, remove old finish
- Clean thoroughly—vacuum and tack cloth
- Mask off edges—protect walls and trim
- Prime wood—apply recommended primer, let dry
- Mix epoxy—follow exact ratio, mix slowly
- Pour and spread—work in small sections
- Remove bubbles—use spiked roller or heat gun
- Apply second coat—sand lightly between coats
- Cure—wait full cure time before heavy use
Each step is important—rushing or skipping steps can lead to problems that are hard to fix later.
Maintenance Tips For Epoxy Wood Floors
Epoxy floors are low-maintenance, but a few simple steps keep them looking fresh:
- Sweep or vacuum regularly to remove grit and dust. Grit can scratch the shiny surface over time.
- Mop with mild soap and water—avoid harsh cleaners or abrasives. Strong chemicals can dull the gloss or leave streaks.
- Place felt pads under furniture legs to prevent scratches. Even though epoxy is tough, sharp edges can leave marks.
- Clean spills quickly—epoxy is water-resistant but not stain-proof. Wipe up wine, coffee, or chemicals to avoid discoloration.
- Avoid dragging heavy items across the floor. Lift furniture rather than sliding it.
If you notice dull spots after several years, you can lightly sand and apply a fresh thin coat of epoxy. For small scuffs, sometimes just buffing with a soft cloth restores the shine.
Credit: xtremepolishingsystems.com
When To Call A Professional
DIY epoxy is rewarding, but not for every situation. Hire a pro if:
- The floor is large (over 500 sq. Ft.)
- You want special effects or embedded designs
- The wood is old and needs repairs
- You have allergies or are sensitive to fumes
Professionals have industrial tools for sanding, dust-free environments, and experience with tricky details. They can also apply specialty topcoats that are not available to the public.
Environmental And Safety Considerations
Epoxy resins contain chemicals. Always work in a well-ventilated area, wear gloves and goggles, and follow all safety instructions. Some products have low-VOC (volatile organic compound) formulas—safer for homes and better for the environment. If you have pets, keep them out of the area until all fumes are gone.
Dispose of unused epoxy and cleaning materials at a proper waste facility. Never wash leftover resin down the drain. Hardened epoxy can be thrown out with trash, but liquid resin is hazardous.
For more about epoxy chemistry and safety, see the Wikipedia entry on Epoxy.
Frequently Asked Questions
How Long Does Epoxy Wood Floor Last?
A well-installed epoxy wood floor can last 10–20 years in homes with proper care. In heavy commercial use, expect 5–10 years. Lifespan depends on traffic, cleaning, and exposure to sunlight. UV light can yellow some epoxies, so consider a UV-resistant topcoat for sun-exposed rooms.
Can I Put Epoxy Over Old Wood Stain Or Finish?
No, all old finish, wax, or oil must be removed. Epoxy needs a clean, sanded wood surface for a strong bond. Skipping this step leads to peeling. If you’re unsure what’s on your floor, test with a small amount of acetone—if the finish softens or smears, it must be removed.
Is Epoxy Slippery When Wet?
Standard epoxy is smooth and can be slippery, especially when wet. For kitchens, bathrooms, or entryways, add non-slip chips or sand to the top coat. There are also matte finish topcoats that reduce slipperiness while keeping the floor attractive.
Can You Repair Scratches Or Chips In Epoxy Floors?
Small scratches can be buffed and recoated, but deep chips often require sanding the area and reapplying epoxy. Large repairs may need a full re-coat for a seamless look. For best results, keep a bit of leftover epoxy for small fixes.
What’s The Difference Between Epoxy And Polyurethane For Wood Floors?
Epoxy is harder, more chemical-resistant, and creates a deeper gloss. Polyurethane is more flexible, easier to repair, and comes in more finish options (matte, satin, gloss). If you want a floor that feels warmer and more natural, polyurethane is usually better. If you want a dramatic, high-shine look, epoxy stands out.
Transforming a wood floor with epoxy takes patience and care, but the result is a beautiful, modern, and tough surface. With the right preparation and technique, you’ll enjoy your epoxy wood floor for many years.