Baking bread at home is a pleasure that brings warmth and aroma to any kitchen. For those who love French bread, making a perfect baguette can feel challenging. The secret tool that helps both beginners and skilled bakers is the baguette pan. This simple piece of bakeware can change your homemade bread from flat and uneven to tall, golden, and crisp. But many home bakers are unsure how to use a baguette pan correctly or how to get the best results from it. If you want to master baguette baking, understanding this pan is your starting point.
This article will guide you step by step through everything you need to know about using a baguette pan. You will learn what makes this pan special, how it works, and the exact process to create beautiful, bakery-style baguettes in your own oven. You will also discover tips, troubleshooting advice, cleaning instructions, and much more. Whether you are baking your first baguette or improving your skills, you will find new insights to make your bread even better.
What Is A Baguette Pan?
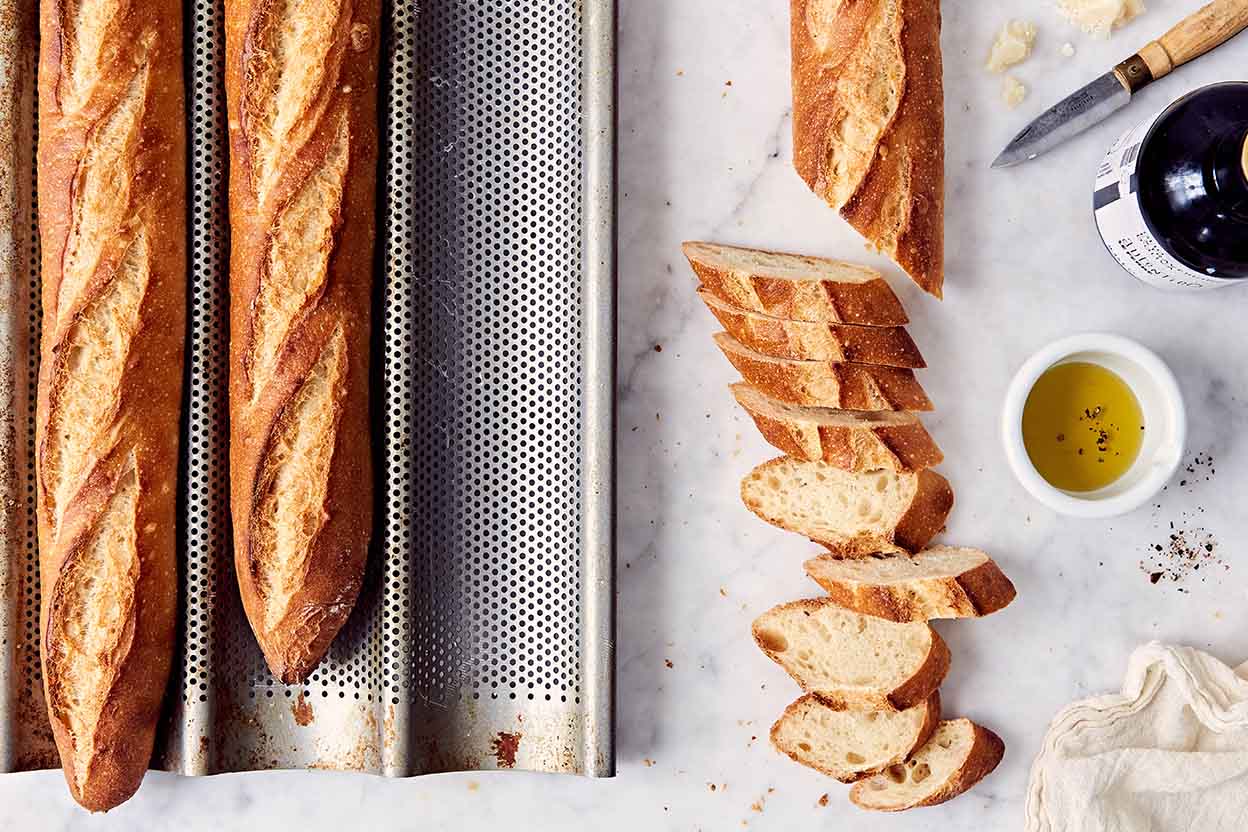
A baguette pan is a baking tool designed specifically for French bread. It is long, narrow, and usually curved with small holes in the bottom. These holes are called perforations, and they help air and heat circulate around the dough. This gives baguettes their famous crispy crust and nice brown color.
Most pans hold two to four loaves at one time. They are often made from metal, especially aluminum or steel, because these materials heat up quickly and evenly. Some have a non-stick coating for easy bread removal, while others are plain metal.
Key Features Of Baguette Pans
- Curved shape: Keeps dough from spreading sideways so your baguette stays tall and round
- Perforated surface: Allows steam and heat to reach the whole loaf, creating a crispy crust
- Metal construction: Distributes heat evenly for good baking results
- Multiple slots: Lets you bake several baguettes at once
Why Use A Baguette Pan?
Baking a baguette directly on a flat tray or pizza stone can be tricky. The soft dough often spreads out and loses its shape. The baguette pan solves this problem.
- Shape support: The pan holds your dough in a rounded, classic baguette form during rising and baking.
- Crust quality: The small holes let heat and moisture move around the loaf, making a crispy, golden crust.
- Even baking: The metal helps bake the bottom and sides at the same rate as the top.
- Convenience: You can bake multiple loaves easily and get consistent results.
Many home bakers are surprised at how much a baguette pan improves their bread’s look and texture. It makes the process easier, especially for beginners.

Credit: www.youtube.com
Choosing The Right Baguette Pan
Before you start baking, it’s important to pick the best baguette pan for your kitchen and baking style. There are several types and features to consider.
Types Of Baguette Pans
| Type | Material | Best For | Common Slot Number |
|---|---|---|---|
| Perforated Metal | Aluminum, Steel | Crispy crusts, professional look | 2-4 |
| Non-stick | Coated Aluminum/Steel | Easy release, quick cleaning | 2-3 |
| Silicone | Silicone | Easy handling, softer crusts | 2-3 |
| Ceramic | Ceramic | Traditional baking, even heat | 1-2 |
What To Consider
- Size: Match the pan size to your oven and the number of baguettes you want to bake.
- Material: Metal pans give crispier crusts; silicone pans are easy to handle but may not brown bread as well.
- Non-stick coating: Good for easy bread removal, but it can wear out over time.
- Number of slots: If you bake a lot, choose more slots. For small kitchens, two-slot pans are enough.
- Durability: Thicker pans last longer and resist warping.
Non-obvious insight: Some pans have deeper slots for thicker baguettes, while others are shallow for thinner, classic French loaves. Choose based on your recipe and preference.
Preparing Dough For Baguette Pans
A great baguette starts with the right dough. While a baguette pan helps with the shape and crust, the dough’s texture and fermentation are also key.
Classic Baguette Dough Ingredients
- 500g (about 4 cups) bread flour (high-protein flour works best)
- 350ml (1.5 cups) water, at room temperature
- 2 tsp salt
- 1 tsp active dry yeast (or 8g fresh yeast)
This makes about three classic baguettes.
Mixing And Fermenting
- Combine flour, yeast, and water: Mix in a bowl until just combined. Let rest for 30 minutes. This rest is called autolyse and helps gluten development.
- Add salt: Sprinkle salt on the dough and mix well.
- Knead or stretch and fold: Knead by hand for 8-10 minutes or use a stand mixer for 6-7 minutes. The dough should be smooth and elastic.
- First rise: Place dough in a lightly oiled bowl, cover, and let rise for 1-2 hours until doubled.
- Cold fermentation (optional): For better flavor, refrigerate dough overnight. This step is common in French bakeries.
Non-obvious insight: Dough for baguettes should be sticky and wet. Don’t add too much flour; a wetter dough makes a lighter, airier crumb.
Shaping And Placing Dough In A Baguette Pan
The way you shape and handle your dough affects your final baguette. Many bakers struggle here, but with practice and a few tips, you’ll get it right.
Step-by-step Shaping
- Turn dough out: Gently place the risen dough on a lightly floured surface.
- Divide: Cut into equal pieces (usually 2-4, depending on pan).
- Pre-shape: Gently form each piece into a short log. Let them rest for 15 minutes covered with a towel.
- Final shape: Flatten each log into a rectangle. Fold the top third down, seal with your fingers, fold the bottom third up, and seal again. Roll into a long, thin cylinder, about the length of your pan slot.
- Tighten the shape: Roll lightly to create surface tension, which helps the loaf rise upward instead of spreading out.
Placing In The Pan
- Lightly grease the pan if it’s not non-stick, or dust with flour.
- Place each shaped dough log into a slot, seam side down.
- Make sure the dough fits the slot, but don’t stretch or press it.
- Cover with a clean cloth or plastic wrap for the final rise (proofing).
Practical tip: Handle dough gently to keep the air bubbles inside. This gives the classic baguette holes in the crumb.
Proofing Dough In The Baguette Pan
Proofing is the final rise before baking. It’s important not to over-proof or under-proof, as both can affect your bread’s texture.
- Room temperature: Proof for 30-45 minutes, depending on room warmth.
- The dough should look puffy and spring back slowly when pressed.
- If your kitchen is cold, proof longer; if hot, check sooner.
Common mistake: Over-proofing makes the dough collapse in the oven. Under-proofing gives a tight, dense crumb.
Credit: www.kingarthurbaking.com
Scoring And Preparing For Baking
Scoring means cutting shallow slashes in the top of the dough. This lets steam escape and helps the bread expand in the oven.
How To Score Baguettes
- Use a sharp knife or a special tool called a lame.
- Make 3-5 diagonal cuts along each loaf.
- Cuts should be about 1/4 inch deep and at a slight angle.
- Score quickly and confidently for best results.
Extra tip: Wetting the blade with water prevents sticking and gives a clean cut.
Baking Baguettes In The Pan
Now it’s time to bake. Preheating and steam are the secrets to a perfect baguette crust.
Steps For Baking
- Preheat oven: Set to 475°F (245°C) at least 30 minutes before baking.
- Create steam: Place a metal tray in the bottom of the oven. Just before putting the bread in, pour a cup of hot water into the tray. The steam helps form a crisp crust.
- Place pan in oven: Slide the baguette pan onto the middle rack.
- Bake: 20-25 minutes, or until golden brown and crusty.
- Check for doneness: Tap the bottom of a loaf. It should sound hollow.
Data point: Professional ovens use steam injection. Home bakers can get 80-90% of that effect with a hot water tray.
Removing From Pan
- Let baguettes cool in the pan for 5 minutes, then move to a wire rack.
- Cooling fully prevents a gummy texture inside.
Pro tip: If using a silicone pan, turn the loaves out immediately, as they can sweat and soften if left too long.
Cleaning And Maintaining Your Baguette Pan
Taking care of your pan keeps it working well and helps it last longer.
Cleaning Steps
- Let pan cool: Never clean a hot pan.
- Brush off crumbs: Use a soft brush to remove loose bits.
- Wash gently: Hand wash with warm water and mild soap. Avoid harsh scouring pads.
- Dry completely: Air dry or towel dry. Don’t store wet to prevent rust.
Maintenance Tips
- Don’t use metal utensils that scratch non-stick coatings.
- If your pan develops rust, scrub lightly with baking soda and water, rinse, and dry well.
- Store in a dry place. Stack pans with a cloth between them if needed.
Non-obvious insight: Never put a perforated metal pan in the dishwasher, as water can get trapped in holes and cause rust over time.
Troubleshooting: Common Problems And Solutions
Even with a good pan, sometimes things go wrong. Here’s how to fix common baguette baking issues.
1. Pale Crust
- Possible causes: Oven not hot enough, not enough steam, or short baking time.
- Solution: Preheat longer, use more steam, and bake until deep golden brown.
2. Flat Baguettes
- Possible causes: Dough too wet, under-kneaded, or over-proofed.
- Solution: Use high-protein flour, knead for enough time, and watch proofing carefully.
3. Sticking To The Pan
- Possible causes: No oil or flour on the pan, or damaged non-stick coating.
- Solution: Lightly oil or flour pan before use, and replace old pans if coating is worn.
4. Dense Texture
- Possible causes: Not enough rising time, cold dough, or too much flour.
- Solution: Allow full fermentation, let dough warm up before shaping, and resist adding extra flour.
5. Uneven Browning
- Possible causes: Oven hot spots, overcrowding, or pan not centered.
- Solution: Rotate pan halfway through baking, and bake fewer loaves at once if necessary.
Extra tip: Take notes each time you bake. Small adjustments help you learn what works best in your oven.
Comparing Baguette Pan Vs. Baking Stone Vs. Regular Tray
Home bakers often ask if a baguette pan is really necessary. Here’s how it compares to other methods.
| Method | Shape Support | Crust Quality | Ease of Use | Capacity |
|---|---|---|---|---|
| Baguette Pan | Excellent | Very Crisp | Easy | 2-4 loaves |
| Baking Stone | Limited | Excellent | Moderate | 1-2 loaves |
| Regular Tray | Poor | Average | Easy | Multiple |
A baguette pan stands out for supporting the classic shape and giving reliable, bakery-style results, even for beginners.
Advanced Tips For Mastering Your Baguette Pan
Once you’re comfortable with basic baking, you can try these advanced techniques to get even better results.
1. Use A Baking Stone Under The Pan
Place a baking stone on the lowest oven rack and set the baguette pan on the rack above. The stone radiates strong, even heat, helping with oven spring and crispiness.
2. Chill Dough Overnight
Long, cold fermentation (12-24 hours in the fridge) adds complex flavor and chewiness. Take dough out one hour before shaping.
3. Experiment With Hydration
Try making dough with 72-75% water (for every 100g flour, use 72-75g water). Higher hydration makes a more open, airy crumb, but dough is stickier and harder to handle.
4. Add Ice Cubes For Steam
Instead of pouring water into a tray, toss a handful of ice cubes into the tray. They melt slowly, keeping steam in the oven longer.
5. Alternate Flours
Try mixing in 10-20% whole wheat or rye flour for a richer taste. Adjust water as needed, since whole grains absorb more.
Non-obvious insight: Using a baking peel or parchment paper to transfer dough into the pan helps keep shaped loaves perfect and avoids deflating them.
Creative Ways To Use Your Baguette Pan
A baguette pan isn’t just for classic French bread. Try these other ideas:
- Sub rolls: Make long, oval sandwich rolls.
- Breadsticks: Shape thin dough ropes for crunchy breadsticks.
- Ciabatta baguettes: Use wetter dough for a chewy, rustic loaf.
- Twisted loaves: Add herbs or cheese and twist dough before placing in the pan.
- Sweet baguettes: Fill with chocolate chips or dried fruit for breakfast bread.
Extra tip: Always adjust baking time for smaller or sweeter loaves, as they brown faster.
Mistakes To Avoid With Baguette Pans
Even experienced bakers can make simple errors. Be mindful of these:
- Not preheating oven or pan: Cold pans give pale, soft crusts.
- Forgetting to grease a non-coated pan: Bread will stick and tear.
- Overcrowding the pan: Baguettes need space for airflow.
- Ignoring pan instructions: Some pans are not dishwasher safe.
- Not cooling bread fully: Warm bread can be gummy inside.

Credit: www.reddit.com
Cleaning And Storage: Keeping Your Pan Like New
You’ll get more life from your pan if you treat it well.
- Never soak perforated pans: Water gets stuck in holes and causes rust.
- For stubborn stains: Use a paste of baking soda and water with a soft brush.
- Dry quickly: After washing, dry with a towel and put in a warm oven for a few minutes.
- Store away from humidity: This prevents rust and keeps non-stick coatings from peeling.
Pro tip: If stacking pans, place a kitchen towel between them to avoid scratches.
Recommended Accessories For Better Baguettes
A few small tools make the baking process smoother:
- Lame: For perfect scoring.
- Bench scraper: For dividing and handling sticky dough.
- Oven thermometer: Oven dials are often inaccurate; check real temperature.
- Cooling rack: Prevents soggy bottoms.
- Spray bottle: For misting the oven if you don’t use a steam tray.
Real-life Example: Home Baker’s Success Story
Maria, a beginner from Chicago, always struggled with flat, pale baguettes. After buying a three-slot perforated baguette pan, she followed a simple recipe and used the cold fermentation method. Her first batch had crispy crusts and beautiful golden color. The pan kept the shape tight, and the perforations helped brown the bottom evenly.
Now, Maria bakes baguettes every weekend for her family, who say they taste just like the bakery’s.
Lesson: The right pan and a few careful steps can turn home-baked bread into something special.
Where To Learn More
For those interested in the history, science, or more advanced baguette baking, the Wikipedia baguette page offers a deeper look at the tradition and craft. Find more at Wikipedia.
Frequently Asked Questions
How Do I Keep My Baguette From Sticking To The Pan?
Lightly oil or flour the pan before placing the dough, especially if your pan is not non-stick. Make sure the pan is clean and dry before use. If sticking continues, the non-stick coating may be worn out, and it could be time for a new pan.
Can I Use Parchment Paper With A Baguette Pan?
Yes, you can lay strips of parchment in each slot. This helps with very sticky doughs or older pans. However, parchment can block some airflow through the holes, so your crust may be slightly less crisp.
Is A Baguette Pan Dishwasher Safe?
Most perforated metal pans are not dishwasher safe. Hand washing is better to prevent rust and damage to coatings. Silicone pans are often dishwasher safe, but always check the manufacturer’s instructions.
Can I Bake Other Breads In A Baguette Pan?
Absolutely. You can make sandwich rolls, Italian bread, breadsticks, or even sweet loaves. Just adjust the baking time and remember that very wet doughs may spread more.
Why Are My Baguettes Not Browning Well?
This is usually due to low oven temperature, not enough preheating, or lack of steam. Make sure your oven is fully hot, use a steam tray or mist water into the oven, and bake long enough for a deep golden color.
Baking with a baguette pan opens up a world of delicious possibilities. With careful preparation, the right tools, and a bit of practice, you’ll enjoy perfect French bread at home—fresh, crisp, and full of flavor every time.