Removing sticky tile from a floor can feel overwhelming, especially if you’ve never done it before. The tiles may be old and stubborn, or you might worry about damaging the surface underneath. Whether you’re renovating your kitchen, freshening up a bathroom, or just updating the look of a room, understanding how to remove sticky tile safely and efficiently is crucial.
This guide walks you through every step, from preparation to finishing touches, so you can tackle the job confidently and avoid common mistakes.
Understanding Sticky Tile And Adhesive
Sticky tiles, also called peel-and-stick tiles or self-adhesive tiles, are popular for their easy installation. They’re commonly used on floors in kitchens, bathrooms, and entryways. The secret to their “stick” is a layer of pressure-sensitive adhesive on the back. When you peel off the protective paper, you press the tile onto a clean, dry floor. Over time, this adhesive can become very strong or even bond with the floor’s surface.
Most sticky tiles are made from vinyl or composite materials. The adhesive used is usually acrylic or rubber-based. Knowing the type of tile and adhesive helps you choose the best removal method. For example, old vinyl tiles may become brittle, while newer ones might be more flexible but have stronger glue.
Tools And Materials Needed
Before starting, gather all the necessary tools and materials. Having everything ready will save time and reduce frustration.
Essential Tools:
- Utility knife with sharp blades
- Putty knife or floor scraper (wide and sturdy)
- Pry bar (for stubborn tiles)
- Heat gun or hairdryer
- Rubber mallet (optional)
- Heavy-duty gloves
- Safety glasses
Materials:
- Adhesive remover (citrus-based or commercial)
- Bucket of warm, soapy water
- Clean rags or towels
- Trash bags or bins for debris
- Painter’s tape (for marking)
- Plastic sheeting or drop cloths
Optional Equipment:
- Respirator mask (if working with chemicals)
- Knee pads (for comfort)
- Oscillating multi-tool (for very tough jobs)
Practical Tip: If you’re working in a large room, consider renting a power scraper. For most DIY jobs, though, hand tools are enough.
Preparing The Room And Floor
Preparation is just as important as the actual tile removal. It keeps the process safe and helps protect your floor and belongings.
- Clear the Area: Remove all furniture, rugs, and items from the room. Give yourself as much open space as possible.
- Protect Surfaces: Cover vents, baseboards, and nearby walls with plastic sheeting or drop cloths. Use painter’s tape to keep the covering in place.
- Check for Asbestos: If your sticky tiles were installed before the 1980s, there’s a small chance they contain asbestos. Do not disturb old tiles until you check with a professional or send a sample for testing.
- Ventilate the Room: Open windows or use fans. Some adhesive removers and older adhesives can release strong fumes.
- Mark the Starting Point: Use painter’s tape to mark a starting tile, especially if you want to remove tiles in a specific pattern.
Non-obvious Insight: Remove shoe molding or quarter round trim before you start. This helps you get tiles up cleanly at the edges and makes it easier to reinstall new flooring later.
How To Remove Sticky Tile From Floor Step By Step
Removing sticky tile is a process. Don’t rush, especially if the adhesive is stubborn or you want to preserve the subfloor.
Step 1: Test A Tile
Choose a corner tile or one near the edge. Use a utility knife to score along the tile’s edge. Slip a putty knife or floor scraper under the tile and gently pry upward. If the tile lifts easily, you can continue with this method.
If not, try warming the tile (see next step).
Beginner’s Mistake: Skipping the test tile can lead to damage. Always test before tackling the whole floor.
Step 2: Use Heat For Easier Removal
Heat softens most adhesives, making the tiles easier to lift. Use a hairdryer or heat gun on the lowest setting. Hold it a few inches above the tile for 30–60 seconds. The tile should become more flexible, and the adhesive will loosen.
- Move the heat source slowly to avoid melting or burning the tile.
- As the tile warms, insert your putty knife and pry gently.
- Work in small sections (one or two tiles at a time).
Non-obvious Insight: Older adhesives can get brittle instead of soft. If heat makes the tile crumble, use a scraper to lift pieces carefully.
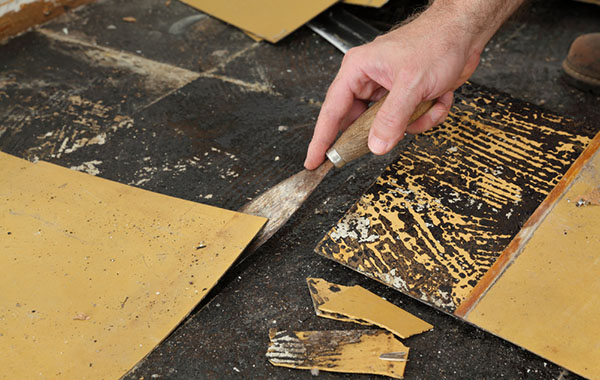
Step 3: Lift And Remove The Tiles
Once the tile is warm, slide your putty knife or scraper underneath. Push forward, keeping the blade flat against the floor. For stubborn spots, tap the scraper with a rubber mallet. If the tile breaks, keep scraping until all pieces are up.
- Place removed tiles in a trash bag immediately. Sticky residue can transfer to other surfaces.
- Work methodically across the room, one row or section at a time.
Step 4: Remove Excess Adhesive
After the tiles are up, adhesive residue is often left behind. This sticky layer can make the floor uneven and affect any new flooring.
- Scrape Residue: Use your putty knife or scraper to remove as much as possible.
- Apply Adhesive Remover: Follow instructions on the label. Most products need to sit for 10–20 minutes.
- Scrub and Wipe: Use a rag to wipe up softened glue. For stubborn spots, use a scrub brush or abrasive pad.
- Repeat as Needed: Old adhesive can be tough. Several rounds of remover may be necessary.
Tip: Avoid using too much water, especially on wood subfloors. Excess moisture can cause warping or mold.
Step 5: Clean And Inspect The Floor
Once all adhesive is gone, clean the floor with warm, soapy water. Rinse with a damp rag and dry thoroughly. Look for any damage, such as gouges or holes, and make repairs before installing new flooring.
- If you find mold or mildew, treat it with a mixture of water and vinegar.
- Fill small holes with wood filler (on wood subfloors) or patch compound (on concrete).
Comparing Removal Methods
Different methods work better for different tile types and subfloors. Here’s a quick comparison of the main approaches.
| Method | Best For | Pros | Cons |
|---|---|---|---|
| Manual Scraping | Small rooms, flexible tiles | Cheap, no fumes | Labor-intensive, slow |
| Heat Application | Stubborn glue, newer tiles | Softens adhesive, less floor damage | Can be messy, risk of burns |
| Chemical Remover | Heavy adhesive, concrete floors | Fast on thick glue | Strong fumes, may harm some floors |
| Power Scraper | Large areas, commercial jobs | Very fast | May damage subfloor, noisy |
Subfloor Types: What You Need To Know
The type of floor under your sticky tile matters. Here’s how removal can vary.
Wood Subfloors
Wood is sensitive to both water and harsh chemicals. When removing sticky tile from wood:
- Use as little water as possible.
- Stick to gentle adhesive removers.
- Sand out any rough patches after removal.
- Fill gouges with wood filler and let it dry before sanding smooth.
Concrete Subfloors
Concrete is tough but porous. Sticky adhesives can soak into the surface.
- Use a scraper and strong adhesive remover.
- Avoid too much water, as it can cause mold.
- Reseal the concrete if it was previously sealed.
Old Vinyl Or Linoleum
Sometimes sticky tile was installed over older vinyl or linoleum. If you plan to remove all layers, check for asbestos (especially in tiles installed before 1980).
- If unsure, consult a pro before disturbing old materials.
Practical Example: If you see a black adhesive (often called “cutback”), it may contain asbestos. Don’t sand or scrape this without expert help.
How Long Does It Take?
The time needed to remove sticky tile depends on the room size, tile age, and adhesive strength.
- Small bathroom (30–50 sq ft): 2–4 hours
- Medium kitchen (100–150 sq ft): 6–10 hours
- Large area (200+ sq ft): 1–2 days
Factors Affecting Time:
- Older, brittle tiles take longer.
- Thick adhesive layers require more effort.
- Working alone is slower than working with a helper.
Non-obvious Insight: Start in a closet or hidden area if possible. It’s a good place to practice without worrying about minor damage.
Common Mistakes And How To Avoid Them
- Rushing the Job: Trying to remove all tiles at once can damage the subfloor. Work slowly and in sections.
- Skipping Safety Gear: Adhesive removers can irritate skin and eyes. Always wear gloves and goggles.
- Ignoring Asbestos Risk: Old tiles and adhesives may contain asbestos. If in doubt, get professional advice.
- Not Removing All Residue: Even a thin layer of adhesive can cause new flooring to bubble or peel.
- Using Too Much Water: Especially risky on wood, excess water can lead to long-term damage.
Credit: twentyandoak.com
When To Call A Professional
Some situations are best left to experts:
- Large commercial spaces
- Suspected asbestos
- Subfloor damage or rot
- You feel overwhelmed or lack the right tools
Professional flooring contractors have access to industrial tools and know the safest removal methods. They can also handle disposal according to local regulations.
Safe Disposal Of Old Tiles And Adhesive
Sticky tiles and adhesive can be messy and may contain chemicals. Check your local rules for disposal.
- Place debris in sturdy trash bags.
- Do not burn old tiles or adhesive—fumes can be toxic.
- If working with potentially hazardous material (like asbestos), arrange for special disposal.
Cleaning Up After Removal
Once all tiles and adhesive are gone, finish with a thorough clean-up.
- Vacuum dust and debris.
- Wipe surfaces with a damp cloth.
- Remove plastic sheeting and painter’s tape.
- Check all tools for sticky residue and clean them with mineral spirits or soap.
Tip: Let the floor dry for 24 hours before installing new flooring. This ensures all moisture and chemical residue are gone.
Preparing For New Flooring
Your subfloor should be smooth, clean, and dry before new flooring goes down.
- Patch and sand any rough spots.
- Prime or seal the floor if required (especially on concrete).
- Let the floor air out to remove any lingering odors.
Practical Example: If you plan to install new peel-and-stick tiles, read the manufacturer’s instructions. Some require a primer or specific cleaning method for best adhesion.

Credit: diy.stackexchange.com
Comparing Popular Adhesive Removers
Here’s a look at common adhesive remover types and what they’re best for.
| Type | Main Ingredient | Best Use | Notes |
|---|---|---|---|
| Citrus-Based | Limonene (from oranges) | Light to moderate adhesive | Low odor, eco-friendly, slower on thick glue |
| Solvent-Based | Acetone, mineral spirits | Heavy-duty, old adhesive | Strong fumes, flammable, use with care |
| Gel Remover | Mix of solvents/gels | Vertical surfaces, thick layers | Stays in place, easy to control, more expensive |
| Enzyme-Based | Biological enzymes | Eco-sensitive areas | Safe, but can be slow |
Tools: Manual Vs. Power Options
Should you use hand tools or power tools? Here’s a comparison.
| Tool Type | Speed | Effort | Best For |
|---|---|---|---|
| Manual (Putty Knife, Scraper) | Slow to moderate | High physical effort | Small rooms, detail work |
| Oscillating Multi-Tool | Moderate to fast | Less effort | Stubborn adhesive, corners |
| Power Scraper | Very fast | Low effort, noisy | Large spaces, thick tiles |
Practical Tip: For most homes, a good putty knife and scraper are enough. Power tools save time but carry a higher risk of damaging the subfloor if not used carefully.

Credit: abutterflyhouse.com
Real-world Example: Kitchen Floor Removal
Let’s look at a typical kitchen (120 sq ft) with sticky vinyl tile on plywood.
- Preparation: Clear the room, cover vents, remove quarter round.
- Test Tile: First tile comes up easily, but adhesive remains on plywood.
- Heat and Scrape: Use hairdryer, tiles peel up in strips.
- Adhesive Remover: Apply citrus-based remover, wait 15 minutes, then scrape off glue.
- Clean Up: Wash floor with soapy water, dry overnight.
- Inspect: Fill a few small gouges with wood filler.
- Ready for New Floor: Floor is smooth and clean, ready for laminate installation.
Result: The job takes about 8 hours, with minimal damage to the subfloor.
Additional Tips For Success
- Start early in the day so you don’t rush as evening approaches.
- Change utility knife blades often; dull blades make more work.
- Take breaks. Removing sticky tile is hard on knees and back.
- Keep children and pets away from the work area, especially if using chemicals.
- Label trash bags in case local disposal rules require special handling.
Where To Find More Help
If you need more detailed advice, the Family Handyman website offers step-by-step guides and photos for all skill levels.
Frequently Asked Questions
How Do I Know If My Sticky Tile Contains Asbestos?
If your tiles were installed before 1980, there’s a risk they may contain asbestos. Asbestos was used in some adhesives and backing materials. The safest option is to send a small sample to a certified lab for testing or consult a local professional before removing old flooring.
What’s The Safest Adhesive Remover For Homes With Kids Or Pets?
Citrus-based adhesive removers are considered safe for homes with children and pets. They have low fumes and are biodegradable. Always keep the area well-ventilated and store all chemicals out of reach until the job is done.
Can I Install New Flooring Immediately After Removing Sticky Tile?
You should wait until the subfloor is completely clean and dry. This usually takes 24 hours. Any leftover adhesive or moisture can cause problems with new flooring, such as poor adhesion or mold.
Will Removing Sticky Tile Damage My Subfloor?
If you work slowly and use the right tools, you can usually remove sticky tile without serious damage. Minor scratches or gouges can be filled and sanded. Power tools and aggressive scraping increase the risk of damage, especially on wood subfloors.
What Should I Do With Leftover Tiles And Adhesive Waste?
Check your local guidelines for disposal. Most sticky tile and adhesive can go in regular trash, but some areas have rules for chemical waste. Never burn old tiles or adhesive, as fumes can be hazardous.
Removing sticky tile from your floor takes patience and care, but it’s a project most homeowners can tackle with the right preparation. By following these steps and tips, you’ll create a clean, smooth surface ready for new flooring—and avoid the common pitfalls that frustrate many DIYers.