When water soaks your ceiling, time is not on your side. Wet ceilings can lead to bigger problems like mold growth, stains, and even structural damage if not handled quickly. Many people feel lost when they see water dripping from above or discover a spreading damp patch. You may wonder, “Do I need to call a pro?” or “Can I fix this myself?” The good news is that most wet ceilings can be dried with the right steps, some patience, and common tools.
Drying a wet ceiling is more than just letting it air out. Skipping steps or moving too fast can leave hidden moisture, causing more trouble later. This guide will walk you through everything: how to check the damage, choose drying methods, prevent future problems, and know when you need expert help. You’ll learn what really matters, what beginners often miss, and get practical advice you can trust. The process isn’t always simple, but by understanding each stage, you’ll avoid common mistakes and protect your home from costly repairs.
Why Ceilings Get Wet
Before you start drying, it helps to know what caused the problem. Ceilings get wet for different reasons, and each one can affect how you dry and repair them.
Common Causes
- Plumbing leaks: Pipes running through ceilings can break, crack, or burst, especially in cold weather. Sometimes, even a small, slow drip from a loose fitting can create large damp areas over time. If you notice wet spots after someone showers or uses an upstairs sink, suspect a plumbing issue.
- Roof leaks: Damaged shingles, flashing, or gutters can let rain in, soaking attic insulation and ceiling panels. Roof leaks often get worse in heavy rain or after snow melts. Look for water trails or staining starting near the edges of rooms.
- Condensation: In rooms like bathrooms or kitchens, moist air can collect and drip onto ceilings. Poor ventilation makes this worse, especially if you see water drops forming on the ceiling after a hot shower. Over time, this can create persistent damp spots or even mold.
- Overflow or spills: Water from an overflowing tub, sink, or washing machine upstairs can soak ceilings below. This kind of water often travels quickly, so the ceiling might drip soon after the accident.
- AC or HVAC leaks: Clogged or broken air conditioning drains sometimes spill water on ceilings. If your AC is running and you see new stains or drips, check the drainage pipes and pans.
Knowing the cause helps you fix the source first, which is the key to stopping more water from coming in. Sometimes, the real source is not directly above the stain—water can travel along beams or wires before soaking through, so checking the whole area is important.
Assessing The Damage
Not all wet ceilings are the same. Some need only a quick dry-out, but others need bigger repairs. Start by checking how serious the problem is.
Safety First
- Turn off the electricity in the affected area. Wet ceilings can hide live wires. If you’re not sure how to do this, find your home’s breaker box and switch off the power to that room.
- Wear gloves and a mask. Water can carry bacteria, and mold spores may be present. If the water looks dirty or has a strong smell, be extra careful.
Signs Of Serious Damage
- Sagging: If your ceiling is drooping, it may collapse. Stay clear and support it if possible. Large, heavy areas may suddenly break, so don’t poke or press on them with your hands.
- Bubbling or peeling paint: This means water is trapped under the surface. You might also see small blisters or raised lines in the paint.
- Discoloration or stains: Brown or yellow marks often show older leaks. If you see rings of color, it could mean the leak has happened before and dried between events.
- Musty smell: Mold may already be growing. If you catch this smell, check closets, attic spaces, and even behind furniture near the wet spot.
How To Check For Moisture
Press gently on the surface. If it feels soft, crumbly, or water comes out, the material is soaked through. Use a moisture meter if you have one—these tools show how wet the ceiling is inside. Moisture meters can be bought at hardware stores, and even affordable models help tell if the ceiling is truly dry before repair.
Quick Reference Table: Types Of Ceiling Damage
| Type of Damage | What It Looks Like | What It Means |
|---|---|---|
| Surface Dampness | Small wet spots, paint intact | Minor leak, usually dries quickly |
| Sagging | Drooping or bulging areas | Heavy water load, risk of collapse |
| Peeling Paint | Paint bubbles, flakes, or peels | Water trapped under paint layer |
| Mold Growth | Black, green, or white patches | Long-standing moisture, health risk |
If you see large sagging, large stains, or mold, consider calling a professional. These signs usually mean the problem is bigger than what you see.
Extra tip: Sometimes water damages more than just the ceiling. Check nearby walls, baseboards, and floors for signs of moisture. Water can run down behind walls and cause hidden trouble, so don’t forget to look for less obvious signs.

Credit: www.amazon.com
Stopping The Source Of Water
Before you dry, you must fix the leak. Drying without stopping the water will only waste time and money.
How To Find The Source
- Check for drips or running water above the ceiling. Use a flashlight to look in attics or crawl spaces if you can.
- Look for wet pipes, wet spots on the floor above, or roof leaks. Sometimes, wet insulation or a puddle in the attic points to the problem.
- Turn off water in that part of the house if a pipe is leaking. This often means using a shut-off valve under sinks or near the water heater.
If you can’t find the source, look for help from a plumber or roofer. Fixing the leak comes before drying. Ignoring the source, even for a day or two, can make repairs much more expensive.
Preparing The Area For Drying
Drying a ceiling can get messy. Water, dust, and small bits of ceiling may fall. Get the area ready:
- Move furniture and valuables out of the way. Water can splash or drip far from the center of the wet spot.
- Lay down plastic sheets or old towels to catch debris and water. This protects floors and makes cleanup easier.
- Open windows for air flow, if weather allows. Good ventilation helps water evaporate faster.
- Set up fans or dehumidifiers nearby (but not blowing directly at sagging areas). Too much air pressure on a weak ceiling could make it fall.
If you’re working in a tight space, like a hallway or closet, extra lighting will help you see all wet areas. Keep pets and children away from the work zone for safety.
Choosing The Right Drying Method
Not all ceilings are made the same. Drywall, plaster, and drop ceilings each need different care. Let’s look at the best ways to dry each type.
Drywall Ceilings
Drywall is common, but soaks up water quickly.
- If the ceiling is sagging, poke a small hole in the lowest part with a screwdriver to drain trapped water into a bucket. Use a towel to catch splashes.
- Remove any loose, wet insulation above the ceiling. Old insulation stays wet and musty, even if the ceiling dries.
- Use towels to blot surface water.
- Place fans and dehumidifiers in the room, pointing air across (not directly at) the wet area. Too much direct air can spread wet particles.
- If the drywall is soft or crumbly after 24-48 hours, cut out the damaged section with a utility knife. Make sure to cut at least 2 inches past the wet edge.
Plaster Ceilings
Plaster is thicker and resists water better, but takes longer to dry.
- Blot surface moisture with towels.
- Use fans and dehumidifiers to circulate air.
- If paint is bubbling, gently score it to let moisture escape. Use a small blade and be careful not to damage the plaster underneath.
- Allow 48-72 hours for drying. Plaster that stays soft or crumbles must be removed.
If your home is older, plaster ceilings may be backed by wood lath, which can also hold moisture. Check for any swelling or softness in the wood behind the plaster.
Drop (suspended) Ceilings
These have tiles that sit in a frame.
- Carefully lift out wet tiles and set them aside to dry (replace if stained or warped). If the tiles feel heavy or smell musty, it’s better to replace them.
- Check the tiles above and below for moisture. Sometimes, water splashes sideways and wets more than one tile.
- Use fans and dehumidifiers in the room.
- Only replace tiles when the frame and space above are fully dry.
Drying Method Comparison
| Ceiling Type | Drying Difficulty | Best Tools | Typical Drying Time |
|---|---|---|---|
| Drywall | Easy to moderate | Fans, dehumidifier, towels | 24-48 hours |
| Plaster | Moderate to hard | Fans, dehumidifier, patience | 48-72 hours |
| Drop Ceiling | Easy | Remove tiles, fans, dehumidifier | 24-48 hours |
Extra insight: It’s tempting to only dry what you can see, but water often travels sideways in ceiling panels and insulation. Always dry a larger area than just the visible stain.
Step-by-step Guide To Drying A Wet Ceiling
Let’s break down the drying process into clear, safe steps. This method works for most homes.
1. Stop The Water
Turn off the water source or fix the leak. No drying will work unless new water is stopped. Even a slow drip can ruin your work.
2. Protect Yourself And Your Home
- Turn off electricity at the breaker box for safety.
- Wear gloves, goggles, and a mask.
- Move furniture and valuables out of the way.
If you need to use a ladder, place it on a dry, stable surface. Wet floors can be slippery.
3. Drain Any Trapped Water
If the ceiling sags, poke a small hole in the lowest spot. Let water drain into a bucket. Use a towel or tarp under the bucket in case of splashes.
4. Remove Wet Materials
- Take out any wet insulation above the ceiling. Insulation that stays wet can ruin your repairs.
- For drywall, cut away soft or crumbly sections.
- Remove drop ceiling tiles that are soaked.
If you’re not sure if insulation is wet, press it gently—wet insulation feels heavy and cold.
5. Dry The Area
- Use towels to blot up extra water.
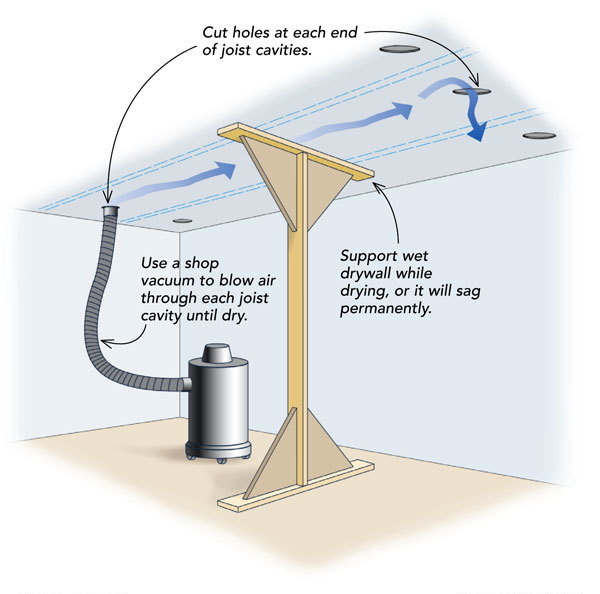
- Set up fans to move air around the wet area.
- Place a dehumidifier in the room to pull moisture from the air.
- Open windows if it’s not humid or raining outside.
Move fans every few hours to cover all areas. For thick ceilings, drying can take longer.
6. Check For Hidden Moisture
Use a moisture meter to test the ceiling and materials above. If you don’t have one, check for cold spots or a musty smell. Sometimes, touching the ceiling with the back of your hand will reveal cool, damp areas.
7. Clean And Disinfect
Wipe the area with a mix of water and mild bleach (1 part bleach to 10 parts water) to kill mold and bacteria. Rinse with clean water and let dry. This step is important even if you don’t see mold—spores can grow quickly if missed.
8. Monitor For Mold
Check the ceiling daily for a week. Look for new spots, smells, or stains. Mold can appear days after drying, especially if even a little moisture remains.
9. Repair And Restore
- Patch holes or replace drywall if needed.
- Repaint with a stain-blocking primer and ceiling paint.
Wait until the ceiling is fully dry before painting or patching. Painting too soon is a common mistake.
Example Timeline
| Step | Action | Typical Time Needed |
|---|---|---|
| Stop Leak | Fix water source | 1-2 hours |
| Remove Wet Material | Cut and clear damaged areas | 2-4 hours |
| Drying | Fans and dehumidifiers | 24-72 hours |
| Disinfect | Wipe with bleach mix | 1 hour |
| Repair | Patching and painting | 2-8 hours (plus drying) |
If the ceiling is textured (“popcorn” or “stucco”), repairs may need special sprays or matching paint. Always check the product instructions before using them.
Credit: www.finehomebuilding.com
Tools And Materials You Will Need
Gather these before you start:
- Fans (floor or box fans)
- Dehumidifier
- Plastic sheets or tarps
- Utility knife (for drywall/plaster)
- Buckets and towels
- Protective gear (gloves, mask, goggles)
- Moisture meter (optional but helpful)
- Bleach and spray bottle
- Replacement insulation (if needed)
- Stain-blocking primer and ceiling paint
A key insight: having the right tools ready saves time and reduces the chance of more damage. Many beginners try to dry ceilings with just a towel and a single fan, which is rarely enough for larger leaks.
Another tip: Don’t use heat guns or hair dryers—they can damage ceilings and spread mold spores into the air.
Dealing With Mold And Mildew
Mold can start growing in as little as 24-48 hours after a leak. If you see black, green, or white spots, or smell a musty odor, act fast.
How To Remove Mold
- Wear a mask and gloves.
- Mix 1 cup bleach with 1 gallon water.
- Scrub visible mold from the ceiling with a sponge or brush.
- Rinse with clean water and dry the area fully.
- If mold covers more than 10 square feet, call a mold specialist.
Non-obvious tip: Mold can hide behind paint and inside ceiling cavities. If you smell must but see nothing, the problem may be inside.
Extra advice: When cleaning, don’t just wipe the surface. Mold roots can go deeper, especially in drywall. Scrub gently but thoroughly, and repeat the process if stains remain after drying.
If you have allergies or asthma, let someone else do the cleaning, or wear a good-quality mask (N95 or better).

Credit: www.youtube.com
Preventing Ceiling Damage In The Future
Once your ceiling is dry, a few smart steps can prevent another mess.
Regular Maintenance
- Check your roof for missing shingles or cracks twice a year.
- Inspect plumbing for leaks, especially in older homes.
- Make sure your bathroom and kitchen fans vent outside, not into the attic.
- Clean gutters and downspouts every season.
Look around attic spaces for wet insulation or musty smells every few months, especially after storms.
Upgrade Where Possible
- Install water leak detectors under upstairs appliances.
- Use moisture-resistant drywall in kitchens and bathrooms.
- Seal gaps around pipes and vents with caulk.
Insight: Many people don’t realize that slow, small leaks cause more ceiling mold than big, obvious floods. Regular checks catch these before they become serious.
Another common miss: Don’t block attic vents or airflows—good ventilation is your best friend against moisture buildup.
When To Call A Professional
Some wet ceilings are best left to the experts. Call for help if:
- The ceiling is sagging or about to collapse.
- The water is from sewage (toilet overflow, etc. ).
- Mold covers a large area or returns after cleaning.
- You cannot find or stop the leak.
- The ceiling is above important rooms or expensive finishes.
Professionals have better drying tools, can check for hidden moisture, and repair damage safely. They can also test for asbestos or lead paint if your home is older.
What Beginners Often Miss
1. Not checking insulation: Wet insulation above the ceiling holds moisture and must be replaced. Leaving it causes mold and future leaks.
2. Not using a dehumidifier: Fans alone do not dry out hidden moisture. Dehumidifiers pull water from the air and speed up drying.
3. Painting too soon: If you paint before the ceiling is fully dry, stains and mold will return.
4. Ignoring small leaks: Even tiny drips can cause major damage over time. Fix every leak, no matter how small.
5. Not looking for secondary damage: Water can travel along beams and wires, causing wet spots far from the original leak.
Another insight: After drying, always look for small cracks or nail pops in the ceiling. These can be early signs of hidden water damage, even if the main wet area looks fine.
Real-world Example
A homeowner in Texas noticed a small brown stain on her living room ceiling after a heavy storm. She wiped the spot and placed a fan below it, but didn’t check the attic. Three days later, a large section of the ceiling collapsed.
The cause? Wet insulation above the ceiling that never dried. The repair cost was over $3,000—more than ten times the cost of replacing insulation early.
This shows why a complete approach matters. Drying only the ceiling surface is not enough. Always check above and around the wet area, and don’t rush repairs before every part is dry.
Another example: A renter in a second-floor apartment found small peeling paint in the bathroom. Instead of reporting it, he repainted. A month later, mold covered the ceiling and upper walls. The cause was a leaking pipe upstairs. Early action would have saved weeks of disruption and a costly clean-up.
Trusted Resources
If you need more information, the Environmental Protection Agency (EPA) has detailed advice on dealing with mold and water damage. You can read more at EPA’s Mold Cleanup Guide.
Frequently Asked Questions
How Long Does It Take For A Wet Ceiling To Dry?
Most ceilings take 24 to 72 hours to dry with fans and dehumidifiers. Plaster and thick ceilings may take longer. Check for hidden moisture before repairing or painting. If the weather is humid or cold, drying can take extra time.
Can I Just Paint Over A Water Stain On My Ceiling?
No. Painting over water stains without drying and cleaning first will not solve the problem. The stain will usually come back, and mold may grow underneath. Use a stain-blocking primer only after the area is completely dry. Wait at least 48 hours after drying to be sure.
Is It Safe To Stay In A Room With A Wet Ceiling?
It depends. If the ceiling is sagging or water is dripping, stay out—collapse is possible. Small damp spots are less risky, but mold may cause breathing issues. Always turn off electricity near wet ceilings. If you have children or elderly people at home, keep them away from the area until repairs are finished.
What Is The Best Way To Dry A Ceiling Fast?
The fastest way is to use multiple fans, a dehumidifier, and open windows if weather allows. Remove any wet insulation or tiles above the ceiling. The more air movement, the quicker it dries. Move fans to cover different angles every few hours.
When Should I Call A Professional For A Wet Ceiling?
Call an expert if the ceiling is sagging, mold is widespread, you can’t stop the leak, or the water is from sewage. Large or hidden water damage needs professional drying to avoid future problems.
Drying a wet ceiling is not just about speed—it’s about doing it right. With these steps, you can handle most wet ceiling emergencies and keep your home safe from future damage. Acting quickly, using the right tools, and following every step will save money, prevent health risks, and protect your home for years to come.