Transforming old furniture can be both practical and rewarding. If you have a dresser that no longer suits your décor or storage needs, you don’t have to throw it away or sell it cheaply. With some creativity and effort, you can turn a dresser into a storage unit that’s perfect for organizing your life, whether in the bedroom, entryway, garage, or even the kitchen. This process is not only cost-effective but also eco-friendly, saving a large piece of furniture from the landfill. In this guide, you’ll find clear steps, useful tips, and smart ideas for making your dresser work harder for your home.
Why Turn A Dresser Into A Storage Unit?
Dressers are often strong, roomy, and made from quality materials. But their design can be limiting if you want flexible storage. By converting a dresser, you can create custom storage for toys, tools, office supplies, pantry items, or even shoes.
This approach is ideal for renters or homeowners who need more storage but want to avoid expensive built-ins or plastic bins that break easily.
Many people miss two simple facts: First, most dressers already have a solid frame, so you don’t need to build much from scratch. Second, the shape and size of dressers make them easy to fit into narrow or awkward spaces, offering storage where other furniture might not fit.
Planning Your Dresser-to-storage-unit Project
Before you start, planning is essential. A little time spent on preparation can save hours of frustration later.
Assess Your Dresser
Check the dresser’s frame, drawers, and back. Is it made of solid wood or particleboard? Solid wood is more durable but heavier. Particleboard is lighter, but it may not hold up well if you plan to store heavy items. Pull the drawers all the way out and inspect the runners and handles.
Look for mold, water damage, or broken parts. If the dresser is wobbly, you might need to tighten screws or add new support.
Decide On Your Storage Needs
Think about what you want to store. Will it be clothing, craft supplies, tools, kitchen items, or something else? The answer will shape the design. For instance, storing heavy tools will require stronger shelves and reinforcements. If you need to store small items, consider adding dividers or bins.
Sketch A Simple Plan
Draw a rough sketch of your dresser and mark where you want shelves, bins, or baskets. This will help you decide what materials you need. Don’t worry about making a perfect drawing—just map out your ideas so you don’t forget details.
Gather Tools And Materials
Here’s a basic list of what you might need:
- Screwdriver (manual or electric)
- Hammer
- Drill and drill bits
- Wood glue
- Measuring tape
- Sandpaper
- Paint or wood stain (optional)
- New knobs or handles (optional)
- Wood screws and brackets
- Plywood or MDF for shelves
- Storage bins, baskets, or drawer dividers
Some dressers need only a few simple changes, while others require more work. Take time to make a shopping list and double-check your measurements.
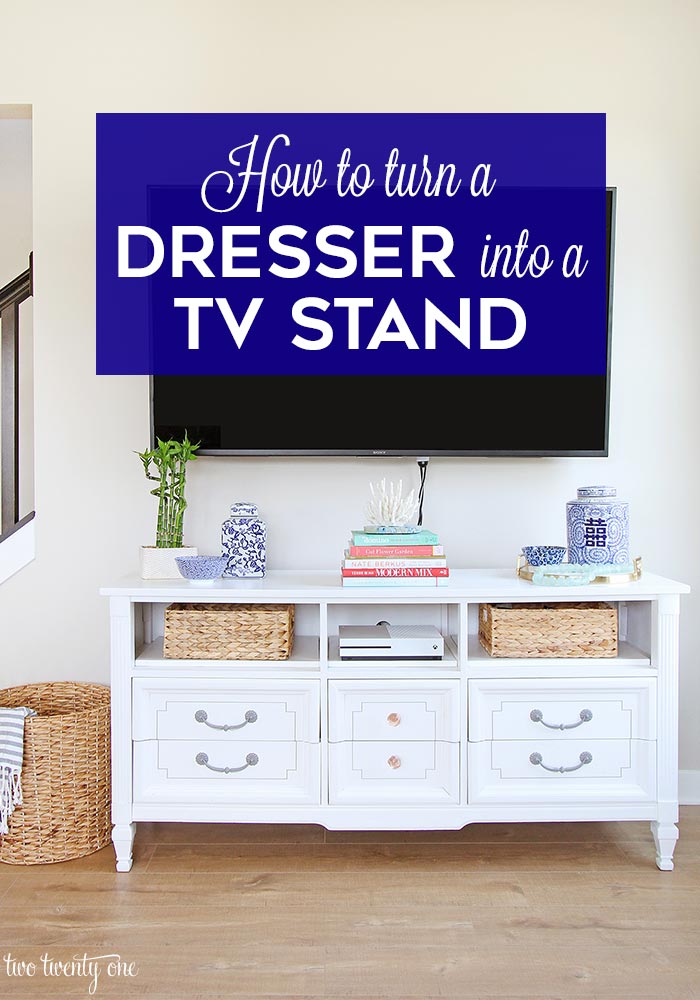
Credit: www.twotwentyone.net
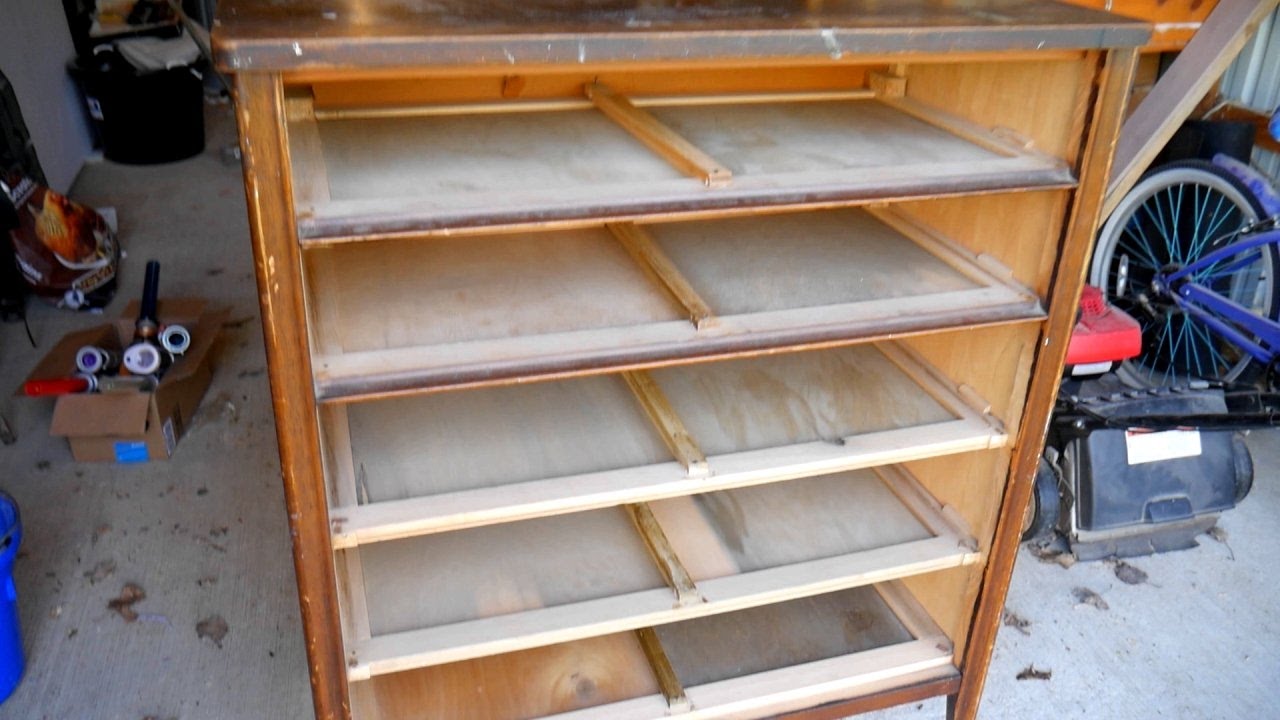
Removing Drawers And Prepping The Frame
Start by taking out all the drawers. If you plan to use the drawers elsewhere, set them aside. Remove any hardware, such as handles or runners, that will get in the way of your new storage design.
Wipe down the dresser with a damp cloth. Dust, dirt, or sticky spots will make it harder to paint or glue later. If you see any cracks or holes, fill them with wood filler and let them dry before sanding smooth.
If you want to paint or refinish the dresser, now is the time. Sand the surface lightly to remove old varnish or paint, then wipe away dust. Use a primer if you’re painting a dark surface with light paint, and let each coat dry fully before moving to the next step.
Choosing The Right Storage Layout
The right layout depends on the items you want to store and the space you have. Here are some common options:
- Open Shelves: Remove drawers and add horizontal shelves for easy access. This works well for shoes, books, baskets, or folded towels.
- Cubby Spaces: Create vertical and horizontal dividers to make small cubbies. Great for kids’ toys, office supplies, or pantry items.
- Mixed Storage: Keep some drawers and add shelves to other sections. This design gives you both closed and open storage.
- Closet Substitute: Add a rod for hanging clothes in one section, keeping drawers below for folded items.
- Bin Storage: Remove drawers and insert plastic or fabric bins for flexible storage. Bins are ideal for kids’ rooms or craft supplies.
Here’s a comparison of different layout options for your dresser storage unit:
| Layout Type | Best For | Difficulty | Customizable? |
|---|---|---|---|
| Open Shelves | Shoes, books, linens | Easy | Yes |
| Cubby Spaces | Toys, office supplies | Moderate | Yes |
| Mixed Storage | Variety of items | Moderate | Yes |
| Closet Substitute | Clothes | Hard | Limited |
| Bin Storage | Kids’ items, crafts | Easy | Yes |

Credit: www.theinspiredhive.com
Building Shelves And Dividers
Adding shelves or dividers is the main structural change. Measure the inside width and depth of your dresser. Cut plywood or MDF to fit, or have it cut at a hardware store for accurate sizing.
Installing Shelves
- Mark the shelf height on both sides of the inside frame.
- Use a level to ensure lines are even.
- Attach small brackets or wood strips as supports.
- Place the shelf on top of the supports and secure with screws or wood glue.
If you’re adding more than one shelf, space them according to the height of the items you plan to store.
Building Cubby Dividers
Cut thin strips of wood or MDF to form vertical and horizontal dividers. Attach them with wood glue and small nails. For a professional look, paint the dividers before installing. Keep in mind that cubbies are best for small or medium items, not heavy objects.
Reinforcing Structure
Older dressers might need extra support, especially if you remove many drawers. Add a strip of wood along the back, bottom, or sides if the frame feels loose. This simple trick can prevent sagging or wobbling later.
Improving Functionality With Accessories
Accessories can make your storage unit much more practical. Here are some options:
- Bins and Baskets: Perfect for loose items or things you want to hide.
- Drawer Dividers: Keep small things organized, from office supplies to socks.
- Hooks: Attach inside for hanging keys, bags, or scarves.
- Labels: Add labels to bins, baskets, or shelves so everyone knows where things go.
- Lighting: Stick-on LED lights help you see inside deep shelves or cubbies.
Small changes can have a big impact. For example, adding labels makes it easier for kids to clean up, and hooks turn a simple shelf into a mini mudroom.
Painting, Staining, And Finishing Touches
A fresh finish can make your new storage unit look high-end. Here’s how to get a clean, lasting result:
- Sand all surfaces lightly to remove rough spots.
- Wipe with a damp cloth to remove dust.
- Use a quality primer if you’re changing from dark to light color.
- Paint with a brush or roller in thin, even coats.
- Let each coat dry fully before adding another.
- For staining, follow the wood grain and wipe off excess with a cloth.
Don’t forget the small details—new knobs, handles, or decorative trim can change the dresser’s whole look. If you want a fun project for kids, let them choose the paint or help apply decals.
Examples Of Dresser-to-storage Transformations
To inspire your project, here are real-life examples of how people have turned dressers into unique storage units:
- Entryway Organizer: A homeowner removed the top drawers and added hooks inside the frame for coats and bags, using the lower drawers for shoes and hats.
- Craft Supply Station: By adding shallow shelves and bins, a crafter organized ribbons, paints, and fabric in clear view.
- Pantry Storage: One dresser was painted white and fitted with pull-out baskets, turning it into extra pantry space for canned goods and snacks.
- Garage Tool Center: An old dresser became a sturdy tool station, with divided drawers for screws and nails, and open shelves for larger items.
- Kids’ Toy Chest: Parents removed drawers and added colorful bins, creating a fun, easy-access toy organizer.
- Bathroom Linen Cabinet: A small dresser was refinished and fitted with shelves to hold towels, toiletries, and cleaning supplies.
These ideas show that you can adapt a dresser to almost any space or need.
Credit: www.youtube.com
Safety And Stability Tips
When repurposing a dresser, safety is important. Here’s how to make sure your storage unit is secure:
- Anchor to the Wall: Especially if you have children or pets, attach the dresser to the wall with anti-tip straps.
- Check for Sharp Edges: Sand any cut wood or rough areas to avoid splinters.
- Weight Limits: Don’t overload shelves. Most dressers can handle moderate weight, but heavy items should go on the lowest shelves or in bottom drawers.
- Ventilation: If you use the unit in a damp area, leave space at the back for air to circulate and prevent mold.
Maximizing Storage: Advanced Ideas
Once the basics are done, you can add features to get even more from your dresser storage unit. Here are advanced ideas to try:
Add Sliding Doors
If you want to keep dust out or hide clutter, install simple sliding doors using lightweight panels and a track system. This works well for garage or workshop storage.
Create A Charging Station
Cut a small hole in the back of the dresser for cables, and use one section to store and charge phones, tablets, or other devices. Add a power strip inside for easy access.
Make It Mobile
Attach locking caster wheels to the bottom, and your storage unit can move wherever you need it. This is handy for craft rooms or garages.
Add Pegboard
Attach pegboard to the sides or back for hanging tools, kitchen utensils, or cleaning supplies. Pegboard is cheap and easy to customize.
Install Pull-out Drawers Or Trays
If you need better access to deep shelves, add pull-out trays or drawers. These can be bought ready-made or built from plywood.
Here’s a quick look at some advanced features and their benefits:
| Feature | Main Benefit | Best For |
|---|---|---|
| Sliding Doors | Hide clutter, keep dust out | Workshops, garages |
| Charging Station | Organize electronics | Offices, bedrooms |
| Wheels | Easy to move | Craft rooms, garages |
| Pegboard | Vertical storage | Tools, kitchen |
| Pull-Out Trays | Easy access | Deep shelves |
Common Mistakes To Avoid
Many beginners make the same errors when turning a dresser into a storage unit. Avoid these common pitfalls:
- Skipping Measurements: Always measure twice before cutting shelves or buying bins.
- Ignoring Weight: Overloading shelves can lead to sagging or breakage.
- Not Anchoring: Unsecured furniture can tip over, especially with children.
- Poor Finish Prep: Painting without sanding or priming leads to chipping and peeling.
- Using Weak Materials: Thin plywood or weak brackets won’t hold up over time.
One less obvious mistake is forgetting about air flow. If you seal off the back or stuff the unit too full, you risk musty smells or mold, especially in humid areas.
Personalizing Your Storage Unit
A custom storage unit is a chance to express your style. Here are ways to personalize your finished piece:
- Paint Patterns: Use stencils or painter’s tape to add stripes, chevrons, or other patterns.
- Wallpaper or Fabric Backing: Line the back of open shelves with bold wallpaper or fabric for a designer look.
- Unique Handles: Swap standard knobs for vintage, brass, or ceramic ones to add character.
- Decals or Stickers: For kids’ rooms, use removable decals to create a playful effect.
- Chalkboard Paint: Paint one drawer front or side with chalkboard paint for quick notes or labels.
Personal touches can make your new storage unit not just useful, but also a focal point in the room.
Cost And Time Estimates
Turning a dresser into a storage unit is usually affordable, but costs vary based on materials and finishes. Here’s an estimated range for a basic project:
| Item | Estimated Cost | Notes |
|---|---|---|
| Basic Tools | $0–$40 | Many people already own these |
| Wood/Plywood | $20–$60 | Depends on shelf number and size |
| Paint/Stain | $10–$30 | Optional |
| Bins/Baskets | $15–$50 | Optional, price varies by quality |
| New Hardware | $5–$25 | Handles, knobs, brackets |
Most projects can be finished in one weekend, including drying time for paint. If you add advanced features like sliding doors or wheels, allow extra time.
Environmental Benefits
Reusing old furniture is good for the environment. According to the Environmental Protection Agency, over 9 million tons of furniture end up in US landfills each year. By repurposing a dresser, you help reduce waste and save energy used in manufacturing new items. For more on the environmental impact of furniture waste, see the EPA’s official data.
Practical Tips For Success
- Test Fit Before Final Assembly: Place shelves or bins inside the dresser before screwing or gluing, to confirm fit.
- Use Quality Fasteners: Cheap screws or brackets can fail. Spend a little more for sturdy hardware.
- Keep a Clean Work Area: Dust and debris can ruin paint finishes or make assembly harder.
- Ask for Help on Big Jobs: Some steps, like attaching a backing or lifting a heavy dresser, are safer with a second person.
- Don’t Rush Drying Times: Let paint or glue dry completely to avoid smudges or weak joints.
A trick many miss: If you use adhesive for shelves or dividers, clamp them firmly and let them sit overnight. This gives much stronger results than rushing.
When To Call A Professional
Most dresser-to-storage conversions are DIY-friendly. However, if you want to add electrical features (like outlets or built-in lighting), or if the dresser needs major structural repair, consider hiring a pro. This is especially true if you’re not comfortable using power tools or if the dresser is antique and valuable.
Frequently Asked Questions
How Do I Know If My Dresser Is Strong Enough For A Storage Unit?
Check the frame and back panel for cracks, warping, or signs of rot. Solid wood dressers are usually stronger than those made from particleboard. If the dresser feels wobbly, reinforce it with extra screws or wood strips before adding shelves or heavy items.
Can I Turn A Laminate Or Particleboard Dresser Into A Storage Unit?
Yes, but be careful with heavy loads. Particleboard is weaker than solid wood. When screwing into laminate, drill small pilot holes first to avoid cracking. Use lightweight bins and avoid overloading shelves.
What’s The Best Way To Add Shelves Inside A Dresser?
Measure carefully and cut shelves to fit snugly. Attach wood strips or metal brackets to the sides as supports. Use screws for a strong hold, and check that everything is level before final assembly.
How Can I Make My New Storage Unit Safe For Kids?
Anchor the dresser to the wall using safety straps. Sand all edges smooth, and avoid using glass or sharp hardware. Keep heavy items on the bottom shelves or in lower drawers to reduce the risk of tipping.
Do I Need Special Tools For This Project?
Basic tools like a screwdriver, drill, hammer, and measuring tape are usually enough. For advanced features (like sliding doors or wheels), you may need a saw, level, or clamp. Most supplies are available at local hardware stores.
Transforming a dresser into a storage unit is a smart way to organize your space while saving money and reducing waste. Whether your style is modern, rustic, or playful, you can create a storage solution that fits your needs and adds character to your home.
With a bit of planning and creativity, your old dresser can become one of the most useful pieces of furniture you own.