
Water damage in wood kitchen cabinets is a common headache for homeowners. It doesn’t just make your kitchen look bad—it can lead to mold, swelling, bad smells, and even structural problems if left untreated. Many people think replacing cabinets is the only solution, but you can often repair water damaged wood kitchen cabinets yourself with some time and effort.
The process is not always simple, but with the right approach and tools, you can restore your cabinets to look clean, smooth, and sturdy again.
If you’re dealing with warped doors, peeling laminate, or dark stains on your cabinet base, you’re not alone. Kitchens are full of water sources—sinks, dishwashers, even spilled drinks. No matter the cause, repairing your cabinets can save you hundreds or even thousands of dollars compared to full replacement.
This guide will walk you through every step of the process, from assessing damage to the final finish. Along the way, you’ll find practical tips, examples, and insights that even many experienced DIYers miss. By the end, you’ll know exactly how to bring your cabinets back to life and protect them for years to come.
Understanding Water Damage In Wood Kitchen Cabinets
Before you start repairs, it’s important to understand how water damages wood cabinets. Water can cause:
- Swelling and warping: Wood absorbs water and swells, which can make cabinet doors and panels twist or bulge.
- Discoloration and stains: Dark spots or lighter patches often show where water has soaked into the wood.
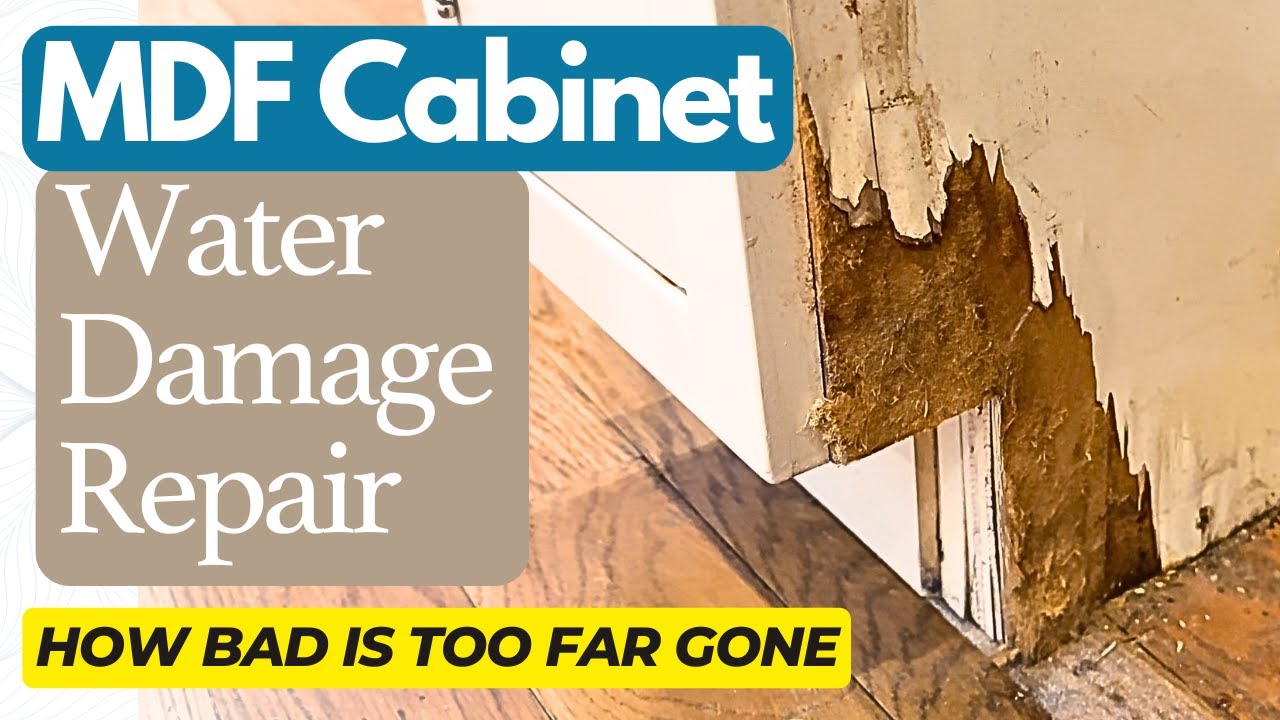
- Delamination: If your cabinets are made with plywood or MDF covered in a laminate, water can make the layers separate or the laminate peel.
- Softening or rot: Extended exposure leads to soft, crumbly wood—sometimes with a musty smell.
Sometimes the damage is only on the surface, like peeling finish or stains. Other times, the wood structure is affected. Identifying the type and extent of damage is the first step to deciding the best repair method.
Assessing The Extent Of Water Damage
Start by taking a close look at every affected cabinet. You need to know if you’re dealing with minor surface issues or deeper structural problems.
Key Steps For Assessment
- Check for Swelling: Run your hand along the wood. Is it smooth, or do you feel bubbles or bulges? Swollen panels may need more work than flat ones.
- Look for Discoloration: Note any dark spots, water rings, or faded areas. These show where water has soaked in.
- Test for Softness: Press gently with your finger or a screwdriver. If the wood feels soft or crumbles, it may be rotted.
- Inspect Laminate: If your cabinets have a vinyl or plastic laminate, look for areas that are peeling, bubbling, or lifting.
- Smell for Mold/Mildew: A musty odor often means water has been there for a while, and you might need to address mold as well.
Table: Common Types Of Water Damage And Repair Difficulty
| Type of Damage | Visible Signs | Repair Difficulty |
|---|---|---|
| Surface Stains | Discoloration, water rings | Easy |
| Warping/Swelling | Bulges, uneven surfaces | Moderate |
| Delamination | Peeling laminate, bubbles | Moderate |
| Rot/Soft Wood | Crumbly texture, musty smell | Hard |
Understanding what you’re dealing with helps you choose the right repair steps.
Gathering Tools And Materials
You don’t need expensive tools to repair most water damage. Here’s what you’ll usually need:
- Screwdriver (to remove doors/hardware)
- Sandpaper (medium and fine grit, 80–220)
- Putty knife
- Wood filler or epoxy wood repair compound
- Clamps (for warped or delaminated areas)
- Primer and paint or wood stain and sealer
- Brushes or rollers
- Cleaning solution (mild soap, water, or white vinegar)
- Protective gear (gloves, mask, safety glasses)
- Fan or hair dryer (for drying)
- Painter’s tape and drop cloths
You may also need replacement hardware or small pieces of veneer, depending on your cabinet style.
Drying Out Water Damaged Cabinets
Before any repair, your cabinets must be completely dry. Working on damp wood is a common mistake that leads to poor results.
How To Dry Cabinets Effectively
- Remove all cabinet contents and open doors/drawers.
- Wipe surfaces with a dry cloth to remove standing water.
- Use a fan or a hair dryer (on a cool or warm setting) to speed up drying. Aim airflow at the most affected spots.
- For hidden areas, like under the sink, use a small fan or dehumidifier.
- If possible, remove the cabinet doors and let them dry separately.
- Let everything dry for at least 24–48 hours before starting repairs.
Pro tip: Never use direct heat (like a heat gun on high) as it can warp the wood further.

Credit: todayshomeowner.com
Cleaning And Preparing The Surface
Once dry, the next step is cleaning. Water often leaves behind dirt, grime, or mildew that can affect repairs.
- Mix warm water and mild soap or a bit of white vinegar.
- Scrub the surface with a soft sponge or cloth.
- For mildew or mold, use a mixture of one part bleach to four parts water. Wear gloves and ventilate the area.
- Rinse with a damp cloth and let dry completely.
Beginner’s mistake to avoid: Skipping this cleaning step can cause paint or filler to peel later.
Repairing Surface Stains And Minor Damage
If your cabinet damage is mostly surface-level—such as stains, minor scratches, or faded finish—repairs are straightforward.
How To Remove Stains
- Light sanding: Use fine-grit sandpaper (150–220) to gently sand the stained area. Sand with the wood grain.
- Bleach for deep stains: For dark water marks, dab with a cloth dipped in a weak bleach solution. Let sit for 10 minutes, then wipe clean and dry.
- Restain or paint: Apply wood stain or paint to match the surrounding area. Use a small brush for control.
- Seal the area with a clear polyurethane, varnish, or matching topcoat.
Non-obvious insight: Sometimes, a stain is only on the finish, not the wood itself. Try sanding a small test spot first to see if you can remove it without using chemicals.
Fixing Warped Or Swollen Wood
Swelling and warping are common where water has sat for a long time. The key is to flatten the wood and restore its shape.
Steps To Repair Swelling
- Remove the door or panel if possible.
- Sand the swollen area with medium-grit sandpaper (80–120). Work slowly, checking often.
- For severe warping, cover the area with a damp towel, place a flat board on top, and use clamps to press the wood flat. Leave for 24 hours.
- After flattening, fill any low spots with wood filler. Let dry, then sand smooth.
- Finish with primer, paint, or stain to match the rest of the cabinet.
Table: Sandpaper Grit Guide For Cabinet Repairs
| Repair Task | Recommended Grit | Purpose |
|---|---|---|
| Remove swelling/rough damage | 80–120 | Shape and smooth wood |
| Blending filler or repairs | 150–180 | Smooth transitions |
| Final finish sanding | 220 | Prepare for paint/stain |
Advanced tip: Sometimes, warping means the wood fibers are permanently changed. In those cases, you may need to replace the panel or door.
Repairing Delaminated Or Peeling Laminate
Many kitchen cabinets use a thin layer of laminate (vinyl or plastic veneer) over wood or MDF. Water can make this layer peel or bubble.
How To Fix Peeling Laminate
- Lift the loose section gently. Don’t pull it off completely if it’s still attached.
- Clean underneath with a small brush and let dry.
- Apply wood glue or contact cement under the lifted area.
- Press down and clamp the laminate in place. Use a piece of wax paper and a flat board between the clamp and the cabinet to avoid marks.
- Let dry for at least 8–12 hours.
- Sand any rough edges and touch up with paint or a laminate repair marker.
If the laminate is missing or badly damaged, you can cut a piece of matching laminate and glue it in place. Most hardware stores sell small sheets for repairs.
Common mistake: Using too much glue can cause new bubbles. Apply glue thinly and spread evenly.

Credit: www.youtube.com
Filling Cracks, Holes, And Soft Spots
Sometimes water damage leaves cracks, gouges, or soft spots in the wood. Filling and reinforcing these areas helps restore strength.
Step-by-step Filling Process
- Clean out loose wood with a putty knife.
- For deep holes or rot, use a wood hardener to strengthen the area (available at most hardware stores).
- Apply wood filler or epoxy wood repair compound. Fill a little above the surface.
- Let dry fully—usually 2–6 hours for filler, 24 hours for epoxy.
- Sand smooth with fine sandpaper.
- Prime and paint or stain to match.
Pro insight: For large repairs, use a two-part epoxy that bonds tightly and resists future water damage better than standard filler.
Sanding And Smoothing The Surface
Sanding is essential after any patching or gluing. It removes rough spots and blends repairs with the rest of the cabinet.
- Start with medium-grit sandpaper (120–150) for rough patches.
- Move to fine grit (180–220) for a smooth finish.
- Always sand with the grain of the wood to avoid scratches.
- Wipe away dust with a damp cloth before painting or staining.
Tip: Use a sanding block for flat areas and a folded piece of sandpaper for corners.
Priming, Painting, Or Staining
Once the wood is repaired and smooth, you need to finish it. This step protects the wood from future water damage and restores the cabinet’s look.
Choosing The Right Finish
- Primer: If you plan to paint, use a stain-blocking primer to stop old stains from showing through.
- Paint: Choose a high-quality cabinet paint (often labeled as “kitchen and bath” or “trim” paint) for durability.
- Stain: For stained cabinets, pick a matching wood stain and follow with a clear sealer.
How To Apply Finish
- Tape off areas you don’t want painted or stained.
- Use a brush or roller for even coverage.
- Apply thin, multiple coats instead of one thick coat.
- Let each coat dry according to the product instructions.
- For extra protection, finish with a polyurethane sealer.
Beginner’s insight: Don’t skip primer. It helps paint stick and hides repairs for a smooth, even finish.
Reattaching Hardware And Doors
After paint or stain is dry, it’s time to put your kitchen back together.
- Reattach hinges, handles, and knobs. Tighten all screws.
- Check for smooth operation. If doors or drawers stick, sand edges lightly.
- Clean up any stray paint or glue before putting items back in the cabinets.
Non-obvious tip: Replace any rusted or damaged hardware. This small change makes cabinets feel new.
Credit: www.youtube.com
Preventing Future Water Damage
Repairing cabinets takes effort. Protect your work by preventing future water problems.
Table: Easy Ways To Prevent Cabinet Water Damage
| Action | How It Helps |
|---|---|
| Install drip trays under sink cabinets | Catches leaks and spills before they reach wood |
| Seal gaps with caulk | Blocks water from seams and corners |
| Check plumbing regularly | Finds leaks early before they cause damage |
| Wipe up spills quickly | Stops water from soaking in |
| Use waterproof sealant on cabinet base | Adds extra layer of protection |
Expert advice: Most cabinet water damage starts with small leaks. Regular checks under the sink and by the dishwasher can prevent big repairs later.
When To Replace Instead Of Repair
Not all water damage can be fixed. Knowing when to replace is as important as knowing how to repair.
Signs Replacement Is Best
- Wood is soft or crumbles in many spots
- Cabinets smell strongly of mold even after cleaning
- Severe warping makes doors impossible to close
- Repeated repairs don’t last
If your cabinets have these problems, replacement may save more time and money in the long run.
Real-world Example: Repairing A Water Damaged Cabinet Base
Let’s look at a common scenario. A homeowner finds the sink cabinet base is swollen, stained, and laminate is peeling due to a slow leak.
Step 1: Turn off water, fix the leak, and dry the area with a fan for two days.
Step 2: Remove everything from the cabinet. Pull up loose laminate with a putty knife.
Step 3: Sand the swollen wood flat, apply wood hardener, then fill deep spots with epoxy wood filler.
Step 4: After drying, sand smooth and glue down any loose laminate. Clamp overnight.
Step 5: Prime and paint with a water-resistant cabinet paint. Add a drip tray before putting items back.
The result: The base is flat, smooth, and protected—without the cost of a new cabinet.
Non-obvious Tips For Better Results
- Color matching: Bring a cabinet door or drawer to the paint store for a perfect match, especially with stained finishes.
- Edge banding: For cabinets with exposed plywood edges, use iron-on edge banding tape for a clean, professional look.
- Label doors and hardware: Before removing, label each door and hinge to make reassembly easier. Many beginners mix these up, leading to crooked doors.
- Use a moisture meter: If you have one, check the wood’s moisture content before repairs. Wood should be below 15% moisture for best results.
Frequently Asked Questions
How Long Does It Take To Repair Water Damaged Kitchen Cabinets?
The time depends on the damage. For light surface stains, repairs can take a few hours. For deep swelling, filling, and painting, it may take 2–4 days (including drying time between steps).
Can I Repair Water Damaged Particle Board Cabinets?
Yes, but particle board is more sensitive to water than solid wood. Dry it completely, cut out the worst damaged parts, and fill with epoxy. However, if the board is very swollen or crumbly, replacement is often a better choice.
What Products Are Best For Sealing Repaired Cabinets?
Use a water-based polyurethane or cabinet-grade paint for best results. These create a tough, water-resistant finish that lasts longer in kitchens.
Is It Safe To Repair Cabinets With Mold Or Mildew?
Minor mold can be cleaned with bleach or vinegar solution. For heavy mold (especially black mold), consult a professional. Breathing mold spores is hazardous, so always wear a mask and ventilate the area.
How Can I Tell If The Cabinet Needs To Be Replaced Instead Of Repaired?
If the wood is soft in many spots, smells bad after cleaning, or won’t hold screws, replacement is usually needed. Also, if repairs do not last, or the cabinet continues to warp, it’s time to replace.
Restoring water damaged wood kitchen cabinets takes patience and a step-by-step approach, but it’s a skill that saves money and extends the life of your kitchen. With careful drying, cleaning, and repair, you can often avoid the cost and trouble of new cabinets. For more tips on home improvement, see resources like Family Handyman. Remember: regular maintenance keeps your kitchen looking great and prevents future problems.