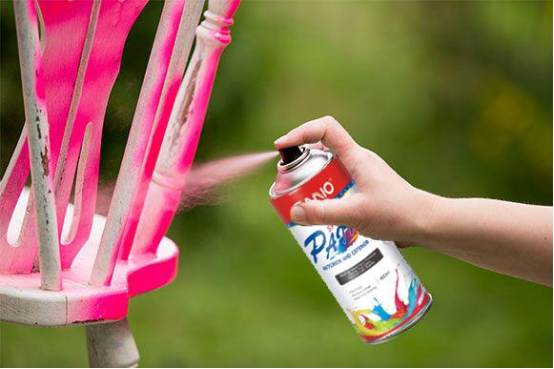
Spray painting inside can feel risky, but with the right steps, you can get a smooth, pro finish without mess or danger. Whether you want to renew old furniture, paint cabinets, or complete a DIY project, knowing how to spray paint indoors is a skill that pays off.
Many beginners worry about fumes, overspray, and ruining their space. But if you plan carefully and follow the right process, spray painting inside can be clean, safe, and even enjoyable.
This guide covers every detail you need—from choosing the right paint and preparing your area, to spraying techniques, drying, and cleaning up. You’ll learn what most first-timers miss, such as how airflow affects your results or why temperature matters more indoors.
You’ll also see simple comparisons and practical tips that make your project easier. Whether you’re a hobbyist or just want a fresh look in your home, this article will help you spray paint inside with confidence.
Why Spray Paint Inside?
Spray painting is popular because it covers surfaces quickly and evenly. Indoor spray painting has special benefits:
- You avoid weather problems—no wind, rain, or dust.
- You can work year-round, even in winter or rain.
- Indoor spaces let you control temperature and humidity for better results.
- It’s easier to paint small objects or furniture that are hard to carry outside.
However, it also comes with challenges: fumes, overspray, and the risk of damaging nearby areas. Most problems happen from poor preparation or skipping safety steps. A little planning makes a huge difference.
Choosing The Right Spray Paint
Not all spray paints are the same. Picking the right one for indoor use is key for safety and finish quality.
Types Of Spray Paint
- Acrylic Spray Paint: Water-based, low odor, and dries fast. Good for wood, plastic, and crafts.
- Enamel Spray Paint: Oil-based, more durable, but stronger fumes. Best for metal and outdoor projects.
- Primer Spray: Used before color to help paint stick and cover stains.
- Clear Coat: Adds shine and protection after painting.
Low-voc And No-voc Options
VOC means “volatile organic compounds.” These are chemicals that cause strong odors and health risks. For indoor projects, choose low-VOC or no-VOC spray paints. They have less smell and are safer to breathe.
Look for labels like “indoor safe,” “low odor,” or “non-toxic. ” Some brands make special paints for indoor furniture or children’s toys.
Spray Paint Vs. Airless Paint Sprayer
You can use aerosol spray cans or airless paint sprayers. Spray cans are cheaper and easier for small jobs, but sprayers cover large areas faster.
| Feature | Spray Can | Airless Sprayer |
|---|---|---|
| Best For | Small objects, crafts | Walls, cabinets, big furniture |
| Cost | Low ($5–$10 per can) | Higher (equipment + paint) |
| Setup | No setup | Needs cleaning and prep |
| Control | Easy for detail work | Smoother, faster for large areas |
| Cleanup | Minimal | Takes time |
For most indoor jobs, aerosol spray cans are easier. Only use a sprayer if you have experience and good ventilation.
Preparing Your Space
Preparation is the most important part of indoor spray painting. Good prep prevents damage and makes clean-up simple.
Picking The Right Area
Choose a well-ventilated spot, like a garage with windows or a basement with an exhaust fan. If you can, use a room with a door you can close. Don’t paint in bedrooms, kitchens, or near pets and kids.
If you must paint in a living area, clear as much as you can. Move small furniture, cover floors, and block off vents.
Covering And Protecting Surfaces
Overspray can reach surprising distances, so block off anything you don’t want painted.
- Drop cloths or plastic sheeting: Cover the floor and nearby walls.
- Painter’s tape: Seal edges where the floor meets walls, around door frames, and any trim.
- Cardboard or boxes: Build a quick spray booth or shield for small items.
- Old sheets: Use as extra protection for surfaces.
Tape down coverings so they don’t move while you work.
Creating A Spray Booth
For small objects, a DIY spray booth controls overspray and keeps dust away. Use a large cardboard box, cut off one side, and set it on its side. Line it with plastic or newspaper, and place your item inside. For larger jobs, hang plastic sheets from the ceiling to make a temporary booth.
Ventilating The Area
Good airflow is critical. Open windows and doors if possible. Use a box fan facing out to push fumes outside. Seal off other rooms with plastic sheets or towels under doors. If you have an exhaust fan, use it during and after painting.
A common mistake is underestimating how far fumes travel. Even “low odor” paints can linger. Run fans for at least 2–3 hours after you finish.
Safety Equipment
Never skip safety gear, even with low-VOC paints.
- Respirator mask: Look for one rated for paint fumes, not just dust.
- Gloves: Protects your hands from paint and solvents.
- Safety glasses: Shields eyes from mist.
- Old clothes or coveralls: Paint stains are hard to remove.
Many beginners try to save time by skipping a mask, but even small projects can cause headaches or lung irritation if you breathe fumes.
Preparing The Object Or Surface
A clean, smooth surface gives the best spray paint results. This step is often rushed, but it’s the secret to a lasting finish.
Cleaning
Wipe down the object with a damp cloth to remove dust, oil, or dirt. For stubborn grease, use mild soap and water, then dry fully. Any debris will show through the paint.
Sanding
If the surface is glossy or uneven, lightly sand with fine-grit sandpaper (220-grit is ideal). Sanding helps paint stick and smooths old bumps. Wipe away all dust after sanding.
Priming
Many surfaces need a primer coat before color, especially bare wood, metal, or plastic. Primer helps paint stick, blocks stains, and prevents peeling.
Spray primer comes in cans—apply it just like paint, with thin, even coats. Let it dry fully before painting (usually 1 hour).
Taping And Masking
Use painter’s tape to block off areas you don’t want painted: hardware, glass, or labels. Press tape edges down firmly to prevent leaks.
For objects with moving parts, remove them if possible (like cabinet doors or drawer pulls). This makes painting easier and avoids clogging hinges.

Credit: sawsonskates.com
How To Spray Paint Inside: Step-by-step
Now comes the main event. Follow these steps for a smooth, even finish with minimal mess.
Step 1: Shake And Test The Paint
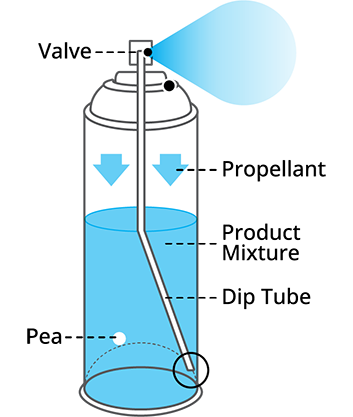
Shake the spray can for at least 1–2 minutes. This mixes the paint and prevents splatters. If using a paint sprayer, mix paint and thinner as directed.
Spray a quick test on cardboard or scrap material to check the nozzle and color.
Step 2: Position The Object
Place the object in your spray booth or on a raised surface (like sawhorses). This helps you reach all sides and avoids bending over. For small items, rotate them as you work.
Step 3: Start Spraying
Hold the can 8–12 inches from the surface. Start spraying slightly before the object, and move in smooth, steady passes. Overlap each pass by about 50% for even coverage.
- Move your whole arm, not just your wrist.
- Keep a steady speed—don’t stop in one spot or you’ll get drips.
- Release the nozzle at the end of each pass.
Most beginners spray too close, causing runs, or too far, causing rough texture. Practice on cardboard first if you’re unsure.
Step 4: Use Light, Multiple Coats
Don’t try to cover in one thick coat. Apply several light coats, letting each dry for 10–20 minutes (check the can for exact times). This prevents drips and gives a smooth finish.
Check for missed spots between coats. It’s easier to add more paint than fix a run.
Step 5: Watch For Drips And Fix Mistakes
If you see a drip or run, stop spraying. Wait until the paint is dry, then sand the drip lightly and re-spray that area. Don’t try to fix wet drips—this only makes it worse.
If you get overspray on something, wipe it off quickly with a damp rag if it’s still wet. For dried paint, use a little rubbing alcohol.
Step 6: Let It Dry
Allow the final coat to dry in a dust-free area. Dry time depends on paint type and room conditions, but most spray paints dry to the touch in 30–60 minutes and cure fully in 24 hours.
Don’t touch or move objects too soon. Even if they feel dry, the paint underneath may be soft.
Step 7: Apply A Clear Coat (optional)
For extra protection or shine, add a clear coat after the color is dry. Use the same spraying technique: light, even coats, with drying time between each.
Step 8: Remove Tape And Clean Up
Carefully peel off painter’s tape before the paint fully hardens to avoid peeling. Fold up drop cloths and throw away used coverings. Wash your hands and tools right away.
Managing Fumes And Air Quality
Spray paint releases chemicals that can linger indoors. Managing air quality is vital for your health.
Best Practices
- Keep windows and doors open for several hours after painting.
- Use an exhaust fan to pull fumes outside.
- Place a bowl of white vinegar or activated charcoal in the room to absorb odors.
- Avoid using spray paint near HVAC vents; fumes can travel to other rooms.
How Long To Wait Before Using The Room
Even with low-VOC paints, wait at least 24 hours before sleeping or spending long periods in the painted room. Sensitive people may need more time. If you smell paint, the air isn’t clear yet.
Common Mistakes And How To Avoid Them
Spray painting inside is easy to mess up if you skip key steps. Here are errors to watch for:
- Not ventilating enough: Fumes build up fast. Always run fans and open windows.
- Skipping surface prep: Dirty or glossy surfaces cause peeling and poor coverage.
- Spraying too thick: Heavy coats cause drips. Use several thin coats instead.
- Painting in poor light: Bad lighting hides missed spots and drips. Use bright, even light.
- Touching too soon: Let paint dry fully before moving or using objects.
- Not testing paint: Always test spray on scrap to check color and nozzle.
- Ignoring temperature and humidity: Too cold, hot, or humid conditions affect drying and finish. Aim for 60–80°F and low humidity.
- Improper cleanup: Don’t let paint dry in nozzles or sprayers. Clean up right after finishing.
Most mistakes are easy to avoid with a little patience and planning.
Advanced Tips For Pro Results
Want a flawless, long-lasting finish? Try these expert tricks:
- Warm your spray can in a bowl of lukewarm water for 5 minutes before painting. This helps paint flow smoother (never use hot water).
- Rotate the object between coats so you cover all angles evenly.
- Use a turntable (lazy Susan) for small items—spin as you spray.
- Mist the floor with water (if safe for your floor type) to keep dust down.
- Backlight your object with a lamp to spot missed spots or uneven areas.
- Lightly sand between coats with 400-grit sandpaper for a super-smooth finish.
These steps are optional but can make your project look truly professional.
Credit: www.sanvochemicals.com
Cleaning Up After Spray Painting
Cleaning is as important as painting. It keeps your space safe and ready for future projects.
Disposing Of Paint And Materials
- Never pour leftover paint or thinner down the drain.
- Let empty spray cans dry fully, then dispose of as directed by your local waste authority.
- Seal used drop cloths and tape in a trash bag.
Storing Leftover Paint
If you have leftover spray paint, store cans upright in a cool, dry place away from heat sources. Label the cap with the color and date for easy reference.
Cleaning Tools And Surfaces
- Wipe nozzles after use to prevent clogging.
- For paint sprayers, flush with water or solvent as directed.
- Clean any spills or overspray right away with a damp rag.
When Not To Spray Paint Inside
Sometimes, it’s safer and easier to paint outdoors or in a professional spray booth. Avoid indoor spray painting if:
- You have no way to ventilate the space.
- The weather outside is mild and you can move the object easily.
- You have sensitive family members, pets, or small children at home.
- The object is too large or awkward for your indoor space.
When in doubt, safety comes first.
Credit: www.slideproducts.com
Comparing Spray Paint With Other Indoor Painting Methods
Spray painting isn’t the only way to paint indoors. Here’s a quick comparison with other methods:
| Method | Speed | Finish | Best For | Mess Level |
|---|---|---|---|---|
| Spray Paint | Fast | Smooth, even | Furniture, small items | Medium (overspray risk) |
| Brush | Slow | Brush marks visible | Trim, detail work | Low |
| Roller | Moderate | Even, some texture | Walls, large flat areas | Low |
| Foam Pad | Moderate | Smooth, less mess | Doors, cabinets | Low |
Spray painting gives the fastest, smoothest finish, but requires more prep to prevent mess. For projects where a flawless look is critical, spraying is the best choice.
Cost And Time Estimates
How much will your project cost and how long will it take? Here’s a rough guide:
- Spray paint cans: $5–$10 each. Most small furniture needs 2–3 cans.
- Drop cloths/plastic sheets: $5–$15.
- Painter’s tape: $5.
- Respirator mask: $20–$40 (reusable).
- Sandpaper and cleaning supplies: $5–$10.
Total: $40–$70 for a typical small indoor project.
Time needed:
- Prep: 30–60 minutes
- Painting: 30–90 minutes (with drying between coats)
- Cleanup: 20–30 minutes
Most projects can be completed in a day if you start early.
Real-world Example: Painting A Small Bookshelf
Let’s see these steps in action.
- Move the bookshelf to a garage or unused room.
- Clean with soapy water, dry, then lightly sand.
- Cover the floor with plastic, tape off the wall.
- Set up a fan in the window blowing out.
- Wear a mask and gloves.
- Shake spray paint can and test on cardboard.
- Spray light coats, waiting 15 minutes between each. Rotate the shelf for even coverage.
- Let dry overnight before moving back inside.
- Peel tape, fold up coverings, and enjoy your “new” bookshelf.
Frequently Asked Questions
How Do I Reduce Overspray When Spray Painting Inside?
To reduce overspray, use a spray booth or large cardboard box for small objects. Always spray in short, controlled bursts and keep the can moving. Cover all nearby surfaces with plastic or drop cloths. Spraying closer to the object (without getting too close) also reduces overspray.
Is It Safe To Spray Paint Inside With Windows Closed?
No, you should always ventilate when spray painting indoors. Paint fumes can be harmful, even with “low odor” formulas. At minimum, open windows and use a fan to push air outside. Never spray paint in a sealed room.
How Long Does It Take For Spray Paint Fumes To Go Away Inside?
Most spray paint fumes fade within 24–48 hours, but some may linger longer. Good ventilation speeds up the process. For sensitive people or pets, wait until the paint smell is completely gone before using the room.
Can I Spray Paint In Winter Inside My House?
Yes, but keep the room at a normal temperature (60–80°F) and ventilate as much as possible. Cold, damp air slows drying and can cause problems with the finish. Use fans and, if needed, a space heater to keep air moving (but keep heaters away from paint fumes for safety).
What’s The Best Mask For Indoor Spray Painting?
A respirator mask rated for paint fumes (look for “organic vapor” cartridges) is best. Disposable dust masks are not enough. Always check the mask’s rating and fit before starting your project.
For more tips on indoor air quality and paint safety, visit the EPA’s Indoor Air Quality page.
Spray painting inside is a great way to update your space or finish DIY projects with pro-quality results. By choosing the right paint, prepping carefully, and following safe spraying techniques, you’ll get a beautiful finish without the mess or stress. Remember: patience and preparation make all the difference. Happy painting!