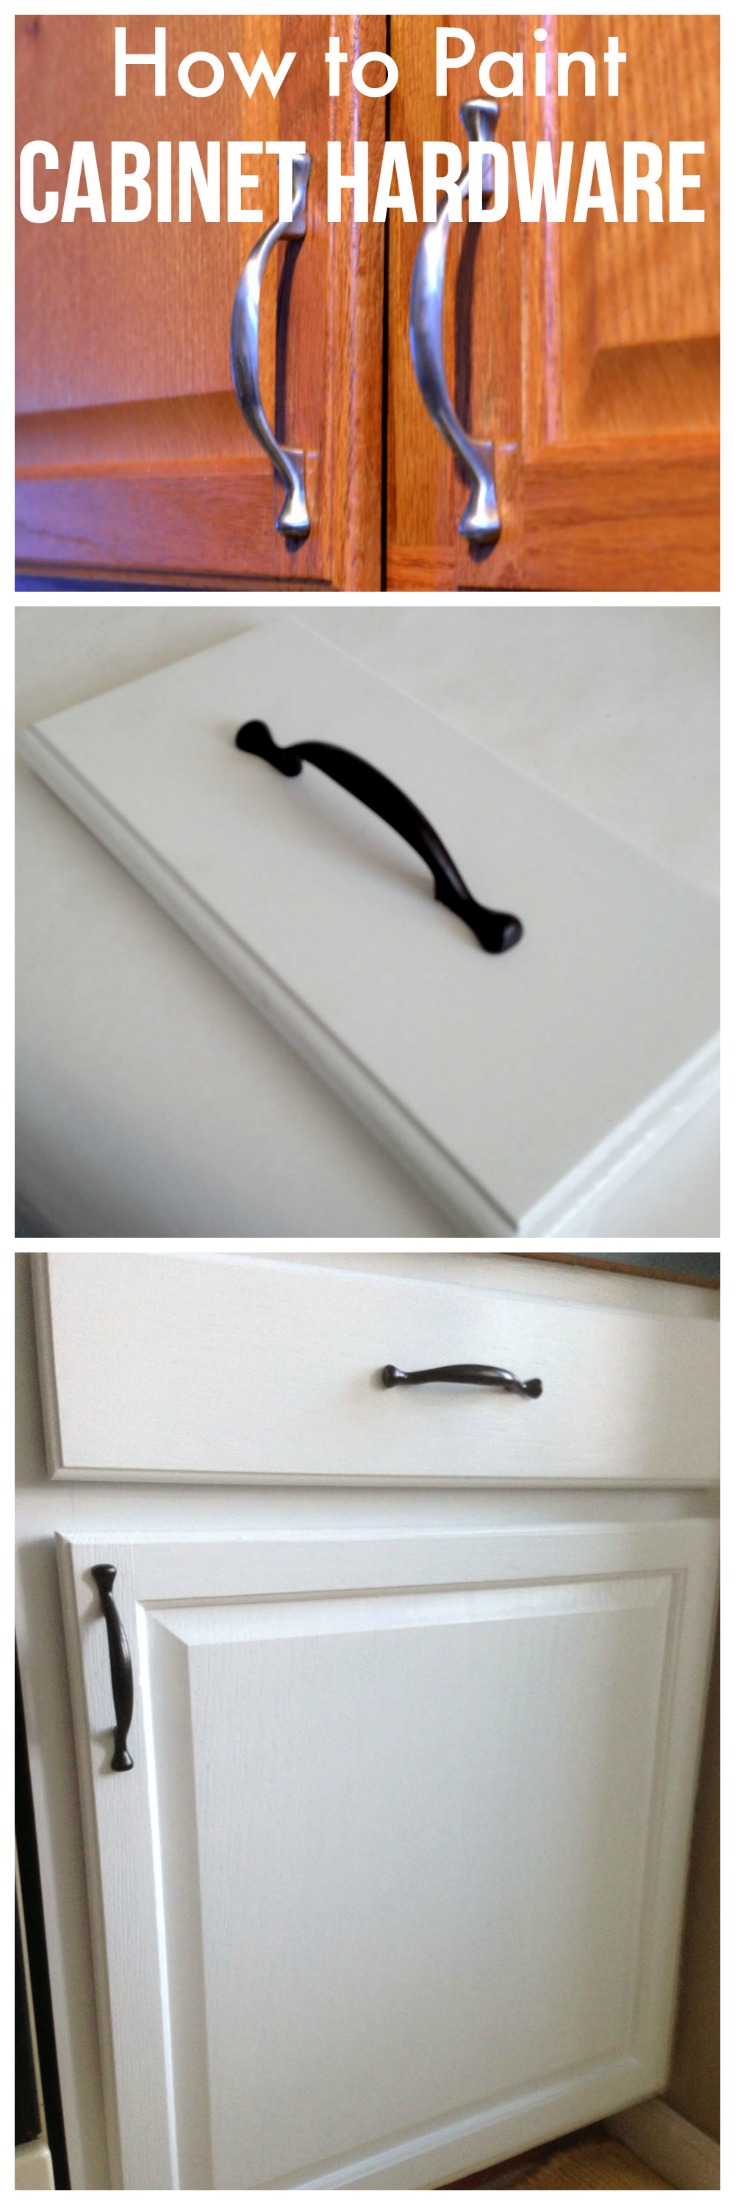
Giving your kitchen or bathroom cabinets a fresh look doesn’t always mean a full remodel. Sometimes, the small details make the biggest difference. Spray painting cabinet hardware—like handles, knobs, and hinges—can transform the style of your space quickly and at a fraction of the cost of buying new hardware.
But to get a smooth, lasting finish, you need more than just a can of spray paint. Many people rush this project, only to end up with chipped, uneven, or sticky hardware in a few weeks. With the right steps and a little patience, you can get professional-looking results, even as a DIY beginner.
This guide will walk you through every part of the process, from choosing the right paint to reinstalling your hardware. You’ll learn not just the “how,” but also the “why”—so you avoid common mistakes and get the most from your effort.
Let’s get started.
Why Spray Paint Cabinet Hardware?
Spray painting cabinet hardware is a simple upgrade with major impact. Buying new handles and knobs can cost between $3 and $15 each, which adds up quickly if you have dozens of pieces. A can of quality spray paint, however, costs $5–$10 and covers all your hardware.
But cost isn’t the only reason. Spray painting lets you:
- Match hardware to your decor without searching for the perfect finish in stores
- Update outdated finishes like brass or chrome to modern black, gold, or matte colors
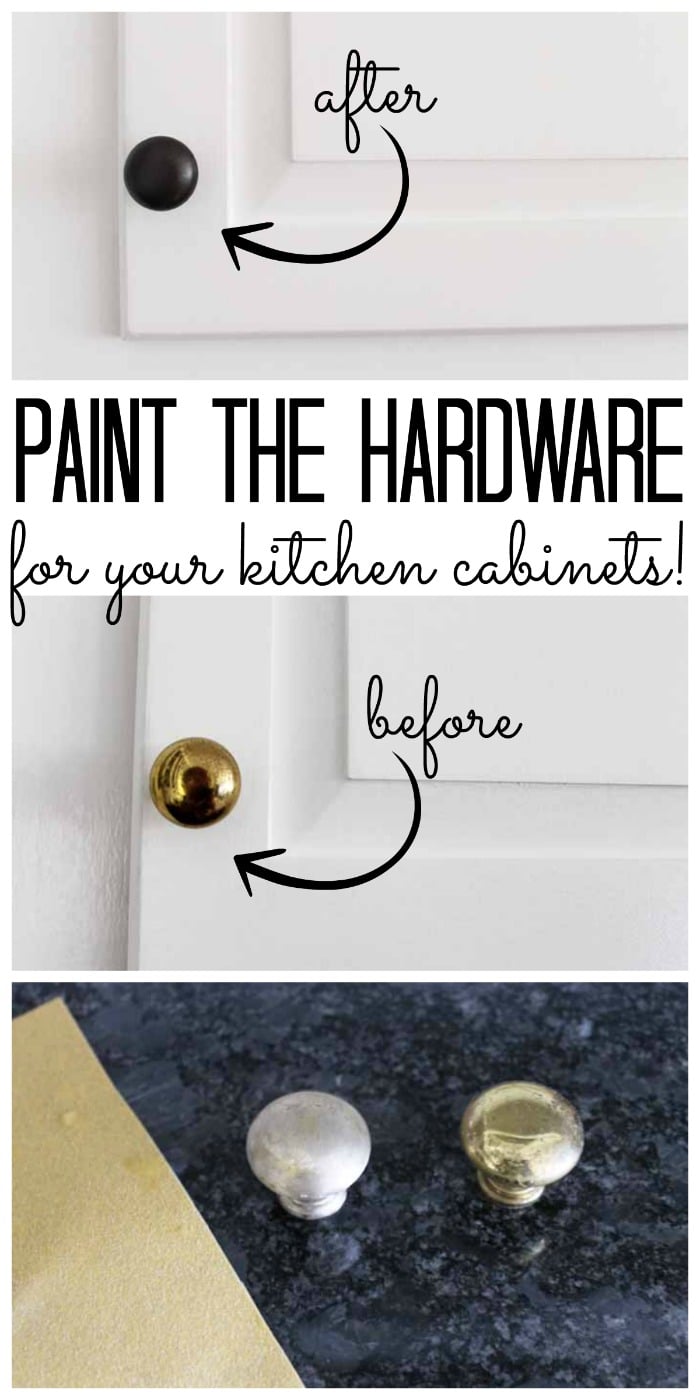
- Refresh worn, scratched hardware for a like-new appearance
- Try trendy looks (such as matte black or brushed gold) without a big investment
It’s also an eco-friendly choice since you reuse what you already have instead of sending metal or plastic to the landfill.
A less obvious benefit is the creative control you get. Sometimes, you want your hardware to be unique—a custom color to match a backsplash, or a finish you can’t buy anywhere. Spray paint gives you that flexibility, so your space feels truly yours. Another bonus: you can change your mind in a year or two and try a new color, for much less effort and money than replacing everything.
Many people are surprised at how dramatic the effect can be. Old, dull hardware that blends into the background suddenly stands out, making even older cabinets look more modern and intentional. If you want to test a bold color or finish, handles and knobs are a low-risk place to experiment—if you don’t like it, it’s easy to repaint or go back to the original look.
Choosing The Right Spray Paint
Not all spray paints are created equal. The finish, durability, and adhesion can vary a lot, and choosing the right one makes a huge difference in how your hardware looks and lasts.
| Paint Type | Best For | Durability | Finish Options |
|---|---|---|---|
| Enamel | Metal, plastic, wood | High | Gloss, satin, matte |
| Acrylic | Metal, some plastics | Medium | Gloss, satin |
| Specialty Metallic | Modern finishes | Medium | Brushed, hammered, chrome |
| Primer + Paint Combo | Quick jobs | Medium | Varies |
For most cabinet hardware, enamel spray paint is best. It sticks well to metal and plastic and resists scratches. If you want a metallic look (like brushed nickel or antique gold), look for specialty spray paints designed for hardware.
Non-obvious tip: Check the paint’s label for “bonding” or “direct-to-metal” features. These paints grip better and last longer, especially on smooth surfaces.
Also consider the sheen. Glossy finishes show fingerprints and smudges more easily, but they’re easier to wipe clean. Matte and satin finishes hide flaws and give a softer look, but may show wear faster in high-traffic areas. If you’re unsure, satin is a safe middle ground—it’s modern and forgiving.
When choosing your color, remember that spray paint sometimes dries darker or with a slightly different tone than the cap suggests. If possible, test your paint on a hidden spot or a spare piece before doing all your hardware.
Some brands offer “universal” spray paints that work on metal, wood, and plastic. While convenient, these are often less durable than true enamel or specialty hardware paints. If your hardware gets heavy use, investing in a paint made for metal is worth the extra few dollars.
What You’ll Need
Gather all your tools before you start. Here’s a complete list:
- Spray paint (enamel or specialty for hardware)
- Spray primer (for best adhesion, especially on shiny or dark hardware)
- Degreaser or dish soap (for cleaning)
- Fine-grit sandpaper (220–320 grit)
- Screwdriver (to remove hardware)
- Disposable gloves
- Drop cloth or cardboard
- Painter’s tape
- Small containers or zip bags (for screws)
- Tack cloth or lint-free rag
- Respirator mask (for indoor spraying)
- Clear topcoat spray (for extra durability, optional)
- Plastic or wood sticks (to prop hardware for painting)
Extra tip: Old egg cartons or foam blocks make great stands for holding screws or propping hardware during painting.
If you want to go one step further, get a piece of scrap wood and screw your handles or knobs into it, so they stand upright. This gives you access to every side while painting and makes moving the hardware easier as it dries.
Don’t forget to have a garbage bag or recycling bin nearby for used gloves, sandpaper, and masking tape. Keeping your workspace tidy reduces mistakes and cleanup time later.
Removing And Organizing Your Hardware
Before painting, you need to take the hardware off your cabinets. This step is often rushed, but careful removal saves time and headaches later.
- Label your cabinets: Place a small piece of painter’s tape inside each door or drawer with a number. Put the hardware in a bag labeled with the same number. This way, everything goes back to its original spot.
- Use the right screwdriver: Most hardware uses Phillips or flathead screws. Using the correct size prevents stripping.
- Keep parts together: Put all screws, bolts, and small pieces in containers or zip bags. Losing even one can delay your project.
If your hardware is different sizes or shapes, take a quick photo before removing. This helps during reinstallation.
Another smart move is to keep a small notepad and jot down any details—like which handles go on larger drawers, or if any piece was tricky to remove. This is especially useful if your cabinets are custom or older, where sizes can vary.
For more complex layouts, a simple hand-drawn map of your kitchen or bathroom can help you remember exactly where each piece belongs.
Cleaning And Prepping The Hardware
Paint sticks best to clean, dull surfaces. Even tiny traces of grease or old polish will cause peeling.
- Wash thoroughly: Mix warm water and a few drops of dish soap or degreaser. Scrub hardware with a brush or sponge to remove all oils, dirt, and fingerprints.
- Rinse and dry: Rinse with clean water and dry completely with a lint-free towel.
- Sand lightly: Use fine-grit sandpaper to scuff all surfaces gently. You don’t need to remove old finish—just rough it up so the primer and paint can grip.
- Wipe with tack cloth: This removes sanding dust and lint for a perfectly clean surface.
Common mistake: Skipping cleaning and sanding leads to bubbling, chipping, or uneven paint. Even brand-new hardware needs cleaning.
For heavily tarnished or greasy hardware, use a stronger degreaser or even a little white vinegar. Rinse thoroughly afterward. If hardware has stuck-on grime, an old toothbrush or a scrub pad (non-abrasive) can help get into the grooves. Let hardware dry fully—any water left can cause rust or affect primer adhesion.
If your hardware has sharp edges or stubborn corrosion, a gentle rub with steel wool (0000 grade) after sanding can help smooth out problem spots. Always wipe with a tack cloth after to remove any metal particles.
Setting Up Your Painting Area
Spray paint travels as a fine mist and can coat everything nearby. A controlled setup gives you better results and less mess.
- Work outside if possible, or in a well-ventilated garage.
- Lay down a drop cloth, old sheet, or large cardboard to protect the ground.
- Elevate hardware: Use plastic cups, wood sticks, or egg cartons to raise hardware off the surface. This lets you spray all sides and prevents sticking.
- Wear gloves and old clothes, as spray paint is hard to remove from skin and fabric.
- Mask nearby surfaces with painter’s tape if spraying indoors.
If you must spray indoors, open windows and use a fan for airflow. A respirator mask is highly recommended.
For small jobs or bad weather, a large cardboard box tipped on its side makes a good spray booth. Cut off one side for access, and spray inside the box. This contains the paint mist and keeps dust off your hardware as it dries.
Plan your workspace so you don’t have to move wet hardware—if you need to relocate pieces, build a simple tray with handles out of cardboard or wood, and line it with your drop cloth.
Priming The Hardware
Primer is the secret to a smooth, chip-resistant finish, especially on shiny or dark hardware. Even if your spray paint says “paint + primer,” a dedicated primer coat improves adhesion.
- Shake the primer can for at least one minute to mix thoroughly.
- Hold the can 8–12 inches away from the hardware.
- Spray light, even coats, moving the can back and forth. Overlap slightly and keep the can moving to avoid drips.
- Let dry fully (usually 20–30 minutes, check the label).
- Flip and spray the other side, repeating until all surfaces are covered.
Some specialty primers are made for metal or plastic. Choose the one that matches your hardware material for best results.
If you’re painting over very dark or rusty hardware, two coats of primer may be needed for full coverage and a bright, even finish. Let each coat dry before adding the next. Don’t worry if the primer looks a bit rough—its job is to help paint stick, not to look perfect.
Insider tip: If you notice any dust or fuzz stuck in the primer after it dries, gently buff with a fine sanding sponge before painting. This small step gives a smoother final result.
Spray Painting Your Cabinet Hardware
This is where you see the transformation. Rushing or spraying too heavily is the number one cause of drips and uneven color.
- Shake the paint can for at least one minute.
- Spray light, thin coats: Start each pass before the hardware and finish after, so paint goes on evenly. Several thin coats are better than one thick coat.
- Wait between coats: Follow the paint can’s instructions (usually 5–15 minutes between coats).
- Rotate hardware: After each coat, check for missed spots and rotate pieces so all angles get covered.
- Apply 2–3 coats for full, even color.
Non-obvious insight: Temperature and humidity affect drying. Spray paint dries best between 50–85°F (10–29°C) with low humidity. Too cold or humid, and the paint may stay tacky or develop a rough finish.
If you want a two-tone or accent look, use painter’s tape to mask off areas before painting.
For handles with tight corners or detailed designs, try short, quick bursts of spray paint rather than a long, continuous spray. This helps avoid pooling or buildup in crevices. For hardware with a screw hole on the bottom, insert a toothpick or small stick—this lets you paint the entire visible surface at once.
If your first coat looks uneven or patchy, don’t worry. The second and third coats will even out the color and give full coverage. Always allow enough drying time between coats, and resist the urge to “fix” wet paint—this often causes more problems.
Credit: createandbabble.com
Applying A Protective Topcoat
For kitchen or bathroom hardware, a clear protective topcoat adds scratch resistance and keeps the finish looking new. This is especially important for high-use handles and knobs.
- Choose a topcoat with the same sheen as your paint (matte, satin, or gloss).
- Spray in thin, even coats just like the paint.
- Let dry fully (usually 24 hours for full cure) before handling.
Some spray paints claim “all-in-one” durability, but a separate topcoat always extends the life of your finish.
If your hardware is in a humid room (like a bathroom), a water-resistant topcoat is a smart choice. For maximum durability, apply two very light coats instead of one heavy coat. This prevents drips and gives a more even finish.
A topcoat also makes cleaning easier—dirt and fingerprints wipe off with a damp cloth, instead of wearing away your color. Remember, even with a topcoat, avoid strong cleaners or scrubbing pads.
Letting The Paint Cure
This is the step most people rush. Spray paint feels dry to the touch in an hour, but it takes much longer to fully harden (“cure”). Handling hardware too soon can cause fingerprints, smudges, or soft spots.
| Paint Type | Touch Dry | Handle Time | Full Cure |
|---|---|---|---|
| Enamel Spray | 30–60 min | 24 hours | 5–7 days |
| Acrylic Spray | 20–40 min | 12–24 hours | 3–5 days |
| With Topcoat | 30–60 min | 24–48 hours | 7 days |
Best practice: Wait at least 24–48 hours before reinstalling hardware. For maximum durability, wait 5–7 days if possible.
If you’re in a hurry, set hardware in a warm, dry place with plenty of airflow. Don’t stack or pile pieces while curing. For extra protection, cover finished hardware loosely with a clean box or container to keep off dust.
One thing many beginners miss: even after hardware feels dry, paint can be soft underneath. Full cure means the paint is hard all the way through and ready for daily use. If you reinstall too soon, screw heads and fingers can leave dents or marks—so patience pays off here.
Credit: www.thecountrychiccottage.net
Reinstalling Hardware On Cabinets
Once your hardware is fully cured, you’re ready for the final step.
- Match hardware to cabinets using your labels or photos from earlier.
- Install screws by hand: Avoid power tools, which can scratch your new finish.
- Check for tightness but don’t overtighten, as this can crack the paint or dent the hardware.
Pro tip: If screws feel loose, add a small piece of toothpick or wood glue into the hole for a tighter fit.
As you reinstall, take the time to clean the area around the screw holes and check for any paint flakes. If you notice a small chip or scratch during installation, don’t panic—wait for the hardware to settle, then touch up with a tiny brush and leftover paint.
For a final touch, wipe down all the hardware with a soft, dry cloth to remove any fingerprints or dust from handling. This extra step really helps your new finish look flawless.
Troubleshooting Common Problems
Even with care, spray painting hardware can come with challenges. Here’s how to handle the most common issues:
Paint Drips Or Runs
- Cause: Spraying too close or too heavily.
- Fix: Let the piece dry, sand the drip gently with fine-grit sandpaper, and respray lightly.
Uneven Coverage Or Bare Spots
- Cause: Spraying from too far or missing angles.
- Fix: Rotate hardware and apply another thin coat.
Peeling Or Flaking Paint
- Cause: Skipped cleaning or priming, or painting over grease.
- Fix: Strip paint with a remover, clean thoroughly, prime, and repaint.
Tacky Finish
- Cause: High humidity, low temperature, or too thick coats.
- Fix: Move hardware to a warmer, drier place and let cure longer. For severe cases, lightly sand and recoat.
Scratches After Reinstalling
- Cause: Handling before full cure or using power tools.
- Fix: Touch up scratches with a small artist’s brush and leftover spray paint sprayed into a cup.
Another issue some people see is “orange peel”—a bumpy, uneven texture. This usually comes from spraying too far away or not shaking the can enough. To fix, sand lightly with a very fine sanding pad, wipe clean, and apply another thin coat.
If the paint starts to bubble or lift after you finish, moisture or grease is often the cause. Remove the paint, clean and dry thoroughly, and try again with extra attention to prep.
Maintaining Painted Cabinet Hardware
To keep your hardware looking sharp:
- Clean with a soft, damp cloth only—no harsh chemicals or abrasive pads.
- Avoid slamming doors or drawers, which can chip the finish.
- Check for chips every few months and touch up as needed with matching spray paint.
With good prep and care, your painted hardware can look fresh for 2–5 years before needing another update.
If you want to extend the life of your hardware, consider adding small felt pads to the inside corners of your cabinet doors. These soften the impact when closing and reduce the risk of chipping the paint. This is especially useful in homes with young children.
Should you notice a chip, clean the area gently, then spray a little paint into a disposable cup. Use a fine brush to dab on a small amount, let it dry, and finish with a dab of clear topcoat. This simple repair will keep your hardware looking neat and consistent.
Comparing Spray Paint With Other Finishing Methods
You might wonder if other methods work better for updating hardware. Here’s a quick comparison:
| Method | Cost | Durability | Skill Needed | Look |
|---|---|---|---|---|
| Spray Paint | Low ($10–$20 total) | Medium-High | Easy | Modern, smooth |
| Hand Painting | Low ($10–$20) | Medium | Medium | Brush marks possible |
| Buying New | High ($50–$200+) | Very High | Easy | Any style |
| Electroplating | Very High ($100+) | Very High | Pro only | Showroom finish |
Spray painting offers the best balance of cost, ease, and style for most DIYers.
Hand painting with a brush can work for small projects or if you want a textured, rustic look. However, brush marks are hard to avoid, and the finish is usually less durable unless you use a special bonding primer and sealer.
Buying new hardware is the easiest but most expensive route. It’s a good option if your hardware is broken or the style doesn’t match your cabinets at all. For most people, though, painting gives a “like new” effect for much less money.
Electroplating is a professional process that gives a permanent, factory-style finish. It’s costly and slow, and usually only worthwhile for antique or valuable hardware.

Credit: www.thriftydecorchick.com
Frequently Asked Questions
How Long Does Spray Paint Last On Cabinet Hardware?
Spray painted hardware usually lasts 2–5 years with normal use, especially if you use a good primer and topcoat. High-traffic kitchens may need touch-ups sooner, but most homeowners find the finish holds up well if cleaned gently.
Can I Spray Paint Hardware Without Removing It From The Cabinets?
It’s possible but not recommended. Removing hardware avoids overspray on cabinets and gives you a smoother finish on all sides. If you must spray in place, use plenty of painter’s tape and plastic to mask surfaces, and expect less even results.
Is It Necessary To Use A Primer Before Spray Painting Hardware?
Yes, primer is strongly recommended. It helps the paint stick, prevents chipping, and covers dark or shiny finishes. Only skip primer if your spray paint specifically says it bonds to metal or plastic without it—but even then, a separate primer coat gives better results.
What Finishes Are Available For Spray Painted Hardware?
You can get almost any look: matte, satin, gloss, metallic, brushed, antique, or even hammered finishes. Specialty spray paints let you mimic popular hardware trends like oil-rubbed bronze, brushed gold, or matte black. Just check the label for finish type.
Where Can I Find More Information About Spray Painting Techniques?
For more advanced spray painting tips, project galleries, and expert advice, visit the Family Handyman guide to hardware painting.
Transforming your cabinet hardware with spray paint is a budget-friendly project that makes a real impact. With careful prep, the right materials, and a little patience, your kitchen or bathroom can look custom-made—without the custom price. Happy painting!