Running electrical wire through a first floor ceiling can be challenging, especially if you want a clean, professional result. Many people worry about damaging their home, making a mess, or even breaking building codes. But with the right steps and some careful planning, you can run wire through your first floor ceiling safely, efficiently, and without major headaches.
This guide will walk you through everything you need to know—whether you’re adding new outlets, installing lighting, or setting up smart home devices. You’ll learn how to plan, what tools to use, and how to avoid common mistakes that even experienced DIYers sometimes make.
Understanding The Basics Of Running Wire Through A First Floor Ceiling
Before you start, it’s important to understand why running wire through a first floor ceiling is different from other wiring projects. Unlike basements or attics, first floor ceilings are often finished and hard to access. They may have insulation, pipes, or HVAC ducts. Knowing what’s inside your ceiling—and how your home is built—will help you plan the safest and easiest path for your wire.
Homes with wood joists or engineered trusses need different approaches. In older homes, you might run into plaster ceilings instead of drywall, which are more brittle and harder to patch. Modern homes sometimes have fire-blocks or soundproofing that make wiring harder. Understanding these differences means you won’t be surprised by unexpected obstacles.
Safety First: Important Precautions
Working with electricity is serious. One mistake can cause electrical shock, a fire, or a code violation. Always turn off power at the breaker before starting. Use a non-contact voltage tester to be sure the circuit is truly dead. Wear safety glasses, gloves, and a dust mask if cutting drywall.
If you are unsure about any part of the job—or if local code requires a licensed electrician—stop and get help. In many areas, you can run low-voltage cable (like for speakers or internet) yourself, but high-voltage work may need a permit or inspection.
Check with your local building department before making holes or running any wire.
Planning Your Wire Run: Smart Preparation
A successful wiring project starts with a good plan. The more time you spend planning, the less time you’ll spend fixing mistakes later. Here’s how to approach it:
- Map Your Route: Identify the starting point (like your breaker panel or junction box) and the ending point (outlet, switch, or fixture). Trace the shortest, most direct route.
- Avoid Obstacles: Use a stud finder to scan for joists, pipes, and other barriers. Mark these on the ceiling or wall with a pencil.
- Choose the Right Wire: For most home circuits, NM (non-metallic) cable like Romex is standard. For lighting, you’ll usually need 14/2 or 12/2 gauge wire, depending on amperage. Check code requirements.
- Decide on Access Points: Plan where you’ll make holes for drilling or pulling wire. Use existing fixtures or closets if possible, to minimize visible damage.
- Gather Materials and Tools: Make a list before you start. Typical tools include a drill with long bits, fish tape, a drywall saw, and wire strippers.
Example: Common Wire Gauge And Their Uses
| Wire Gauge | Common Use | Max Amperage |
|---|---|---|
| 14/2 | Lighting circuits | 15 Amps |
| 12/2 | General outlets | 20 Amps |
| 10/2 | Appliances (A/C, dryer) | 30 Amps |
Locating Joists, Obstacles, And Existing Wiring
One of the hardest parts of running wire through a first floor ceiling is finding a clear path. Ceilings often have:
- Joists (wood or engineered)
- Pipes (water, drain, HVAC)
- Electrical wiring
- Fire-blocks
Use a stud finder with a deep scan mode to locate joists and large pipes. If you have blueprints or can access a floor plan, study them to see where obstacles may be. Sometimes, a small inspection hole (about 2 inches) with a drywall saw or hole saw lets you peek inside with a flashlight or inspection camera. Always patch these holes after your work.
Pro Tip: Inspect From Above
If you have access to the second floor or attic above, check for plumbing or wiring that might run perpendicular to your planned route. This can save you hours of frustration.
Choosing The Best Tools For The Job
Having the right tools makes the project much easier and helps you avoid damage. Here’s a breakdown of what you’ll likely need:
- Drill with long auger bits: For drilling through joists.
- Fish tape or glow rods: To pull wire through tight spaces.
- Flexible drill bit: For drilling between wall cavities or through fire-blocks.
- Drywall saw or oscillating multi-tool: For making access holes.
- Wire strippers and cutters: For prepping wire ends.
- Non-contact voltage tester: For safety checks.
- Stud finder: To locate joists and avoid pipes.
- Tape measure, pencil, flashlight: For measuring and marking.
Investing in quality tools will save time and result in a neater job.
Tool Comparison: Fish Tape Vs. Glow Rods
| Tool | Best Use | Pros | Cons |
|---|---|---|---|
| Fish Tape | Long, straight runs | Flexible, reaches far | Hard to steer around bends |
| Glow Rods | Short, complex paths | Stiff, steerable, visible in dark | Limited reach, more expensive |
Making Access: Cutting Holes The Smart Way
Most first floor ceilings are finished with drywall. To run wire, you’ll need to make access holes. Always cut holes in a way that’s easy to patch later, and try to place them where they won’t be noticed (like inside closets or behind fixtures).
- Mark your spot: Measure carefully and mark with a pencil.
- Score first: Use a utility knife to score the outline before using a saw. This prevents chipping.
- Cut slowly: A drywall saw or oscillating multi-tool gives better control than a power saw.
- Save the drywall piece: You can use it to patch the hole later.
- Check for obstacles: Before drilling, feel inside the hole for wires or pipes.
Non-obvious Tip: Use A Magnet
A strong magnet can help you find nails or screws in joists, which tells you where the joist edges are. This helps avoid accidentally cutting into wood.
Drilling Through Joists And Fire-blocks
Once you have access, you may need to drill through wood joists or fire-blocks to run your wire. Here’s how to do it safely:
- Drill in the center of the joist: This keeps the structural strength intact. For a 2×8 joist, drill through the middle third.
- Use the right bit size: A 3/4” auger bit is usually enough for one or two wires.
- Avoid over-drilling: Don’t make holes bigger than needed, as this weakens the joist.
- Watch for obstacles: Go slowly to avoid hitting pipes or wires.
If you hit a fire-block (a horizontal 2×4 between studs), use a flexible drill bit to get through without making a huge hole.
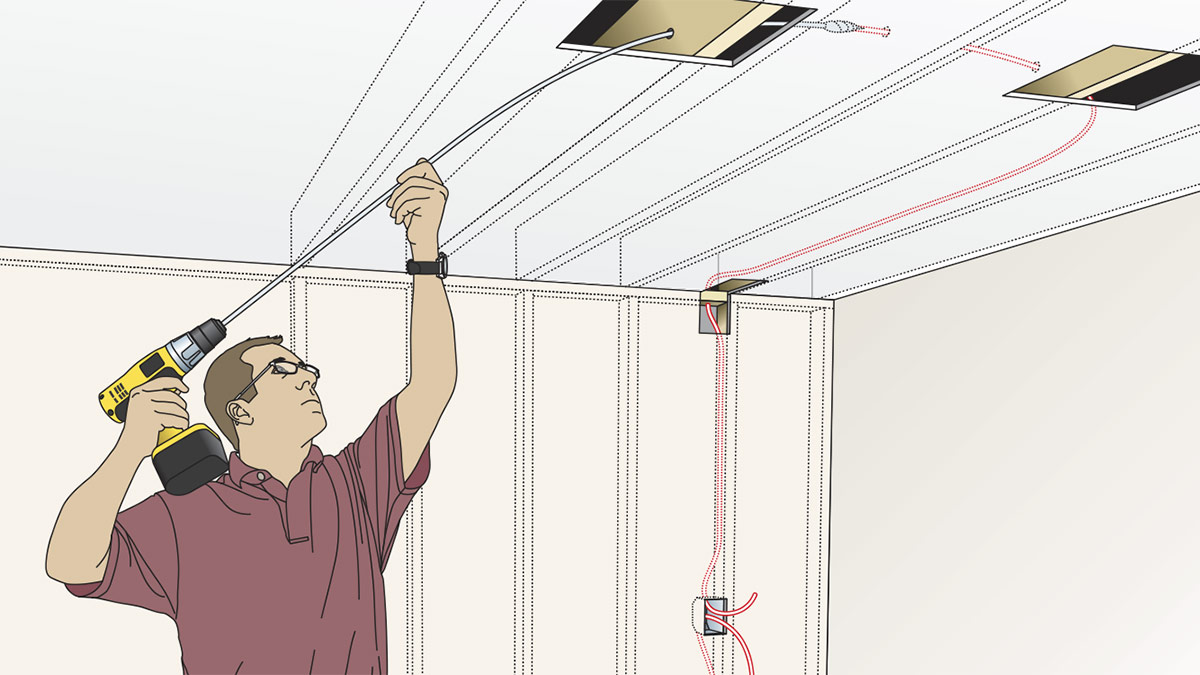
Fishing Wire Through The Ceiling
This is often the most frustrating part. After holes are drilled, you need to pull the wire through the space between joists. Here’s a step-by-step approach:
- Attach the wire to fish tape or glow rods: Use electrical tape to secure it well.
- Push the fish tape through: Start from one hole and guide it toward the other.
- Have a helper if possible: One person pushes, the other pulls.
- Pull slowly: Don’t yank; gentle pressure works best.
- Check for snags: If it gets stuck, pull back and try again.
Advanced Tip: Use Lubricant
Wire-pulling lubricant makes it easier to slide wire through tight spots. It’s especially useful for long runs or when the wire gets caught on insulation.
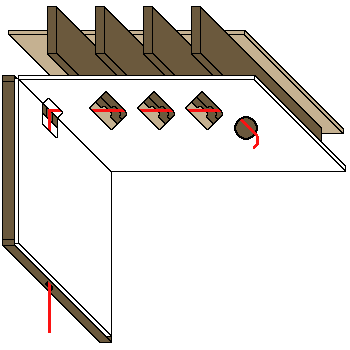
Running Wire To Boxes And Outlets
Once the wire is through the ceiling, you need to route it to your boxes or outlets:
- Use grommets or bushings: When passing wire through metal boxes or sharp-edged holes, use plastic grommets to prevent damage to the insulation.
- Leave extra wire: Always leave at least 6” of wire extending from the box for connections.
- Clamp the wire: Use built-in box clamps or cable staples to secure the wire within 12 inches of the box.
Example: Correct Wire Routing
| Step | What to Do | Why |
|---|---|---|
| Drill entry hole | 3/4” in center of joist | Protects structure |
| Pull wire through | Use fish tape, check for snags | Prevents damage |
| Secure at box | Clamp or staple wire | Meets code, safe installation |
Making Connections: Safe And Code-compliant
Connecting your new wire is more than just twisting wires together. Follow these steps for a safe, code-compliant connection:
- Strip wires carefully: Use a wire stripper, not a knife. Expose only as much copper as needed.
- Match wire colors: Black (hot), white (neutral), green or bare (ground).
- Twist wires tight: Use UL-listed wire nuts and twist until secure.
- Ground everything: Attach ground wires to metal boxes or ground screws.
- Check all connections: Pull gently to ensure nothing is loose.
If you’re adding a new circuit, make sure to connect the wire to the correct breaker in your panel. If you’re not comfortable with breaker work, call an electrician.
Closing Up And Patching The Ceiling
When the wiring is done, it’s time to patch any holes you made. Here’s a simple process:
- Fit the saved drywall piece back in the hole.
- Use drywall screws to secure it to joists or blocking.
- Apply joint compound: Feather the edges for a smooth finish.
- Sand and repeat: After drying, sand and apply a second coat if needed.
- Prime and paint: Match the existing ceiling color.
Small holes (under 6 inches) are easy to patch. For larger holes, use a drywall repair kit or install a backing board for support.
Non-obvious Tip: Texture Matching
Ceiling textures (like popcorn or knockdown) are hard to match. Save some original texture material if possible, or use a spray texture kit for a better blend.
Testing Your New Wiring
Before using your new circuit, always test for safety and function:
- Turn on the breaker: Use a voltage tester to confirm power.
- Check outlets and switches: Make sure everything works as expected.
- Test for ground faults: Use a plug-in tester for outlets.
- Look for signs of trouble: Flickering lights, buzzing, or tripped breakers mean something’s wrong.
Don’t skip this step. Testing is your last chance to catch mistakes before they become hazards.
Credit: www.structuredhomewiring.com
Common Mistakes And How To Avoid Them
Even experienced DIYers make mistakes. Here are some to watch for:
- Drilling too close to the edge of joists: This weakens the structure.
- Forgetting about insulation: Pulling wire through insulation can snag and tear the jacket.
- Making holes too big: Hard to patch neatly.
- Not securing wires: Loose wires can move and get damaged.
- Mixing wire gauges: Always match existing wire size and type.
Pro Insight: Label Your Wires
Use a marker to label both ends of your wire, especially if you’re running multiple cables. This avoids confusion when making connections later.
Working With Different Ceiling Types
Not all ceilings are the same. Here’s how to handle some common ones:
Drywall Ceilings
- Easiest to cut and patch
- Use a drywall saw or oscillating tool
Plaster Ceilings
- Harder to cut cleanly
- Use a rotary tool or fine-tooth saw
- Go slow to avoid cracks
Drop Ceilings
- Panels lift out for easy access
- Be careful not to damage fragile tiles
Textured Or Coffered Ceilings
- More difficult to patch invisibly
- Plan access holes in less visible areas
Each ceiling type has its own tricks. Always test your cutting tool on a small area first.
Dealing With Insulation And Other Obstacles
Many first floor ceilings have insulation for sound or energy efficiency. Running wire through insulation can be tough:
- Wear gloves and a mask: Fiberglass is itchy and can irritate lungs.
- Use glow rods: They slide better through insulation than fish tape.
- Go slow: Don’t force the wire or you’ll tear the insulation.
If you hit a pipe or HVAC duct, reroute your wire. Never run electrical cable in contact with hot pipes or ducts.
Special Considerations For Code Compliance
Building codes exist for a reason—they keep your home safe. Some key rules to follow:
- Secure wires: Use staples or clamps within 12 inches of boxes.
- Hole placement: Drill only in the center third of joists.
- Fire-blocking: Seal any holes made in fire-blocks with fire-rated caulk.
- Box fill: Don’t overcrowd boxes with too many wires.
- Permits: Check local rules before starting. Some areas are strict.
If you’re not sure, consult the National Electrical Code (NEC) or ask your local building official. For more details, check the NFPA’s National Electrical Code.

Credit: www.reddit.com
When To Call A Professional
Some jobs are best left to the pros. Call an electrician if:
- You’re uncomfortable working near live wires.
- Your ceiling contains asbestos or lead paint.
- The wire run is very complex or long.
- Local laws require a licensed electrician.
Trying to save money by doing it yourself is not worth risking your safety.
Upgrading Or Expanding: Planning For The Future
When running wire, consider your future needs. It’s much easier to add an extra cable now than to open the ceiling again later. For example:
- Run an extra Ethernet or coaxial cable for future tech.
- Install a larger box if you might add more circuits.
- Use conduit for easy future upgrades.
Planning ahead saves time and money in the long run.
Credit: www.finehomebuilding.com
Cost And Time Estimates
How much will this project cost? Here’s a rough breakdown:
- Materials: $40–$120 (wire, boxes, connectors, paint)
- Tools: $50–$200 (if you need to buy them)
- Time: 3–8 hours for a simple run, more for complex layouts
Hiring a pro can cost $300–$800 or more, depending on the job’s difficulty.
Environmental And Health Considerations
Cutting into ceilings releases dust and sometimes old insulation, which can be harmful. Always:
- Wear a mask and goggles
- Keep the area well-ventilated
- Clean up dust and debris right away
If your house was built before 1978, test for lead paint or asbestos before cutting. These require special handling.
Frequently Asked Questions
What Is The Easiest Way To Run Wire Through A First Floor Ceiling?
The easiest way is to use existing access points like ceiling lights or attic hatches. Use a fish tape to pull wire through joist spaces, and only cut small holes as needed. Planning your route to avoid obstacles makes the job much simpler.
Can I Run Wire Through A Ceiling Without Cutting Holes?
It’s sometimes possible if you have removable ceiling panels or existing fixtures. However, in most finished ceilings, you’ll need to cut small access holes to drill through joists and fish the wire. The goal is to keep holes as small and few as possible.
What Type Of Wire Should I Use For Ceiling Wiring?
Use NM cable (like Romex) rated for your circuit’s amperage—14/2 for 15-amp lighting, 12/2 for 20-amp outlets. Always match the existing wire size and type. For low-voltage runs, use cable rated for the device (like Cat6 for Ethernet).
Is It Safe To Run Wire Through Insulation In The Ceiling?
Yes, as long as the wire is rated for in-wall use (like NM cable). Avoid compressing insulation too much, and don’t run wire next to hot pipes. Wear gloves and a mask to protect yourself from fiberglass.
Do I Need A Permit To Run Wire Through My Ceiling?
In many areas, yes, especially for high-voltage (120V/240V) circuits. Always check with your local building department before starting. Permits ensure your work is safe and up to code.
Running wire through a first floor ceiling is a project that rewards careful planning and attention to detail. With the right approach, you can add new power, lights, or data connections to your home without major mess or stress. Take your time, follow safety rules, and don’t hesitate to ask for help when you need it.
Your efforts will pay off in a safer, more functional home for years to come.