Restoring Terrazzo Floors: The Complete Step-by-step Guide
Terrazzo floors are a symbol of elegance and durability. You find them in historic buildings, stylish homes, and modern commercial spaces. But over time, even the toughest terrazzo can lose its shine, develop cracks, or become stained. Many people believe restoring terrazzo is a job only for professionals.
The truth is, with the right knowledge and some patience, you can bring back the original beauty of your terrazzo floor yourself.
This guide will walk you through every part of terrazzo restoration. You’ll learn how to assess your floor, choose the best methods, avoid common mistakes, and get results that last for years. Whether you’re a homeowner, property manager, or just curious about the process, you’ll find practical steps and expert insights that most beginners miss.
Understanding Terrazzo Floors
Before you start, it’s important to know what makes terrazzo unique. Terrazzo is a composite material, made by mixing marble chips (or sometimes other stones and glass) into a binder like cement or epoxy. This surface is then ground smooth and polished, creating a mosaic look.
There are two main types:
- Cement-based terrazzo: Older and more common in historic buildings. Usually thicker and more porous.
- Epoxy-based terrazzo: Newer installations, often found in modern buildings. Thinner, less porous, and available in brighter colors.
Each type has different care and restoration needs. Cement terrazzo is more sensitive to acids and moisture, while epoxy terrazzo reacts differently to chemicals and heat.
Why Restore Terrazzo Floors?
Terrazzo is famous for lasting decades—sometimes over 100 years. But heavy foot traffic, spills, scratches, and poor cleaning can make it look dull or damaged. Restoration is not just about appearance; it also:
- Improves safety (removes tripping hazards)
- Preserves property value
- Extends the life of the floor
- Reduces the need for expensive replacements
Many property owners are surprised to learn that a well-restored terrazzo floor can look even better than new.
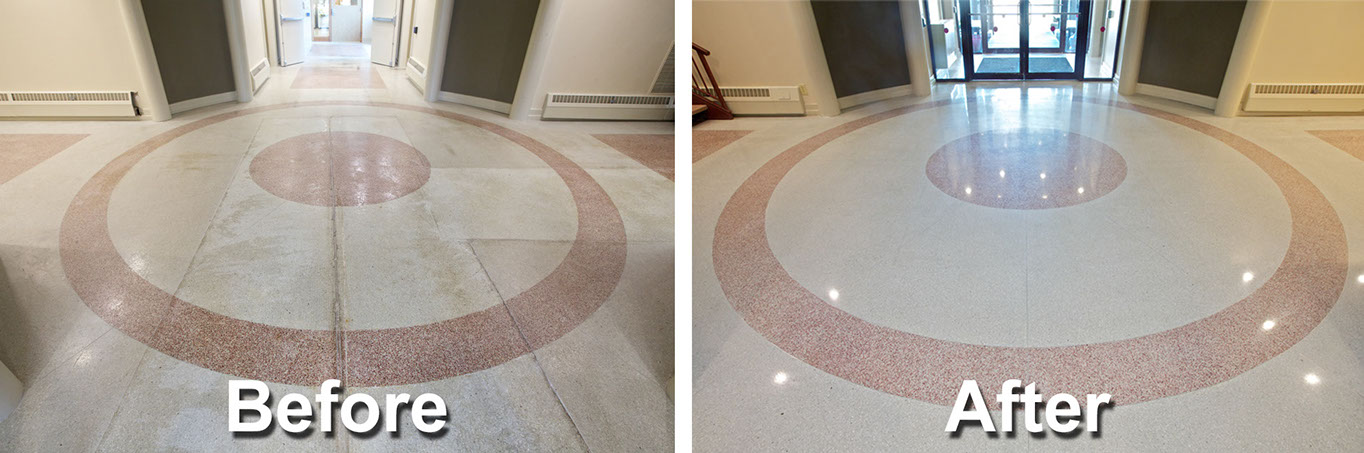
Credit: www.themjacompany.com
Assessing Your Terrazzo Floor
Start by closely examining your floor. This helps you decide what level of restoration is needed.
- Surface Condition: Is the floor simply dull, or does it have deep stains, cracks, or holes?
- Type of Damage: Look for chips, etching (dull spots from acids), scratches, or missing pieces.
- Type of Terrazzo: Cement or epoxy? This affects your cleaning and repair methods.
- Previous Treatments: Has the floor been waxed, sealed, or painted over?
Take notes and photos of problem areas. If you’re unsure about the floor’s type, a small water test can help: place a few drops of water on the surface. If the water soaks in quickly, it’s likely cement; if it beads up, it’s probably epoxy.
Tools And Materials You’ll Need
Having the right tools makes restoration easier and safer. Here’s what you’ll need for most jobs:
- PH-neutral cleaner (never use vinegar or acid)
- Microfiber mops and cloths
- Plastic scraper or putty knife
- Diamond polishing pads (various grits, usually from 50 up to 3000)
- Angle grinder or floor buffer (with adjustable speeds)
- Epoxy or cement patch kits (for filling cracks and holes)
- Masking tape and plastic sheeting (to protect walls)
- Wet/dry vacuum
- Protective gear: Gloves, goggles, dust mask
- Terrazzo sealer (choose one suitable for your terrazzo type)
- Natural or white polishing powder (for final shine, optional)
If you’re restoring a large area, you might need to rent some equipment from a hardware or flooring store.
Preparing The Area
Good preparation saves time and prevents damage to your property.
- Remove all furniture and rugs from the floor.
- Clean the floor with a dry mop or vacuum to remove dust and grit.
- Mask baseboards, walls, and fixtures with tape and plastic sheeting.
- Check for loose tiles or pieces and mark these for repair.
Never start wet grinding or polishing until the area is completely clear.
Deep Cleaning Terrazzo
Many terrazzo floors look dull simply because they’re dirty or covered with old wax. Deep cleaning is your first step.
- Mix a pH-neutral cleaner with warm water (follow product instructions).
- Mop the floor thoroughly, focusing on stained or sticky areas.
- For stubborn spots, use a soft brush or non-abrasive pad.
- Rinse with clean water and dry with microfiber cloths or a wet/dry vacuum.
Avoid using harsh chemicals—acidic cleaners can etch the floor, making it look worse.
Removing Old Wax Or Sealer
If the floor has been waxed or sealed, you’ll need to strip it before polishing.
- Use a wax remover designed for terrazzo (test on a small spot first).
- Apply with a mop, let it sit, then scrub gently.
- Rinse thoroughly to remove all residue.
Never use paint stripper or strong solvents—they can damage the terrazzo.
Repairing Chips, Cracks, And Holes
Damaged areas are common, especially near doorways or in high-traffic spots.
Filling Small Cracks
- Clean the crack with a vacuum and damp cloth.
- Mix a terrazzo patch compound (epoxy or cement-based, matching your floor’s color as closely as possible).
- Apply with a putty knife, pressing firmly into the crack.
- Smooth the surface and let it cure as directed (usually 24 hours).
Fixing Larger Holes Or Chips
- Remove any loose pieces.
- Fill the hole with new terrazzo mix (marble chips plus binder).
- Try to match the chips and binder color—collect chips from a hidden area if possible.
- Level the patch with the surrounding floor.
- Allow to cure fully before grinding or polishing.
Non-obvious tip: When matching colors, always test a small amount of patch in an out-of-the-way spot. Some binders change color as they dry.
Addressing Stains And Etching
- For organic stains (coffee, juice, etc. ), apply a poultice paste and cover with plastic. Let sit 24 hours, then clean.
- For oil stains, use a degreaser made for stone surfaces.
- For etching (dull spots from acid spills), light polishing is usually needed.
Grinding And Honing The Surface
Grinding removes the top layer of terrazzo, erasing scratches, stains, and old sealers. Honing smooths the surface in preparation for polishing.
Choosing The Right Grit
- Start with a coarse grit (usually 50 or 100) for deep scratches or uneven floors.
- For floors in better shape, start at 200 or 400 grit.
- Work up to finer grits (800, 1500, and finally 3000) for a high-gloss finish.
Grinding Process
- Attach diamond pad to your grinder or buffer.
- Wet the floor slightly to control dust (unless using a dry grinder designed for dustless operation).
- Move the machine slowly and evenly over the surface, overlapping each pass.
- Rinse and vacuum after each grit to remove slurry.
- Inspect the floor between stages—if scratches remain, repeat with the same grit.
Beginner mistake: Don’t rush. Skipping grits or moving too fast leaves visible lines and uneven shine.
Hand Grinding For Edges And Corners
Floor machines can’t reach every spot. Use a handheld grinder with small diamond pads for edges, corners, and around fixtures.
Polishing Terrazzo
Polishing brings out the classic terrazzo shine and helps protect the surface.
Dry Vs. Wet Polishing
- Wet polishing: Less dust, cooler surface, slightly more mess to clean up.
- Dry polishing: Faster, but creates fine dust (always wear a mask and use a vacuum).
For home projects, wet polishing is usually safer.
Steps For Polishing
- Start with a fine diamond pad (1500 or 3000 grit).
- Work in small sections, keeping the pad and floor damp.
- Buff until the surface is even and glossy.
- For extra gloss, apply polishing powder (made for terrazzo or marble) with a white pad.
- Rinse and vacuum thoroughly.
Pro tip: Use slow, overlapping passes and keep checking your progress under different lights.
Sealing Terrazzo Floors
Sealing is critical for long-lasting protection. It helps prevent stains and makes cleaning easier.
Choosing The Right Sealer
- Penetrating sealers soak into the surface. They don’t change the floor’s appearance, but protect from the inside.
- Topical sealers sit on the surface, adding extra shine but may need more maintenance.
Cement terrazzo is more porous and always needs sealing. Epoxy terrazzo is less porous but still benefits from a light sealer.
Sealing Steps
- Let the floor dry completely after polishing (at least 24 hours).
- Apply sealer evenly with a microfiber mop or applicator pad.
- Let it soak in and wipe off excess as directed.
- Allow to cure fully before walking on the floor.
Insight: Don’t overapply sealer—too much can leave a sticky residue that attracts dirt.
Maintaining Restored Terrazzo
Once your floor is restored, regular care will keep it looking beautiful for years.
Daily And Weekly Care
- Sweep or vacuum daily to remove grit and dust.
- Mop with a pH-neutral cleaner once a week (avoid harsh chemicals).
- Wipe spills quickly to prevent stains.
Annual Maintenance
- Check for new stains, chips, or wear every year.
- Reapply a thin layer of sealer if water no longer beads on the surface.
- Polish high-traffic areas as needed.
Real-world tip: Place mats at entrances and felt pads under furniture to prevent scratches.
Comparing Diy Vs. Professional Restoration
Some projects are easy to do yourself, but others need expert help. Here’s a quick comparison:
| Task | DIY | Professional |
|---|---|---|
| Basic Cleaning & Sealing | Easy, low cost | Faster, more thorough |
| Small Crack Repairs | Possible with patch kits | Color matching is better |
| Grinding & Polishing | Requires tools, learning curve | Better equipment, perfect finish |
| Major Damage Repair | Risk of visible patches | Professional results |
If your floor has deep cracks, large holes, or historic value, consider hiring a terrazzo specialist.
Costs Of Restoring Terrazzo
Restoration is usually much cheaper than replacing terrazzo. Here are typical costs in the US:
| Service | DIY Cost (per sq. ft.) | Professional Cost (per sq. ft.) |
|---|---|---|
| Deep Cleaning | $0.10 – $0.25 | $0.50 – $1.00 |
| Patch Repairs | $1.00 – $3.00 | $5.00 – $10.00 |
| Grinding & Polishing | $0.50 – $2.00 | $3.00 – $7.00 |
| Sealing | $0.10 – $0.30 | $0.50 – $1.00 |
A 200 square foot room can often be restored for $100–$400 if you do it yourself. Professional jobs may cost $1,000 or more, depending on damage and location.
Common Mistakes To Avoid
Many beginners make the same errors when restoring terrazzo. Avoid these pitfalls for the best results:
- Using acidic cleaners (like vinegar or bleach), which etch the surface.
- Skipping grits when grinding or polishing, leading to uneven finish.
- Overapplying sealer, resulting in a sticky or cloudy surface.
- Not matching patch colors for repairs—test in a hidden spot first.
- Ignoring safety gear—always wear gloves and goggles during repairs and grinding.
Insider tip: Always read the instructions for every product you use—some sealers or polishers need special steps that aren’t obvious.
When To Call A Professional
Some situations need expert help:
- Large cracks or missing sections
- Extensive stains that don’t respond to cleaning
- Floors with historic or artistic value
- When you want a flawless, mirror-like finish
Professionals have access to high-grade equipment and materials, as well as years of experience in color matching and repairs.
Case Study: Restoring A 1970s Terrazzo Floor
Let’s look at a real-world example. A homeowner in Florida had a 500 sq. ft. terrazzo floor, hidden under carpet for decades. The floor had:
- Multiple carpet tack holes
- Dull, stained patches
- Old adhesive residue
Steps taken:
- Adhesive removed with a non-acidic stripper.
- Holes patched with color-matched epoxy.
- Floor ground starting at 100 grit, progressing to 3000 grit.
- Polished with terrazzo powder for extra shine.
- Sealed with a penetrating sealer.
Results: The floor’s natural beauty returned, with only a few patches visible up close. The restoration cost about $800 (DIY), compared to $5,000 for replacement.
Bonus insight: Many older terrazzo floors have unique marble chips that are hard to match today. Always save any chips from repairs for future touch-ups.

Credit: www.youtube.com
Sustainability And Terrazzo Restoration
Restoring terrazzo is environmentally friendly. Terrazzo itself is made from recycled materials (like stone chips) and lasts much longer than tile or carpet. By restoring instead of replacing, you avoid landfill waste and reduce the need for new materials.
According to the National Terrazzo & Mosaic Association, terrazzo can last 75–100 years with proper care. This makes it one of the most sustainable flooring options available. Learn more at the NTMA Sustainability page.
Frequently Asked Questions
What’s The Difference Between Terrazzo Restoration And Terrazzo Cleaning?
Terrazzo cleaning is regular maintenance—sweeping, mopping, and removing surface dirt. Terrazzo restoration is a deeper process that may involve grinding, polishing, repairing cracks, and resealing to bring back the floor’s original shine and smoothness.
Can I Use Vinegar Or Bleach To Clean Terrazzo Floors?
No. Both vinegar and bleach are acidic or harsh. They can etch and dull the surface of terrazzo, especially cement-based terrazzo. Always use a pH-neutral cleaner designed for stone or terrazzo.
How Long Does It Take To Restore A Terrazzo Floor?
For an average-sized room (200 sq. Ft. ), DIY restoration can take 2–4 days, including drying time for repairs and sealer. Professional jobs are faster—often completed in 1–2 days, depending on the extent of damage.
Do I Need To Reseal Terrazzo After Polishing?
Yes. Sealing is important after polishing because it protects the surface from stains, moisture, and wear. Even epoxy terrazzo benefits from a light seal every few years.
Will All Stains And Cracks Disappear After Restoration?
Most stains and small cracks can be removed or hidden with proper restoration. However, very deep stains or large cracks may remain slightly visible, especially if the terrazzo is old or the original chips are hard to match. Professional repair can minimize these issues.
Restoring terrazzo floors is a rewarding project that brings back beauty, value, and character to any space. With the right steps and careful attention, you can enjoy a stunning floor that lasts for generations.
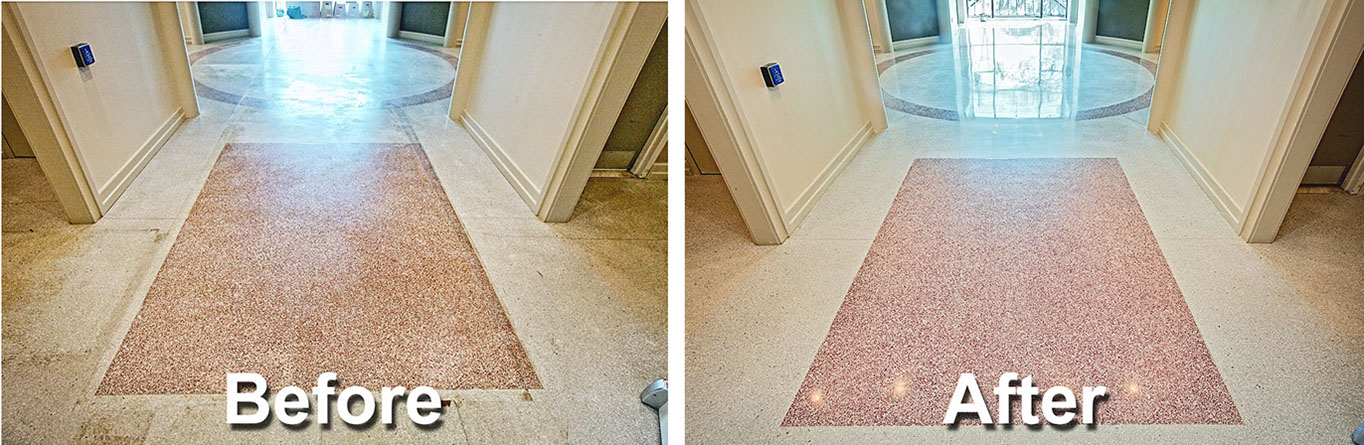
Credit: www.themjacompany.com