If you want the beauty of natural wood, but you only have paint on hand, you might wonder if you can make paint look like stain. You’re not alone. Many homeowners, DIYers, and even professionals face this situation. Maybe you have old painted furniture that needs a new look, or you’re trying to fake a wood grain effect on a flat door. The good news: with the right methods and tools, you can transform paint into a finish that closely resembles wood stain—even on surfaces that aren’t real wood. This approach opens up creative options for home projects, budget makeovers, and even upcycling.
In this guide, you’ll discover clear, step-by-step instructions to help you achieve a realistic stained-wood effect using paint. I’ll also cover how to choose the right materials, techniques for different surfaces, helpful tricks, and mistakes to avoid. By the end, you’ll have all the information you need to make paint look like stain—without confusion or guesswork.
Understanding The Difference: Paint Vs. Stain
Before you start, it’s important to understand how paint and stain work differently. Paint sits on top of the surface and creates a solid layer. Stain, on the other hand, soaks into the material—usually wood—and brings out the natural pattern, or grain.
- Paint: Opaque, covers everything, hides flaws and wood grain.
- Stain: Transparent or semi-transparent, lets the grain show, usually highlights natural wood.
When you want paint to look like stain, your main goal is to mimic the look of wood grain and create a finish that feels natural and layered. This means you’ll be using special techniques to fake depth and texture.
When Should You Use This Technique?
This method is useful in many situations:
- Covering up damage or old paint, while creating a “wood” look.
- Updating cabinets, doors, or furniture when actual wood stain isn’t possible.
- Matching new pieces to existing stained wood.
- Decorating surfaces that aren’t wood (like MDF, metal, or laminate).
One non-obvious insight: Even if your surface is not real wood, you can still create a convincing wood-stained look with paint. It’s all about the right preparation and technique.
Choosing The Right Paints And Materials
Not all paints work for creating a stain effect. Here’s what you need:
Paint Types
- Acrylic paint: Water-based, dries fast, easy to thin. Good for beginners.
- Latex paint: Also water-based, often used for walls and furniture.
- Oil-based paint: More durable, but harder to clean and takes longer to dry.
You’ll need to thin your paint to make it look like a stain. Most people use water for water-based paints and mineral spirits for oil-based. The paint should be translucent (see-through), not thick.
Tools And Supplies
- Good quality brushes: A soft brush for smooth strokes, and a stiff brush for wood grain effects.
- Foam brush or roller: For large, flat areas.
- Rags or sponges: For wiping and blending.
- Wood grain tool: Optional, but helps create realistic grain patterns.
- Painter’s tape: For clean edges.
- Sandpaper (medium and fine grit): For surface prep.
- Clear sealer or topcoat: For protection and shine.
Don’t use cheap brushes. They can leave marks or lose bristles in your finish.
Gathering Extra Materials
Depending on your project, you may need:
- Primer: If your surface is very shiny, damaged, or not wood.
- Drop cloth: To protect your workspace.
- Glaze or extender: To slow down drying and allow better blending.
- Mixing containers: For diluting paint.
Surface Preparation Is Key
Your result depends on how well you prepare the surface. Here’s what you should do:
- Clean the surface. Remove dust, grease, and old paint flakes.
- Sand the area. Start with medium-grit sandpaper (like 120), then finish with fine (220). This helps the paint stick and removes bumps.
- Repair flaws. Fill holes or cracks with wood filler and sand smooth.
- Prime if needed. If painting over metal, laminate, or glossy surfaces, use a good bonding primer.
- Wipe with a damp cloth. Removes sanding dust.
A big mistake many people make is skipping the sanding step. Even “no-sand” paints work better on a lightly sanded surface.

Credit: www.remodelaholic.com
How To Thin Paint For A Stain Look
The magic comes from making paint more transparent, like a stain. Here’s how:
Thinning Water-based Paint
- Pour some paint into a container.
- Add water slowly—start with about 1 part water to 4 parts paint.
- Mix well.
- Test on scrap wood or cardboard.
- If it’s too thick, add more water. For a stained look, you want the paint to flow and show the surface underneath.
Thinning Oil-based Paint
- Use mineral spirits instead of water.
- Always work in a well-ventilated area.
Pro tip: It’s better to thin a small amount at a time. You can always add more, but you can’t take water or spirits out once mixed.
Creating A Wood Grain Effect With Paint
Now for the fun part: making paint look like wood stain. There are several methods, depending on the look you want. Here’s a step-by-step guide for the classic faux-wood effect.
Step 1: Base Coat
Start with a base color that matches the lightest part of the wood you want to imitate. For example, for oak, use a pale yellow or beige. For walnut, try a warm tan.
- Apply the base color evenly.
- Let it dry completely.
Step 2: Apply The Thinned “stain” Paint
- Use your thinned paint as the “stain.”
- Work in small sections (2–3 feet at a time).
- Brush the paint on in the direction of the grain, even if the surface isn’t wood.
Step 3: Blend And Wipe
- Immediately after brushing, use a clean rag or sponge to wipe off excess paint.
- Wipe in long, even strokes.
- The goal: The paint stays in the “grain” and low spots, and the high spots are lighter.
Step 4: Add Grain Details
If you want a realistic wood effect:
- Use a wood grain tool. Rock it slowly as you drag it through the wet paint.
- Or, use a dry brush to drag lines through the paint for subtle grain.
- For knots or patterns, twist the brush tip gently as you move.
Step 5: Layer For Depth
Let your first “stain” layer dry. Then, add a second (or third) layer with slightly darker or different shades, using the same technique. This builds a realistic, multi-tone effect like real wood.
Non-obvious insight: Real wood has many colors and patterns. Don’t be afraid to mix tiny amounts of different colors for more depth.
Step 6: Seal The Finish
After your final layer dries fully, protect your work with a clear sealer. Choose satin, semi-gloss, or matte depending on the wood look you want.
- Apply with a clean brush or foam roller.
- Let it dry as directed.
Skipping the sealer can make your finish less durable and harder to clean.
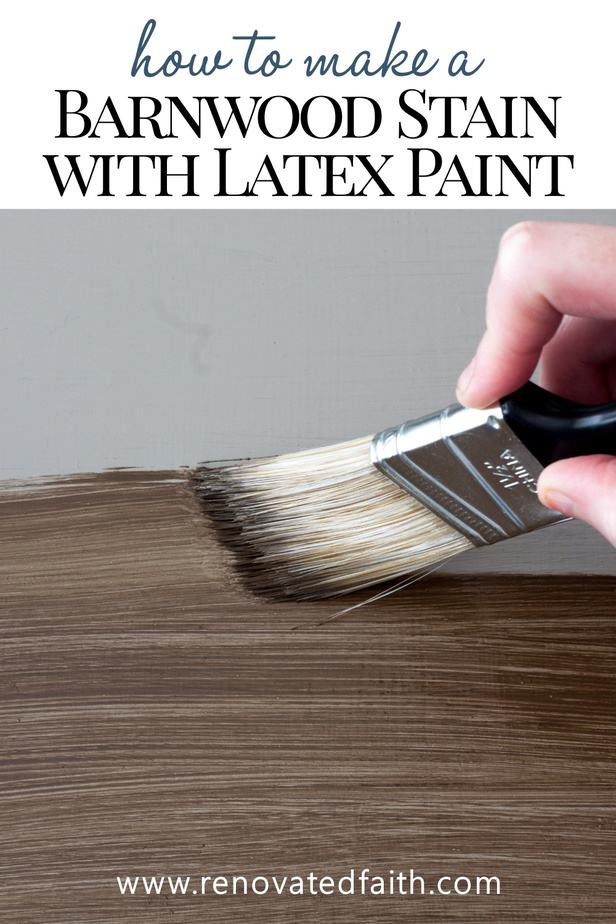
Credit: renovatedfaith.com
Using Glaze For A More Authentic Look
Glaze is a special medium that artists and painters use to create transparent layers. Adding glaze to your paint gives you more time to blend and makes it even more like stain.
- Mix 1 part paint with 2–3 parts glaze.
- Apply and blend as before.
Glaze is especially useful on cabinets and doors, where a longer working time makes it easier to get a natural look.
Faux Bois: Advanced Wood Grain Techniques
“Faux bois” (French for “fake wood”) is a painting style that imitates wood grain. Professionals use this technique for high-end finishes on doors, panels, and even walls.
What You’ll Need
- Multiple shades of brown or wood-toned paint
- Glaze medium
- Fine artist’s brushes
- Wood grain tool or comb
- Reference photo of real wood
How To Do It
- Paint the base color and let it dry.
- Mix different shades of brown with glaze.
- Paint thin, uneven lines to mimic wood grain patterns.
- Add knots and swirls for realism.
- Blend lightly with a dry brush.
- Seal when done.
This method takes time and patience but can fool the eye into thinking a surface is real wood.
Comparing Paint Vs. Stain For Different Surfaces
Not every surface responds the same way. Here’s a quick comparison to help you decide when to use each method:
| Surface | Real Stain | Faux Stain with Paint | Notes |
|---|---|---|---|
| Raw Wood | Best | Good | Both work, but real stain is easier |
| Painted Wood | Poor | Best | Paint method is preferred |
| MDF/Laminate | Poor | Good | Paint is the only option |
| Metal/Plastic | Not possible | Possible | Needs good primer for adhesion |
Popular Wood Looks You Can Create With Paint
Different woods have their own color and grain style. Here’s how to match popular types:
- Oak: Use yellowish tan as a base. Add medium brown for grain. Grain is straight and coarse.
- Walnut: Start with a light brown base. Layer rich, dark browns. Grain is smooth, with swirls and occasional knots.
- Cherry: Use a reddish-brown base. Add deep red-brown layers. Cherry has fine, straight grain.
- Mahogany: Begin with a red base, then add dark brown and black grain lines. Grain is wavy and dramatic.
- Pine: Base coat is pale yellow or cream. Add light brown for soft, wide grain. Pine often has knots.
Use reference images as you work. Real wood has irregular lines and color shifts.
Step-by-step Example: Faux Stain On A Door
Let’s walk through a real-life project—making a painted door look like stained wood.
Materials Needed
- Light tan acrylic or latex paint (base coat)
- Medium and dark brown paint (for “stain”)
- Glaze medium
- Synthetic brush
- Wood grain tool
- Rags
- Painter’s tape
- Sandpaper
- Clear satin polycrylic sealer
Steps
- Remove hardware and tape off edges.
- Sand the door until smooth.
- Wipe off dust.
- Paint a base coat of light tan. Let dry.
- Mix medium brown paint with glaze (2: 1 ratio).
- Brush on in long, vertical strokes.
- While wet, drag the wood grain tool through the paint, rocking it to create knots and grain.
- Wipe with a rag to soften.
- Repeat with a darker brown for more depth.
- Let dry. Apply a clear sealer.
This method can turn even a plain hollow-core door into a dramatic statement piece.
Common Mistakes And How To Avoid Them
Many people try to create a faux stain effect and end up frustrated. Here’s what to watch out for:
- Skipping surface prep: Paint won’t stick to dust, grease, or glossy surfaces. Always sand and clean.
- Too much water in paint: If you add too much, the paint will run or won’t cover. Thin slowly and test.
- Working too slowly: Thinned paint dries fast. Work in small sections so you can blend before it dries.
- Using flat, solid color: Real wood has variation. Add layers and mix colors for realism.
- Forgetting the topcoat: Without sealing, your finish can scratch or fade.
Non-obvious insight: Always step back and look at your work from a distance. The wood effect should look natural, not like painted lines up close.

Credit: whipperberry.com
Tips For Different Surfaces
Cabinets
- Remove doors and hardware before starting.
- Number the doors to keep track.
- Clean with degreaser, as kitchen cabinets often have oil buildup.
- Prime glossy surfaces for best results.
Furniture
- Disassemble if possible for easier painting.
- Watch for drips on edges and corners.
- Protect floors with a drop cloth.
Walls
- Use a foam roller for the base.
- Faux bois techniques look great on accent walls.
- Use a level and painter’s tape to keep “planks” straight.
Metal Or Plastic
- Clean with alcohol to remove oils.
- Use a bonding primer.
- Be gentle with sanding to avoid scratches.
How To Maintain Your Faux-stained Finish
Once your project is done, you want it to last. Here’s how:
- Wait at least 24 hours before regular use.
- Clean with a soft, damp cloth—no harsh chemicals.
- Touch up chips with a small artist’s brush and leftover paint.
- Reapply a clear sealer every few years for heavy-use surfaces.
Advanced Effects: Adding Texture And Dimension
Beyond just color, you can add texture for a more authentic look:
- Use a dry brush to create roughness.
- Dab with a sponge for subtle knots.
- Add highlights with a lighter shade, and shadows with a darker one.
- For deep grooves, use a stylus or edge of a credit card to “draw” lines before the paint dries.
These small touches can fool the eye and make your finish look like real, hand-rubbed wood.
Cost, Time, And Effort: What To Expect
Here’s a quick comparison of painting vs. real stain, with estimated time and cost:
| Method | Materials Cost | Time (per door/panel) | Skill Level |
|---|---|---|---|
| Traditional Stain | $15–$30 | 2–3 hours | Beginner |
| Faux Stain with Paint | $20–$40 | 4–6 hours | Intermediate |
- Faux stain takes more time and practice, but lets you create a wood look where stain can’t be used.
- Most supplies are reusable, so the cost drops for larger projects.
Real-world Examples And Inspiration
Many famous designers and DIYers use this technique. For example, you’ll find faux wood finishes in boutique hotels, restaurants, and even on stage sets where weight and cost are issues. Some upcyclers transform old IKEA furniture into “high-end” wood pieces with paint alone.
Tip: Check out online forums and social media for photos of finished projects. You’ll see everything from painted concrete floors that look like wood planks to kitchen cabinets reborn with a walnut finish.
Troubleshooting: What If It Doesn’t Look Right?
If you finish a section and it doesn’t look like real wood, don’t panic:
- Let it dry, then add another thin layer with a different color for more depth.
- Use a small brush to add fake “grain” lines and knots.
- If it’s too dark, lightly sand and apply a lighter color as a wash.
- If it’s too light, add another layer of thinned paint.
Remember: Wood is never perfect. Imperfections add to the realism.
Safety Tips And Environmental Notes
- Always work in a well-ventilated space, especially with oil-based paints or mineral spirits.
- Wear gloves to protect your skin.
- Dispose of paint and rags properly—some can be flammable.
- Consider eco-friendly paints and sealers for a safer home.
For more information on paint safety, visit the EPA Safer Choice site.
Frequently Asked Questions
How Long Does It Take For Faux Stain To Dry?
Drying time depends on the paint and room conditions. Water-based paint layers usually dry in 1–2 hours; oil-based takes longer. Add extra time between layers and before sealing.
Can I Use This Method On Laminate Or Veneer Furniture?
Yes! Just make sure to use a good bonding primer first, and sand lightly for better adhesion. Faux stain is a popular way to refresh laminate cabinets and tables.
Is It Possible To Fix Mistakes After The Paint Dries?
Small mistakes can be sanded lightly and covered with another thin layer. For big errors, let the paint dry fully, sand smooth, and start again with a fresh coat.
Will The Finish Hold Up In High-traffic Areas?
With a quality clear sealer, your finish can last for years—even on kitchen cabinets or doors. For floors or outdoor use, pick a heavy-duty, water-resistant sealer.
Can I Make A Gray Or Whitewashed Stain Effect With This Method?
Absolutely. Use thinned gray or white paint instead of brown. Apply in thin layers, wiping back for a soft, weathered look. This is popular for farmhouse and coastal styles.
Making paint look like stain is a creative skill that gets easier with practice. With patience, the right materials, and attention to detail, you can give almost any surface a beautiful, wood-like finish. Whether you’re updating a room or saving a piece of furniture from the landfill, this technique delivers style and versatility.
Try it on your next project—and enjoy the transformation!