A gas appliance can make life comfortable, but when the pilot light goes out, it can be frustrating and even a bit worrying. If you have ever found yourself with a cold shower because your water heater stopped working, or your gas stove won’t light, you know the importance of a steady pilot flame. Fixing a pilot light is a practical skill that can save you time, money, and the inconvenience of waiting for a technician. This article will guide you step by step, explain why pilot lights go out, how to relight and maintain them, and answer common questions. With a calm, expert approach, you’ll learn not just to fix a pilot light, but also to do so safely and with confidence.
Understanding The Pilot Light On A Gas Appliance
Before you start fixing anything, it’s important to know what a pilot light is. In simple terms, a pilot light is a small flame that stays on inside many gas appliances. It acts as an ignition source for the main burner, turning on the larger flame when you need heat or hot water. Common appliances with pilot lights include:
- Gas water heaters
- Gas furnaces
- Gas fireplaces
- Gas stoves and ovens
A working pilot light is critical. If it goes out, the appliance won’t work—and in rare cases, gas can build up, which is dangerous. Safety systems in modern appliances usually stop the gas if the pilot goes out, but older models may not.
Why Pilot Lights Go Out
You may wonder why your pilot light suddenly stops burning. There are several reasons, and understanding them helps you fix the problem for good.
- Drafts or sudden air movement: If a door slams or a window is open, a draft can blow out the small flame.
- Dirty or clogged pilot orifice: Dust, dirt, or spider webs can block the small opening where gas comes out.
- Faulty thermocouple: The thermocouple senses the flame. If it stops working, it shuts off the gas as a safety measure.
- Low gas pressure: Issues with the gas supply or regulator can cause the flame to go out.
- Moisture or condensation: Water from leaks or humidity can put out the flame.
- Mechanical problems: Old or worn parts may simply fail.
Many beginners do not realize that fixing the pilot light is not just relighting it. You need to find out why it went out, or it could happen again.
Safety First: Preparing To Fix A Pilot Light
Safety should always come first when working with gas. Gas is flammable and can be dangerous if not handled properly. Here are important safety steps before you begin:
- Turn off the gas supply to the appliance. Find the gas shut-off valve near the appliance and turn it to the “off” position.
- Wait a few minutes to let any gas escape. This reduces the risk of fire or explosion.
- Ventilate the area by opening windows and doors if possible.
- Read the manufacturer’s instructions for your appliance. Each model is a little different.
- Have a flashlight handy. You’ll often need to see into dark areas.
Some people skip these steps because they are in a hurry. This is a mistake. Gas safety is serious—never rush or take shortcuts.
Tools And Materials You Will Need
To fix a pilot light, you do not need expensive tools. Here’s a list of what you should have ready:
- Long-reach lighter or long match (never a short match)
- Small adjustable wrench or pliers
- Screwdriver (flat or Phillips, depending on your appliance)
- Soft brush or compressed air (for cleaning)
- Clean, dry cloth
- Flashlight
- Replacement thermocouple (if needed)
- Safety gloves and glasses
Having these tools close by saves time and helps you work safely. Many beginners forget about cleaning tools, but a dirty pilot is a common problem.
Step-by-step: How To Fix A Pilot Light
Let’s break down the entire process of fixing a pilot light into clear steps. These apply to most gas appliances, but always check your owner’s manual for specifics.
Step 1: Locate The Pilot Light
Find the pilot assembly. On water heaters, it’s usually behind an access panel at the bottom. On stoves, it may be under the burners. For fireplaces, look inside near the control knob.
Look for three main parts:
- The pilot orifice (where the small flame burns)
- The thermocouple (a thin copper wire next to the flame)
- The gas control knob (often marked “Off,” “Pilot,” and “On”)
Step 2: Turn Off The Gas
Turn the gas control knob to the “Off” position. Wait at least five minutes. This lets any leftover gas clear out.
Step 3: Clean The Pilot Assembly
A dirty pilot is a top reason for failure. Carefully brush away dirt and dust from the pilot area. If you see spider webs or debris inside the pilot orifice, use compressed air to blow it out.
A non-obvious tip: Even tiny bits of dust or spider silk can affect the small flame. Cleaning often solves the problem.
Step 4: Check The Thermocouple
The thermocouple is a safety device. It senses the heat of the pilot flame and tells the gas valve to stay open. If it’s loose, dirty, or faulty, the pilot won’t stay lit.
- Make sure the thermocouple is positioned so the flame touches it.
- Gently clean it with steel wool or a soft brush.
- If it looks damaged or very old, consider replacing it.
Beginners often miss the importance of the thermocouple. A weak or misaligned thermocouple will cause repeated pilot light failures.
Step 5: Relight The Pilot Light
Now you are ready to relight:
- Turn the gas control knob to “Pilot.”
- Press and hold the knob down to start the gas flow to the pilot.
- While holding the knob, use a long lighter or match to ignite the pilot flame. Keep holding the knob for 30 to 60 seconds.
- Release the knob slowly. The pilot should stay lit. If it goes out, repeat the process one more time.
If the pilot still won’t stay lit after three tries, turn the knob to “Off” and investigate further.
Step 6: Turn The Appliance Back On
Once the pilot flame stays on, turn the knob to the “On” position. For water heaters, you may need to adjust the thermostat. For stoves, test by lighting a burner.
If Everything Works, You Have Fixed Your Pilot Light!
Troubleshooting Common Pilot Light Problems
Sometimes, the pilot light still won’t stay on after following the steps. Here are some common problems and solutions.
The Pilot Light Won’t Ignite
Possible causes:
- No gas supply (check if the main gas valve is open)
- Clogged pilot orifice
- Faulty gas control knob
Solution: Double-check the gas supply and clean the pilot orifice again. If there is still no flame, the control knob or valve may need replacement.
The Pilot Light Won’t Stay Lit
Possible causes:
- Bad thermocouple (most common)
- Weak pilot flame (not touching thermocouple)
- Drafts blowing the flame out
Solution: Adjust or replace the thermocouple, and check for drafts. Make sure the flame is steady and blue—not yellow or flickering.
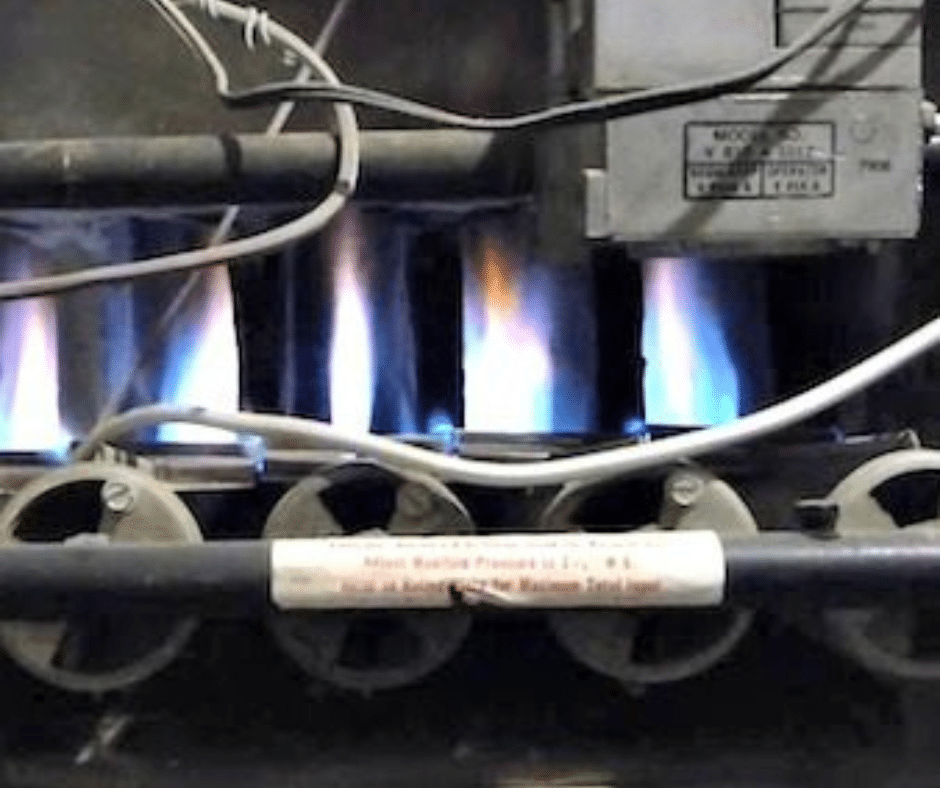
The Flame Is Yellow, Not Blue
A healthy pilot flame should be small and blue. A yellow flame means incomplete burning or a dirty orifice.
Solution: Clean the pilot orifice and adjust the air shutter if your appliance has one.
The Pilot Flame Is Too Weak
If the flame is very small, it may not stay lit during normal use.
Solution: Check for low gas pressure, clean the pilot assembly, and consider calling a professional if the problem continues.
Credit: www.marklindsayplumbing.com
When To Replace The Thermocouple
The thermocouple is a simple part, but it wears out over time. Signs that you need to replace it:
- Pilot light won’t stay lit, even after cleaning
- Thermocouple looks bent, broken, or corroded
- Appliance is over 10 years old and never had the thermocouple replaced
Replacing a thermocouple is easy. Turn off the gas, unscrew the old thermocouple, and screw in the new one. Make sure the new thermocouple touches the pilot flame directly.
Below is a comparison of signs for a bad thermocouple versus a dirty pilot orifice:
| Problem | Bad Thermocouple | Dirty Pilot Orifice |
|---|---|---|
| Pilot light goes out quickly | Yes | Sometimes |
| Pilot light will not relight | Sometimes | Yes |
| Flame is weak or yellow | No | Yes |
| Thermocouple looks damaged | Yes | No |
Special Tips For Different Appliances
Fixing a pilot light is similar for most gas appliances, but there are important details for each type.
Gas Water Heater
- Always relight the pilot through the access panel at the bottom.
- Some models have a piezoelectric igniter (push-button spark). Others require a match or lighter.
- Adjust the thermostat after relighting.
Gas Furnace
- The pilot is often behind a small cover. Remove it to reach the assembly.
- Modern furnaces may have electronic ignition instead of a standing pilot.
- Check the owner’s manual for your model.
Gas Fireplace
- Turn off the gas before cleaning inside the firebox.
- Make sure logs or rocks do not block the pilot area.
- Use a long lighter for safety.
Gas Stove Or Oven
- Many stoves have more than one pilot light (for oven and burners).
- Clean the pilot with a needle if it is clogged.
- Modern stoves may use spark ignition instead.
How To Prevent Pilot Light Problems
Prevention is easier than repair. Here are proven steps to avoid pilot light trouble:
- Clean the pilot area regularly, especially before the heating season.
- Check for drafts near the appliance. Seal windows and doors if needed.
- Inspect the thermocouple for corrosion or loose connections.
- Schedule yearly maintenance for gas appliances by a professional.
- Keep the area dry—fix leaks or sources of moisture.
Most people skip regular cleaning, but even a little dust or spider web can block the tiny pilot opening. This is an easy way to avoid future problems.
Safety Risks And When To Call A Professional
Some pilot light problems are easy to fix, but others require a professional. If you notice any of the following, do not try to fix it yourself:
- Smell of gas (like rotten eggs) even when the appliance is off
- Soot, smoke, or carbon buildup near the pilot area
- Repeated pilot light failures after cleaning and replacing parts
- Unusual noises or vibrations from the appliance
If you smell gas, leave the area immediately and call your local gas company. Do not use electrical switches or phones inside the house until it’s safe. For more on gas safety, see the CDC’s gas safety guidelines.
Credit: www.constellationhome.com
Comparing Pilot Light Vs. Electronic Ignition
Many new appliances use electronic ignition instead of a standing pilot light. Here’s how they compare:
| Feature | Pilot Light | Electronic Ignition |
|---|---|---|
| Energy Use | Uses small amount of gas 24/7 | Uses no gas except when starting |
| Maintenance | Needs cleaning and relighting | Requires less cleaning, but may need electric repair |
| Reliability | Simple, easy to fix | More parts, can fail during power outage |
| Cost | Usually cheaper to install | Higher upfront cost, saves money long-term |
Common Mistakes When Fixing A Pilot Light
Even people who are handy with tools make mistakes. Here are some to avoid:
- Not turning off the gas before working
- Using a short match (risk of burns)
- Rushing the relighting process (hold the knob long enough)
- Forgetting to clean the area before relighting
- Not checking for drafts that can blow out the flame
- Ignoring the thermocouple (a frequent cause of problems)
Many people think relighting is enough. If you skip cleaning or checking the thermocouple, the problem will return.
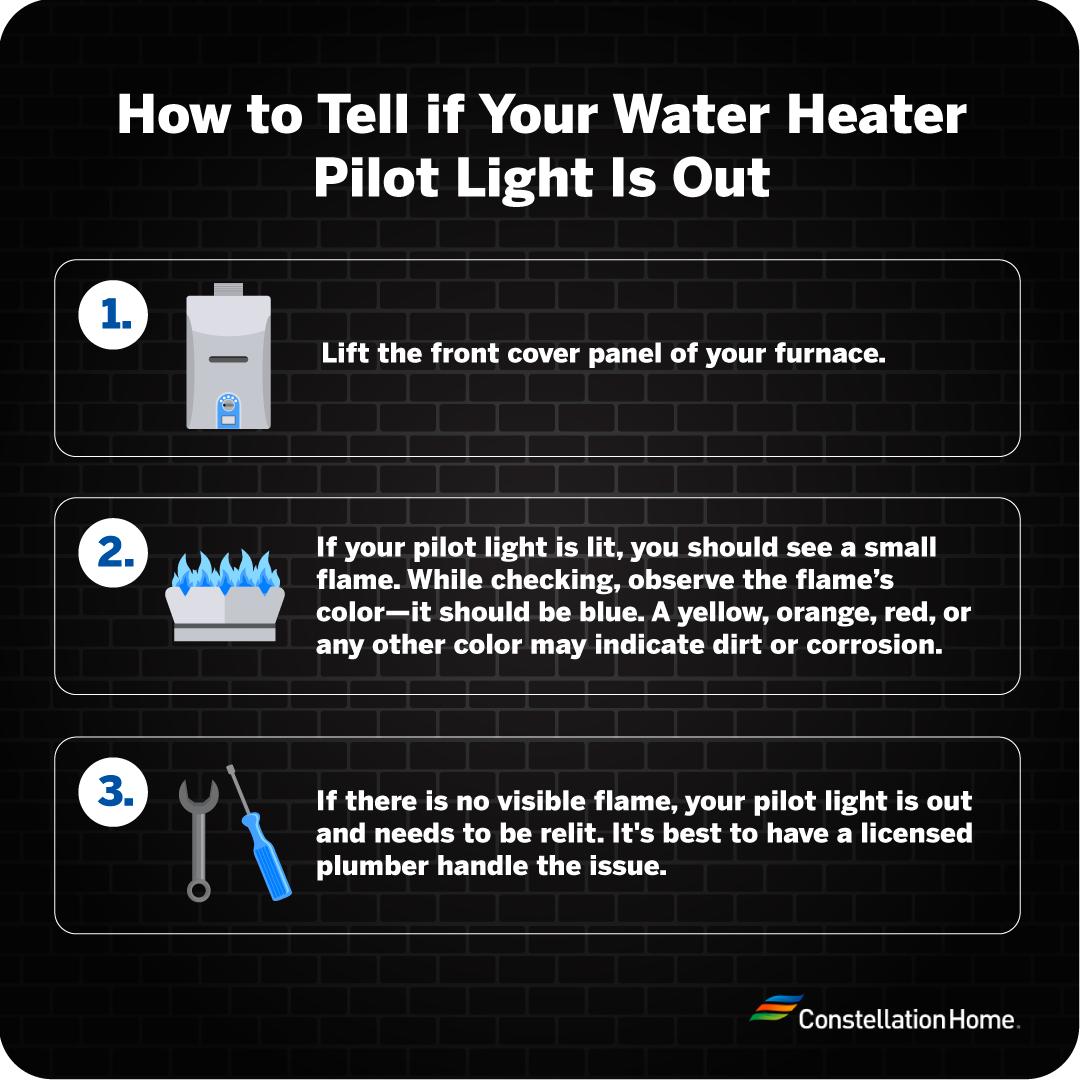
How To Know If Your Pilot Light Is Out
Sometimes, you may not see the pilot flame directly. Signs that the pilot light is out include:
- No hot water or no heat from the appliance
- “No pilot” or “error” message on newer models
- Clicking sound as the appliance tries to start
- No blue flame in the pilot window
If you are unsure, refer to your appliance’s manual for the location of the pilot window or inspection glass.
Energy And Cost Considerations
A pilot light burns a small amount of gas all the time. On average, it uses 500 to 1,000 BTUs per hour. Over a year, this can add $10–$20 to your gas bill for each appliance.
If you want to save energy, consider upgrading to an electronic ignition model. While the upfront cost is higher, you will save money over time due to lower gas use.
Here’s a simple comparison of annual energy use:
| Appliance Type | Pilot Light (BTUs/year) | Electronic Ignition (BTUs/year) |
|---|---|---|
| Water Heater | 4,380,000 | Less than 500,000 |
| Furnace | 2,190,000 | Less than 250,000 |
Environmental Impact
A small pilot flame might not seem like much, but across millions of homes, it adds up. Using electronic ignition reduces natural gas use and helps the environment.
If you must use a pilot light, keeping it well maintained is the best way to reduce waste.
Extra Tips For Success
- Take a photo of the pilot assembly before taking anything apart. This helps with reassembly.
- Label screws and small parts in a container as you remove them.
- Do not force anything when removing or tightening parts. They are often delicate.
- Test the appliance after relighting the pilot. Let it run for a few cycles to make sure the problem is solved.
- Record the date of your repair in a notebook. If problems return, you’ll have a history for the technician.
Many people overlook the value of keeping a simple maintenance log, but it helps spot patterns and saves time in future repairs.
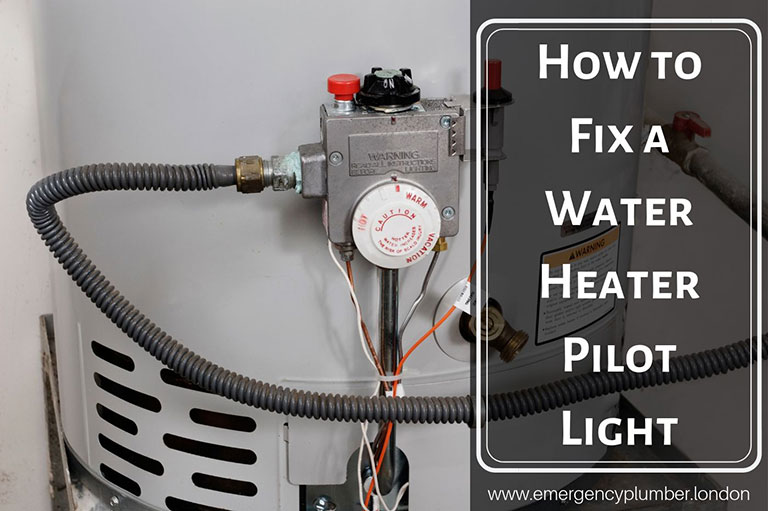
Credit: www.emergencyplumber.london
Frequently Asked Questions
Why Does My Pilot Light Keep Going Out?
The most common reasons are a dirty pilot orifice, a bad thermocouple, drafts, or low gas pressure. Cleaning the area and checking the thermocouple usually solves the problem.
Is It Dangerous If The Pilot Light Goes Out?
Most modern appliances have safety features that stop the gas if the pilot goes out. However, if you smell gas, leave the area and call your gas company immediately.
How Do I Know If My Thermocouple Is Bad?
If the pilot light will not stay lit after cleaning, or if the thermocouple looks damaged or corroded, it likely needs replacement.
Can I Relight The Pilot Light Myself?
Yes, if you follow safety steps and the appliance manual. Turn off the gas, wait for gas to clear, and use a long lighter. If you are unsure, call a professional.
Should I Upgrade To Electronic Ignition?
Electronic ignition saves energy and requires less maintenance, but may cost more to install. For older appliances, it may be worth considering an upgrade.
Fixing a pilot light on a gas appliance is within reach for most homeowners. By learning how to diagnose, clean, and relight safely, you can restore warmth and hot water without waiting for help. Remember to put safety first, keep your tools handy, and maintain your appliances regularly. A little care goes a long way toward peace of mind and lower energy bills.