Cabinets are more than just storage. They shape the style and mood of kitchens, bathrooms, and living spaces. Many people love the rustic look—it makes a room feel warm, welcoming, and full of character. Maybe you want your cabinets to look like they’ve been part of your home for decades. Or you want to bring the charm of a country cottage to a modern space. The good news is, you don’t need to buy expensive new cabinets. With the right techniques, you can turn almost any set of cabinets into a rustic highlight.
This guide will show you everything you need to know about making cabinets look rustic. You’ll learn about materials, tools, painting and staining methods, distressing techniques, hardware choices, and more. You’ll find practical steps, expert tips, and real-life examples—plus two detailed comparison tables to help you choose the best products and methods.
If you want your cabinets to have that “lived-in” beauty, you’re in the right place.
What Makes Cabinets Look Rustic?
Before you start, it helps to understand what gives cabinets a rustic appearance. Rustic style is about natural materials, aged finishes, and imperfections that look real—not fake or forced. Here are some key features of rustic cabinets:
- Visible wood grain and knots
- Distressed or weathered paint (worn edges, scratches, chips)
- Muted, earthy colors
- Matte or satin finishes
- Simple, sturdy hardware (iron, bronze, or pewter)
- Open shelving or glass fronts (sometimes)
- Handmade or rough details
Rustic doesn’t mean sloppy or dirty. It means cabinets look like they’ve had a life—maybe a few dents, maybe old paint showing through, but always solid and honest.
Choosing The Right Cabinets For A Rustic Makeover
Not all cabinets are equal when it comes to rustic style. Some types work better than others. The good news is, most solid-wood cabinets can be transformed. Even laminate and MDF cabinets can work, but need extra care.
Best Cabinet Materials
- Solid wood: The best choice. Wood grain and knots look great when distressed.
- Wood veneer: Works well, but be careful not to sand through the thin veneer layer.
- MDF or laminate: Can work, but paint and distressing must be gentle.
Cabinet Style
Simple Shaker-style doors, flat panels, or beadboard work best. Avoid highly modern or glossy cabinets. Raised panels or carved details can also fit, especially for a farmhouse look.
Condition
Cabinets don’t have to be perfect. Small dents, scratches, or unevenness actually help the rustic look. However, make sure they’re structurally sound.
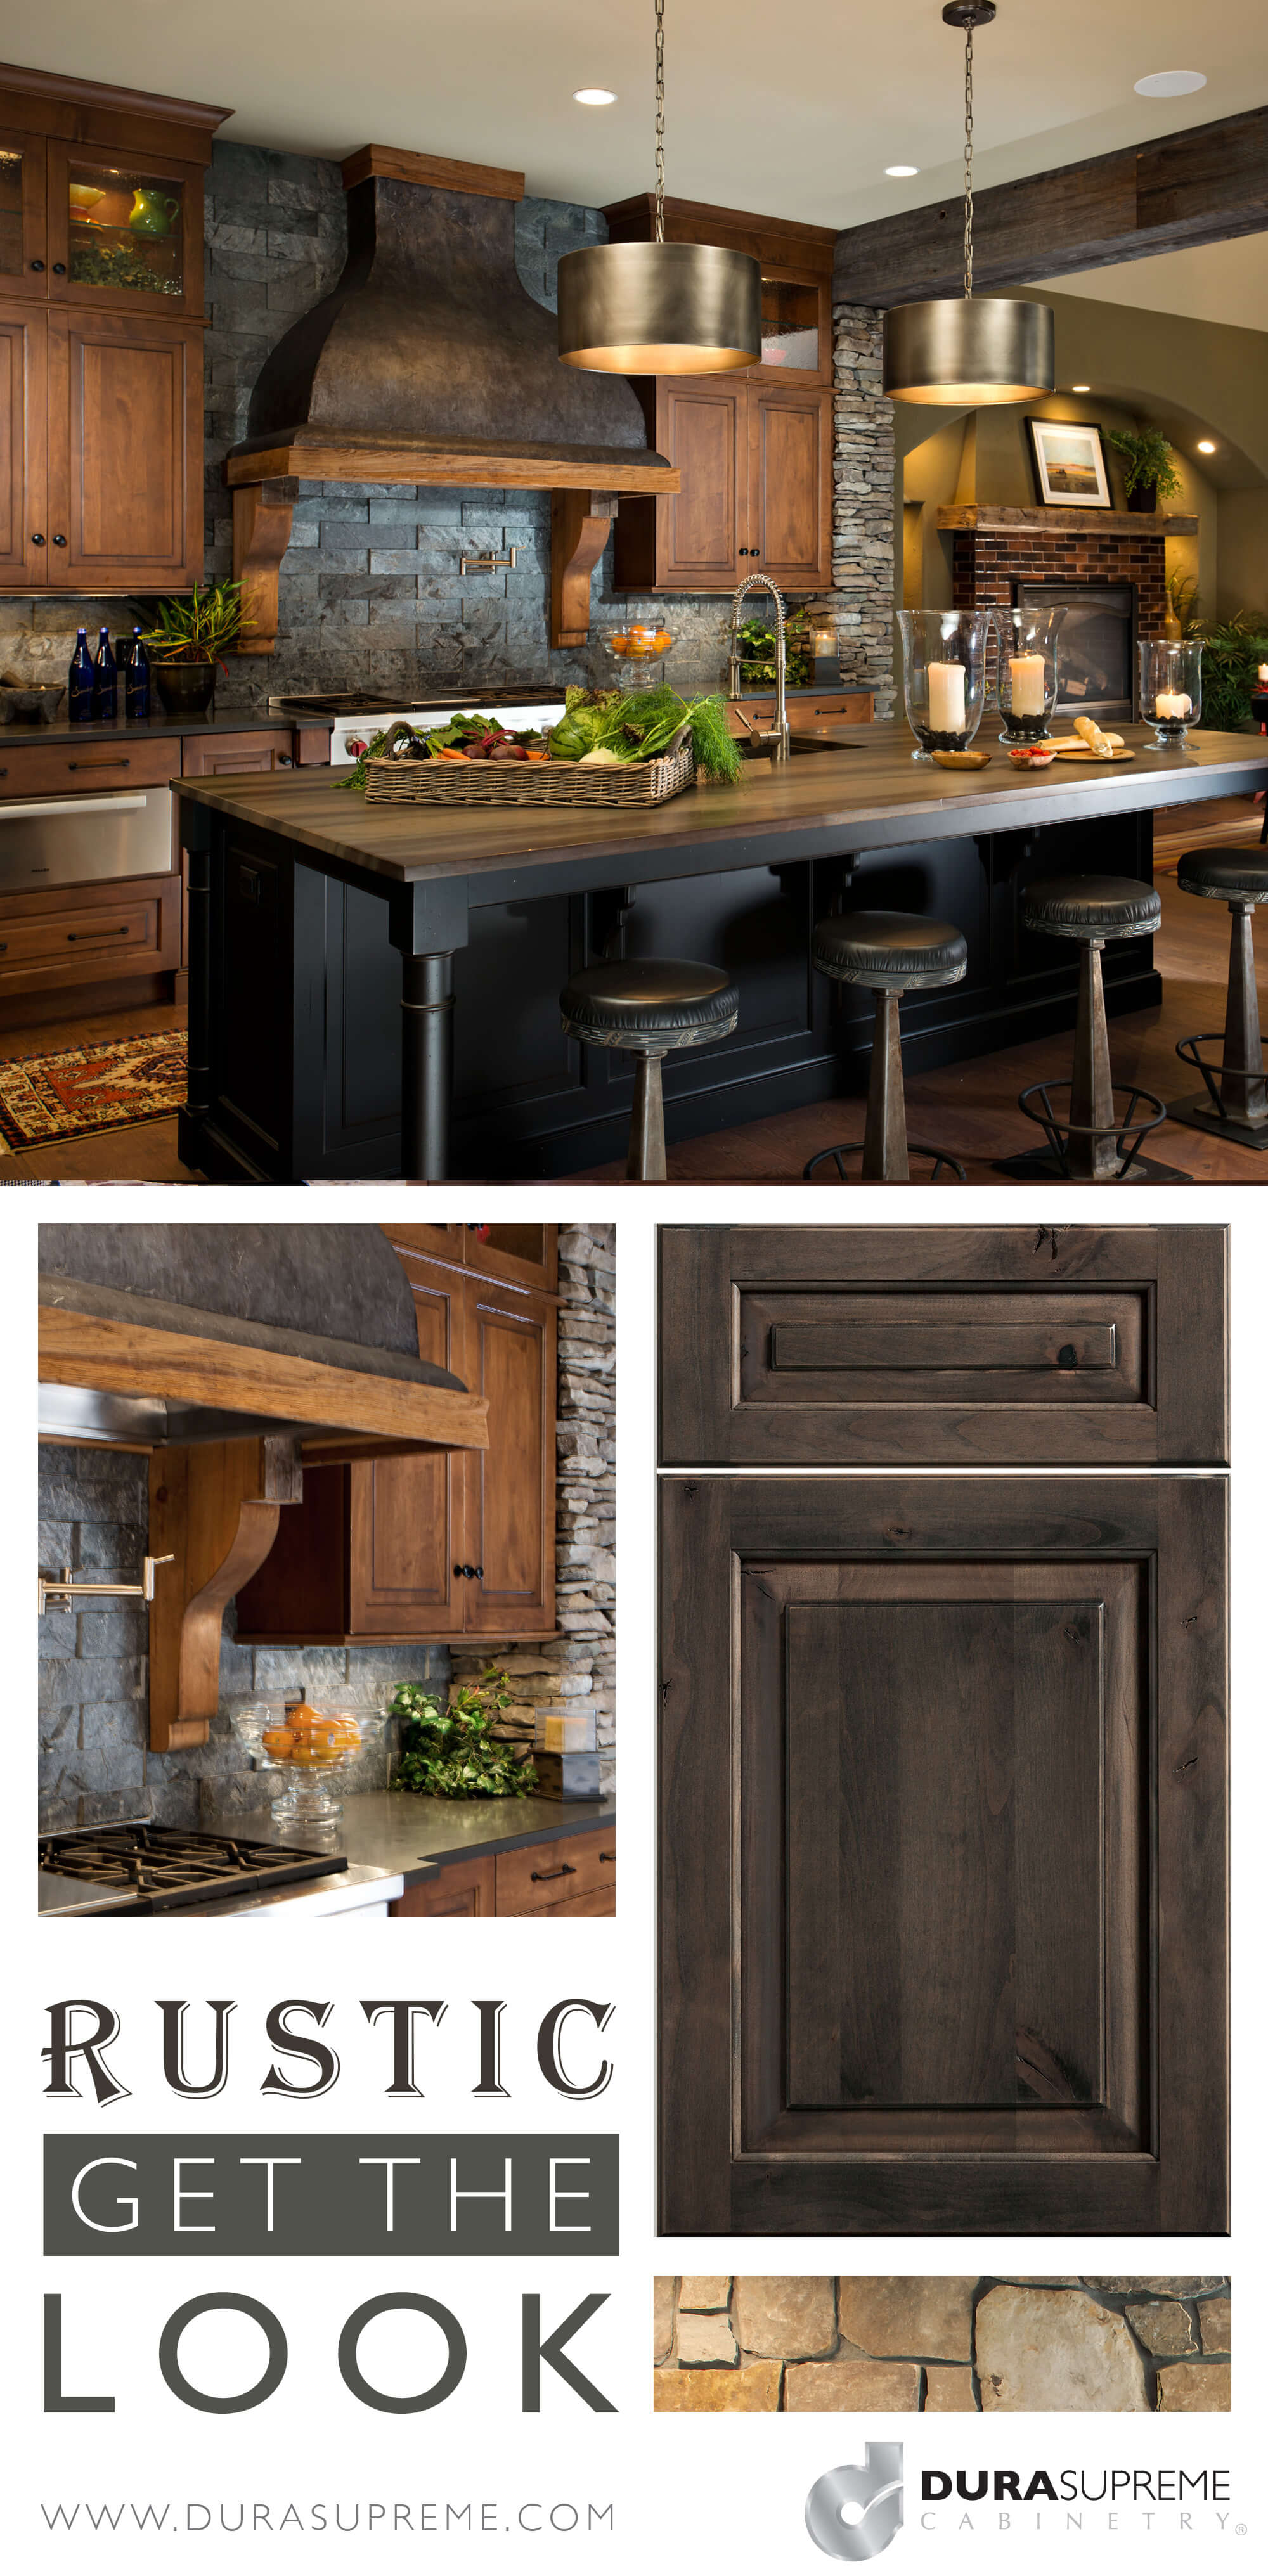
Credit: www.durasupreme.com
Tools And Materials You’ll Need
A rustic cabinet makeover doesn’t require expensive tools. Here’s a list of basics:
- Screwdriver (for removing hardware)
- Sandpaper (medium and fine grit: 120–220)
- Sanding block or electric sander
- Paintbrushes (various sizes, natural bristle for chalk paint)
- Rags or tack cloth
- Painter’s tape
- Drop cloths
- Putty knife (for chipping paint)
- Wood stain or glaze
- Chalk paint or milk paint (for a matte, vintage finish)
- Clear wax or matte polyurethane (for protection)
- Distressing tools: Hammer, chains, nails, screwdrivers, steel wool (for adding wear)
- White vinegar (for aging hardware)
- New hardware (if changing knobs or pulls)
Many of these items are already in most homes. The rest are easy to find at hardware stores.
Step-by-step: How To Make Cabinets Look Rustic
The rustic transformation involves a few main steps: prepping, painting or staining, distressing, sealing, and finishing with the right hardware.
1. Preparation: The Foundation For A Good Finish
Start by removing all cabinet doors, drawers, and hardware. Label each piece to make reassembly easy. Clean every surface with a degreaser or mild soap to remove oils and dirt. This step is crucial—paint won’t stick to grease.
For wood cabinets, lightly sand the surfaces. Use a sanding block and move with the wood grain. If your cabinets have gloss or a shiny finish, sand more thoroughly (120-grit, then 220-grit). Wipe off dust with a damp rag or tack cloth.
If you have laminate or MDF cabinets, roughen the surface gently and use a bonding primer. This helps the paint stick and prevents peeling.
2. Choosing Paints And Stains For Rustic Cabinets
Paint and stain choices are key for the rustic look. The right combination gives cabinets depth and a sense of history.
Paint Options
- Chalk paint: Matte, easy to distress, sticks to most surfaces. Available in earthy colors.
- Milk paint: Slightly more transparent, creates natural aging and chipping effects.
- Latex paint: Works if you want a smoother finish, but less rustic.
Stain Options
- Oil-based stains: Bring out wood grain and knots. Warm brown or gray shades work best.
- Gel stains: Good for vertical surfaces, less drippy.
- Glazes: Used after painting to add depth and “antique” effects.
Choosing Colors
Popular rustic shades include:
- Soft whites and creams
- Warm grays
- Muted sage green
- Deep blues
- Barn red
- Natural wood tones
Avoid bright or shiny colors. Rustic is all about soft, weathered, and natural hues.
3. Painting And Staining Techniques
Apply paint or stain in thin, even coats. For paint, use a brush (not a roller) to leave subtle brush marks. Brush in the direction of the grain. Let each coat dry completely before adding another.
For stains, wipe or brush on, then wipe off excess with a rag. The longer you leave stain on, the darker it will be. Always test colors on a hidden area first.
Layered Paint For Depth
For extra depth, try layering two colors. Paint a darker color first, let it dry, then paint a lighter color over it. When you distress the surface, the darker color shows through, giving a “worn” look.
4. Distressing: Creating Authentic Wear
This is the fun part—making your cabinets look like they’ve survived years of use.
Sanding Edges
Use medium-grit sandpaper or a sanding block. Focus on corners, edges, and areas that would naturally get worn. Sand until the base color or bare wood shows through.
Creating Dents And Scratches
Gently tap the surface with a hammer, chain, or screwdriver. Make small dents or scratches—don’t overdo it. Less is more. The goal is random, natural-looking wear.
Chipped Paint
Use a putty knife to gently scrape off small areas of paint around handles and edges. For a “flaked” look, apply a little petroleum jelly to spots before painting the top coat—paint won’t stick there and will chip off easily.
Adding A Glaze
After distressing, brush on a glaze (or diluted dark paint). Wipe off most of it, leaving some in cracks and grooves. This adds age and highlights details.
5. Sealing And Protecting Rustic Cabinets
Rustic cabinets need a protective finish, but shiny is not the goal. Use a clear wax for matte chalk paint or a matte polyurethane for durability. Avoid glossy finishes.
- Wax: Rub on with a cloth, let dry, buff lightly. Best for low-traffic areas.
- Matte polyurethane: Brush on thin coats, sand lightly between coats. Best for kitchens and bathrooms.
One non-obvious tip: let paint and glaze cure fully (at least 24–48 hours) before sealing. If you seal too soon, you risk smudging or lifting the finish.
6. Choosing And Aging Hardware
Hardware is the “jewelry” of your cabinets. For a rustic look, skip shiny chrome or modern handles. Instead, choose:
- Iron or oil-rubbed bronze pulls
- Distressed pewter or antique brass knobs
- Hand-forged or hammered hardware
Want to age your existing hardware? Soak metal handles in white vinegar overnight. Scrub with steel wool for a weathered finish. This is an easy way to save money and add authenticity.
7. Reassembling And Styling
After all paint, stain, and sealers are dry, reattach doors and hardware. Adjust hinges so everything hangs straight. If you want, replace some cabinet doors with open shelving or glass inserts for extra rustic charm.
Style the cabinets with simple, natural accessories: woven baskets, ceramic dishes, or mason jars. Avoid anything too modern or shiny.
Comparing Paints And Stains For Rustic Cabinets
Choosing between paints and stains can be confusing. Here’s a side-by-side look at how each option works for rustic cabinets:
| Feature | Chalk Paint | Milk Paint | Wood Stain | Latex Paint |
|---|---|---|---|---|
| Finish | Matte, powdery | Matte, vintage | Natural wood grain | Semi-matte to eggshell |
| Distressing | Very easy | Easy, chips naturally | N/A (shows wood wear) | Harder, less authentic |
| Color options | Wide, earthy tones | Limited, muted | Wood shades only | Wide, but often too bright |
| Durability | Good with wax | Good with wax | Very durable | Durable, needs good prep |
| Best for | Heavily aged look | Chippy, farmhouse style | Natural, subtle rustic | Simple makeovers |
Common Rustic Cabinet Styles And How To Achieve Them
Rustic isn’t just one look. Here are three popular styles and how to create each:
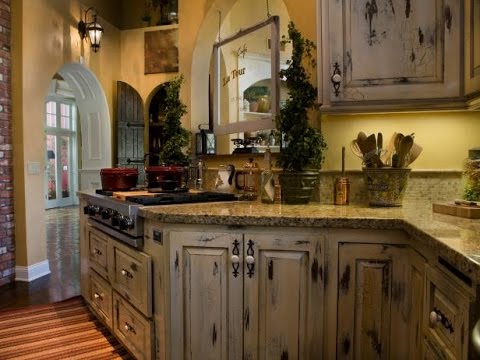
Farmhouse Rustic
- Use white or cream chalk paint
- Distress edges heavily
- Choose black iron pulls
- Add open shelves or beadboard panels
Mountain Lodge Rustic
- Use warm brown or gray stain to highlight wood grain
- Minimal paint, just clear matte finish
- Add heavy, hammered hardware
- Keep accessories simple (stoneware, wood trays)
French Country Rustic
- Use muted blue, green, or gray paint
- Light distressing with sandpaper
- Add glass knobs or ornate pulls
- Consider decorative molding on doors
Each style uses the same basic steps, but color and hardware choices set the mood.

Credit: thehoneycombhome.com
Advanced Distressing Techniques (for Extra Character)
You can get even more creative with advanced techniques. These are optional, but add depth and uniqueness.
Dry Brushing
Dip a brush in paint, wipe most off, and drag lightly across the surface. This leaves streaks and highlights, especially over wood grain or raised details.
Two-tone Layering
Apply one color as a base, let it dry, then a second color on top. Sand through the top layer in places to let the bottom color show. Great for a “painted and repainted” look.
Crackle Finish
Use a crackle medium between two paint layers. The top coat cracks as it dries, making cabinets look very old. Use lightly—too much can look fake.
Wax Resist
Rub a candle or clear wax on edges and corners before painting the final color. Paint won’t stick to waxed areas, so it chips off easily when sanded.
Liming Or Whitewashing
Apply a thin white or gray stain over bare wood, then wipe off. This highlights grain and gives a faded, coastal look.
Mistakes To Avoid When Making Cabinets Look Rustic
Even experienced DIYers make mistakes. Here are common ones and how to avoid them:
- Over-distressing: Too many dents or scratches can look fake. Focus on areas that get natural wear.
- Skipping prep: Painting over grease or gloss means your finish will peel. Always clean and sand.
- Using shiny finishes: Glossy paint or sealer ruins the rustic effect. Use matte products.
- Choosing the wrong colors: Neon or pure white rarely look rustic. Stick to muted, earthy tones.
- Not letting layers dry: Rushing the process leads to smudges and sticky surfaces. Patience pays off.
- Mixing modern hardware: Sleek, shiny handles clash with rustic paint. Choose aged metal or wood.
Real-life Example: Rustic Cabinet Makeover
Let’s walk through a real example to see how these ideas come together.
Sarah had old oak cabinets in her kitchen—solid, but orange and outdated. She wanted a farmhouse look without spending a fortune.
- First, she removed all doors and hardware, cleaned thoroughly, and sanded with 220-grit paper.
- She painted the cabinets with two coats of cream chalk paint, letting each coat dry overnight.
- Using medium sandpaper, she distressed edges, corners, and around the handles.
- She applied a dark brown glaze, wiping off most but letting it settle in grooves.
- After letting it dry for two days, she sealed with clear wax, buffing to a soft sheen.
- For hardware, she soaked the old brass pulls in vinegar and used steel wool for a weathered finish.
- The result: Cabinets that looked like they’d been in a farmhouse for 50 years. Friends couldn’t believe it was a DIY job.
This process took a weekend, cost under $150, and transformed the kitchen.
Comparing Sealing Products For Rustic Cabinets
Choosing the right sealer is key for durability and looks. Here’s how popular options compare:
| Product | Finish | Protection Level | Best For | Downsides |
|---|---|---|---|---|
| Clear Wax | Matte | Medium | Chalk/milk paint, low-traffic | Needs reapplying, can stain |
| Matte Polyurethane | Matte/Satin | High | Kitchens, bathrooms | Can yellow slightly over time |
| Paste Wax | Very matte | Low | Decorative cabinets | Not water-resistant |
| Oil Finish | Natural, subtle sheen | Medium | Stained wood | Needs regular upkeep |
Non-obvious Tips For A More Authentic Rustic Look
Many beginners focus only on paint and distressing. But real rustic charm comes from small details.
- Leave some wood exposed. Paint every surface, but sand back spots to bare wood. This echoes how real old cabinets wear over time.
- Vary the distressing. Don’t sand every edge the same way. Some corners should be nearly bare; others untouched.
- Change the hardware screws. Use flathead screws instead of Phillips for a more authentic, old-fashioned look.
- Add beadboard or tongue-and-groove panels to door fronts for instant farmhouse appeal.
- Install soft-close hinges if you want modern function with rustic looks—best of both worlds.
How Long Does A Rustic Cabinet Makeover Take?
Time depends on the number of cabinets and how many layers you use. Here’s a typical timeline for a medium-sized kitchen:
- Preparation (cleaning, sanding, removing hardware): 4–6 hours
- Painting (2 coats, with drying): 8–12 hours (spread over two days)
- Distressing and glazing: 2–4 hours
- Sealing (with drying time): 4–6 hours
- Reinstalling doors and hardware: 2–3 hours
In total, plan for a long weekend if you work steadily. Drying times matter—don’t rush between coats.
Is It Worth The Effort?
A rustic cabinet makeover is one of the best ways to transform a kitchen or bathroom on a budget. Professionally painted cabinets can cost $2,000–$5,000. Doing it yourself usually costs $100–$400, depending on the products and hardware you choose.
More importantly, you get a look that’s unique to your home. No two rustic cabinets are the same. The style hides small mistakes and adds personality. If you love the warmth of country homes, cozy lodges, or European cottages, rustic cabinets are a perfect fit.
For more inspiration, you can explore examples and tutorials on Better Homes & Gardens.
Frequently Asked Questions
How Durable Are Rustic Cabinets Compared To Regular Painted Cabinets?
Rustic cabinets are as durable as the products and prep you use. If you seal them with matte polyurethane and let each layer cure, they’ll stand up to daily kitchen or bathroom use. The beauty of rustic style is that new dings or chips just add to the look.
Can I Make Laminate Cabinets Look Rustic?
Yes, but you’ll need to use a bonding primer to help paint stick. Choose chalk or milk paint, distress gently, and seal with polyurethane. Avoid heavy distressing, since laminate is thin and can peel if sanded too much.
What Colors Work Best For Rustic Cabinets?
The best colors are earthy neutrals like cream, sage green, muted blue, warm gray, barn red, and natural wood tones. Avoid bright or glossy colors—rustic style is all about softness and age.
How Do I Clean And Maintain Rustic Cabinets?
Clean with a soft, damp cloth and mild soap. Avoid harsh chemicals or scrubbing pads. If you use wax, reapply every 6–12 months. Polyurethane finishes need less upkeep—just wipe clean.
Can I Use This Technique On Bathroom Cabinets Or Furniture?
Absolutely. The same steps apply to bathroom vanities, dressers, or bookshelves. Just make sure you use a water-resistant sealer in bathrooms or damp areas.
A rustic cabinet makeover brings warmth and character to any space. With the right tools, colors, and techniques, you can create cabinets that look like family treasures—without spending a fortune. Take your time, enjoy the process, and let your creativity show.
The imperfections are what make rustic cabinets truly beautiful.
Credit: www.youtube.com