Building your own round ottoman is one of those DIY projects that can transform both your living space and your crafting skills. Ottomans are more than just footrests—they can serve as coffee tables, extra seating, or add a pop of color to a room. Buying a quality round ottoman can be expensive, but making one yourself lets you choose the size, fabric, and style that fit your needs. If you’ve ever wondered how to make a round ottoman from scratch, this guide will walk you through each step, from gathering materials to finishing the final stitch. You’ll learn techniques, discover common pitfalls, and get tips for a professional look—even if you’ve never upholstered furniture before.
Why Make A Round Ottoman?
A round ottoman has several advantages over a square or rectangular one. The smooth shape makes it easier to move around, especially in rooms with lots of foot traffic. It’s also safer for homes with children, as there are no sharp corners to bump into.
This can be a big relief for parents or pet owners who worry about accidents.
Customizing your own ottoman allows you to pick a fabric that matches your decor, adjust the size for your space, and even add clever storage inside. Maybe your living room is small and you need a piece that works as both a table and a seat—making it yourself means you can get exactly what you want.
Plus, building your own furniture can save money and give you a sense of accomplishment. Every time you use it, you’ll remember the work you put in. It’s also a conversation starter—guests often ask where you bought your ottoman, and you’ll have a story to share.
What You’ll Need: Materials And Tools
Before you start, gather everything you need. Having the right materials and tools will make the process smoother and help you avoid common mistakes. If you’re missing a tool, ask friends or family if you can borrow one before buying new.
Basic Materials
- Plywood or MDF (Medium Density Fiberboard): For the ottoman base, at least ¾ inch thick. Plywood is lighter, while MDF is smoother and heavier.
- Foam: 2–4 inches thick for the top, high-density recommended. This will decide how comfortable your ottoman feels.
- Batting: Polyester or cotton, to soften edges and smooth the surface.
- Upholstery fabric: Enough to cover the entire ottoman, including some extra for seams and mistakes.
- Staple gun and staples: ¼ inch to ½ inch, depending on the thickness of your wood and fabric.
- Spray adhesive: For attaching foam. Some brands are stronger—check reviews if you’re unsure.
- Threaded rod and nuts/bolts: If you want to add legs or make the ottoman modular.
- Wood glue: For strong joints.
- Screws: 1–1½ inches. Make sure they’re not too long, or they’ll poke through.
- Wood for legs: If you want your ottoman raised.
- Decorative trim or piping (optional): Adds a tailored look, hides seams, and helps your project look finished.
Tools
- Jigsaw or circular saw: To cut round shapes. A jigsaw is easier for beginners.
- Drill and bits: For pilot holes and attaching legs.
- Measuring tape and ruler: Accuracy is crucial.
- Marker or pencil: For marking cuts.
- Scissors: Good fabric scissors make a big difference.
- Screwdriver: For attaching legs or hardware.
- Hammer (for tacking trim or nails).
- Sewing machine (optional, for advanced upholstery or if making a slipcover).
- Safety gear: Gloves, mask, and goggles. Cutting MDF or plywood makes a lot of dust, and safety comes first.
Pro tip: Use a large piece of cardboard or craft paper to make a template for your ottoman top. This helps avoid mistakes when cutting your wood or foam. If you make a mistake on cardboard, it’s much cheaper than on wood!
Planning Your Ottoman: Size, Shape, And Style
Choosing The Size
A round ottoman can be as small as 18 inches in diameter for a footrest or as large as 36 inches for a coffee table. The standard height is 16–18 inches, but this can be adjusted to match your sofa or chairs.
If you want your ottoman to slide under a table or fit in a corner, measure that space first.
Common Sizes
| Ottoman Type | Diameter (inches) | Height (inches) |
|---|---|---|
| Footrest | 18–22 | 14–16 |
| Coffee Table | 30–36 | 16–18 |
| Extra Seating | 24–28 | 16–18 |
Extra insight: If your ottoman will be used for sitting, choose a diameter at least 20 inches wide so it’s comfortable for adults.
Deciding On Fabric And Style
Choose a durable upholstery fabric if the ottoman will get a lot of use. Velvet, leather, and heavy cottons are popular. If you have kids or pets, consider a stain-resistant or washable material. You can buy fabric with a special finish to resist spills, or even use outdoor fabric for extra durability.
Style Elements
- Tufting: Adds a classic look but requires more skill. Tufted ottomans look great in traditional or modern rooms and are easier to keep neat.
- Piping or trim: Gives a finished edge. You can buy pre-made piping or make your own from matching or contrasting fabric.
- Button details: For a vintage touch. Buttons can be covered in the same fabric for a custom look.
- Storage: Ottomans can be built with a removable top. This is especially useful for small spaces or apartments.
Beginner insight: Don’t pick a stretchy or slippery fabric for your first project. These are harder to work with and can slip or wrinkle. Medium-weight woven fabrics are easiest.
Non-obvious tip: If your fabric has a pattern, make sure you have enough to match the design at the seams.
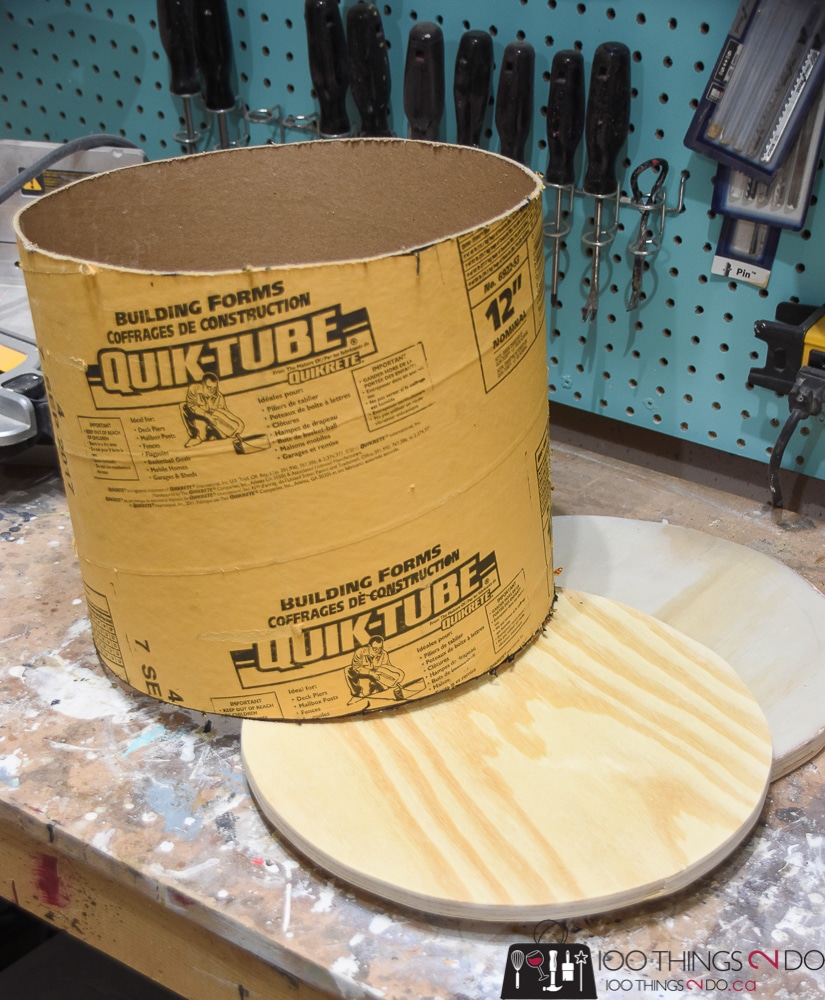
Step 1: Building The Ottoman Base
The base is the foundation of your ottoman, so take your time with this step. Most round ottomans use plywood or MDF for strength. If you want a lightweight ottoman, use thinner plywood, but reinforce it with extra wood blocks.
Cutting The Top And Bottom Circles
- Create a template. Tie a string to a pencil, pin one end in the center of your board, and draw a circle the size you want. This makes your circle more accurate than trying to draw freehand.
- Cut the circles. Use a jigsaw to follow your pencil line carefully. Cut two circles: One for the top and one for the bottom. If you don’t have a jigsaw, some home improvement stores will cut wood for you.
- Sand edges. Smooth all edges with sandpaper to avoid splinters. A rough edge can catch fabric and make it hard to get a neat finish.
Building The Side Panel
- Measure the circumference of your circle (Diameter x 3.14).
- Cut a strip of plywood or MDF to this length and your desired ottoman height. If your material is too stiff to bend, score shallow lines with a saw every few inches to help it curve.
- Bend the strip around the bottom circle and attach with wood glue and screws. Work slowly to avoid cracking the wood.
- Reinforce with small wood blocks inside if needed. Place blocks near the seams for extra strength.
Quick Reference: Cutting Your Side Panel
| Diameter (inches) | Circumference (inches) | Panel Length (inches) |
|---|---|---|
| 24 | 75.4 | 76 |
| 30 | 94.2 | 95 |
| 36 | 113.0 | 114 |
Non-obvious tip: If your plywood won’t bend, cut several shorter panels and join them in a circle. Place seams where they’ll be hidden by fabric. You can reinforce seams with small metal brackets or wood pieces glued behind.
Attaching The Top
Once the side panel is secure, attach the top circle with screws from the outside or inside. Make sure it’s flush and stable. Test the strength by pressing down before moving to the next step. If the top wobbles, add more screws or wood glue.
Beginner mistake: Not checking the frame for wobble before adding foam and fabric. Fix all problems now, while they’re easy to see.
Step 2: Adding Foam And Batting
Foam gives your ottoman its soft, comfortable feel. Choose a high-density foam for best results. Softer foam can feel nice, but may sag after a few months.
Cutting And Gluing Foam
- Trace the top circle onto foam and cut with a sharp knife or electric carving knife. Try to keep the cut straight for a neat edge.
- Attach foam to the wood top with spray adhesive. Wait a few minutes for the glue to get tacky before pressing foam in place.
- For extra softness, wrap foam down the sides as well. Cut foam strips and glue around the side panel. This makes the ottoman more comfortable to touch and sit on.
Extra tip: If your foam is too thin, stack two layers with spray adhesive. Let the glue dry fully so the foam doesn’t shift.
Wrapping With Batting
- Cover the foam with a layer of batting. This smooths out rough edges and hides seams.
- Wrap the batting over the top and sides, pulling tight. Don’t pull so hard that the batting tears.
- Staple the batting underneath the base every few inches. Check that there are no lumps before stapling.
Beginner mistake: Don’t skip the batting. Without it, fabric can wear out faster and you may see lumps or edges. Batting also helps the fabric slide smoothly during upholstery.
Non-obvious insight: Use two layers of batting for extra plushness, especially if your fabric is thin or lightly colored.
Step 3: Upholstering The Ottoman
Now comes the part that makes your ottoman beautiful. Upholstery takes patience, but with some care, your results can look professional. If you want a really crisp look, iron your fabric before starting.
Cutting Fabric
- Place the ottoman upside down on your fabric.
- Cut a large circle, allowing 4–6 inches extra all around for pulling and stapling. It’s better to have too much fabric than not enough.
- Cut a side strip long enough to wrap around the ottoman, plus 2 inches for overlap. If your ottoman is very large, you may need to sew two strips together.
Extra detail: If your fabric has a nap (direction, like velvet), make sure all pieces run the same way.
Attaching The Fabric
- Place the fabric over the ottoman, centering the pattern if there is one.
- Start stapling at four points: North, south, east, west. Pull fabric tight and staple under the base.
- Work around the circle, pulling fabric tight and placing a staple every 2–3 inches. Check for evenness every few staples.
- Smooth wrinkles as you go. Take your time at the curves—small pleats may be needed for a smooth finish. Try to keep pleats small and evenly spaced.
Beginner insight: If you make a mistake, gently pull out the staple and try again. Don’t rush this part.
Finishing The Edges
- Trim any excess fabric.
- For a clean look, cover the bottom with a circle of felt or fabric, tacked in place. This hides staples and gives a finished look.
- Use fabric glue for the bottom cover if you don’t want visible staples.
Advanced option: For a tailored look, sew a band for the sides and attach it separately. Add piping or trim between the top and side for extra style. If adding piping, sew it before attaching the band to the ottoman.
Non-obvious insight: Always pull the fabric evenly in all directions. Uneven tension causes puckers and visible wrinkles. Check your work from all sides as you go.

Credit: www.youtube.com
Step 4: Adding Legs (optional)
Legs give your ottoman height and style. You can buy pre-made furniture legs or make your own. Some people use short bun feet, metal hairpin legs, or even wheels for a mobile ottoman.
Attaching Legs
- Flip the ottoman upside down.
- Mark where each leg will go, usually evenly spaced around the edge. Use a ruler to keep the legs the same distance from the center.
- Drill holes and attach with screws or bolts. Pre-drill to avoid splitting the wood.
- For a modern look, try angled legs or metal hairpins. For a classic look, use wood bun feet.
Tip: If you want the ottoman to double as a table, choose sturdy, wide-set legs for stability. Test the ottoman for wobble before using.
Extra detail: Add felt pads or rubber tips to the bottom of legs to protect your floor.
Step 5: Optional Features—tufting And Storage
Tufting
Tufting adds a classic, luxurious look but requires patience.
- Mark spots for buttons on the top. Space them evenly in a grid or diamond pattern.
- Drill small holes through the wood base.
- Thread a long needle with upholstery thread, pull through a button, and back down.
- Pull tight and staple thread under the base. Knot securely.
Warning: Tufting works best with thicker foam and sturdy fabric. Thin foam or weak fabric can tear. If you’re new to tufting, practice on scrap pieces first.
Non-obvious insight: Use a curved upholstery needle for easier button placement, especially on deep tufting.
Storage
To add storage, make the top removable.
- Use piano hinges or a simple lift-off design. For a hinged top, attach a chain inside to keep the lid from falling back.
- Line the inside with fabric for a neat look. You can glue or staple fabric to the inside walls.
Practical insight: Reinforce the inside edge of the base with extra wood so the top sits securely. Add a small handle or loop to lift the top easily.
Credit: jenwoodhouse.com
Step 6: Final Touches
Check all staples and trim for a neat finish. Add floor protectors to the legs if needed. Give your ottoman a test—sit on it, put your feet up, and make sure it feels sturdy.
If you see any loose fabric or staples sticking out, fix them before using. Wipe the ottoman with a damp cloth to remove dust from construction.
Extra detail: For a really polished look, add decorative tacks or ribbon around the base.
Common Beginner Mistakes And How To Avoid Them
- Cutting the foam or wood unevenly. Always use a template and measure twice before cutting. Uneven cuts make assembly much harder.
- Picking the wrong fabric. Thin or stretchy fabrics are difficult to staple smoothly. They also show every lump underneath.
- Not pulling fabric tight enough. This leads to wrinkles and sagging. Check your work as you go, and re-staple if needed.
- Skipping reinforcement. A weak frame can break with use. Always check for stability before adding foam and fabric.
- Ignoring safety. Wear gloves and eye protection when cutting wood and using power tools. DIY is fun, but not worth an injury.
Extra insight: Don’t rush the project. Let glue dry completely before moving to the next step, or your ottoman may be wobbly.
How Much Does It Cost To Make A Round Ottoman?
Making your own ottoman is usually cheaper than buying a designer model, but costs can vary depending on the materials you choose and what you already have at home.
| Item | Estimated Cost (USD) |
|---|---|
| Plywood/MDF | $15–$30 |
| Foam | $20–$50 |
| Batting | $10–$15 |
| Fabric | $20–$60 |
| Legs (set of 4) | $20–$40 |
| Other (staples, glue, trim) | $10–$20 |
| Total | $95–$215 |
Note: Prices may be lower if you already have tools or can use recycled materials. Buying in bulk or using leftover fabric can also save money.
Non-obvious insight: Some local upholstery shops sell leftover foam and fabric at a discount. Ask if they have “remnants” before buying new.
Practical Tips For Success
- Test your stapler on scrap fabric and wood before starting. Make sure staples go in flat and hold the fabric tight.
- If your fabric is patterned, align it carefully before stapling. Pin it in place and step back to check.
- Use a friend or family member to help hold fabric tight. Two sets of hands make upholstery much easier.
- For a no-sew option, choose a fabric that doesn’t fray and staple carefully. Felt or vinyl are good choices.
- When adding legs, double-check measurements so all legs are even. An uneven ottoman is hard to fix later.
Extra detail: If you’re unsure about a step, watch a video or look up tutorials before proceeding.
Sustainability: Using Recycled Materials
You can make a round ottoman more eco-friendly by using reclaimed wood, old foam (from a mattress or sofa), or leftover fabric. Many thrift stores sell furniture legs you can reuse. Not only does this save money, but it also reduces waste and gives your project a unique look.
Important insight: If using recycled materials, check for pests, mold, or damage before starting your project. Clean and air out old foam or fabric thoroughly.
Non-obvious tip: Old curtains, tablecloths, or denim jeans can be used as upholstery fabric for a one-of-a-kind look.
Maintenance And Care
To keep your ottoman looking new:
- Vacuum regularly to remove dust and crumbs, especially if you have pets.
- Blot spills right away with a clean, dry cloth. Don’t rub—this can spread stains.
- For tough stains, use a gentle upholstery cleaner suited for your fabric type. Always test in a hidden spot first.
- Rotate the ottoman occasionally to even out wear if it gets a lot of use.
- Tighten legs and check staples every few months. Small fixes now prevent bigger problems later.
Extra detail: If your ottoman is used as a table, use a tray to protect the fabric from drinks and snacks.
Creative Ideas For Customization
- Add nailhead trim around the base for a classic look. Space nails evenly for best results.
- Make a slipcover for easy washing or seasonal changes. This is a great way to refresh your decor without building a new ottoman.
- Use bold prints or bright colors to make your ottoman a statement piece. Don’t be afraid to try something fun.
- Add a tray on top for drinks or snacks. This turns your ottoman into a versatile coffee table.
- Personalize with monogrammed fabric or custom embroidery. This is easier than you think with iron-on letters or by ordering online.
Non-obvious insight: Ottomans are perfect for adding texture to a room—try boucle, velvet, or faux fur for a cozy touch.
When To Call A Professional
If you want a large ottoman, complex tufting, or expensive fabric, consider hiring a professional upholsterer. They can handle challenging details and ensure a perfect finish. For most basic ottomans, DIY is very achievable and rewarding.
For more advanced upholstery techniques, you can check resources like This Old House.
Extra detail: Some professionals will handle just the tricky parts, like button tufting, if you bring in your ottoman frame.

Credit: kimsupholstery.com
Frequently Asked Questions
How Long Does It Take To Make A Round Ottoman?
For beginners, expect the project to take 1–2 days. This includes time for cutting wood, letting glue dry, and careful upholstery. With experience, you may finish in half a day. Remember, most projects take longer than you think—don’t rush.
Can I Make A Round Ottoman Without Power Tools?
It’s possible, but more difficult. You’ll need a hand saw for wood and a strong staple gun. Some hardware stores will cut wood circles for you if you bring measurements. Ask about this service—it can save a lot of time and effort.
What Type Of Foam Is Best?
High-density upholstery foam is best. It holds its shape, supports weight, and lasts longer. Avoid soft, cheap foam, as it compresses quickly and may not support sitting. Check for “furniture grade” foam when shopping.
Is It Cheaper To Build Or Buy An Ottoman?
Building is often cheaper, especially if you use recycled materials or have tools. Store-bought ottomans of similar quality can cost $300 or more, while DIY can be done for under $150. Plus, you get to choose every detail.
How Do I Clean An Upholstered Ottoman?
Vacuum regularly and blot spills. For fabric, use a gentle cleaner and spot-test in a hidden area. For leather, use products made for leather care. If your fabric is removable, wash it according to the label.
Creating a round ottoman lets you craft furniture that matches your needs and style. With careful planning and a little patience, you’ll have a piece that’s both functional and beautiful—one that you’ll be proud to say you made yourself.