Lining dresser drawers might seem like a small detail, but it can make a big difference in your daily routine. A well-lined drawer protects your clothes, keeps everything fresh, and even adds a touch of style to your furniture. Many people overlook this simple task, but it’s a practical way to extend the life of both your drawers and your belongings. Whether your dresser is new or has seen years of use, learning how to line dresser drawers is a skill you’ll use again and again.
People often feel unsure about where to start or which materials work best. Some worry that lining drawers is difficult or time-consuming. The truth is, it’s a straightforward project that anyone can do with the right guidance. This article will walk you through every step of the process, from choosing materials to maintaining your liners.
You’ll discover common mistakes to avoid, learn how to measure and cut liners perfectly, and find tips for making your drawers look great and stay organized. By the end, you’ll have the knowledge and confidence to line any drawer in your home.
Why Line Dresser Drawers?
Lining dresser drawers goes beyond just making things look nice. There are several strong reasons to do it.
- Protects your dresser: Drawers take a lot of wear and tear from sliding, opening, and closing. Liners help guard the bottom and sides from scratches, dents, and stains. This is especially important for older or antique dressers.
- Keeps clothes clean: Wood can sometimes leave residue or splinters on clothes. Liners create a barrier that keeps your garments safe, especially delicate fabrics like silk and cashmere.
- Prevents odors: Some liners are scented or have moisture-wicking properties. They help prevent musty smells from building up, which is common in older furniture.
- Easier to clean: If something spills or leaks in a drawer, a liner is much simpler to wipe down or replace than the raw wood inside.
- Style and personality: Liners come in many colors and patterns. You can add a personal touch to your furniture, making it feel unique and cheerful.
- Organization: Some liners are slightly cushioned or have grip, stopping items from sliding around when you open and close the drawer.
Many people don’t realize that a simple liner can extend the life of both their dresser and their clothes. It’s a small investment of time and money for a long-lasting benefit.
Types Of Drawer Liners
Choosing the right liner is an important step. There are several types, each with its own pros and cons.
1. Adhesive Liners
These liners have a sticky backing that attaches firmly to the drawer. They come in rolls or sheets and are easy to cut to size.
Pros:
- Stays in place
- Doesn’t slide or bunch up
- Good for high-use drawers
Cons:
- Harder to remove (can leave sticky residue)
- Not ideal if you want to change the look often
2. Non-adhesive Liners
Made from foam, plastic, or fabric, these liners simply lay in the drawer without sticking.
Pros:
- Easy to remove or replace
- Won’t damage the drawer
- Often washable
Cons:
- Can slip or bunch up if not cut to fit exactly
- May not stay put in very shallow drawers
3. Fabric Liners
These can be purchased or made from leftover fabric. Some people use cotton, felt, or even velvet.
Pros:
- Soft and gentle on clothes
- Can be customized in style and size
- Often machine washable
Cons:
- May slide around
- Needs more maintenance (washing, ironing)
4. Cedar Liners
Thin sheets or panels of cedar wood are popular for their natural aroma and pest-repelling qualities.
Pros:
- Repels moths and insects
- Absorbs odors and moisture
- Lasts for years
Cons:
- More expensive
- May need cutting tools
- Adds weight to the drawer
5. Paper Liners
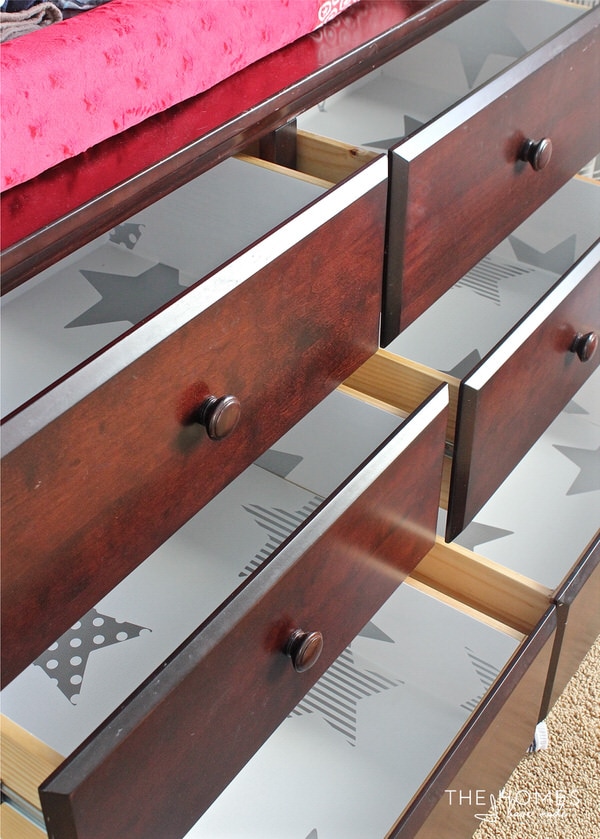
Decorative paper or wallpaper can be used to line drawers. Some even use wrapping paper for a unique look.
Pros:
- Inexpensive
- Easy to replace for a new look
Cons:
- Tears easily
- Not moisture-resistant
- Needs double-sided tape or adhesive
6. Rubber Or Plastic Liners
Designed for utility, these liners are often found in kitchen drawers but work well in dressers too.
Pros:
- Waterproof and durable
- Easy to clean
- Non-slip surface
Cons:
- May not look as stylish
- Can have a chemical smell at first
| Type | Best For | Key Benefit | Downside |
|---|---|---|---|
| Adhesive | Permanent solution | Stays firmly in place | Hard to remove |
| Non-Adhesive | Temporary/seasonal | Easy to switch out | Can slip |
| Fabric | Delicate items | Soft on clothes | Needs washing |
| Cedar | Closet/dressers | Repels pests | Expensive |
| Paper | Decorative touch | Cheap and stylish | Tears easily |
| Rubber/Plastic | Utility drawers | Waterproof | Plain look |
Non-obvious insight: Some people layer two types—like a cedar base with a fabric top—for both protection and fragrance.
Tools And Materials You Need
Before starting, gather everything you need. Having tools ready helps you finish faster and with less frustration.
- Liner material: Choose your preferred type (see above)
- Measuring tape or ruler: For precise measurements
- Scissors or utility knife: Sharp enough for clean cuts
- Pencil or fabric marker: For marking cutting lines
- Adhesive (if needed): Double-sided tape, glue, or spray adhesive
- Cleaning supplies: Mild soap, cloths, and vacuum for prepping the drawer
- Optional: Straight edge or cutting mat for fabric and paper liners
If you’re using cedar or thick materials, a small saw or craft knife may help. Always cut on a safe surface to protect your table or floor.
How To Prepare Dresser Drawers
A clean, smooth surface is key to a perfect result. Don’t skip these steps.
- Empty the drawer completely. Remove all clothes, liners, or debris.
- Vacuum or wipe out dust. Pay attention to corners and seams where dirt hides.
- Wash with mild soap if the drawer is sticky or stained. Use a damp (not wet) cloth.
- Let the drawer dry completely. Moisture under a liner can cause warping or mildew.
- Check for rough spots. Sand any splinters or sticky residue. Liners lay flatter on a smooth surface.
- Remove old liners (if any). Carefully peel them off. Use adhesive remover or rubbing alcohol for stubborn glue.
Some people skip cleaning, but dirt under a liner can cause smells or lumps. Taking a few extra minutes now means your liner will last longer and look better.
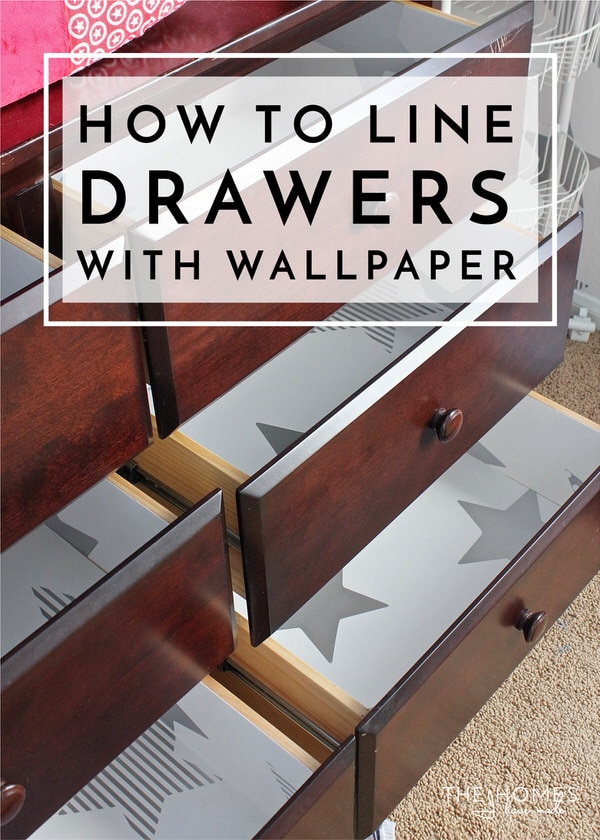
Credit: thehomesihavemade.com
Measuring And Cutting Liners
Getting the right fit is the secret to a neat finish. Rushing this part leads to wrinkles, gaps, or wasted material.
Steps For Accurate Measuring
- Measure the inside length and width of the drawer, not the outside.
- If your drawer has curved corners, trace the shape on paper first.
- Double-check measurements. Even small mistakes can make a big difference.
Cutting Tips
- Unroll your liner on a flat surface.
- Mark your measurements with a pencil or marker.
- Use a straight edge for long cuts.
- Cut slightly larger than needed if you’re unsure; you can always trim more.
- For rounded corners, use a template or trace the drawer edge directly.
Non-obvious insight: Always cut one liner and test-fit it in the drawer before cutting the rest. This avoids repeating mistakes.
How To Install Different Types Of Liners
Each liner type has its own tricks for the best results.
Installing Adhesive Liners
- Peel back a small section of the backing.
- Align the liner with the back edge of the drawer.
- Press down, smoothing from back to front as you peel away more of the backing.
- Use a credit card or squeegee to remove air bubbles.
- Trim any excess with a sharp blade.
Installing Non-adhesive Liners
- Lay the liner flat in the drawer.
- Press it into corners and edges.
- If it moves, add double-sided tape at the corners.
- For deep drawers, let the liner run up the sides for added protection.
Installing Fabric Liners
- Lay the fabric in the drawer.
- Smooth out wrinkles with your hands or a flat tool.
- Tuck in edges or secure with double-sided tape.
- If using felt, cut slightly larger and press into corners for a snug fit.
Installing Cedar Liners
- Lay cedar sheets or panels flat in the drawer.
- If needed, cut with a small saw or heavy-duty scissors.
- For a custom look, combine with fabric or paper on top.
Installing Paper Liners
- Cut paper slightly larger than the drawer.
- Lay it in place, folding up the sides if desired.
- Secure with small dots of glue or double-sided tape.
Installing Rubber/plastic Liners
- Cut to size and lay flat.
- Most have a textured bottom to prevent slipping.
- If not, use a small piece of tape at the corners.
Common Mistakes And How To Avoid Them
Even experienced DIYers sometimes make small errors. Here’s what to watch out for:
- Measuring the outside of the drawer: Always measure the inside.
- Skipping cleaning: Dust or crumbs will show through and cause bumps.
- Not flattening the liner: Air bubbles under adhesive liners look messy and wear out faster.
- Using too much adhesive: It can seep through paper or fabric, causing stains.
- Not trimming excess: Overhanging liner can catch on clothes and wrinkle.
- Ignoring moisture: Never line a damp drawer; it can lead to mold.
- Choosing the wrong liner: For example, using thin paper in a high-use drawer leads to quick tearing.
A good tip is to start with one drawer as a test. Once you’re happy, do the rest.
Advanced Tips For A Professional Look
Once you know the basics, try these ideas to make your drawers look and function even better.
- Layer for extra protection: Place a thin rubber liner under decorative paper for non-slip and style.
- Use patterned liners: Bright colors or patterns can give you a smile when you open your drawer.
- Mix and match: Use different liners for socks, shirts, or accessories to help with organization.
- Add labels: For kids or shared dressers, label each drawer with the contents.
- Refresh with the seasons: Swap out paper or fabric liners every few months to keep things fresh.
- Scented liners: Add a drop of essential oil to fabric or use pre-scented paper for a pleasant smell.
- Cedar blocks or sachets: Even if you use fabric liners, add small cedar pieces to repel pests.
How To Care For And Replace Drawer Liners
Liners don’t last forever, but they can be simple to maintain.
- Vacuum or wipe regularly: Keeps dust and lint from building up.
- Spot clean spills: Use a damp cloth for non-adhesive liners; dry completely before replacing clothes.
- Remove for deep cleaning: Non-adhesive and fabric liners can be lifted out and washed or shaken outside.
- Replace when worn: Paper and thin plastic may need swapping every 6-12 months, depending on use.
- Refresh scents: Scented liners fade over time; add a few drops of oil or replace them as needed.
- Check for pests: Especially with cedar, look for moth or insect activity and replace liners if needed.
Decorating Ideas: Making Your Drawers Unique
Lining drawers is also a chance to show your personality.
- Use leftover wallpaper or gift wrap for a matching home look.
- Try bold colors for kids’ rooms; it encourages them to keep drawers tidy.
- Mix textures, like velvet for jewelry drawers or flannel for winter clothes.
- Add stenciled designs or stickers on plain liners.
- Use chalkboard liner and write messages or labels directly inside the drawer.
Customizing your dresser drawers can turn an everyday piece of furniture into something special.
Drawer Liners For Special Needs
Some situations call for extra thought:
- Baby clothes: Use hypoallergenic, washable liners. Avoid scented or adhesive types.
- Jewelry drawers: Velvet or felt works best, as it prevents scratching.
- Vintage dressers: Non-adhesive or fabric liners protect without damaging old wood.
- Humidity-prone areas: Cedar or moisture-absorbing liners prevent mold.
- Pet owners: Rubber liners are easy to clean and prevent hair buildup.
Drawer Liner Safety And Environmental Concerns
Not all liners are created equal when it comes to health and the environment.
- Choose BPA-free plastic for peace of mind, especially in baby or kitchen drawers.
- Natural fibers like cotton or wool are biodegradable and washable.
- Cedar is a renewable resource and naturally pest-resistant.
- Recycle paper liners when replacing.
- Some adhesive liners have strong chemical smells; air them out before using.
If you’re sensitive to smells or chemicals, look for unscented or natural options.
Cost And Value: How Much Should You Spend?
Lining dresser drawers can be budget-friendly or a small luxury, depending on your choices.
| Liner Type | Average Cost per Drawer | Lifespan | Value Rating |
|---|---|---|---|
| Paper | $1–$3 | 6 months | Low |
| Adhesive | $2–$5 | 1–2 years | Medium |
| Fabric | $3–$8 | 2–3 years | High |
| Cedar | $7–$15 | 5+ years | Premium |
| Rubber/Plastic | $2–$6 | 2–4 years | High |
If you’re lining just one dresser, even premium options are affordable. For whole-home projects, consider mixing liner types based on the drawer’s use.
Non-obvious insight: Discount stores often sell rolls of shelf liner for less, but measure the thickness and quality—thinner liners may wear out faster.
Troubleshooting: Fixing Common Problems
If something goes wrong, don’t worry. Most issues are easy to solve.
- Liner won’t stay in place: Try double-sided tape or cut for a tighter fit.
- Bubbles under adhesive liner: Use a pin to poke a small hole and smooth out air.
- Liner smells strange: Air out before use or choose natural materials.
- Drawer won’t close: Liner may be too thick; trim edges or choose a thinner material.
- Wrinkled fabric liner: Iron before installing, or stretch and secure with tape.
- Sticky residue after removing liner: Use rubbing alcohol or a citrus-based cleaner on the wood.

Credit: inmyownstyle.com
Should You Hire A Professional?
For most people, lining dresser drawers is an easy DIY task. However, there are times when professional help can be valuable:
- Expensive or antique furniture where you want a perfect finish
- Large projects (lining all closets and dressers in a new home)
- Custom-fit cedar panels or complicated drawer shapes
If you choose to hire a pro, look for someone with experience in furniture restoration or interior design. But for everyday dressers, you’ll likely get great results with a little patience and care.
Real-life Example: Transforming An Old Dresser
Let’s see how lining drawers can make a difference. Imagine you buy a vintage dresser at a flea market. The wood is scratched inside and has a musty smell. Here’s what you’d do:
- Remove all old liners and vacuum out dust.
- Wipe the drawers with mild soap and let them dry fully.
- Sand any rough spots and wipe again.
- Choose cedar panels for the bottom and a soft fabric liner on top.
- Install both, making sure they fit snugly.
- Add a lavender sachet for a fresh scent.
The result? The dresser looks new inside, smells fresh, and your clothes are protected. Small changes like this can increase the value and comfort of your furniture.
Where To Buy The Best Drawer Liners
You can find drawer liners in many places:
- Home improvement stores (Home Depot, Lowe’s)
- Online retailers (Amazon, Etsy)
- Fabric stores for custom options
- Specialty shops for cedar or scented liners
Always check reviews for durability and safety, especially for children’s furniture. For more ideas, check out Good Housekeeping’s guide to drawer liners.
Frequently Asked Questions
How Often Should I Replace Dresser Drawer Liners?
Most liners last 1–2 years, depending on material and use. Paper liners wear out faster, while cedar or thick fabric can last longer. Replace liners if they look worn, smell musty, or after a spill.
Can I Wash My Drawer Liners?
Fabric liners are often machine washable—just air dry before reinstalling. Non-adhesive plastic or rubber can be wiped with a damp cloth. Adhesive or paper liners usually need replacing instead of washing.
What Is The Best Liner For Delicate Clothes?
Soft fabric, felt, or velvet liners are gentle on delicate fabrics like silk or lace. Avoid rough or textured liners that might snag. If you want extra protection, use a double layer with a soft top.
How Do I Stop My Liner From Sliding?
Cut the liner for a snug fit, and use double-sided tape in the corners if needed. Some liners have a grippy or textured bottom to help them stay in place.
Are Drawer Liners Safe For All Types Of Wood?
Most liners are safe, but adhesive types can sometimes damage very old or soft wood when removed. If you have antique or valuable furniture, use non-adhesive or fabric liners to avoid damage.
Lining your dresser drawers is a simple project with big rewards. It keeps your furniture looking good, protects your clothes, and adds a touch of style. With the right liner and a little care, your drawers will stay clean, fresh, and organized for years to come.
Credit: thehomesihavemade.com