Decoupage is an art form that can transform even the most ordinary piece of furniture into something unique and beautiful. With a few simple materials and a creative mindset, you can breathe new life into old tables, chairs, dressers, and more.
Many people think decoupage is only for small crafts, but it’s a powerful technique for home improvement that anyone can master. In this guide, you’ll discover everything you need to know about how to decoupage furniture, from choosing the right paper to sealing your finished work.
With practical tips, real examples, and answers to common questions, you’ll be ready to start your own decoupage project with confidence.
What Is Decoupage And Why Use It On Furniture?
Decoupage is a decorative technique where you glue pieces of paper, fabric, or other thin materials onto surfaces, then seal them with varnish or lacquer. This method dates back to the 17th century and has been used in everything from home decor to fine art.
Its name comes from the French word “découper,” which means “to cut out,” reflecting the process of cutting images and arranging them on a new surface.
The reason so many people love to decoupage furniture is simple: it’s affordable, customizable, and doesn’t require advanced skills. You don’t need to be a professional artist or carpenter. With the right tools and a bit of patience, you can personalize your furniture to match your style or even cover up scratches and blemishes.
Some people use decoupage to update old or damaged items, while others use it to create statement pieces for their home. There are no strict rules—your imagination is the limit. In fact, the ability to reuse materials and create something new is one of the most satisfying parts of decoupage.
Another advantage is that decoupage can be as subtle or bold as you want. You can choose a single image for a minimalist look or cover an entire piece with a collage of patterns and colors. This makes it an accessible art form for people with different tastes and skill levels.
Essential Materials For Decoupaging Furniture
Before you start, gather all the supplies you’ll need. Having the right materials makes the process smoother and helps you avoid common mistakes.
- Furniture piece: Start with a clean, dry, and stable item. Wood works best, but you can also decoupage on metal, glass, or plastic with proper preparation. Items like side tables, stools, and dressers are popular choices for beginners.
- Paper or fabric: Choose from napkins, tissue paper, wrapping paper, scrapbook paper, magazine cutouts, or thin fabric. Thinner materials adhere better and are easier to smooth out. Using a variety of patterns can add depth and interest to your project.
- Decoupage glue or medium: Products like Mod Podge or PVA glue are popular. Make sure your glue dries clear. Some glues are specially made for outdoor use or for high-moisture environments.
- Sealer: Acrylic sealer, polyurethane, or even spray lacquer will protect your finished piece. Choose the finish (matte, satin, or gloss) based on your style preference.
- Brushes: Foam or synthetic brushes help apply glue and sealer evenly. Keep a few sizes on hand for different areas.
- Scissors or craft knife: For cutting out your designs. A sharp blade is essential for clean edges, especially with detailed images.
- Sandpaper: Medium to fine grit (120–220) for surface prep and smoothing. This helps the glue bond better and prevents future peeling.
- Sponge or cloth: To wipe away excess glue or clean the surface. A damp cloth also helps remove sanding dust.
- Ruler and pencil: For measuring and marking placement. This is especially useful if you want to keep designs straight or evenly spaced.
- Protective gear: Gloves and a mask, especially when sanding or sealing. This is important for safety, as some sealers have strong fumes.
Pro Tip: Not all paper is equal. Thicker paper, like card stock, is harder to smooth and can leave visible edges. Start with thin materials until you gain more experience. If you want to experiment, try layering different materials to see how they interact.
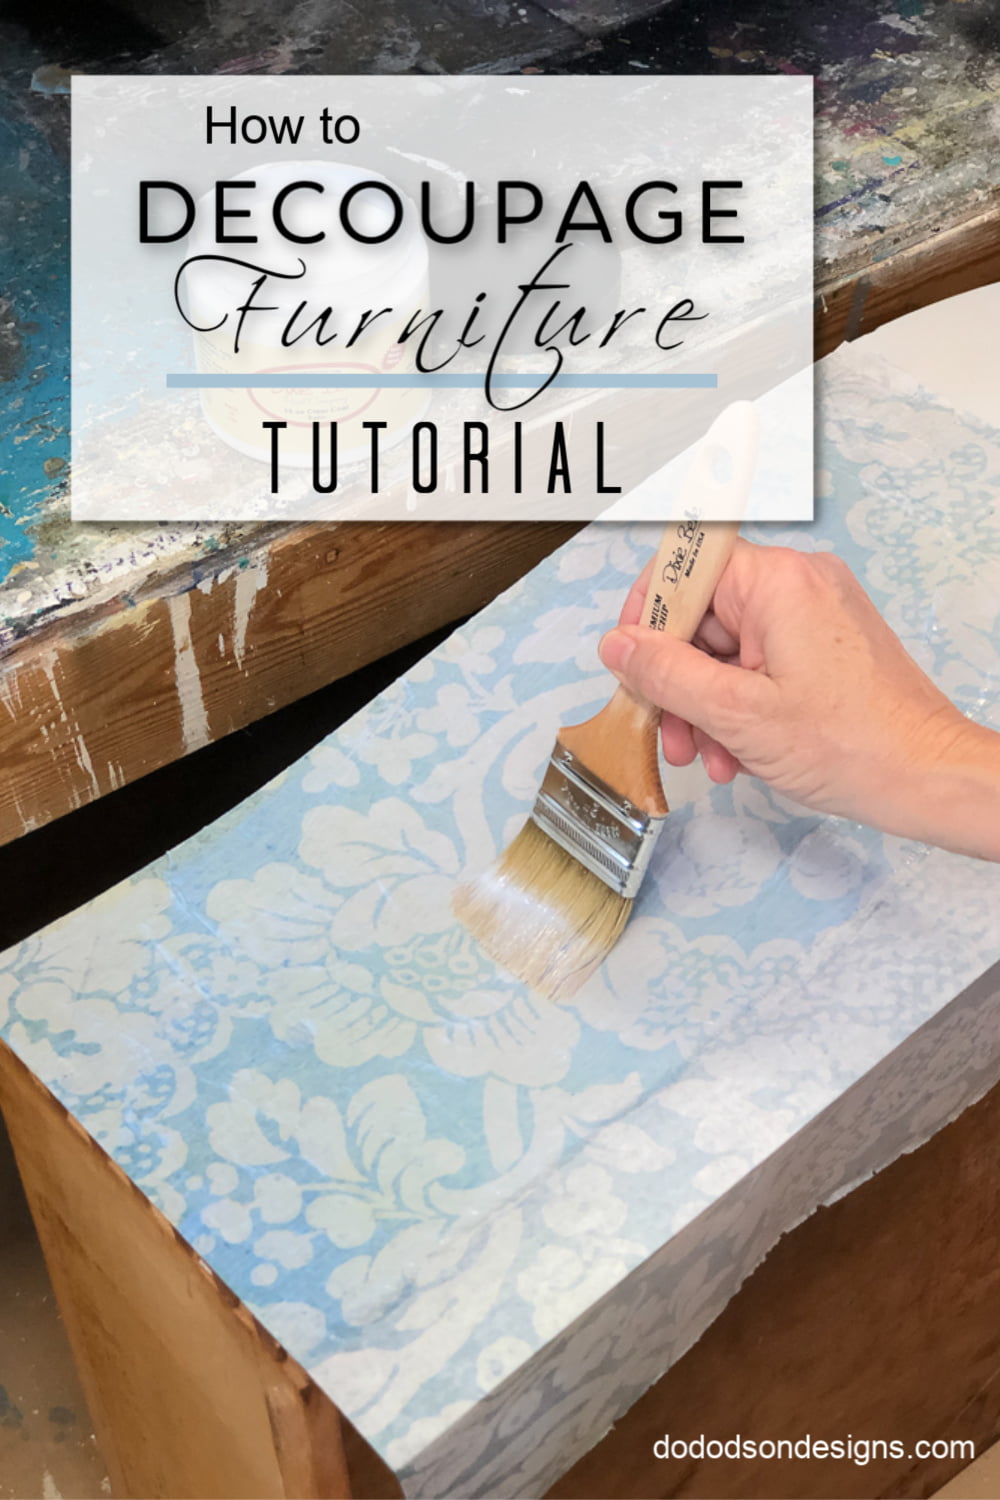
Credit: www.dododsondesigns.com
Choosing The Right Furniture For Decoupage
Not every piece of furniture is ideal for decoupage. Here’s what to look for:
- Smooth, flat surfaces are easiest to work on, such as tabletops, drawer fronts, or cabinet doors. Curved or uneven surfaces are more difficult but can be tackled with practice.
- Solid wood or MDF accepts glue better than glossy or plastic finishes. If you want to decoupage on laminate or plastic, always sand and prime first.
- Avoid heavily textured, carved, or upholstered pieces for your first project. These require advanced techniques and more patience.
If your furniture is glossy, use sandpaper to roughen the surface. This helps the glue grip better. For pieces with existing paint or varnish, lightly sand and wipe clean before you begin.
Don’t overlook small or damaged pieces. Even a battered nightstand can become a work of art with decoupage. If you’re nervous, try starting with a thrift store find or a piece you don’t mind experimenting on.
Selecting Your Decoupage Paper Or Fabric
Your choice of paper or fabric affects the final look. Here’s a quick comparison to help you decide:
| Material | Pros | Cons | Best Uses |
|---|---|---|---|
| Napkins | Very thin, easy to blend edges | Tear easily, require gentle handling | Soft, layered looks |
| Scrapbook Paper | Many designs, sturdy | Harder to smooth, visible edges | Bold patterns, accent pieces |
| Wrapping Paper | Large sheets, affordable | May wrinkle if thin | Covering larger surfaces |
| Magazines | Unique images, glossy finish | Ink can bleed, not as durable | Collage effects |
| Fabric | Textured, flexible | May fray, needs extra glue | Soft, tactile surfaces |
You can also experiment with specialty papers like handmade paper, sheet music, or even vintage book pages for a one-of-a-kind look. Always test a small piece first to see how it reacts with your glue and sealer.
Non-obvious insight: If you want to use photos printed at home, make sure to use a laser printer. Inkjet prints can run or blur when glue is applied. If you only have an inkjet, try spraying your print with a clear acrylic sealer before using it.
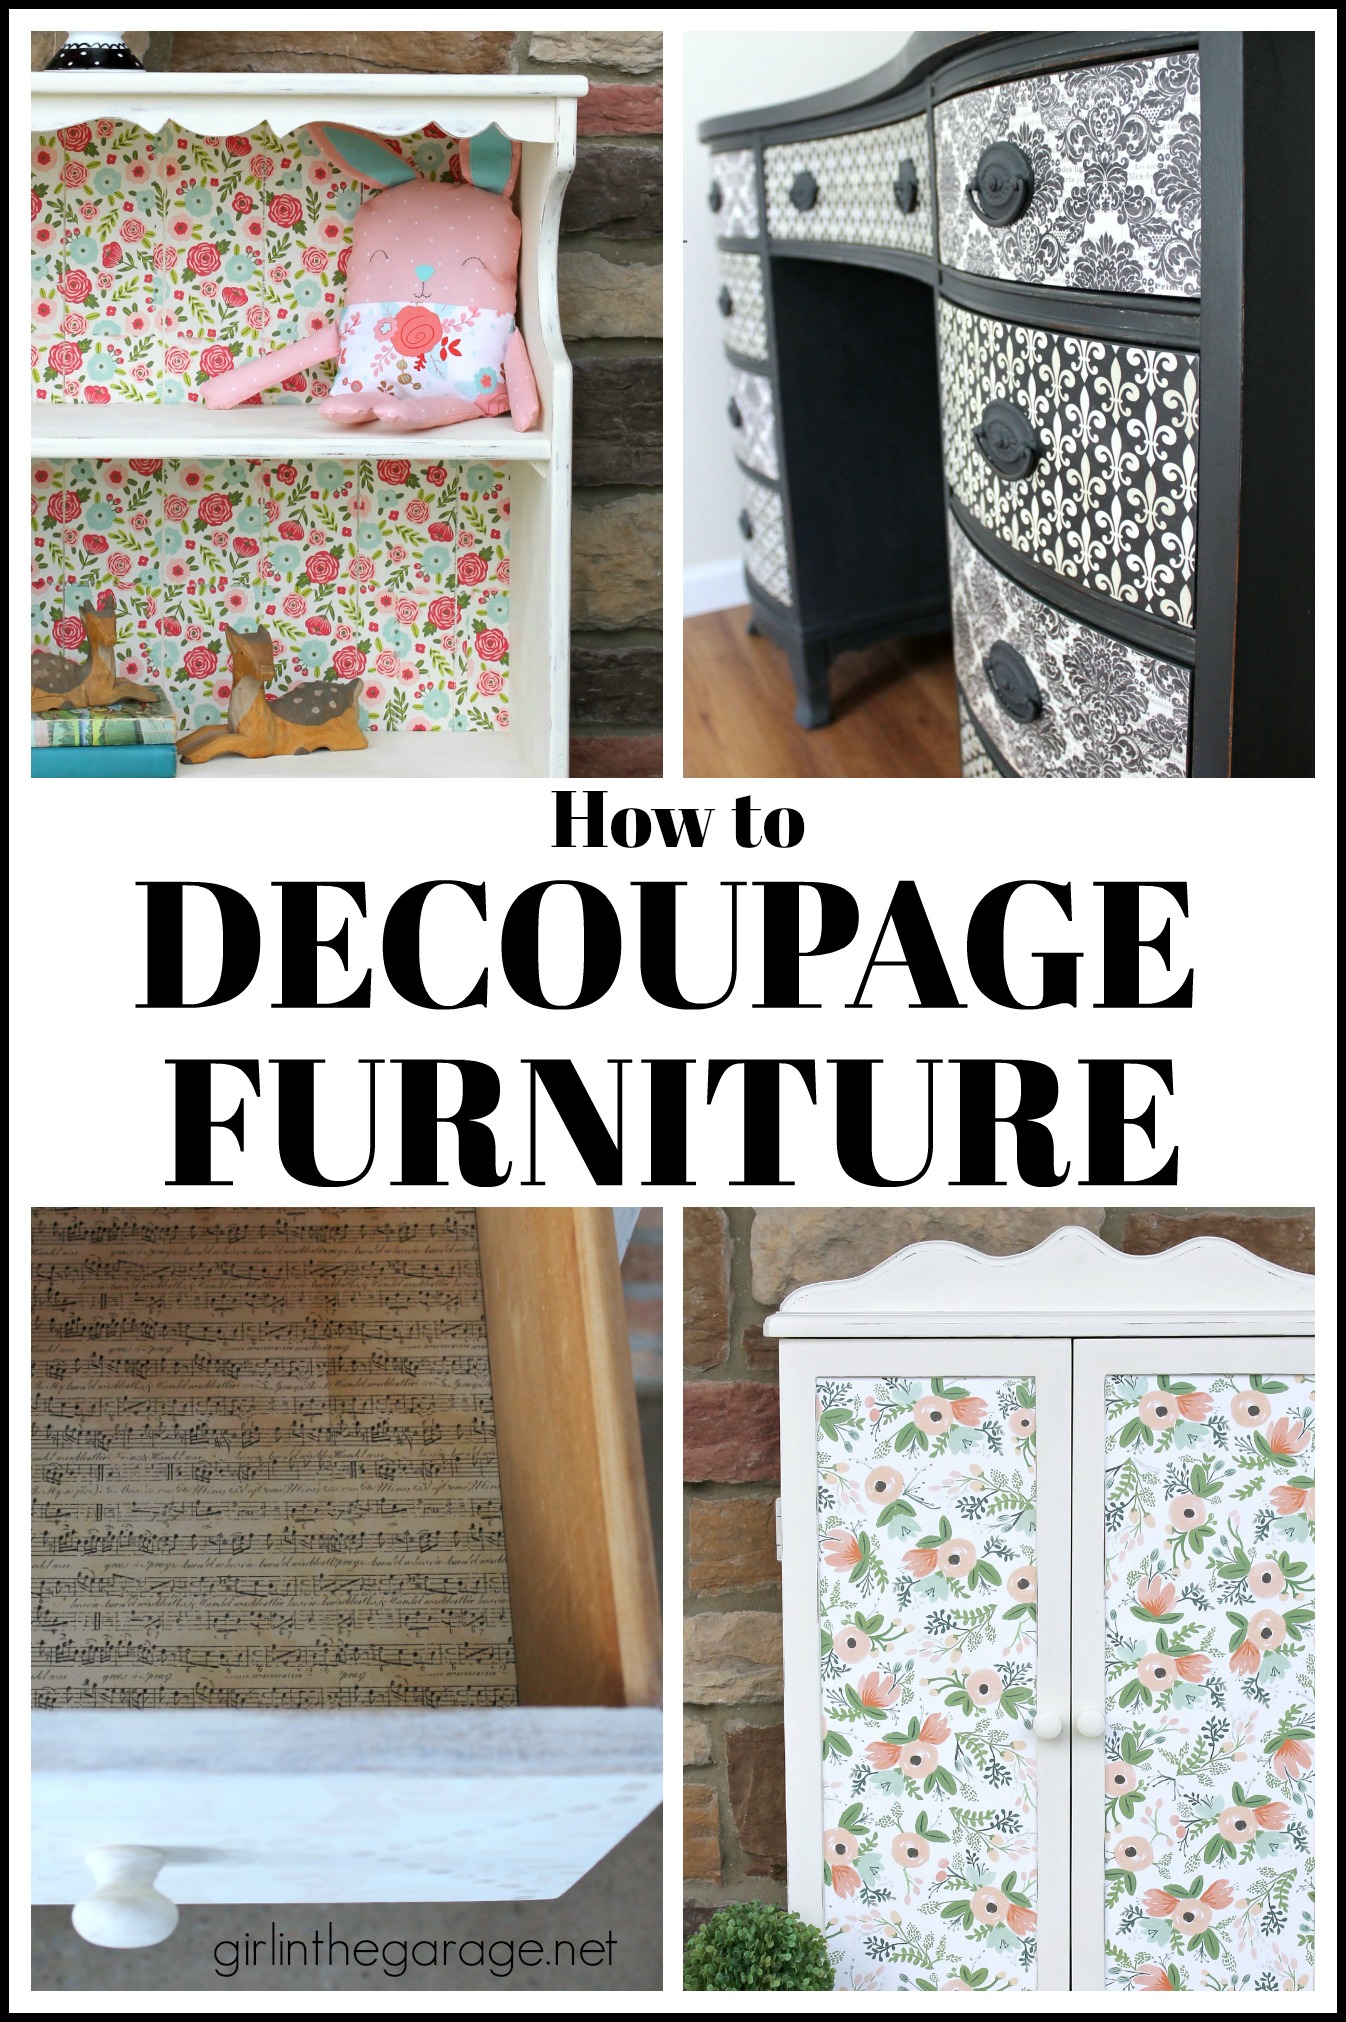
Credit: girlinthegarage.net
Preparing Your Furniture
Preparation is the foundation of a successful decoupage project. Rushing this step is a common mistake that leads to peeling or bubbling later on.
- Clean the surface: Remove dust, grease, or old paint. Mild soap and water are enough for most jobs. Let it dry completely. For sticky or greasy areas, rubbing alcohol can help.
- Sand if necessary: Use medium-grit sandpaper to create a slightly rough surface. Wipe away dust with a damp cloth. Sanding also helps remove old finishes and smooth out imperfections.
- Repair damage: Fill holes or cracks with wood filler. Sand smooth when dry. If you skip this, bumps or dents will show through your paper.
- Prime if needed: For dark or uneven surfaces, apply a coat of white paint or primer. This helps your paper colors stay bright and prevents stains from showing through. Water-based primers are easiest to work with.
Pro Tip: For furniture with raised details, consider decoupaging only the flat areas and painting the rest for a neat contrast. This is a clever way to highlight both the decoupage and the shape of the furniture.
Planning Your Design And Layout
Good planning saves time and prevents frustration. Here’s how to approach your design:
- Lay out your pieces without glue first. Try different arrangements. This lets you see how patterns and colors interact before committing.
- Mix large and small elements for a balanced look. If covering a whole surface, overlap edges for a seamless effect. Overlapping helps hide seams and creates a more unified finish.
- Consider symmetry if you want a formal style, or go random for a playful, collage look. There’s no right or wrong—just what you enjoy.
- Use a pencil and ruler to mark key placement points, especially for repeating patterns or borders. Light pencil lines can be erased later.
If you’re nervous about design, look for inspiration online or sketch out your idea first. Some people even create templates to help with complex layouts.
Beginner mistake: Rushing into gluing without testing the layout often leads to awkward gaps or crooked designs. Taking a few extra minutes at this stage pays off later.
How To Decoupage Furniture: Step-by-step Instructions
Follow these steps for a smooth and professional result:
1. Cut And Prepare Your Paper Or Fabric
- Cut out your shapes or images with sharp scissors or a craft knife. For a softer edge, try tearing the paper instead of cutting.
- For napkins, separate the top patterned layer from the backing. Only use the top layer. This makes the napkin almost transparent when glued.
- Test-fit pieces on your furniture before gluing. This helps you avoid surprises and make final adjustments.
2. Apply Decoupage Glue
- Use a clean brush to apply a thin, even layer of glue to the furniture surface. Too much glue can cause wrinkles.
- For large surfaces, work in small sections to prevent the glue from drying out. Only cover as much area as you can finish in a few minutes.
- Position your paper or fabric gently on the glued area. Once it touches, avoid shifting it too much to prevent tearing.
3. Smooth Out Bubbles And Wrinkles
- Start from the center and press outward with a clean, dry brush, a brayer, or your fingers (if the glue is non-toxic).
- For delicate paper, use a plastic bag or cling wrap over your hand to avoid tearing. This trick is especially useful with thin napkins.
- Wipe away excess glue with a damp sponge. Don’t scrub, just dab lightly.
4. Repeat And Overlap As Needed
- Continue adding pieces, overlapping edges for full coverage or leaving space for a patchwork effect. There’s no need to rush—take your time for best results.
- If you make a mistake, gently lift and reposition before the glue dries. Once dry, it’s difficult to adjust.
5. Let Dry Completely
- Wait at least 1–2 hours, or longer for thick layers. Humidity can make drying slower.
- Don’t rush to sealing—trapped moisture can cause bubbles or cloudiness. If in doubt, let it dry overnight.
6. Seal Your Work
- Apply 2–3 thin coats of sealer with a clean brush, allowing each coat to dry before the next.
- For a smooth finish, lightly sand between coats with fine-grit sandpaper. This step removes brush marks and dust.
- For a glossy effect, use a lacquer spray as the final layer. Always spray in a well-ventilated area.
7. Reassemble And Enjoy
- Once fully dry (usually 24–48 hours), reattach any hardware or doors. Handle the piece gently at first.
- Your decoupaged furniture is now ready to use! Show it off or share photos with friends and family.
Advanced Techniques And Creative Ideas
Once you master the basics, try these techniques to make your furniture stand out:
- Layering: Place multiple images or patterns to create depth. You can use transparent materials over bold prints for a rich look.
- Aging: Use tea-stained paper or sand edges for a vintage look. Light distressing adds character.
- Stenciling: Combine paint and decoupage for custom patterns. Paint borders or accents before adding paper.
- 3D Effects: Add beads, lace, or textured paper. Small details can turn furniture into a true artwork.
- Photo Transfers: Move images from laser prints onto furniture with special transfer mediums. This lets you add personal photos or custom graphics.
Try experimenting with metallic foils, pressed flowers, or even fabric patches. The more you play, the more you’ll learn what works for your style.
Non-obvious insight: For a seamless look, dampen thicker paper slightly before applying. It becomes more flexible and less likely to wrinkle. But don’t soak it—just a light mist is enough.
Common Problems And How To Fix Them
Even experienced crafters face issues. Here’s how to handle the most frequent problems:
- Bubbles or wrinkles: Gently prick with a pin and smooth with a brush. For big bubbles, lift the paper, add more glue, and re-smooth. If the paper dries with small wrinkles, often they become less visible after sealing.
- Paper tears: Patch with a small piece of matching paper or touch up with paint. Sometimes, imperfections add charm.
- Cloudy finish: This usually means the glue wasn’t fully dry before sealing. Let it cure for several days—it often clears up. If not, lightly sand and add another layer of sealer.
- Sticky surface: Too much glue or not enough drying time. Allow extra curing or add a coat of clear acrylic spray. Keep the piece out of humid rooms until fully cured.
Another issue is yellowing over time, especially if you use cheaper glues or paper. To avoid this, always use acid-free materials and high-quality sealers.
Comparing Decoupage Mediums
Not all glues and sealers are the same. Here’s a quick comparison to help you choose:
| Product | Application | Durability | Finish |
|---|---|---|---|
| Mod Podge (Classic) | Easy for beginners | Good for light use | Matte or gloss |
| PVA Glue | Affordable, versatile | Moderate | Clear |
| Polyurethane | Brush-on or spray | Very strong | Glossy or satin |
| Acrylic Sealer | Spray for easy use | Water-resistant | Various finishes |
If you want your furniture to be waterproof or used outdoors, look for outdoor-rated Mod Podge or marine varnish. For children’s furniture, choose non-toxic, water-based sealers for safety.
Pro Tip: For high-traffic pieces like tabletops, always finish with a durable sealer such as polyurethane. Don’t skip this step if you want your work to last.

Credit: www.traceysfancy.com
Maintenance And Care Of Decoupaged Furniture
Proper care keeps your artwork looking fresh:
- Wipe with a soft, damp cloth. Avoid harsh cleaners. Mild soap is fine, but don’t soak the surface.
- Protect from direct sunlight to prevent fading. UV light can make colors dull over time.
- Use coasters and placemats on decoupaged tables. This prevents water rings and heat damage.
- If damage occurs, lightly sand and add another coat of sealer. Minor repairs are usually easy.
If you notice the finish getting dull or scratched, buff lightly with fine sandpaper and reseal. Well-sealed decoupage can last as long as any painted surface.
With care, well-sealed decoupaged furniture can last for many years without peeling or yellowing. Many people find that the finish gets even more attractive as it ages gently.
Real-life Examples And Success Stories
Many people have transformed their homes with decoupage. For example, one DIY enthusiast turned an old dresser into a bold statement piece by covering drawer fronts with floral napkins and finishing with gold handles. Another upcycled a plain coffee table by adding comic book pages, creating a fun conversation piece for their living room.
One crafter used pages from vintage cookbooks to decorate a kitchen cabinet, giving it both personality and a nod to family history. Another covered a child’s desk with maps, sparking curiosity and creating a learning tool.
These projects show that you don’t need expensive supplies or rare skills—just creativity and a willingness to experiment. Sharing your work with friends or online communities can bring new ideas and encouragement.
Sustainability And Upcycling With Decoupage
Decoupage is not just creative—it’s also eco-friendly. By reusing old furniture and scraps of paper, you keep items out of landfills and reduce waste. Vintage maps, newspapers, or old greeting cards can all become beautiful decorations.
Many crafters now focus on upcycling, turning thrift store finds into stylish, personalized pieces. This approach saves money and gives you furniture with a story. It also encourages a more thoughtful way of decorating—choosing items for their potential rather than just buying new.
Children’s furniture, garden benches, and even outdoor plant pots can be upcycled with weatherproof decoupage. The only limit is your imagination and willingness to experiment.
For more about upcycling and creative reuse, you can visit Wikipedia’s Upcycling page.
Practical Tips To Make Your First Project A Success
- Start small, like a stool or tray, before tackling a large dresser. Small projects build confidence.
- Test your materials on a hidden area first. Some papers or glues react differently than expected.
- Work slowly—patience is key for a smooth result. Rushing often leads to mistakes.
- Don’t worry about perfection. Handmade pieces have character! Little flaws make your work unique.
- Share your results online for inspiration and feedback. Other crafters can offer tips and encouragement.
Another tip: Keep a notebook of your projects, including what materials and techniques worked best. This will help you improve and remember what to do (or avoid) next time.
Frequently Asked Questions
How Durable Is Decoupaged Furniture?
With the right sealer, decoupaged furniture is quite durable. It can handle daily use, but it’s best to avoid heavy water exposure or placing hot items directly on the surface. Regular cleaning and occasional re-sealing will extend its life. If you want extra protection, add a glass top for tables.
Can I Decoupage Over Painted Or Varnished Surfaces?
Yes, but you must sand glossy finishes first. This helps the glue stick and prevents peeling. If the surface is very dark or uneven, a coat of white paint or primer gives better results. Always clean the surface before starting.
What’s The Best Type Of Glue For Decoupage?
Most people use Mod Podge or similar decoupage mediums. PVA glue (like school glue) also works if it dries clear. For outdoor or high-use furniture, look for waterproof or extra-durable formulas. Read labels to make sure the glue matches your needs.
How Do I Prevent Bubbles And Wrinkles?
Work slowly, apply thin glue layers, and smooth from the center out. For delicate papers, use a plastic wrap barrier when smoothing to avoid tearing. Let each layer dry fully before adding more. If you see bubbles forming, deal with them right away before they set.
Is Decoupage Reversible If I Make A Mistake?
Once sealed, decoupage is hard to remove without damaging the surface. If you notice a problem before sealing, you can lift the paper and reapply. For sealed pieces, sanding and repainting is usually the best fix. Always plan carefully to reduce big mistakes.
Decoupage is more than just a craft—it’s a way to express your creativity, save money, and give old furniture a new purpose. With a bit of practice and the right approach, you can create furniture that’s both functional and a true work of art.
Whether you’re updating a family heirloom or adding flair to a thrift store find, the possibilities are endless. Start your project today and discover the joy of making something uniquely yours.