Building your own cabinet box can be a rewarding project. Whether you want to upgrade your kitchen, create custom storage, or simply learn woodworking, making a cabinet box is a practical skill. Many people think cabinets are complicated, but with clear steps and the right approach, you can achieve professional results at home.
In this guide, you’ll learn how to build a cabinet box from start to finish. We’ll cover everything: planning, materials, measurements, cutting, assembly, and finishing. You don’t need expensive tools or expert skills—just patience, attention to detail, and a willingness to learn. Along the way, you’ll discover practical tips and common mistakes to avoid, so even a beginner can build a sturdy and attractive cabinet box.
Understanding Cabinet Box Basics
Before you begin, it’s important to understand what a cabinet box is. The box is the main structure of any cabinet. It holds the shelves, doors, and drawers. Most kitchen and bathroom cabinets use a simple box design, sometimes called a “carcass.”
A basic cabinet box includes:
- Two side panels
- A top panel and a bottom panel
- A back panel
- Sometimes a face frame (on framed cabinets)
- Optional: Shelves or dividers
Cabinet boxes can be base cabinets (sit on the floor), wall cabinets (hang on the wall), or tall cabinets (reach from floor to ceiling).
Knowing these parts helps you plan your materials and measurements.
Planning And Design
Planning is the foundation of a successful cabinet build. Rushing or skipping this step often leads to mistakes.
Decide The Cabinet’s Purpose
What will your cabinet store? Will it hold heavy pots and pans, or just light items like towels? The use will affect your choice of materials, size, and design. For example, kitchen base cabinets usually have a standard depth of 24 inches, while wall cabinets are often 12 inches deep.
Measure Your Space
- Measure the width, height, and depth of the space where the cabinet will go.
- Double-check for level floors and square walls.
- Leave space for doors to open and for any appliances or trim.
Sketch Your Cabinet
Draw your cabinet on paper or use a simple online tool. Mark the location of:
- Sides
- Top and bottom
- Shelves or drawers
- Face frame (if used)
Choose Cabinet Style
There are two main types:
- Frameless cabinets (European style): The box is open at the front. Doors and drawers attach directly to the box. Easier for beginners.
- Framed cabinets (American style): A wood frame covers the front edges. This adds strength and a classic look.
If you’re new to woodworking, start with a frameless design. It’s simpler and requires fewer steps.
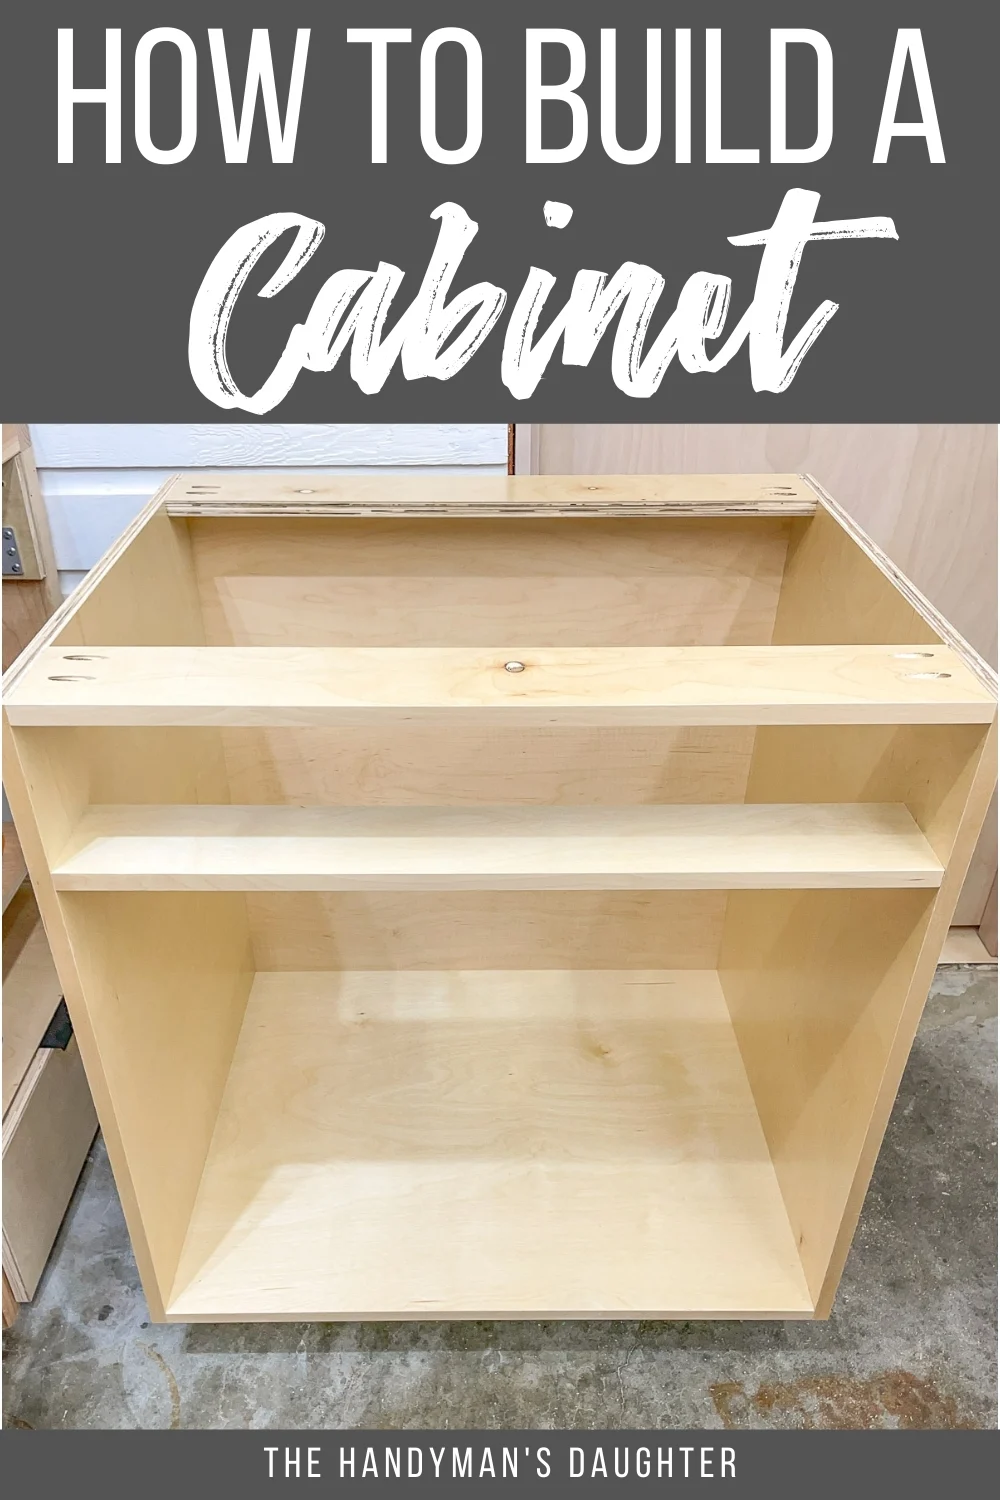
Credit: www.thehandymansdaughter.com
Choosing Materials
Picking the right materials is critical for a strong, durable cabinet.
Common Materials
- Plywood: The most popular choice. Strong, stable, and easy to cut. Use 3/4-inch plywood for sides, top, and bottom. 1/4-inch plywood is good for the back.
- MDF (Medium-Density Fiberboard): Very smooth and flat, but heavy and less strong than plywood. Not good for damp areas.
- Particleboard: Cheap, but not very strong or durable. Avoid for main structure.
- Solid wood: Beautiful, but expensive and can warp. Usually used for face frames or doors, not the box.
Typical Cabinet Material Comparison
| Material | Strength | Moisture Resistance | Cost (Per 4×8 Sheet) | Recommended Use |
|---|---|---|---|---|
| Plywood | High | Good | $45–$70 | Main structure |
| MDF | Medium | Poor | $35–$50 | Painted cabinets, doors |
| Particleboard | Low | Poor | $20–$30 | Cheap cabinets, shelving |
Hardware And Fasteners
You will also need:
- Wood screws (1-1/4” or 1-5/8”)
- Wood glue
- Shelf pins (if adding adjustable shelves)
- Pocket hole screws (optional for hidden joints)
- Hinges (if adding doors)
- Drawer slides (if adding drawers)
Use high-quality hardware. Cheap fasteners can lead to loose cabinets and safety issues.
Tools You’ll Need
You don’t need a workshop full of tools to build a cabinet box. Here are the essentials:
- Circular saw or table saw (for cutting panels)
- Drill/driver (for screws and shelf pin holes)
- Measuring tape
- Carpenter’s square (for marking straight, square lines)
- Clamps (to hold pieces as you work)
- Sander or sanding block
- Pencil
Optional:
- Pocket hole jig (for invisible joints)
- Track saw (for straighter cuts)
- Jigsaw (for notches or cutouts)
Tip: Many hardware stores will cut plywood for you if you provide measurements. This can save time and make transport easier.
Cutting Your Panels
Accurate cuts are key for a cabinet that fits together well. Measure twice, cut once.
Plan Your Cuts
Make a cutting diagram so you get all your pieces from your plywood sheet with minimal waste. Mark each panel on the plywood before you start cutting.
A typical base cabinet box needs:
- 2 side panels (same height as cabinet, full depth)
- 1 top panel (width minus thickness of both sides)
- 1 bottom panel (same as top)
- 1 back panel (full width and height, but thinner material)
- Optional: Toe kick (for base cabinet), stretchers (support pieces)
For example, for a 30” high x 24” deep x 36” wide cabinet:
- Sides: 30” x 24” (2 pieces)
- Top/Bottom: 34.5” x 24” (2 pieces, subtract side thicknesses)
- Back: 30” x 36” (1 piece, usually 1/4” plywood)
Cutting Tips
- Use a fine-tooth blade for plywood to avoid splinters.
- Cut the largest pieces first.
- Label each piece as you cut.
- Clamp a straight edge as a guide for your saw.
- Always check for square corners after each cut.
Assembling The Cabinet Box
This is where your cabinet takes shape. Take your time with alignment and joinery.
Dry Fit First
Before using glue or screws, put the panels together without fasteners. Check that everything fits. This helps catch mistakes early.
Assembly Steps
- Attach the Sides to the Bottom Panel
- Stand both side panels upright.
- Place the bottom panel between them, flush with the bottom edge.
- Apply wood glue to the edges where they meet.
- Drill pilot holes, then drive screws through the sides into the bottom.
- Attach the Top Panel
- Repeat the process for the top panel. It should be flush with the top of the sides.
- Install the Back Panel
- Lay the box face down.
- Attach the back panel with glue and short screws or brad nails.
- The back keeps the box square and rigid.
- Add Stretchers or Rails
- Some cabinets have 2-3 “stretchers” or rails at the top/back for extra strength. These can be simple strips of wood.
- Check for Square
- Use a carpenter’s square to check all corners.
- Measure diagonals from corner to corner. If both are equal, your box is square.
Fastening Methods Compared
| Method | Strength | Visibility | Skill Needed | Best For |
|---|---|---|---|---|
| Screws | High | Visible | Low | Beginner projects |
| Pocket hole screws | High | Hidden | Medium | Cabinet boxes, face frames |
| Biscuits/Dowels | Medium | Hidden | High | Fine furniture |
Adding Shelves And Dividers
Shelves make cabinets more useful. You can add fixed shelves, adjustable shelves, or dividers for organizing.
Fixed Shelves
- Cut shelves from the same material as the box.
- Attach with glue and screws, or use shelf supports.
- Fixed shelves add strength, especially for wide cabinets.
Adjustable Shelves
- Drill a series of holes (usually 1/4” diameter) along the inside of each side panel.
- Use a jig or template for even spacing (typically every 2 inches).
- Insert shelf pins, then rest the shelf on the pins.
Dividers
- Vertical dividers are useful for tall cabinets or to separate drawers from shelves.
- Attach with screws and glue, similar to shelves.
Non-obvious insight: If you plan to add drawers, install a horizontal divider above and below the drawer space for extra support. This prevents sagging over time.
Installing The Face Frame (optional)
A face frame is a wood frame attached to the front of the box. It covers the raw plywood edges and adds strength. Many modern cabinets skip this step, but it’s common in traditional American designs.
Building A Face Frame
- Use 1×2 hardwood (like maple or poplar).
- Cut rails (horizontal pieces) and stiles (vertical pieces) to fit the box front.
- Join with pocket screws or dowels.
- Attach the frame to the box with glue and brad nails or screws.
Tip: Sand the frame smooth before attaching. It’s easier to finish now than after it’s on the box.
Preparing For Doors And Drawers
If you plan to add doors or drawers, now is the time to add support pieces.
Hinges
- For frameless cabinets, use European-style concealed hinges.
- Drill mounting holes (usually 35mm diameter) at the correct location for your hinges.
- For framed cabinets, surface-mount or inset hinges can be used.
Drawer Supports
- Attach drawer slide supports inside the box. These keep the slides aligned and allow smooth operation.
- Use a level to make sure they are perfectly horizontal.
Non-obvious tip: Attach drawer slide brackets before installing the cabinet. It’s much easier than working inside a finished, mounted cabinet.
Finishing The Cabinet Box
Proper finishing makes your cabinet look professional and protects it from moisture and wear.
Sanding
- Sand all surfaces with 120- to 180-grit sandpaper.
- Pay extra attention to edges and corners.
- Remove all dust before applying finish.
Edge Banding
- Plywood edges can look rough. Cover them with edge banding tape (available in wood or plastic).
- Apply with a household iron, then trim with a utility knife.
Painting Or Staining
- For a painted finish, use a primer first, then 2 coats of cabinet-grade paint.
- For a stained finish, apply wood conditioner, stain, then a clear topcoat.
- Let each coat dry fully before adding the next.
Sealing
- Use polyurethane or lacquer for durability, especially in kitchens or bathrooms.
- Apply with a foam brush or sprayer for a smooth finish.
Installing The Cabinet Box
After finishing, you’re ready to install the cabinet.
Base Cabinets
- Mark the location on the floor and wall.
- Set the cabinet in place. Shim under the bottom if the floor is not level.
- Check for level and plumb (vertical).
- Attach to wall studs with long screws through the back panel or stretchers.
- Secure multiple cabinets together by screwing through their side panels.
Wall Cabinets
- Find and mark wall studs.
- Use a ledger board to support the cabinet while you attach it.
- Lift the cabinet into position.
- Drive screws through the back and into studs.
- Remove the ledger board after installation.
Non-obvious insight: Always install upper (wall) cabinets before base cabinets. This gives you more room to work.
Common Mistakes And How To Avoid Them
- Skipping planning: Take time to measure, sketch, and plan. Mistakes here are hard to fix later.
- Poor cutting accuracy: Double-check measurements and use a straight edge. Even small errors can cause problems.
- Not checking for square: Cabinets must be square, or doors and drawers won’t fit right.
- Using cheap hardware: Inferior screws and hinges can fail. Use high-quality hardware.
- Rushing the finish: Good sanding and finishing make your cabinet look professional.
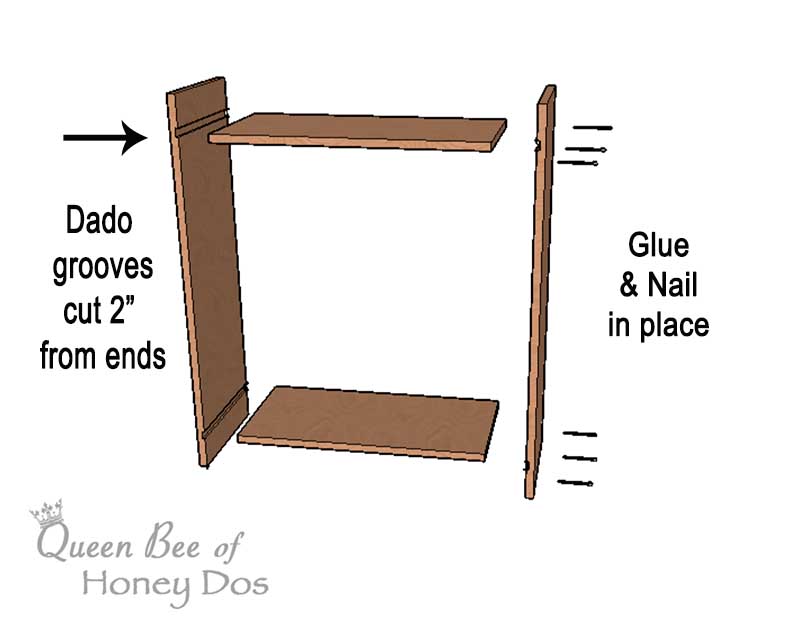
Credit: www.queenbeeofhoneydos.com
Practical Tips For A Professional Result
- Use cabinet screws (with wide, flat heads) instead of drywall screws. They hold better and won’t split the wood.
- Clamp panels before screwing to prevent shifting.
- Test-fit shelves and hardware before final assembly.
- Pre-drill all screw holes to prevent splitting.
- Save all cutoffs and scraps for test cuts or fixing mistakes.
- If installing multiple cabinets, align all tops and faces for a seamless look.
Example: Simple Base Cabinet Box
Let’s put all this together in an example. Suppose you want a 30” high, 36” wide, 24” deep base cabinet.
Materials Needed:
- 1 sheet 3/4” plywood (for sides, top, bottom, and shelf)
- 1/4” plywood (back panel)
- Wood screws (1-5/8”)
- Wood glue
- Edge banding (optional)
Steps:
- Cut 2 sides: 30” x 24”
- Cut top and bottom: 34.5” x 24”
- Cut back: 30” x 36”
- Dry fit all panels.
- Assemble sides, top, and bottom with screws and glue.
- Attach back panel.
- Add shelf pins or fixed shelf.
- Sand all surfaces.
- Apply edge banding.
- Finish with paint or stain.
- Install in your space.
This simple box can be used alone or as part of a larger set. You can add drawers, doors, or more shelves as needed.
Cost Breakdown
Building your own cabinet box is often cheaper than buying one. Here’s a typical cost estimate for a single base cabinet (30”x36”x24”):
| Item | Quantity | Cost |
|---|---|---|
| 3/4″ Plywood (4×8 sheet) | 1 | $50 |
| 1/4″ Plywood (back) | 1 | $15 |
| Screws & Glue | – | $10 |
| Edge Banding | – | $8 |
| Paint/Stain & Finish | – | $20 |
| Total | – | $103 |
This is much less than the $200–$400 you might pay for a similar cabinet from a store.
Safety Tips
- Always wear safety glasses when cutting or drilling.
- Use hearing protection with power tools.
- Work in a well-ventilated area when sanding or finishing.
- Keep hands clear of saw blades and moving parts.
- Secure materials before cutting to prevent kickback.
- Read all tool manuals and follow safety warnings.

Credit: makingprettyspaces.com
Resources For Further Learning
If you want to explore more advanced cabinetmaking, check out resources like the Cabinetry Wikipedia page. There, you can learn about different joinery styles, advanced hardware, and finishing techniques.
Frequently Asked Questions
How Strong Is A Homemade Cabinet Box?
A well-built cabinet box from 3/4” plywood is very strong—often stronger than many store-bought cabinets. Proper screws, glue, and a solid back panel add to the strength. It can easily support a countertop or heavy dishes if assembled correctly.
Can I Build A Cabinet Box Without A Table Saw?
Yes, you can use a circular saw with a straight edge as a guide. Some hardware stores will also cut plywood to size for you. The key is making straight, accurate cuts.
What Is The Best Wood For Cabinet Boxes?
Plywood is the top choice for most cabinet boxes. It’s strong, stable, and resists warping. Avoid particleboard for main structure as it sags and absorbs moisture.
How Do I Get Perfectly Square Cabinets?
Check all panels for square corners before assembly. Use a carpenter’s square as you screw panels together. Measure diagonals—if both are equal, your box is square. The back panel locks everything in place.
Should I Use Glue And Screws, Or Just One?
Use both. Wood glue bonds the surfaces for long-term strength, and screws hold everything tight as the glue dries. This combination gives the strongest, most durable cabinet.
Building a cabinet box is a valuable skill that can save money and upgrade your home. With careful planning and attention to detail, you’ll create a cabinet you can be proud of for years.