Building a table with a leaf is a rewarding project that combines woodworking skill, practical design, and a touch of engineering. A table leaf, sometimes called an extension leaf, allows you to expand your table for more guests or space, then shrink it for daily use.
Many people buy tables with leaves, but making your own brings extra satisfaction—and can save money while letting you customize the size, materials, and finish. Even if you’re new to woodworking, with patience and the right guidance, you can create a beautiful, functional table that fits your space perfectly.
This guide walks you through every step of building a table with a leaf, from planning and materials to precise construction and finishing. Along the way, you’ll discover tips and solutions that help beginners avoid common mistakes. By the end, you’ll not only understand how to make a table with a leaf, but also how to create a piece that lasts for years and becomes a centerpiece in your home.
Understanding Table Leaves And Their Mechanisms
Before you start, it’s important to know what a table leaf is and how it works. A table leaf is a removable or insertable piece that extends the tabletop. There are several types:
- Drop-in leaf: A separate piece you add between two halves of the table.
- Butterfly leaf: A leaf that folds in half and is stored inside the table.
- Drop-leaf: Side sections that fold down when not in use.
Most home woodworkers build a simple drop-in leaf table. This style is strong, reliable, and fits many dining rooms and kitchens.
How Table Leaf Mechanisms Work
A table with a leaf usually uses a slide mechanism under the tabletop. When you pull the table ends apart, the slides guide each half outward, creating a space for the leaf. The leaf fits snugly in the middle, level with the rest of the tabletop. Good slides ensure the table stays stable and aligned whether the leaf is in or out.
There are two main types of slides:
- Wooden slides: Traditional, made from hardwood. They’re strong but need careful fitting.
- Metal slides: Modern, smooth, and easier to install. They last longer and hold more weight.
Choosing the right slide depends on your tools, skill, and budget.
Planning Your Table With A Leaf
A solid plan is key to a successful project. You’ll need to consider size, shape, seating, and how the table will fit in your space. Rushing this step leads to headaches later.
Deciding Table Size And Leaf Dimensions
First, measure your room. Leave at least 36 inches (about 91 cm) of clearance around all sides so chairs can move freely.
A common dining table for six people is 72 inches long and 36 inches wide. With a leaf, you might extend it to 96 inches. The leaf is usually 18 to 24 inches wide.
Think about your needs:
- For 4-6 people: Table length 60-72 inches, leaf 18 inches
- For 6-8 people: Table length 72-84 inches, leaf 18-24 inches
If you often host big gatherings, a larger leaf or even two leaves is helpful.
Choosing Table Shape
Rectangular tables are easiest for leaves. Oval or round tables are more complex, but possible with careful planning.
Sketching Your Design
Draw your table, showing the top, legs, and how the leaf fits. Mark all measurements. Even a simple pencil sketch helps prevent mistakes.
Credit: www.woodcademy.com
Selecting Materials And Tools
Your choice of materials affects the look, strength, and cost of your table. For beginners, solid wood is easier than plywood or veneer.
Best Woods For Tabletops
- Hard maple: Very strong, smooth, light color
- Red oak: Durable, classic grain pattern, easy to stain
- Cherry: Ages to a rich color, easy to work with
- Walnut: Dark, elegant, more expensive
Avoid soft woods like pine; they dent easily.
Hardware And Slides
You’ll need:
- Table slides (wood or metal, at least the length of your table halves)
- Tabletop fasteners (figure-8 or Z-clips)
- Dowels or biscuits (for tabletop alignment)
- Wood glue
- Screws and brackets (for attaching slides and aprons)
Basic Tools Needed
- Table saw or circular saw
- Miter saw
- Drill and bits
- Clamps (long bar clamps for glue-ups)
- Sander or sanding block (120–220 grit sandpaper)
- Tape measure and square
- Chisels (for fine adjustments)
Optional tools, like a biscuit joiner or router, make some steps easier but are not required.
Building The Tabletop And Leaf
The tabletop is the most visible part of your table. Take your time for a smooth, tight joint.
Step 1: Cutting And Preparing Boards
Buy boards wide enough for your tabletop and leaf. For a 36-inch wide table, use three or four 8–12 inch wide boards.
- Cut your boards to length, adding 2 inches extra for trimming later.
- Check for straightness. If boards are warped, joint the edges with a saw or hand plane.
Step 2: Gluing Up The Top
Lay boards side by side, matching the grain for a pleasing look. Mark the order with chalk or pencil.
- Apply wood glue to the edges. Use dowels or biscuits every 10–12 inches for perfect alignment.
- Clamp the boards tightly. Wipe away glue squeeze-out with a damp cloth.
- Let cure for at least 8 hours.
Repeat this process for the main tabletop and for the leaf. The leaf should use boards from the same batch so it matches in color and grain.
Step 3: Trimming And Sanding
After the glue dries:
- Unclamp and trim both ends to final size with a saw.
- Sand the surface smooth, starting with 120 grit and finishing with 220 grit. Sand the edges and corners slightly rounded for comfort.
Step 4: Ensuring Alignment
To keep the tabletop and leaf perfectly level, add alignment pins or dowels. Drill holes along the edges where the leaf joins the table, then insert metal or wooden pins. This prevents the pieces from shifting when in use.
Non-obvious tip: Mark each pin location carefully. Even a 1/16 inch difference makes the leaf uneven. Use a center punch or template for accuracy.
Building The Table Base And Aprons
The base supports the tabletop and holds the slides.
Step 1: Building The Apron
The apron is the frame under the tabletop, usually 3–4 inches wide and 3/4 inch thick. Cut four pieces:
- Two long sides (length = table length minus 2 × apron thickness)
- Two short sides (width = table width minus 2 × apron thickness)
Join at the corners using pocket screws, dowels, or mortise-and-tenon joints. Attach the apron to the tabletop using figure-8 fasteners or Z-clips. These allow wood movement, preventing cracks.
Step 2: Attaching Legs
There are several leg styles:
- Straight square legs (simplest)
- Tapered legs (elegant, lighter look)
- Turned legs (classic, but need a lathe)
Attach legs to the apron with corner brackets or mortise-and-tenon joints. Check that the base is square and stable before moving on.
Step 3: Installing Table Slides
Mount the slides under the tabletop, centered along the length. Metal slides screw in easily; wooden slides need careful alignment and waxing. Test the slides: both table halves should pull out smoothly and evenly.
Beginner insight: If the slides are not perfectly straight, the table will jam or bind. Use a straightedge during installation.
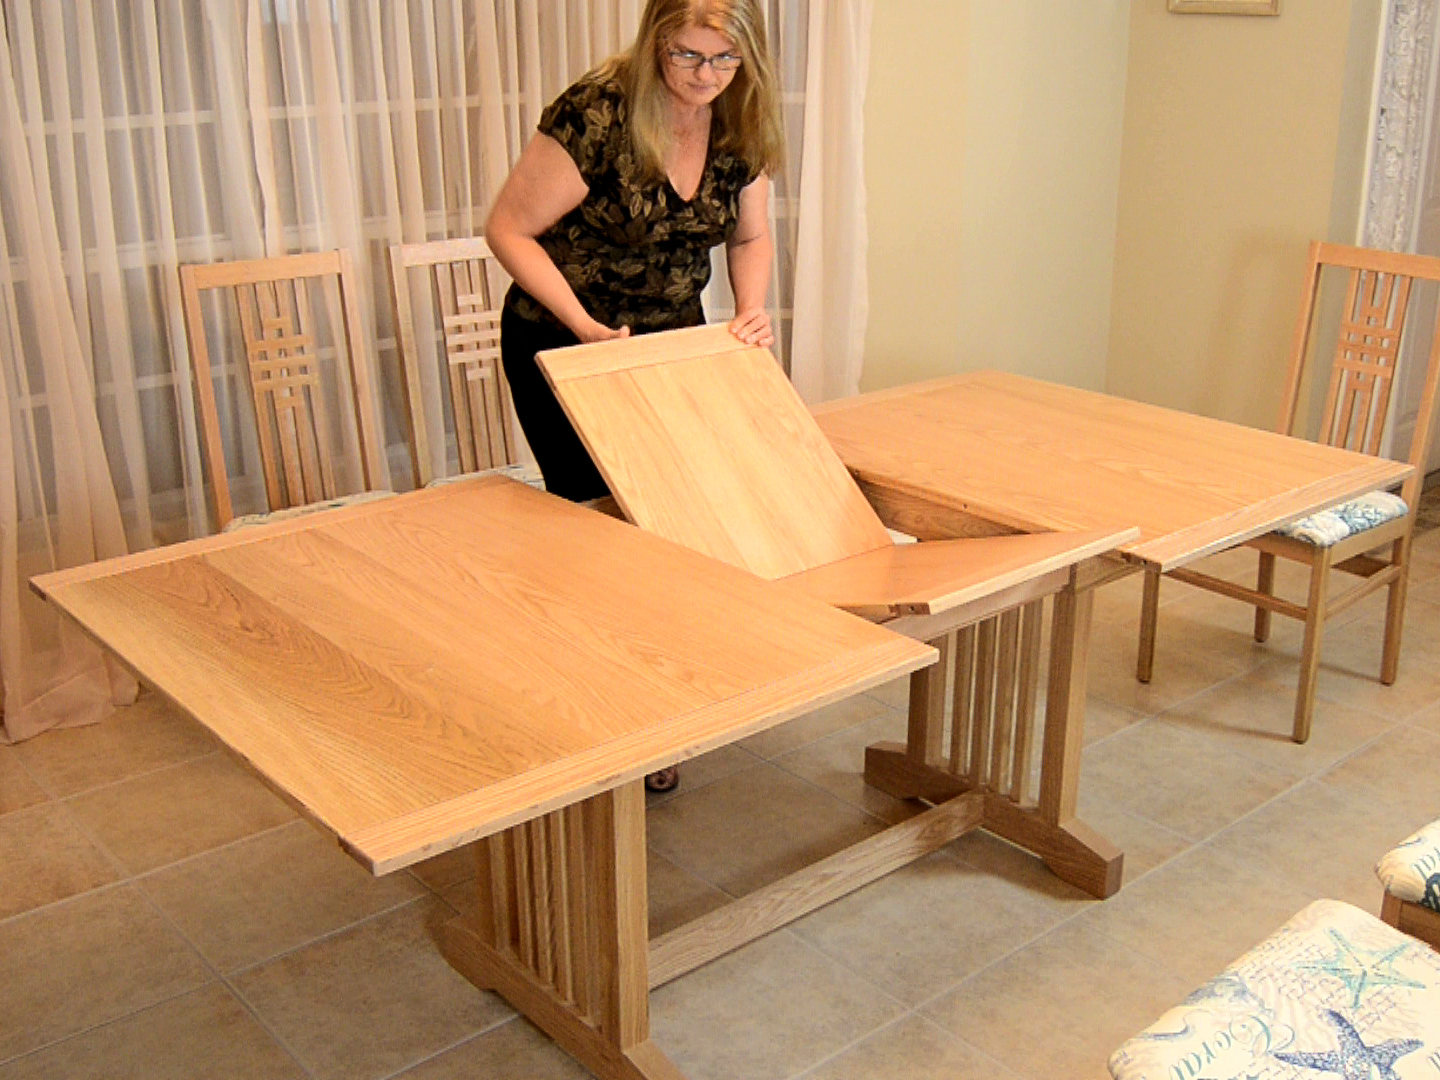
Creating The Leaf And Joinery
Now, prepare the leaf to fit perfectly between the two table halves.
Step 1: Sizing The Leaf
The leaf width should match the opening created when the slides are fully extended. Cut the leaf slightly wider (about 1/16 inch) to allow for sanding and fine-tuning.
Step 2: Adding Leaf Pins And Locks
Install metal or wooden pins at the leaf edges and matching holes on the table halves. Some tables use table leaf locks—small latches underneath that hold everything tight.
Non-obvious tip: For seamless alignment, sand the leaf edges while test-fitting between the table halves. Even small adjustments make a big difference in how smooth the surface feels.
Step 3: Leaf Storage
Some tables store the leaf inside, but most basic designs require you to store the leaf separately. Create a felt-lined rack or shelf to prevent scratches.
Table Assembly And First Test Fit
Assemble all parts before final finishing.
- Place the tabletop on the base, attach with fasteners.
- Pull out the slides, insert the leaf, and check for levelness.
- Adjust pins or sand edges as needed.
- Test the table with weight to make sure it’s sturdy.
It’s common for first-time builders to find a small gap or unevenness. Don’t panic—most can be fixed by sanding, tightening fasteners, or adjusting pins.
Finishing The Table
A good finish protects your table from spills, scratches, and changes in humidity. Take time for each step, and don’t rush the drying process.
Step 1: Choosing A Finish
Popular choices:
- Oil-based polyurethane: Durable, glossy or satin options, easy to apply
- Water-based polyurethane: Clear, less odor, dries faster
- Danish oil or tung oil: Natural look, less protection, easy to repair
Step 2: Applying The Finish
- Sand all surfaces with 220 grit for a silky feel.
- Remove all dust with a tack cloth.
- Apply the first coat with a brush or rag, following the wood grain.
- Let dry, then sand lightly with 320 grit.
- Apply 2–3 more coats, sanding between each.
For a glass-smooth top, rub the final coat with fine steel wool and add paste wax.
Beginner insight: Always finish the tabletop and leaf at the same time, with the same batch of finish. Otherwise, the color or sheen may not match.

Credit: www.woodsmithplans.com
Common Mistakes And How To Avoid Them
Building a table with a leaf is challenging for beginners. Here are frequent errors and how to prevent them:
- Poor slide installation: Leads to sticking or uneven movement. Use a straightedge and measure carefully.
- Mismatched wood grain on leaf: Makes the leaf stand out. Use boards from the same batch and lay out grain before gluing.
- Over-tightening fasteners: Can crack wood or prevent movement. Tighten until snug, not more.
- Skipping test fits: Always dry-fit parts before gluing or screwing.
- Ignoring wood movement: Wood expands and contracts with humidity. Use floating fasteners, not glue, to attach the top to the apron.
Cost And Time Estimate
Building your own table with a leaf saves money compared to buying custom furniture, but it’s not free.
Average Material Costs
| Item | Estimated Cost (USD) |
|---|---|
| Hardwood boards | $150 – $300 |
| Table slides (metal) | $40 – $80 |
| Legs (set of 4) | $60 – $120 |
| Finish and supplies | $30 – $60 |
| Miscellaneous hardware | $20 – $40 |
Total estimated cost: $300–$600, depending on wood type and quality.
Time Required
Most beginners spend 25–40 hours over 2–3 weekends. This includes drying time for glue and finish.
Comparing Table Slide Types
Choosing the right slide matters for strength and ease of use.
| Slide Type | Pros | Cons | Best For |
|---|---|---|---|
| Wooden slides | Traditional look, can be made at home | More friction, requires careful fitting | Rustic or historic tables |
| Metal slides | Smoother action, high strength | Higher cost, modern appearance | Most home projects |
| Ball-bearing slides | Very smooth, easy to use | Expensive, complex installation | Large, heavy tables |
For most beginners, metal slides give the best mix of cost, strength, and ease.
Customizing Your Table
A handmade table can reflect your style.
Edge Profiles
- Square: Simple and modern
- Beveled: Angled edge, easy to sand
- Rounded (radius): Comfortable, child-safe
Use a router or sandpaper to shape the edge.
Stain And Color
Staining lets you match the table to your room. Always test stain on scrap wood first.
Unique Features
- Breadboard ends: Decorative and helps keep the tabletop flat
- Inlays: Add a strip of contrasting wood for style
- Painted legs: For a two-tone look
Beginner tip: Start simple. Add details on your next table after you master the basics.
Maintenance And Long-term Care
A table with a leaf needs occasional care to keep it beautiful and functional.
- Wipe spills immediately to prevent stains.
- Avoid placing the table in direct sunlight (prevents fading and warping).
- Wax slides once a year for smooth operation.
- Store the leaf flat, not upright, to avoid warping.
- Reapply finish every few years, especially on high-wear surfaces.
Safety Tips For Diy Table Building
Woodworking is rewarding, but safety comes first.
- Always wear safety glasses when cutting or sanding.
- Use hearing protection around power tools.
- Keep your workspace clean and uncluttered.
- Clamp boards securely before cutting.
- Read tool manuals and follow manufacturer instructions.
If you’re new to power tools, ask for advice at your local hardware store or take a beginner’s workshop.
Real-life Example: Building A Table With A Leaf
Consider Alex, who built a 72-inch by 36-inch oak table with a 20-inch leaf for his family. He used metal slides and spent about $450 on materials. Alex took two weekends, working evenings. He made a few mistakes—drilling one dowel hole slightly off-center—but fixed it with a dowel jig. After finishing, the table fit eight people comfortably, and the leaf matched perfectly. Alex’s main advice: measure twice, cut once, and don’t rush the finish.
Environmental Impact Of Building Your Own Table
Making your own table can be more eco-friendly than buying mass-produced furniture.
- You can choose locally sourced wood or reclaimed lumber.
- Less transportation and packaging waste.
- You decide the finish—choose low-VOC or natural oils.
A well-built table lasts decades, reducing landfill waste.
If you’re interested in sustainable wood sources, the Forest Stewardship Council offers tips on buying certified wood.

Credit: scavengerchic.com
Troubleshooting Common Problems
Even careful builders sometimes face issues.
- Tabletop bows or warps: Often caused by uneven drying. Always finish both sides equally and store flat.
- Leaf doesn’t fit: Sand edges slightly. Check for sawdust in alignment holes.
- Slides stick: Wax or oil the slides, and check for screws that are too tight.
- Finish looks blotchy: Sand more between coats. Use a wood conditioner if staining soft woods.
Frequently Asked Questions
How Do I Make Sure The Leaf Matches The Rest Of The Table?
Use boards from the same batch and glue-up process as the main tabletop. Lay out the grain direction before cutting. Finish the leaf and tabletop at the same time, with the same product.
Can I Add A Leaf To An Existing Table?
It depends on your table’s design. If the table already splits in the middle and has slides, you can add or replace a leaf. Solid, one-piece tables usually cannot be modified without major work.
What’s The Best Wood For Beginners Building A Table?
Red oak is a good choice. It’s strong, easy to work with, and takes stain well. Hard maple is also excellent but a bit harder to cut.
How Do I Store The Table Leaf Safely?
Store the leaf flat, not upright, to prevent warping. Place it in a felt-lined bag or shelf. Avoid damp places like basements.
How Do I Fix A Table Leaf That Doesn’t Line Up Perfectly?
Check for sawdust or debris in alignment holes. Sand the edges of the leaf gently until it fits smoothly. If the difference is large, check your measurements and alignment pins.
A table with a leaf is a valuable, flexible addition to any home. Building your own lets you control the size, look, and quality—while learning skills you can use for many future projects. With careful planning, patience, and the right materials, you’ll create a table that brings people together for years to come.