Removing a kitchen faucet can seem like a tough job, especially if you do not have the right tool. Many guides suggest using a basin wrench, but what if you do not have one? The good news is, you can still get the job done with everyday tools and a careful approach. This guide will show you how to remove a kitchen faucet without a basin wrench, step by step. We will cover the process, the tools you can use, tips for tricky situations, and safety advice. By the end, you will know how to handle this common home repair with confidence—even if you are not a professional plumber.
Understanding The Challenge
Before you start, it helps to know why the basin wrench is often recommended. The faucet nuts are usually tucked up behind the sink, in a tight space that is hard to reach. A basin wrench is made to fit into this area and grip the nuts. Without it, you need to get creative. But many homeowners do not have a basin wrench, and buying one for a one-time job is not always practical.
Kitchen faucets are attached to your sink by one or two nuts. These nuts hold the faucet tightly in place. Over time, they can become rusty or stuck due to water and mineral buildup. This means you need the right plan—and the right tools—to loosen them.
Tools And Materials You Will Need
You do not need expensive tools to remove a kitchen faucet. Here are the main items you will need:
- Adjustable wrench (also called a crescent wrench)
- Socket wrench set (helpful for certain nut sizes)
- Channel lock pliers (large pliers with an adjustable jaw)
- Regular pliers (for gripping and turning small parts)
- Screwdriver (flathead and Phillips, for screws or prying)
- Penetrating oil (like WD-40, for loosening stuck nuts)
- Flashlight or work light (to see under the sink)
- Bucket or towels (to catch any water drips)
- Safety gloves (to protect your hands)
- Safety goggles (if you expect rust or debris)
- Rag (for cleaning up)
These basic tools can be found in most homes or local hardware stores. You may not use every tool listed, but having options makes the job much easier.
Step-by-step Guide: Removing A Kitchen Faucet Without A Basin Wrench
Let’s break down the process into simple steps. Take your time with each step for the best results.
1. Turn Off The Water Supply
Find the shut-off valves under your kitchen sink. Turn each valve clockwise until it stops. This cuts off the water to your faucet. If your sink does not have shut-off valves, you may need to turn off the main water supply for your home.
After turning off the water, open the faucet to let any water left in the lines drain out. Place a bucket or towel under the sink to catch any drips.
2. Clear Out The Area Under The Sink
You will need space to move and work under the sink. Remove any cleaning supplies, trash cans, or other items from the cabinet. Set up your flashlight or work light so you can see what you are doing. Wear gloves if the space is dusty or dirty.
3. Disconnect The Water Supply Lines
The supply lines are small pipes or flexible hoses that connect your faucet to the shut-off valves. Use an adjustable wrench or pliers to loosen the nuts that hold these lines in place. Turn the nuts counterclockwise. If they are stuck, spray a little penetrating oil and wait a few minutes.
Once the nuts are loose, carefully pull the supply lines off the faucet. Some water may drip out, so keep your towel or bucket handy.
4. Locate The Mounting Nuts
Look up behind the sink bowl. You will see one or two mounting nuts holding the faucet to the sink. These nuts may be metal or plastic. They are usually in a hard-to-reach spot.
If there is a lot of rust or buildup, spray the nuts with penetrating oil and let them sit for 10–15 minutes. This will make them easier to remove.
5. Loosen The Mounting Nuts
Now, you need to loosen the nuts without a basin wrench. Here are some methods you can try:
Using An Adjustable Wrench
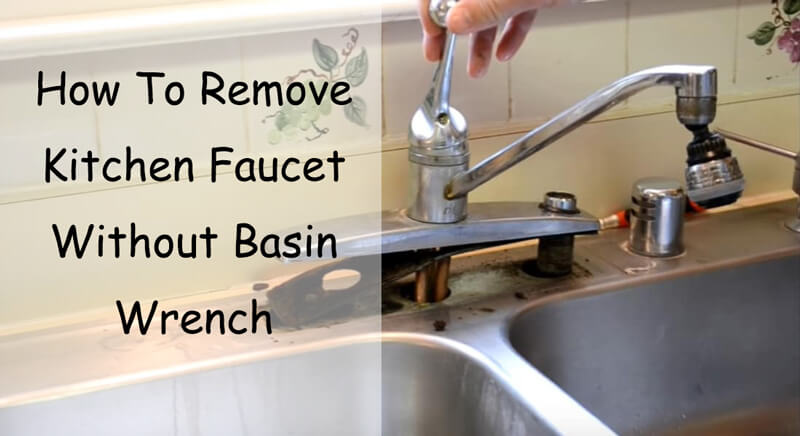
If you have enough space to fit an adjustable wrench onto the nut, adjust the jaws to grip it tightly. Turn counterclockwise to loosen. This works best if the nut is not far up or blocked by the sink.
Using Channel Lock Pliers
If the nut is large or hard to reach, try channel lock pliers. Adjust the jaw to fit and grip the nut. Turn counterclockwise. This tool gives you extra leverage.
Using A Socket Wrench
For nuts with a hexagonal shape, a socket wrench might fit. Choose the right size socket and attach it to the nut. Use the handle to turn. This can be easier if there is more space.
Creating More Leverage
If the nut is stuck or you cannot grip it well, try slipping a short piece of pipe over the handle of your wrench or pliers. This gives you more leverage and makes it easier to turn.
Using A Flathead Screwdriver And Hammer
If the nut is plastic and will not budge, you can use a flathead screwdriver and a hammer. Place the screwdriver tip against the edge of the nut, and gently tap the handle with the hammer to turn the nut counterclockwise. This is a last resort, as it may damage the nut.
Cutting The Nut (if Necessary)
If all else fails and the nut will not come off, you can carefully cut through it using a small hacksaw or rotary tool. Be careful not to damage the sink or faucet if you plan to reuse them.
6. Remove The Faucet
Once the nuts are off, gently lift the faucet up and out of the sink from above. If the faucet does not move, try wiggling it side to side. Some old faucets may be stuck by old putty or mineral deposits.
Use a putty knife to carefully break the seal if needed.
7. Clean Up The Sink Area
After you remove the faucet, check the sink deck. Scrape away any old sealant, putty, or grime. Wipe the area clean with a rag. This makes it ready for a new faucet installation.
Alternative Tools And Their Pros And Cons
When you do not have a basin wrench, several common tools can take its place. Here is a quick comparison:
| Tool | Best For | Pros | Cons |
|---|---|---|---|
| Adjustable Wrench | Accessible nuts | Easy to use, common tool | Hard to fit in tight spaces |
| Channel Lock Pliers | Large or stuck nuts | Strong grip, adjustable | Needs space to operate |
| Socket Wrench | Hex-shaped nuts | Quick turning, good leverage | Cannot fit all nut types |
| Pliers | Small nuts, connectors | Easy for small tasks | Less leverage, can slip |
| Flathead Screwdriver & Hammer | Plastic nuts, emergencies | Works if nut is weak | Can damage parts |
Credit: www.wowowfaucet.com
Real-world Example: Removing A Stuck Kitchen Faucet Nut
Let’s look at an example. Imagine you are trying to remove a kitchen faucet in an older home. The nuts are metal, and there is some rust. You do not have a basin wrench.
- You spray the nuts with penetrating oil and wait 15 minutes.
- You try an adjustable wrench. It fits, but there is little room to turn it.
- Next, you switch to channel lock pliers. With some effort and patience, the nut begins to turn.
- The nut is stuck halfway. You slip a short pipe over the handle of your pliers for more leverage. The nut finally comes loose.
- You lift out the faucet and clean up the area.
This method takes a bit more time and patience, but it saves you the cost of a special tool.
Safety Tips You Should Not Ignore
While removing a kitchen faucet is not the most dangerous task, it does have some risks. Here’s how to stay safe:
- Wear gloves to protect your hands from sharp edges, rust, or old plumbing.
- Use safety goggles if you expect rust flakes or debris to fall.
- Keep tools organized to avoid dropping them on yourself.
- Work slowly in tight spaces to avoid injury.
- Do not force tools if they slip—you could hurt your knuckles or strip the nut.
- Check for leaks after removing the supply lines to avoid water damage.
Common Problems And How To Solve Them
Removing a faucet without a basin wrench can come with a few surprises. Here are some common issues and solutions:
Problem: The Nut Will Not Budge
- Try more penetrating oil and wait longer.
- Use a pipe for leverage on your wrench or pliers.
- Alternate turning the nut back and forth to break it free.
Problem: The Nut Is Stripped
- Use channel lock pliers for a better grip.
- If the nut is plastic, use a screwdriver and hammer to break it loose.
- As a last resort, cut the nut with a hacksaw.
Problem: Rust Or Mineral Buildup
- Soak the nut with penetrating oil.
- Tap the nut gently with a hammer to loosen the rust.
- Clean the area with a wire brush if you can reach.
Problem: Hard To Reach Area
- Use a socket wrench with an extension.
- Try different tool angles.
- If possible, remove other parts (like the sink trap) for more space.
When To Call A Professional
Sometimes, a faucet nut is just too stuck, or the space is too tight. If you have tried every method and nothing works, or you are worried about damaging your plumbing, it is okay to call a licensed plumber. This can save you time, frustration, and extra costs from accidental damage.

Credit: www.youtube.com
How To Prepare For A New Faucet Installation
Once your old faucet is out, you might plan to install a new one. Here are a few steps to get ready:
- Measure the mounting holes in your sink. Make sure your new faucet will fit.
- Check the supply lines. If they are old or damaged, replace them.
- Clean the sink deck so the new faucet seals well.
- Read the new faucet instructions before starting.
Doing these steps now makes the next installation much smoother.
Cost Savings: Doing It Yourself Vs. Hiring A Plumber
Many homeowners wonder if removing a kitchen faucet themselves is worth the effort. Here’s a comparison:
| Option | Estimated Cost | Time Required | Skill Level |
|---|---|---|---|
| DIY (No Basin Wrench) | $0–$20 (tools/parts) | 1–2 hours | Beginner to Intermediate |
| Hire a Plumber | $100–$200 (labor) | 30–60 minutes | Professional |
| Buy Basin Wrench + DIY | $10–$30 (tool) | 45–90 minutes | Beginner |
If you already have the basic tools, doing it yourself can save you a significant amount of money.
Non-obvious Insights For Beginners
Many first-timers miss a few important details. Here are some tips you may not find in every guide:
- Supply lines can twist if you turn them too much when loosening. Hold the line steady with pliers to avoid kinks.
- Old faucets may have hidden clips or washers under layers of grime. Use a flashlight and a small brush to find and remove them.
- Take photos before you remove anything. This makes it easier to reinstall or troubleshoot if you forget where a part goes.
- Label your parts as you remove them—especially if you plan to reuse the faucet or supply lines.
Environmental Considerations
Old kitchen faucets sometimes contain lead or other metals. Dispose of them according to your local recycling guidelines. Some cities have special drop-off centers for metal fixtures. Reusing or recycling your faucet is better for the environment than putting it in the trash.
When A Basin Wrench Is Worth Buying
While this guide shows you how to remove a faucet without a basin wrench, there are times when buying one makes sense:
- You plan to do more plumbing projects in the future.
- You have very little space behind your sink.
- The nuts are deeply recessed or very tight.
A basin wrench is not expensive, but for most one-time jobs, the methods above will work just fine.
Additional Resources
If you want more details about plumbing tools and techniques, you can check out this Basin Wrench Wikipedia page. It explains how the tool works and why it is commonly used.

Credit: www.reddit.com
Frequently Asked Questions
How Do I Loosen A Faucet Nut Without Special Tools?
You can use an adjustable wrench, channel lock pliers, or even a socket wrench if there is enough space. For stuck nuts, try applying penetrating oil and waiting before trying again. Sometimes a flathead screwdriver and hammer can help, but use caution to avoid damage.
What If My Kitchen Faucet Is Still Stuck After Removing The Nuts?
If the faucet will not lift out, it may be stuck to the sink with old putty or mineral deposits. Use a putty knife to carefully cut around the base of the faucet. Gently rock the faucet back and forth until it loosens.
Is It Safe To Cut A Faucet Nut If It Will Not Come Off?
Cutting a nut with a hacksaw or rotary tool is a last resort. Wear safety gear, work slowly, and be careful not to damage the sink or other plumbing. This method is usually safe if you take precautions.
Do I Need To Replace The Supply Lines When I Change My Faucet?
It is a good idea to replace old or worn supply lines to prevent leaks. If your lines are in good shape, you can reuse them, but always check for cracks, rust, or wear before deciding.
Can I Install A New Faucet Without A Basin Wrench?
Yes, you can install a new kitchen faucet using the same tools: adjustable wrench, pliers, and patience. A basin wrench can make the job easier, especially in tight spaces, but it is not required for most installations.
Removing a kitchen faucet without a basin wrench is possible for most people. With the right approach, everyday tools, and a little patience, you can handle this task and save money. If you get stuck, do not hesitate to ask for help or call a professional.
The experience you gain will make future repairs much easier.