As an Amazon Associate I earn from qualifying purchases.
An Insinkerator is a handy kitchen appliance. It helps dispose of food waste quickly.
But what happens when it stops working? Many people rely on their Insinkerator daily. When it breaks, it can be a big hassle. Understanding common issues can help you fix it faster. In this blog post, we’ll explore why your Insinkerator might not be working.
We’ll also look at simple solutions you can try at home. This way, you can get your kitchen back to normal in no time. Let’s dive into the reasons behind a faulty Insinkerator and how to troubleshoot it.
Credit: www.herrmannservices.com
Common Issues
Experiencing issues with your Insinkerator can be frustrating. Understanding common problems can help you quickly find solutions and get your unit back to normal. Below are some frequent issues Insinkerator users face.
No Power
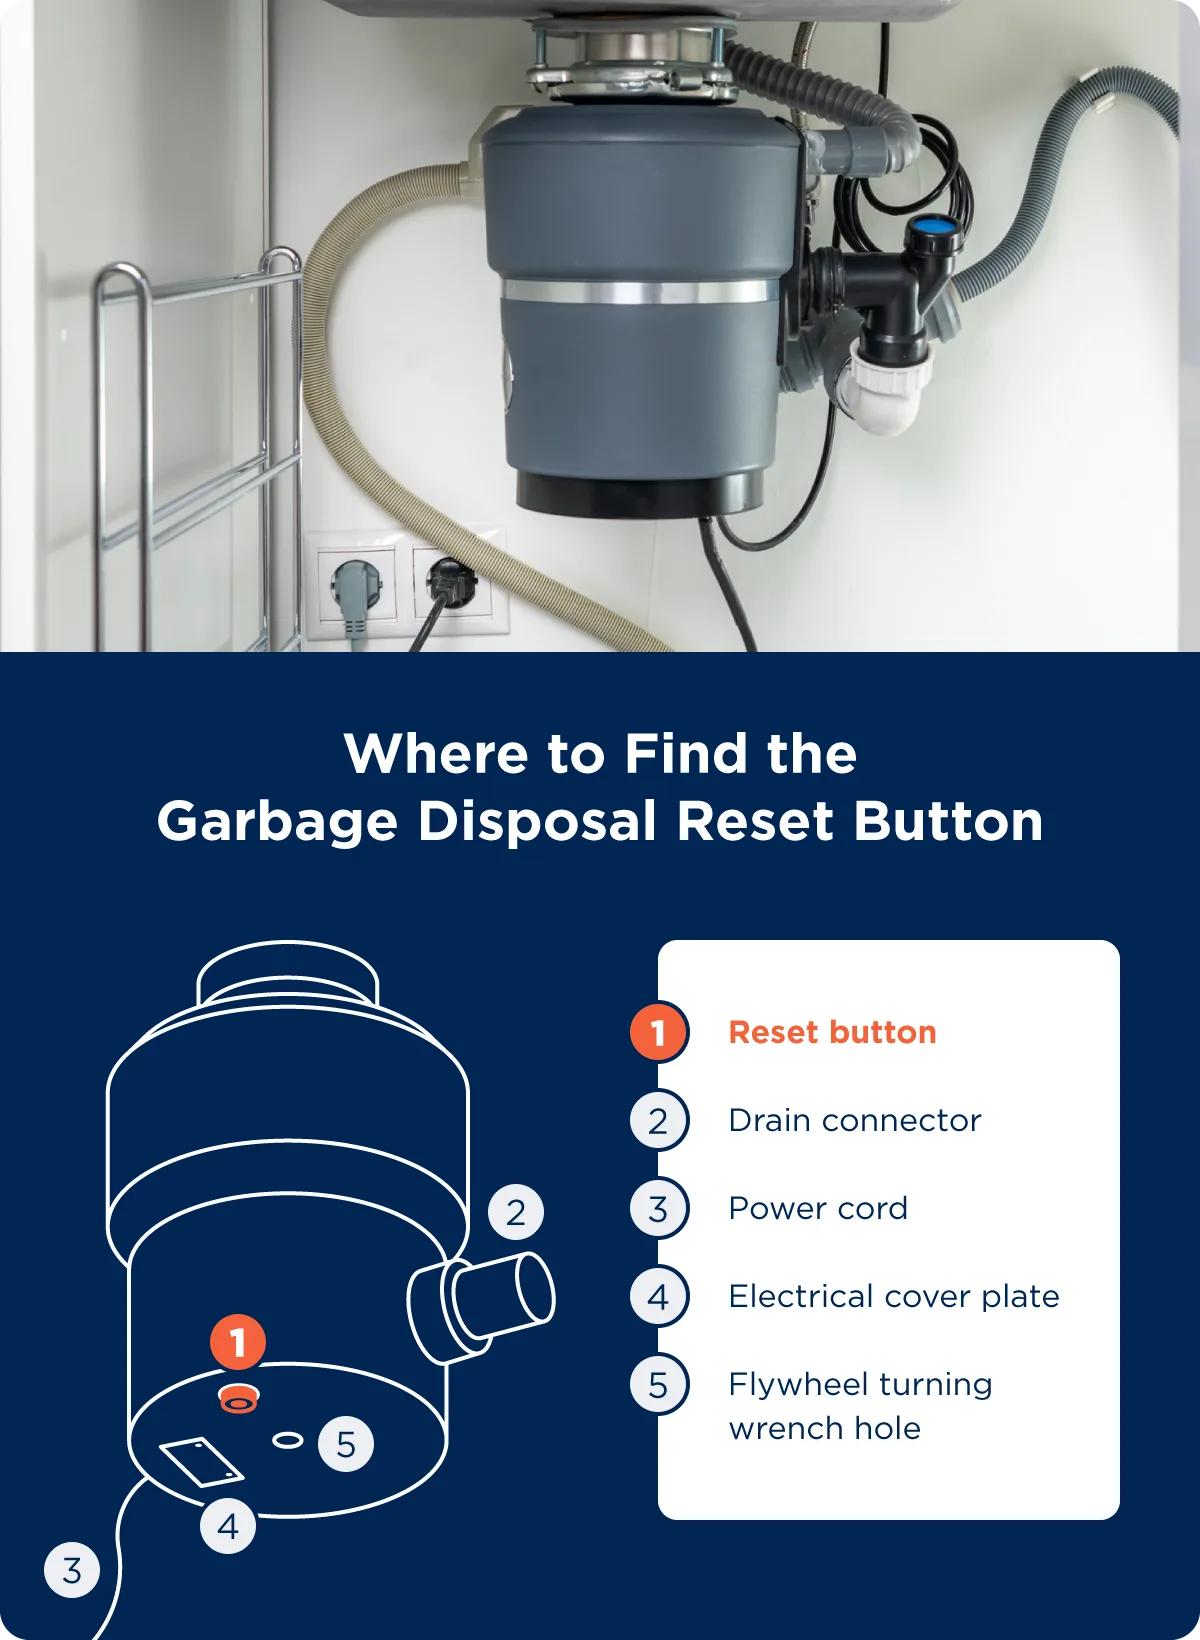
If your Insinkerator is not turning on, it might be a power issue. First, check if the unit is plugged in properly. Ensure the outlet is working by testing it with another device. If the outlet works, inspect the reset button on the bottom of the unit. Press it to reset the system. If the reset button does not fix the issue, check your home’s circuit breaker. It might have tripped, cutting power to the unit.
Jammed Unit
A jammed unit is another common problem. You might notice a humming sound or no sound at all. Turn off the power to the unit before inspecting it. Use a flashlight to look inside the disposal. You might see foreign objects like bones or utensils causing the jam. Use tongs or pliers to remove the obstruction. Never use your hands. After removing the object, turn the power back on and reset the unit. Your Insinkerator should work smoothly now.
Credit: www.mrappliance.com
Troubleshooting Steps
Is your Insinkerator not working? Don’t worry. Follow these troubleshooting steps to get it back in action. These simple steps can save you time and a service call. Let’s dive into the process.
Resetting The Insinkerator
First, locate the red reset button. It is usually at the bottom of your Insinkerator. Press the button firmly. Wait for a click. This indicates the unit has reset. Test the garbage disposal again. If it still doesn’t work, move to the next step.
Checking The Circuit Breaker
Sometimes, the problem lies in the electrical circuit. Go to your main electrical panel. Look for the breaker labeled for the garbage disposal. Switch it off, then on again. This resets the breaker. Return to the Insinkerator and try it once more. If it is still not working, you may need professional help.
Tools Needed
If your Insinkerator isn’t working, don’t worry, you’re not alone. Many people face this issue, but the good news is that it can often be fixed with some basic tools. In this section, we’ll walk you through the essential tools needed to get your Insinkerator up and running again. By the end, you’ll feel confident and ready to tackle the job yourself!
Screwdrivers
First and foremost, you’ll need a set of screwdrivers. These are essential for removing the screws that hold the Insinkerator in place. Typically, a Phillips head screwdriver and a flathead screwdriver will cover most of your needs.
- Phillips Head Screwdriver: This is perfect for the cross-shaped screws you’ll encounter.
- Flathead Screwdriver: This works well for flat-blade screws and can also help you pry things apart gently if needed.
Having both types on hand ensures you’re prepared for any situation. Plus, they’re handy for other household repairs too. I remember once using my Phillips screwdriver to fix a loose drawer handle – talk about multipurpose tools!
Hex Wrench
Another critical tool is the hex wrench, also known as an Allen wrench. The Insinkerator often comes with its own hex wrench, but if you’ve misplaced it, don’t panic. You can find a replacement at any hardware store.
- Hex Wrench: This tool is essential for turning the motor shaft manually and dislodging any jams.
Using the hex wrench is straightforward. Insert it into the hole at the bottom of the Insinkerator and turn it back and forth. This action can help free up any obstructions. Think of it as giving your Insinkerator a little nudge to get back on track.
With these tools in hand, you’re well on your way to fixing your Insinkerator. It might seem daunting at first, but trust me, with a bit of patience and the right tools, you’ll have it working like new in no time. Happy fixing!
Safety Precautions
When your Insinkerator stops working, it’s essential to follow safety precautions. These steps will help you avoid injuries and further damage to the unit. Always prioritize safety before attempting any repairs or maintenance.
Turning Off Power
First, turn off the power to your Insinkerator. Locate the circuit breaker or fuse box. Flip the switch that controls the garbage disposal. Ensure the power is completely off before proceeding.
Using Protective Gear
Wear protective gear to safeguard yourself. Use rubber gloves to protect your hands from sharp objects. Safety glasses are important to shield your eyes from debris. These items are crucial for safe handling.
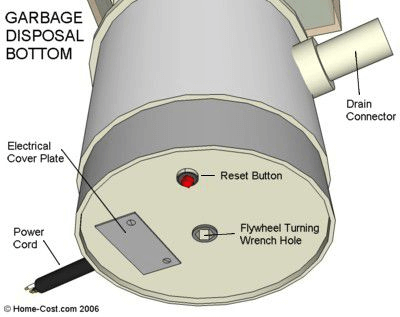
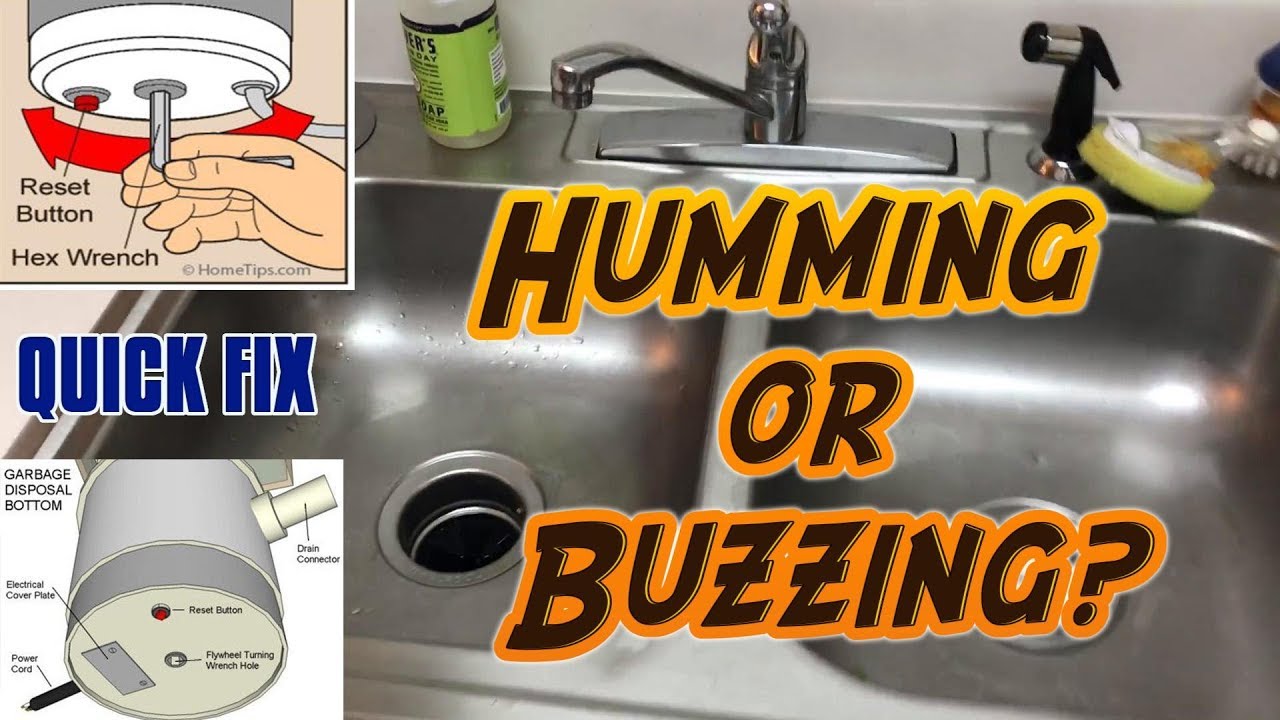
Reset Button Location
If your Insinkerator isn’t working, don’t panic! One common issue can be resolved by simply pressing the reset button. Knowing where to find this button and how to press it correctly can save you a lot of trouble and even a call to the plumber. Let’s break it down step-by-step to get your Insinkerator back in action.
Finding The Reset Button
First things first, you need to locate the reset button. Typically, this button is red and situated at the bottom of the garbage disposal unit. You might need to crouch down and look underneath your sink to find it. Can you see the red button? It’s usually right in the middle, making it easy to spot once you know where to look.
Here’s a quick tip: make sure the disposal is turned off before you start looking. Safety first, always! It’s no fun getting a jolt while trying to troubleshoot.
Properly Pressing The Button
Now that you’ve found the reset button, it’s time to press it. But how hard should you press it? A gentle but firm push is all it takes. Think of it like pressing a doorbell – you want to make sure it activates, but you don’t need to force it.
After pressing the button, wait for a moment. You should hear a small click, which indicates the reset has been successful. If you don’t hear anything, try pressing the button again. Sometimes, it takes a couple of tries to get it just right.
Once you’ve pressed the button, turn the Insinkerator back on and see if it works. Often, this simple reset is enough to solve the problem. If it still doesn’t work, there might be a deeper issue at play. But for now, you’ve tackled the first step like a pro!
Credit: www.youtube.com
Clearing Jams
Clearing jams in your Insinkerator is essential for smooth operation. A jammed disposal can cause frustration and inconvenience. Luckily, you can often fix the issue yourself. Follow these simple steps to clear jams effectively.
Using A Hex Wrench
First, turn off the power to the Insinkerator. Locate the small hole at the bottom center of the unit. Insert a hex wrench into this hole. Rotate the wrench back and forth. This motion helps dislodge any stuck debris. Continue until the wrench moves freely.
Manual Rotation
If the hex wrench method doesn’t work, try manual rotation. Use a wooden spoon or similar tool. Insert it through the sink drain into the disposal. Carefully rotate the blades. This can help remove stuck food. Ensure the power is off for safety.
Checking For Leaks
When your Insinkerator isn’t working as it should, one of the most common issues you might face is leaks. Checking for leaks is crucial as it can prevent further damage and avoid a messy situation in your kitchen. Let’s dive into how you can inspect connections and replace seals to fix those pesky leaks.
Inspecting Connections
First things first, let’s check the connections. Often, leaks are caused by loose or damaged connections. Follow these steps to inspect them:
- Turn off the power to the Insinkerator. Safety first!
- Look under your sink and locate the Insinkerator unit.
- Check the connection between the sink and the disposal unit. Is it tight and secure?
- Look for any visible cracks or damage in the pipes. Sometimes, even a small crack can cause a big leak.
- Use a wrench to tighten any loose connections. Make sure not to overtighten as it can cause damage.
Pro tip: If you notice any rust or corrosion, it might be a sign that a replacement is needed.
Replacing Seals
If inspecting the connections didn’t solve the problem, the next step is to check and replace the seals. Seals can wear out over time, leading to leaks. Here’s how to do it:
- Purchase a replacement seal kit from your local hardware store or online. Make sure it’s compatible with your Insinkerator model.
- Turn off the water supply and ensure the unit is completely dry before proceeding.
- Carefully remove the old seals. You might need a screwdriver to help pry them off.
- Clean the area where the seals were located. Any debris or gunk can prevent a proper seal.
- Install the new seals according to the instructions provided in the kit.
- Reconnect everything and turn the water supply back on. Check for leaks again.
Replacing seals can seem daunting, but it’s often a straightforward process. Plus, it can save you a lot of trouble in the long run.
So, there you have it! By inspecting connections and replacing seals, you can tackle one of the most common Insinkerator issues. Remember, a little maintenance goes a long way in keeping your kitchen running smoothly.
When To Call A Professional
Have you ever tried to fix your Insinkerator yourself, only to find that the problem persists? It can be frustrating, especially when you think you’ve done everything right. Sometimes, it’s best to call a professional to handle the situation. But when exactly should you make that call? Let’s dive into some specific scenarios where professional help is necessary.
Persistent Issues
If your Insinkerator is giving you a headache with ongoing problems, it might be time to consider professional assistance. For example:
- Recurring Jams: If your garbage disposal keeps jamming no matter how many times you clear it, a professional might be needed to diagnose the underlying issue.
- Strange Noises: Unusual grinding or rattling sounds can signal a more serious problem that requires expert attention.
- Leaks: Persistent leaks can be tricky to fix on your own. A professional can identify the source and repair it effectively.
Don’t let these issues drive you crazy! Professionals have the tools and knowledge to fix them quickly and efficiently.
Electrical Problems
Electrical issues can be both dangerous and complicated. Here are some signs that you might need to call in an expert:
- Power Failures: If your Insinkerator frequently loses power or doesn’t turn on, there could be an electrical issue at play.
- Tripped Breakers: Constantly tripping the circuit breaker is a clear sign that something is wrong with the electrical system.
- Burning Smell: If you notice a burning smell, it’s crucial to shut off the power and call a professional immediately.
Messing with electrical components without the right knowledge can be risky. Leave it to the pros to handle these potentially hazardous situations.
In conclusion, while some minor issues with your Insinkerator can be fixed with a bit of DIY spirit, persistent and electrical problems are best left to professionals. This ensures your safety and the longevity of your appliance. So, the next time your Insinkerator acts up, remember, sometimes it’s worth making that call!
Frequently Asked Questions
Why Has My Insinkerator Stopped Working?
Your Insinkerator may have stopped working due to a jam, electrical issue, or motor failure. Check for obstructions, reset the unit, or inspect the power source.
Is There A Reset Button On An Insinkerator?
Yes, an InSinkErator has a reset button. It’s located on the bottom of the unit.
How To Make An Insinkerator Work Again?
Reset the Insinkerator by pressing the red button underneath. Clear any jams using an Allen wrench. Ensure it’s plugged in.
Why Is My Garbage Disposal Humming But Not Working?
Your garbage disposal hums but doesn’t work because it may be jammed or the motor could be failing. Try resetting it.
Why Is My Insinkerator Not Working?
Your Insinkerator might not be working due to a tripped reset button or a jam.
Conclusion
Dealing with a faulty Insinkerator can be frustrating. Check for common issues first. Ensure power supply is stable. Remove any blockages in the unit. Use a reset button if needed. If problems persist, consult a professional. Regular maintenance prevents many issues.
Keep your Insinkerator clean and clog-free. This ensures smooth operation. Following these steps can save time and money. With these tips, enjoy hassle-free waste disposal.
