Refinishing distressed hardwood floors can completely change the look of your home. A worn floor may seem too damaged to save, but with patience and the right steps, you can restore its beauty. Many people think refinishing is only for professionals, but with clear guidance, even a homeowner can achieve stunning results.
This guide will walk you through every part of the process, from inspection to the final coat. You’ll also learn tips that most beginners miss, so you avoid common mistakes and get the best finish possible.
Understanding Distressed Hardwood Floors
Distressed hardwood floors are made to look aged, worn, or weathered. Some are naturally old; others are intentionally marked with dents, scrapes, or color changes. These floors are popular because they add character and warmth. However, over time, heavy use can lead to scratches, fading, and deeper gouges.
Before starting, it’s important to know if your floor is solid hardwood or engineered wood. Solid hardwood can be sanded and refinished many times, but engineered flooring has a thin top layer and may only handle one or two sandings. Use a small tool to check the thickness of the wear layer if unsure. If your floor is too thin or heavily damaged, replacement may be safer.
When Should You Refinish?
Not every scratch means you need a full refinish. Sometimes, a deep cleaning or minor touch-up is enough. Refinishing is best when:
- The floor has deep scratches, gouges, or dark stains.
- The finish is worn off in high-traffic areas.
- The wood is fading or turning gray (a sign of water damage).
- You want to change the color or sheen.
A good test: Sprinkle a few drops of water on the wood. If it soaks in quickly, the finish is gone and refinishing is needed.
Planning And Preparation
Preparation is half the battle. Rushing these early steps can lead to poor results or even permanent damage.
Inspect The Floor
Walk the entire floor and look for:
- Loose boards or squeaks
- Nails sticking up above the surface
- Pet stains or water damage
- Deep dents or cracks
Mark any trouble spots. If you see black stains, these may be from pet urine or water. They can be very difficult to remove and sometimes need special treatment.
Gather Materials And Tools
You’ll need:
- Floor sander (drum or random orbital)
- Edge sander or hand sander
- Sandpaper in several grits (36, 60, 80, 100, 120)
- Wood filler or putty
- Vacuum and tack cloths
- Stain (optional)
- Sealer (if using water-based finish)
- Polyurethane or other finish
- Brushes and applicator pads
- Safety gear (mask, goggles, hearing protection)
Renting a professional sander is often better than buying a cheap one. Good sanders are heavy and remove material evenly.
Protect The Area
Refinishing makes a lot of dust and fumes. Take time to:
- Remove all furniture and rugs.
- Seal doors and vents with plastic sheeting.
- Cover nearby outlets and light fixtures.
- Remove baseboards if possible (for a cleaner edge).
Open windows for ventilation, but avoid strong drafts that can blow dust onto wet finish.
Sanding: The Most Critical Step
Sanding removes the old finish and smooths out scratches, but it also shapes the final look of your floor.
Choosing A Sander
- Drum sanders are powerful and work quickly, but can gouge the floor if used carelessly.
- Orbital sanders are gentler and safer for beginners but may take longer, especially for very rough floors.
For edges and corners, use an edge sander or a hand-held random orbital sander.
Sanding Process
Follow these steps for best results:
- Start with coarse grit (36 or 40) to remove the old finish and level the wood.
- Move to medium grit (60 or 80) to smooth out scratches.
- Finish with fine grit (100 or 120) for a silky surface.
Always sand with the grain to avoid scratches. Overlap each pass by about one-third. Sand the main area, then do edges and corners. Sweep and vacuum thoroughly between each grit change.
A common mistake: Not sanding enough with the first grit. If you don’t remove all the old finish and deep scratches now, they’ll show up later.
Sample Sanding Sequence
| Step | Grit Size | Purpose |
|---|---|---|
| 1 | 36 or 40 | Remove old finish and deep scratches |
| 2 | 60 or 80 | Smooth the surface |
| 3 | 100 or 120 | Finish sanding and prepare for stain/finish |
Dealing With Distressed Features
If your floor is intentionally distressed, decide how much you want to keep. Heavy sanding can remove these marks, making the floor look newer but less rustic. If you want to keep the old look, sand lightly and avoid flattening dents and grooves.
Cleaning And Repairs
After sanding, you must clean every bit of dust. Even small amounts can ruin the finish.
- Vacuum slowly and thoroughly.
- Wipe with a tack cloth or damp microfiber cloth.
- Check for cracks, gaps, or nail holes. Fill these with a matching wood filler. Avoid fillers that shrink or crack as they dry.
For deep gouges or stains that did not sand out, you can:
- Use a darker stain to blend them in.
- Add a few new distress marks for a consistent look.
Let the filler dry fully, then sand lightly with fine grit to smooth any rough spots.
Staining (optional)
Staining changes the color of your floor. It’s optional, but many people choose it to match a new style or hide repairs.
Choosing A Stain
You can use:
- Oil-based stains for deep, rich color and longer working time.
- Water-based stains for faster drying and less odor.
Test your chosen stain on a small, hidden area. Wood species, age, and previous damage all affect how stain looks.
Applying The Stain
- Use a brush or applicator pad.
- Work in small sections.
- Wipe off excess after a few minutes with a clean rag.
- Keep a “wet edge” to avoid lap marks.
Let the stain dry fully (often 24 hours) before applying finish.
Achieving A Consistent Look
Stains can look uneven, especially on distressed wood. To avoid blotches:
- Use a wood conditioner before staining if the wood is soft (like pine).
- Don’t let stain puddle in dents or grooves; wipe these carefully.
Credit: www.youtube.com
Choosing Your Finish
The finish protects your floor and adds shine. There are several types, each with pros and cons.
| Type | Durability | Drying Time | Sheen Options | Notes |
|---|---|---|---|---|
| Oil-based Polyurethane | Very high | 8-12 hours between coats | Gloss, semi-gloss, satin | Strong odor, amber tint |
| Water-based Polyurethane | High | 2-4 hours between coats | Gloss, semi-gloss, satin, matte | Clear finish, low odor |
| Penetrating Oil | Moderate | 12-24 hours | Low sheen | Easy to repair, more natural look |
Pro tip: Water-based finishes dry fast, so work quickly and keep the area dust-free.
Applying The Finish
Most people use polyurethane for its durability and easy care.
Step-by-step Application
- Stir the finish gently. Shaking can cause bubbles.
- Pour a small amount into a paint tray.
- Use a brush or applicator pad to coat the edges first.
- Apply the finish in long, even strokes, following the grain.
- Let each coat dry fully before adding the next (follow the manufacturer’s instructions).
Apply at least two to three coats for best protection. Lightly sand with fine grit (220) between coats to remove dust nibs. Clean all dust before adding the next coat.
Avoiding Common Problems
- Don’t walk on the floor while the finish is drying.
- Watch for drips or thick spots, especially in grooves.
- Make sure the room is warm and not too humid for best drying.
Allowing For Curing Time
The finish may feel dry in a few hours, but it takes longer to fully cure. Avoid heavy furniture, rugs, or water for at least a week. For oil-based finishes, wait 2 weeks before heavy use. Read the product label for exact times.
Fact: According to the National Wood Flooring Association, 90% of finish failures are due to dust, poor prep, or rushing the process.
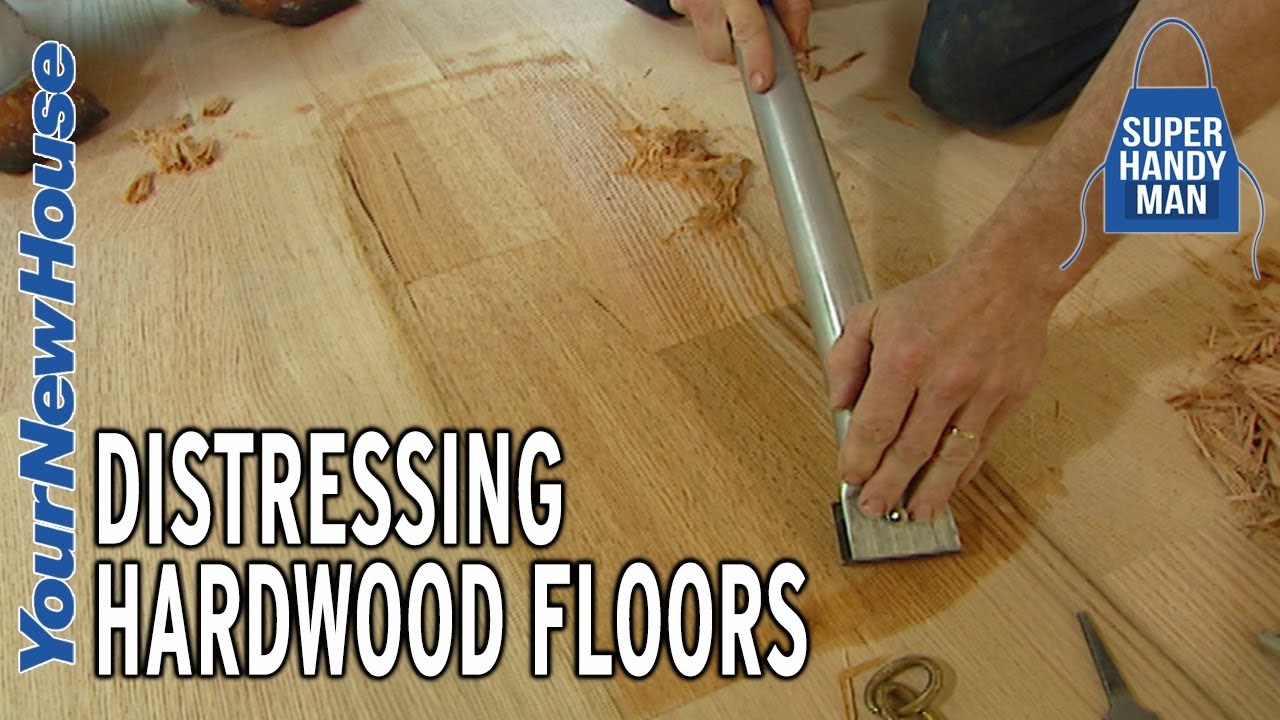
Bringing Back The Distressed Look
If you sanded away too much character, you can add it back:
- Use a hammer, chain, or screwdriver to add gentle dents.
- Rub dark stain into these new marks for a natural look.
- Sand lightly to blend the new distressing with the rest.
Be careful—less is more. It’s easier to add a few marks than to fix too many.

Credit: www.wagnermeters.com
Cleaning Up And Reinstalling
Once the finish is fully cured:
- Reinstall baseboards or trim.
- Move furniture back carefully. Use felt pads under legs to avoid scratches.
- Avoid dragging heavy items across the floor.
Clean the floor with a soft broom or vacuum (no beater bar) and a damp mop. Avoid harsh cleaners, as these can dull the finish.
Maintenance Tips For Long-lasting Beauty
A well-finished floor can last decades with the right care. Here’s how to keep it looking great:
- Sweep or vacuum regularly to remove grit that can scratch.
- Wipe up spills quickly to avoid water damage.
- Use rugs in high-traffic areas.
- Avoid harsh cleaners—stick to products made for hardwood floors.
- Recoat every few years if the finish starts to look dull.
Never use steam mops or wet towels, as excess moisture can damage wood.
Credit: www.nhance.com
Troubleshooting: Common Problems And Fixes
Even with careful work, issues can happen. Here’s what to do:
- Cloudy finish: Often caused by trapped dust or humidity. Sand lightly and add another coat.
- Bubbles: Usually from shaking the can or applying too thick. Sand them flat and recoat.
- Sticky spots: Not enough drying time. Wait longer before use.
- Uneven sheen: May be from uneven sanding or not mixing the finish well. Buff and recoat.
If you notice a problem early, it’s usually easier to fix.
Cost And Time Comparison
Refinishing yourself saves money but takes time and effort. Here’s a simple comparison:
| Option | Average Cost (per sq ft) | Time Needed (300 sq ft) | Pros | Cons |
|---|---|---|---|---|
| DIY | $1 – $3 | 3-5 days | Cost savings, personal satisfaction | Labor intensive, risk of mistakes |
| Professional | $4 – $8 | 2-3 days | Faster, high-quality finish | Higher cost, scheduling needed |
Most DIYers spend $300–$900 for a medium-sized room. Professionals may charge $1,200–$2,400 for the same area.
Non-obvious Insights Most Beginners Miss
- Humidity control matters: Wood moves with changes in moisture. Refinishing during humid or very dry weather can cause problems later, like gaps or buckling.
- Old finishes may contain lead: If your home was built before 1978, test for lead paint. Sanding old, lead-based finishes is dangerous. For safety, use a test kit or hire a pro if you suspect lead.
- Edge sanding is critical: Many people neglect the edges, but these areas catch the eye. Spend extra time getting them smooth and even.
- Lighting reveals flaws: Use a bright light at a low angle to highlight scratches or missed spots before finishing.
Safety Precautions
Refinishing floors creates dust and fumes. Protect yourself by:
- Wearing a high-quality dust mask or respirator.
- Using goggles and hearing protection.
- Keeping the area well-ventilated.
- Storing oil-soaked rags in a sealed metal container (they can catch fire).
For more safety tips, the CDC’s guide to wood dust safety is a reliable resource.
When To Call A Professional
Some jobs are too big or risky for DIY. Call a pro if:
- The floor has deep structural damage.
- There’s a risk of lead paint.
- You want a special finish, like bleaching or wire-brushing.
- You don’t have time for careful prep and cleanup.
A professional can often finish the job faster and with fewer mistakes.
Frequently Asked Questions
How Long Does It Take To Refinish Distressed Hardwood Floors?
Refinishing a room of about 300 square feet usually takes 3–5 days for DIYers. This includes time for prep, sanding, staining, and drying between finish coats. Larger rooms or special stains may need more time.
Can I Refinish Engineered Hardwood Floors?
Some engineered hardwood floors can be sanded and refinished, but only if the top layer is thick enough (at least 2-3 mm). If your floor is thin or has already been refinished before, sanding may expose the core. Always check with the manufacturer.
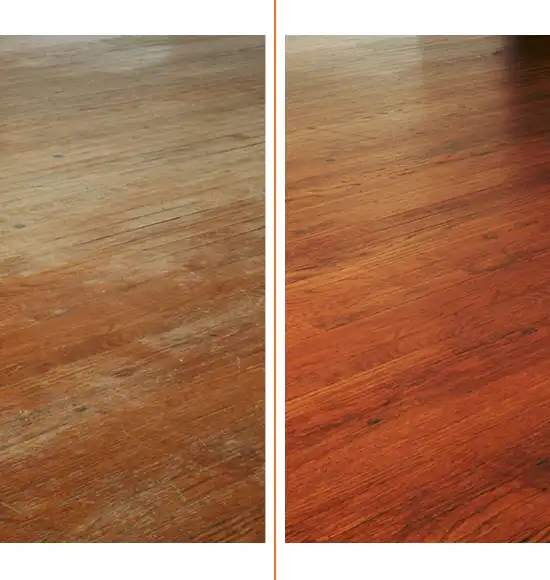
How Do I Keep The Distressed Look After Refinishing?
To keep the distressed look, sand lightly and avoid removing all the marks and grooves. You can also add distressing after sanding. Using a darker stain can help blend any new or old marks.
What’s The Best Finish For High-traffic Areas?
Oil-based polyurethane is often the most durable for high-traffic areas. It stands up to scratches and wear but has a strong smell and takes longer to dry. Water-based polyurethane is also tough, dries quickly, and has less odor.
How Can I Reduce Dust During Sanding?
Use a sander with a vacuum attachment if possible. Seal off the work area with plastic sheeting, and vacuum and wipe the floor with a damp cloth between sanding steps. Always wear a dust mask for safety.
Restoring distressed hardwood floors takes time and care, but the results can transform your space. With these steps and tips, you’ll be ready to take on the challenge confidently and create a floor that’s beautiful and built to last.