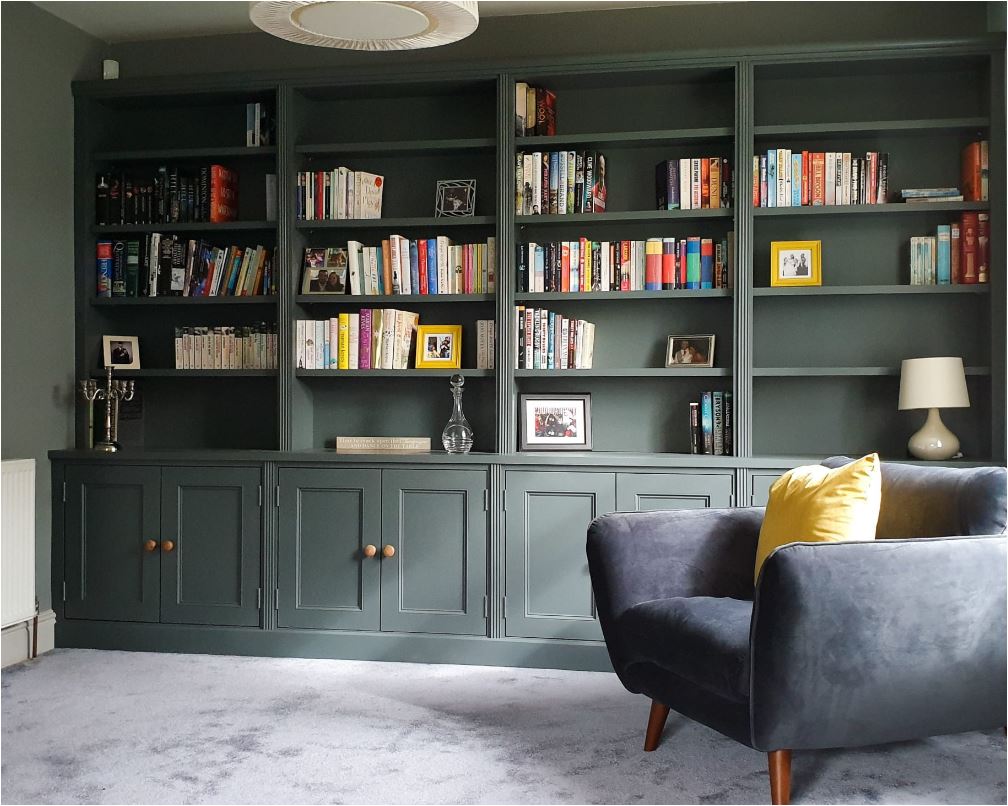
Painting built-in bookshelves can completely change the look of a room. A fresh coat of paint can turn old, tired shelves into a modern feature. But getting a smooth, lasting finish on built-ins is not as simple as painting a wall.
Bookshelves have corners, trim, and sometimes different materials. Mistakes can lead to peeling, brush marks, or uneven color. This guide walks you through every step to paint built-in bookshelves like a pro. You’ll learn how to prepare, choose tools, fix common issues, and get a beautiful result that lasts for years.
Why Painting Built-in Bookshelves Matters
Built-in bookshelves draw the eye. They hold your favorite books, family photos, and treasured objects. But if they look old or the paint is chipped, they can make the whole room feel dated. Fresh paint can:
- Brighten the space and make it feel larger
- Protect the wood from moisture and wear
- Match your style, whether you want classic white or a bold color
Many people try to paint bookshelves quickly, but this leads to peeling, streaks, or sticky paint that never feels dry. Taking your time and following the right steps makes a big difference. Well-painted shelves can even add value to your home.
Assessing Your Built-in Bookshelves
Before you start painting, take a close look at your bookshelves. Every project is a little different, and understanding what you’re working with will help you plan.
Check The Material
Built-ins can be made from:
- Solid wood (oak, pine, maple, etc.)
- Plywood with a wood veneer
- MDF (medium-density fiberboard)
- Laminate (plastic finish over particleboard)
Solid wood and plywood are easiest to paint. MDF also paints well but needs careful priming. Laminate is trickier because paint doesn’t stick as easily. Knowing your shelf material helps you pick the right primer and paint.
Inspect For Damage
Look for:
- Scratches, dents, or gouges
- Water stains or mold
- Loose shelves or trim
- Old paint that is peeling or sticky
Fixing these problems now prevents bigger issues later. For example, painting over mold or peeling paint means the new paint won’t last.
Measure And Plan
Measure your shelves to know how much paint and primer you need. A simple formula is:
- One quart of paint covers about 100 square feet with one coat.
Don’t forget the sides, back, and any trim. Planning ahead saves time and money.
Gathering Materials And Tools
Having the right supplies makes painting smoother and faster. Here’s what you’ll need for most built-in bookshelf projects:
- Drop cloths or old sheets to protect floors
- Painter’s tape for clean edges
- Screwdriver to remove hardware or doors
- Sandpaper (120- and 220-grit) or a sanding block
- Tack cloth or microfiber cloth to remove dust
- Filling compound (like wood filler or spackle) for holes
- Putty knife
- High-quality primer (type depends on shelf material)
- Paint (see next section for types)
- Angled paintbrush (2-2.5 inch) for corners and trim
- Small foam roller for flat surfaces
- Mini paint tray
- Paint can opener and stir sticks
- Protective gear (gloves, mask, old clothes)
Some people also use a small vacuum to remove sanding dust, but a damp cloth works for most jobs.
Choosing The Right Paint And Primer
Not all paints work well for bookshelves. The type of paint affects the look, feel, and how long your shelves last.
Primer Types
Primer helps the paint stick and blocks stains. Choose based on your shelf material:
- Wood: Use a stain-blocking latex or oil-based primer.
- MDF: Water-based primer to prevent swelling.
- Laminate: Special bonding primer designed for glossy surfaces.
Good primer prevents stains from bleeding through and keeps the color even.
Paint Finishes
Paint comes in different sheens:
- Flat/Matte: Hides flaws but scratches easily. Not recommended.
- Eggshell/Satin: Easy to clean, soft sheen. Good for shelves.
- Semi-gloss: Durable, reflects light. Most popular for bookshelves.
- Gloss: Very shiny, hardest finish. Shows brush marks easily.
Semi-gloss or satin is best for most built-ins—they’re easy to wipe clean and look sharp.
Paint Types
- Acrylic latex paint: Dries fast, low odor, easy cleanup. Good for most shelves.
- Alkyd (oil-based) paint: Hard finish, very durable, but strong smell and slow drying.
- Enamel paint: Extra tough, great for high-traffic shelves.
Low-VOC (volatile organic compounds) paints are safer for indoor use, especially if you’ll be painting with windows closed.
Color Choices
Classic white is popular, but don’t be afraid to use color. Deep blue, green, or even black can make your shelves stand out. Consider the room’s light and your decor style.
Preparing The Workspace
Preparation is key for a smooth, stress-free project.
Clear The Shelves
Remove all books, objects, and decor. Take off any doors, hardware, or adjustable shelves. If shelves are fixed, tape off the edges to protect nearby walls.
Protect Floors And Walls
Lay down drop cloths or old sheets. Use painter’s tape around the edges of the bookshelf, baseboards, and any wall areas you don’t want painted.
Ventilation
Open windows if possible. Painting in a closed room can cause strong odors and slow drying. If you must paint with windows closed, use a fan to move air.
Cleaning And Repairs
Never paint over dust, grease, or damage. Taking time here leads to a better finish.
Cleaning
Wipe down the entire bookshelf with a damp cloth. For greasy or sticky spots (often near kitchen shelves), use a gentle degreaser. Let everything dry fully before moving on.
Sanding
Lightly sand all surfaces with 120- or 220-grit sandpaper. This removes shine from old paint and helps the new paint stick. Focus on:
- Flat surfaces
- Edges
- Inside corners
After sanding, wipe with a tack cloth or damp microfiber cloth to remove all dust.
Filling Holes And Cracks
Use wood filler for dents or nail holes. For deep gouges, apply in thin layers and let each dry. Smooth with sandpaper after it dries. Fill any gaps between the shelf and wall with paintable caulk for a seamless look.
Checking For Mold Or Mildew
If you see black spots or musty smell, treat with a mix of water and vinegar. Let dry completely before priming.
Credit: centsationalstyle.com
Priming The Shelves
Priming creates a smooth, even base and helps paint stick. Skipping primer is a common beginner mistake.
How To Apply Primer
- Stir primer well before using.
- Use an angled brush for corners and edges.
- Use a small foam roller for flat surfaces.
- Apply a thin, even coat. Don’t overload the brush or roller.
- Let dry completely (check the can for drying time).
For dark wood or old paint, a second coat of primer may be needed. This blocks stains and gives the best color.
Special Tips
- For laminate, use a bonding primer. Let it cure overnight.
- For MDF, avoid too much water or it will swell. Use a gentle touch with the roller.
Painting Step-by-step
Now you’re ready to paint! Patience and thin coats are key for a beautiful finish.
Cutting In
“Cutting in” means painting corners and edges with a brush. Start with:
- Inside corners
- Along trim
- Where shelves meet the wall
Use a steady hand. A 2-inch angled brush gives the best control.
Rolling The Surfaces
Dip the foam roller lightly in paint. Roll off excess so you don’t get drips. Paint in long, even strokes. Overlap slightly for even coverage.
Let the first coat dry completely. This usually takes 4–6 hours, but check the paint can instructions.
Sanding Between Coats
After the first coat dries, lightly sand with 220-grit sandpaper. This removes tiny bumps and brush marks. Wipe away dust before adding the next coat.
Applying The Second Coat
Repeat the steps above. Two coats are usually enough for even color and durability. For dark colors or big color changes, a third coat may be needed.
Painting Trim And Details
For small trim or carved details, use a small artist’s brush. Don’t rush—paint can pool in grooves if you work too quickly.
Common Mistakes And How To Avoid Them
Painting bookshelves can be tricky. Here are mistakes beginners often make—and how to avoid them.
1. Skipping Prep Work
Painting over dirty or shiny surfaces leads to peeling. Always clean, sand, and prime first.
2. Using Cheap Brushes Or Rollers
Low-quality tools leave streaks or shed bristles. Invest in a good angled brush and foam roller for a smooth finish.
3. Rushing Between Coats
If you paint the second coat before the first is dry, the paint can bubble or stay sticky. Be patient and check drying times.
4. Not Using Enough Light
Painting in dim light means you’ll miss drips, streaks, or thin spots. Use a work light or paint during the day for best results.
5. Ignoring Ventilation
Strong paint fumes are unhealthy and slow drying. Open windows or use a fan.
6. Forgetting To Remove Tape Quickly
If you wait until paint is dry, tape can pull up paint and ruin your edges. Remove tape while the last coat is still a little tacky.
Achieving A Professional Finish
To take your shelves from “good enough” to stunning, use these pro tips:
- Feather edges: Lightly blend the paint at edges with the brush so you don’t see lines where one area dries before another.
- Work in sections: Paint one shelf at a time for even coverage.
- Watch for drips: Check corners and edges for drips and smooth them out before they dry.
- Let paint cure: Shelves may feel dry after a day, but full hardness takes 7–14 days. Avoid heavy books or objects during this time.
Reattaching Hardware And Shelves
When paint is dry to the touch (usually overnight), reattach any doors, knobs, or hardware. Put shelves back in place carefully—don’t slide heavy items until the paint is fully cured.
Cleaning Up
Wash brushes and rollers right after use, before paint dries. Latex paint cleans up with soap and water. Oil-based paint needs mineral spirits. Fold up drop cloths and remove painter’s tape while the paint is still a bit soft for sharp edges.

Credit: sawdustsisters.com
Maintenance Tips For Painted Bookshelves
A well-painted shelf will last for years, but a little care keeps it looking new.
- Dust regularly with a soft cloth.
- Wipe spills right away to avoid stains.
- Avoid heavy objects until paint is fully cured.
- Touch up chips with leftover paint and a small brush.
If you plan to change colors in the future, just clean, sand lightly, and repaint—no need to strip everything unless the paint is peeling.
Real-life Example: Transforming A Living Room
Imagine a set of built-in oak bookshelves from the 1980s—dark, scratched, and dated. The homeowner chose a bright white semi-gloss paint. They spent two days prepping: removing old caulk, cleaning, and sanding. After priming and two coats of paint, the shelves looked brand new. The room felt larger, lighter, and modern. The project cost about $120 in supplies and took one weekend, but added much more value to the home.
Comparing Paint Types For Bookshelves
Here’s a quick comparison of common paint types for bookshelves:
| Paint Type | Durability | Dry Time | Odor | Best For |
|---|---|---|---|---|
| Acrylic Latex | Good | Fast (1-2 hrs) | Low | Most wood or MDF |
| Oil-Based | Excellent | Slow (8-24 hrs) | High | Heavy-use shelves |
| Enamel | Very High | Medium (4-8 hrs) | Medium | Children’s rooms, kitchens |
Tools: Brush Vs. Roller Vs. Spray
Wondering which tool to use? Each has strengths:
| Tool | Best For | Finish Quality | Ease of Use | Cleanup |
|---|---|---|---|---|
| Angled Brush | Edges, corners, trim | Sharp lines | Easy | Simple (soap/water) |
| Foam Roller | Flat shelves, sides | Very smooth | Easy | Simple |
| Sprayer | Large built-ins | Flawless, factory finish | Harder | Complex |
When To Hire A Professional
Some bookshelf projects are simple DIY jobs. But call a pro if:
- Shelves are very damaged or warped
- You want a sprayed, factory-perfect finish
- Shelves are built into expensive or historical woodwork
- You’re working with lead paint (older homes)
Professionals have tools and experience to handle tricky jobs and guarantee results.
Non-obvious Insights For A Lasting Finish
- Prime both sides of adjustable shelves. If you only paint one side, the shelf can warp over time due to moisture changes.
- Let paint cure before heavy use. Paint may feel dry, but it takes days or weeks to reach full hardness. Rushing can dent or scratch the finish.
- Check humidity and temperature. High humidity or cold slows drying and can cause sticky paint.
- Paint shelf undersides. Even if not seen often, painting underneath prevents future warping and gives a more professional look.
- Use a fine-grit sanding sponge for quick touch-ups between coats. It fits corners better than flat paper.
Safety Reminders
- Always wear a mask when sanding old paint—especially in homes built before 1978, which may have lead paint.
- Keep paint and cleaning materials away from children and pets.
- Dispose of old paint or solvents according to local rules.
Additional Resources
For more on paint types and techniques, the This Old House guide offers expert advice and examples.

Credit: www.houzz.com
Frequently Asked Questions
How Long Should I Wait Before Putting Books Back On The Shelves?
Wait at least 7 days after the final coat for the paint to cure fully. Light objects can go back after 48 hours, but heavy books can dent paint if placed too soon.
Can I Paint Laminate Bookshelves?
Yes, but use a bonding primer made for glossy surfaces. Lightly sand the laminate first to help the primer stick. Paint as usual after priming.
What Is The Best Paint Finish For Bookshelves?
Semi-gloss is most popular for its durability and easy cleaning. Satin is also a good choice if you want less shine.
Do I Need To Remove The Shelves To Paint Them?
If shelves are adjustable, remove them for easier painting. For fixed shelves, use painter’s tape on edges and paint carefully with an angled brush and small roller.
How Do I Avoid Brush Marks?
Use a high-quality brush and avoid overloading it with paint. Always brush in the direction of the wood grain. For a super-smooth finish, lightly sand between coats.
Final Thoughts
Painting built-in bookshelves is a project that pays off with a fresh, custom look. The key is careful prep, the right tools, and patience during each step. Don’t skip sanding or priming, and let paint cure before loading up your shelves. With these tips, your built-ins can become the highlight of your room for years to come. If you want a flawless result, don’t hesitate to consult a professional or trusted resource like This Old House. Happy painting!