Installing Bilco doors can transform a dark, unused basement entrance into a safe, dry, and attractive space. For many homeowners, these classic bulkhead doors are the best way to access the basement from outside. But putting in Bilco doors is not a simple DIY project. It takes planning, the right tools, and careful steps to make sure your doors are secure, watertight, and last for years.
Whether you want to replace old, rusty cellar doors or add a new entry to your basement, this guide will walk you through everything you need to know. You’ll learn how to measure, prepare your foundation, assemble and install the doors, and finish the job with professional results.
Along the way, you’ll find out what tools you really need, common mistakes to avoid, and some tips that even experienced DIYers often miss. By the end, you’ll feel confident taking on this project and getting it done right.
Understanding Bilco Doors
Before you start, it’s important to know what Bilco doors are and why they’re special. Bilco is a popular brand, but the term is often used for any sloped, metal basement door. These doors are usually made from galvanized steel or powder-coated steel for long-lasting rust protection. They are designed to keep out rain, snow, and pests while making your basement easily accessible for people and large items.
Bilco doors come in several standard sizes, but you can find custom sizes too. The most common types are:
- Classic Series: The original sloped steel doors.
- Ultra Series: Made from polyethylene for homeowners who want less maintenance.
- Stair Stringer Units: Complete units with built-in stairs for new installations.
Most homes use the Classic Series because of its strength and traditional look. When you install these doors, you’re not just adding an entry—you’re improving the value and safety of your house.
Planning Your Bilco Door Installation
Careful planning is the key to a successful install. Even if you have some DIY experience, take time to prepare before you start buying materials or removing your old doors.
Measuring Your Opening
The first and most important step is to measure the opening where the Bilco doors will go. Here’s how to do it:
- Width: Measure the width of the foundation opening at the widest point.
- Length: Measure the distance from the edge of the house to the end of the opening.
- Height: Measure from the ground to the top of the foundation.
Record all your measurements in inches. Bilco offers detailed size charts on their website. Picking the wrong size is one of the biggest mistakes people make—measure twice!
Choosing The Right Door
With your measurements ready, compare them to the size options. If your opening is not a standard size, you may need a custom Bilco door or to adjust your foundation. It’s also smart to think about:
- Material: Steel is stronger, but polyethylene is rustproof.
- Color: Some models come pre-painted.
- Security: Look for options with better locks if safety is a concern.
Getting Permits
Many cities require a building permit for exterior door installation. Call your local building office to check the rules. Skipping this can lead to fines and headaches later.
Gathering Tools And Materials
You’ll need several tools and materials for a proper installation:
- Tape measure
- Level (at least 4 feet long)
- Hammer drill or rotary hammer
- Masonry bits
- Socket set and wrenches
- Screwdrivers
- Chalk line
- Utility knife
- Shims
- Construction adhesive (masonry-safe)
- Caulking gun and exterior-grade caulk
- Galvanized lag bolts or anchor bolts
- Safety gear (gloves, goggles, ear protection)
- Bilco door kit (with hardware)
- Concrete mix (if patching is needed)
- Treated lumber (for framing adjustments, if needed)
If you are replacing an old door, you might also need a reciprocating saw, pry bar, and rust remover.
Credit: windowwellsupply.com
Removing Old Bilco Doors
If you are replacing old doors, safe removal is essential. Old steel doors can be very heavy—use a helper.
- Clear the Area: Remove any debris, plants, or old hardware.
- Unfasten the Doors: Using a socket wrench, unscrew all bolts attaching the doors to the foundation and each other.
- Remove the Doors: With someone helping, carefully lift the doors off the hinges.
- Take Off the Frame: Pry the frame away from the concrete. You may need to cut through old caulk or rusted bolts.
- Inspect the Foundation: Check for cracks, crumbling concrete, or water damage.
This step is often messier than people expect. Sometimes, you’ll find rot or insects hiding under old doors. Fix any foundation problems now, before you put in new doors.
Preparing The Foundation
A strong, level foundation is critical. If the concrete is crumbling or uneven, your new doors won’t seal well. Here’s what to do:
Cleaning And Repairing
- Sweep away dirt, old caulk, and debris.
- Scrape off any loose paint or rust from the opening.
- Patch cracks or holes with hydraulic cement or a suitable concrete patch.
- For uneven surfaces, use a concrete grinder or chisel to smooth them out.
Let all repairs cure fully (usually at least 24 hours) before moving to the next step.
Leveling The Surface
Use a 4-foot level to check if the mounting surface is flat side to side and front to back. Shim or grind as needed. If the opening is badly out of level, you may need to pour a thin leveling layer of concrete.
Pro tip: If you’re not sure, set the Bilco frame (without doors) in place and test with the level. Make adjustments until the frame sits perfectly flush.
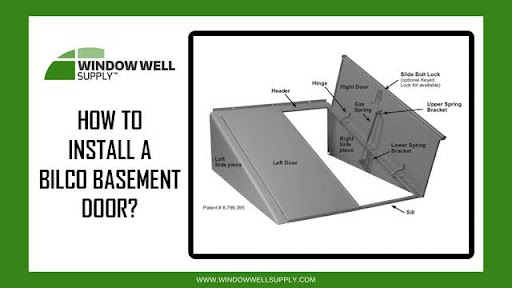
Assembling The Bilco Door Kit
Most Bilco doors come as a kit with panels, a frame, and hardware. Read the instructions that come with your kit—there are small differences depending on the model. Here are the general steps:
- Lay Out All Parts: Open the box and arrange everything near your work area.
- Assemble the Frame: Use the included bolts and brackets to connect the side and header pieces. Do not fully tighten bolts until you test-fit the assembly.
- Attach Hinges: Bolt the hinges to the frame, following the door’s instructions.
- Install Weatherstripping: Some doors include foam or rubber weatherstripping. Install this before mounting the doors.
Many beginners skip carefully sorting parts, which causes frustration later. Take a few minutes to make sure you have everything.
Installing The Bilco Door Frame
With the foundation ready and the frame assembled, you’re ready to install.
Positioning The Frame
- Carefully set the frame on the foundation.
- Use your level to make sure it sits flat in all directions.
- Adjust with shims if needed. Do not force the frame into place—this can cause leaks later.
Securing The Frame
Bilco doors are usually anchored with lag bolts or masonry anchors. Check your kit for the right size and type.
- Mark Drilling Points: Use a pencil or chalk to mark where the holes line up with your foundation.
- Drill Pilot Holes: Use a hammer drill with a masonry bit to drill anchor holes (usually 3/8” diameter, 3” deep).
- Apply Construction Adhesive: Run a bead of masonry-safe adhesive under the frame for extra sealing.
- Bolt Down the Frame: Insert the anchors or lag bolts and tighten them evenly. Do not overtighten—this can crack the concrete.
Check for squareness and level one more time before moving on.
Sealing The Joint
For a watertight seal, caulk the joint between the frame and foundation. Use a high-quality exterior caulk (polyurethane or silicone). Smooth the bead with your finger or a caulk tool.
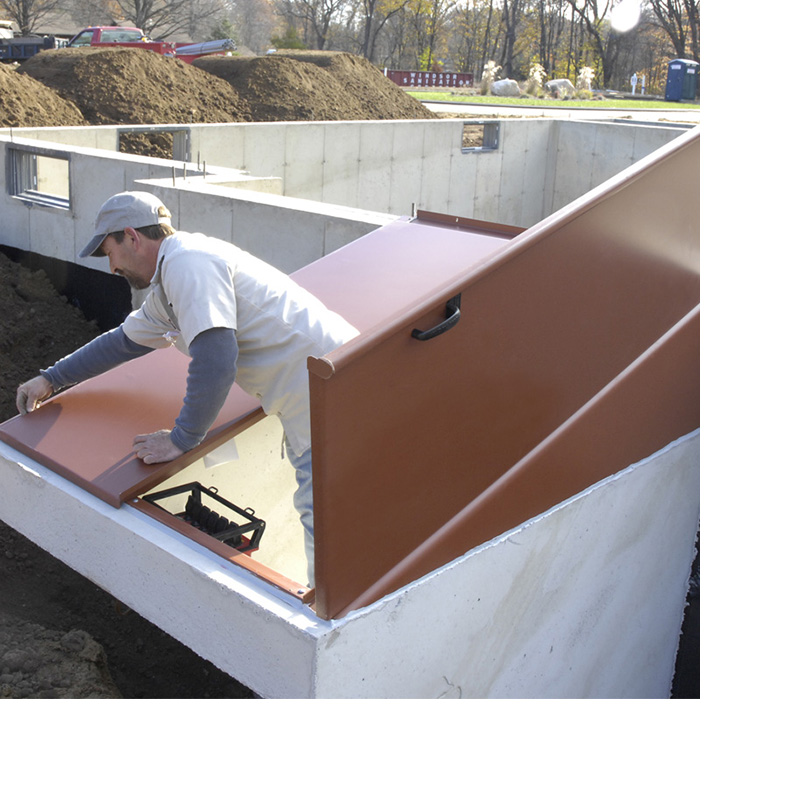
Hanging The Bilco Doors
Now it’s time to hang the doors on the frame. This part is heavy and awkward—always have a helper.
- Lift Each Door Panel: Place the door on the hinges. The Classic Series uses pin-style hinges that slide into place.
- Secure Hinge Pins: Insert and lock the pins according to the directions.
- Test the Doors: Swing each door open and closed. They should move smoothly and not rub or catch.
- Adjust if Needed: If the doors don’t close evenly, adjust the hinges or shims until you get a perfect fit.
Non-obvious insight: Many people forget to check the gap between the doors. Leave a small, even gap (about 1/8”) to allow for weather changes.
Installing Hardware And Finishing Touches
Your Bilco doors come with latches, locks, and sometimes gas springs or prop rods. Here’s how to finish the job:
Latches And Locks
- Install the latch handles and lock hardware using the included bolts.
- If your doors have inside-release handles (for safety), make sure they’re working.
- Test the lock with the doors closed.
Gas Springs Or Props
Some Bilco models use gas springs to make opening easier. Attach these to the brackets as shown in your instructions. They should open and hold the door safely without slamming.
Painting And Rustproofing
If your doors are not factory-painted, apply a coat of outdoor metal primer and two coats of exterior paint. Focus on all edges and screw holes.
Extra tip: Even powder-coated doors benefit from an annual touch-up with rustproof paint, especially in snowy or salty climates.
Weatherproofing
Check all seams, especially where the doors meet the frame and the foundation. Add more caulk if you see gaps. Install the included weatherstripping for extra protection.
Backfilling And Landscaping
If you had to dig around the foundation to install the doors, fill in the soil and slope it away from the house. This helps water drain away, protecting your new doors and the basement.
- Tamp the soil gently as you fill to avoid future settling.
- Add gravel at the base for better drainage if your area gets a lot of rain.
- Consider adding a small concrete or stone pad in front of the doors for a clean look.
Safety And Code Considerations
Installing Bilco doors isn’t just about looks—it’s about safety. Here are some important points:
- Egress Requirements: If this is your only basement exit, your doors may need to meet egress codes. Usually, that means a clear opening of at least 32” wide by 48” high.
- Inside Release: All new Bilco doors must have a way to open from inside in case of emergency.
- Security: Upgrade to a keyed lock if you use your basement for storage or as a living space.
Check your city’s building codes or ask your inspector if you’re unsure.
Credit: www.bilco.com
Common Mistakes To Avoid
Even skilled DIYers make mistakes installing Bilco doors. Here are some you can avoid:
- Skipping Foundation Repairs: Small cracks can turn into leaks. Always patch and level before installing.
- Not Checking for Square: If the frame is twisted, the doors will never close right.
- Forgetting to Seal: Water always finds the smallest gap. Take your time with caulking and weatherproofing.
- Overtightening Bolts: This can bend the frame or crack the concrete.
- Ignoring Permits: Always check local rules. It’s easier than dealing with fines.
Non-obvious insight: If you live in a high-water area, consider adding a drain or sump pump inside the basement entry before installing the doors.
Maintenance Tips For Long Life
Once installed, Bilco doors need only simple care:
- Inspect yearly for rust and repaint as needed.
- Lubricate hinges and locks with silicone spray.
- Clear leaves and debris from around the doors each season.
- Check caulking and weatherstripping in spring and fall.
Regular maintenance keeps your investment in top shape and prevents costly repairs.
Cost Considerations
Installing Bilco doors yourself can save money, but there are real costs to consider. Here is a rough breakdown:
| Item | DIY Cost (USD) | Pro Install Cost (USD) |
|---|---|---|
| Bilco Door Kit | $800-$1,200 | $800-$1,200 |
| Tools and Materials | $150-$300 | Included |
| Labor | $0 | $900-$1,500 |
| Permits | $50-$150 | $50-$150 |
| Total | $1,000-$1,650 | $1,750-$2,850 |
If you have basic tools and DIY skills, installing yourself can save $800 or more. But if you need major concrete work, hiring a pro may be worth the cost.
Comparing Bilco Door Materials
Bilco doors are made from different materials. Here’s how they compare:
| Material | Pros | Cons | Best For |
|---|---|---|---|
| Galvanized Steel | Strong, secure, classic look | Can rust if scratched | Most homes |
| Powder-Coated Steel | Extra rust protection, many colors | More expensive | Coastal or wet areas |
| Polyethylene | No rust, lightweight, low maintenance | Less secure, less traditional look | Easy-care needs |
Most homeowners pick steel for strength, but polyethylene is growing in popularity for those who want zero maintenance.

Credit: windowwellsupply.com
Example Installation Timeline
Wondering how long installation will take? Here’s a realistic timeline for a DIYer:
| Step | Time (Hours) |
|---|---|
| Measuring and Planning | 2 |
| Removing Old Doors | 2-3 |
| Foundation Repair/Prep | 3-6 (plus curing time) |
| Assembling Frame and Doors | 1.5 |
| Installing Frame | 1 |
| Hanging Doors | 1 |
| Finishing/Sealing | 1 |
| Backfilling/Landscaping | 1-2 |
| Total | 12-17 (over several days) |
Allow extra time if you need to fix major foundation problems or wait for paint or concrete to dry.
When To Call A Professional
Not all Bilco door installations are DIY-friendly. Here’s when it’s smart to call a pro:
- The foundation is badly damaged or not level.
- The opening is non-standard and needs custom framing.
- The location is hard to access or very heavy doors are involved.
- You are not comfortable using power tools or working with concrete.
A professional installer will have the right tools and experience to get perfect results. You can find certified installers on the Bilco website or ask for referrals at your local building supply store.
Frequently Asked Questions
How Long Does It Take To Install Bilco Doors?
Most DIYers can install Bilco doors in two or three days, allowing for foundation repairs and paint drying. The actual labor is about 12–17 hours, but the project can stretch over a weekend or more if you need to patch concrete or wait for weather.
Can I Install Bilco Doors Over An Old Foundation?
Yes, as long as the foundation is solid, level, and not crumbling. If the concrete has major cracks or is out of square, fix these problems before installing new doors. Skipping this step can lead to leaks and doors that don’t close well.
Do I Need To Pour A New Concrete Foundation For Bilco Doors?
Not usually. Most homes can use the existing foundation with minor repairs. However, for a brand-new basement entry or if the old foundation is beyond repair, you will need to pour a new concrete pad. This adds time and cost but is necessary for a strong, leak-free installation.
Are Bilco Doors Waterproof?
Bilco doors are designed to be watertight when installed correctly. The key is careful sealing, patching cracks, and making sure the doors sit flat on the foundation. For homes in very wet areas, adding a drain or sump pump inside is smart.
Where Can I Find Detailed Bilco Door Size Charts Or Instructions?
You can find complete size charts, installation guides, and videos at the official Bilco site: Bilco. Always double-check the latest instructions for your specific door model.
Installing Bilco doors is a rewarding DIY project that adds value, safety, and beauty to your home. With the right planning, tools, and a careful approach, you’ll enjoy a dry, secure basement entrance for many years. If you’re ever unsure, get help—investing in your home’s safety is always worth it.