
A sagging floor in your crawl space can feel like a silent warning from your home. You might see uneven floors, notice doors that do not close, or even hear strange creaks. Many homeowners ignore these signs, hoping things will get better. In reality, a sagging crawl space floor is a problem that will only grow worse. Left untreated, it can damage your walls, plumbing, and even lower your home’s value.
Understanding why your floor is sagging, how to inspect the damage, and how to fix it is not as complicated as it sounds. With some guidance, you can regain the safety and comfort of your home—without feeling overwhelmed or lost in technical details.
This guide will show you every important step, from diagnosis to permanent repair. Whether you want to do it yourself, or just want to understand what contractors are doing, you’ll find the answers here.
What Causes A Sagging Floor In Crawl Space?
Before you fix the problem, you need to know what caused it. Your crawl space is the area below your home that supports the floor joists and beams. When something goes wrong here, the entire floor above can start to sag.
Main causes include:
- Moisture damage: Crawl spaces are often damp. Water can enter from the ground, plumbing leaks, or poor drainage. Over time, moisture will rot wooden joists and beams, making them weak.
- Poor support piers: Many crawl spaces have concrete or brick piers that hold up the beams. If these shift, sink, or crumble, your floor will lose its support and sag.
- Termite or pest damage: Wood-loving insects like termites can eat away at the structure, making it unsafe and unstable.
- Improper design or construction: Sometimes, homes are built with beams or joists that are too small for the load. This makes them bend or sag over time.
- Soil movement: The soil under your home can shrink, swell, or erode, especially if there are drainage issues. This causes the piers or foundation to move.
Non-obvious insight: Many homeowners forget that even small plumbing leaks in the crawl space can cause major damage over years. Regular checks for leaks, especially after heavy rain or cold weather, can prevent costly repairs.
Signs You Have A Sagging Crawl Space Floor
Not every squeak or bounce means your floor is failing. Here are clear signs that point to a sagging floor problem:
- Uneven or sloping floors: Use a level or even a marble. If it rolls, your floor isn’t flat.
- Bouncy or soft spots: Walking across the floor feels springy or spongy.
- Cracks in walls or ceilings: Structural movement below can show up as cracks above.
- Doors and windows stick: Shifting floors can twist frames, making doors and windows hard to open or close.
- Visible gaps between floor and baseboard: The floor drops away from the wall.
- Sinking support piers: In the crawl space, piers may look tilted or lower than others.
- Musty smells or visible mold: Chronic moisture in the crawl space often means wood rot.
Tip: Inspect the crawl space at least once a year. Bring a flashlight and look for any changes, such as new cracks or shifting beams.
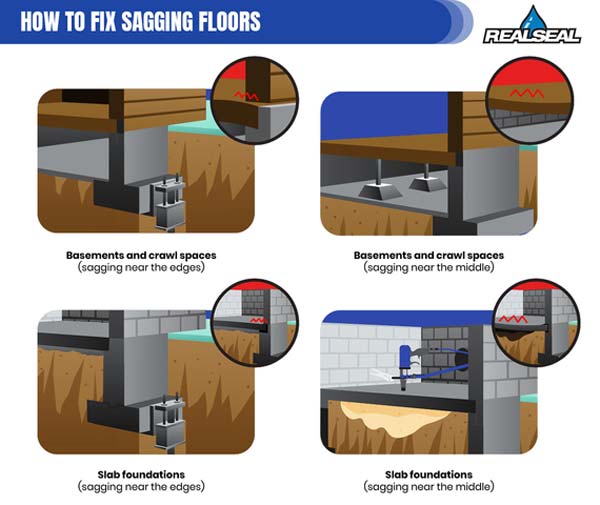
Credit: www.therealsealllc.com
Step-by-step Inspection Guide
Before you attempt to fix anything, you need a full picture of the damage. Here’s how to inspect your crawl space safely and thoroughly:
1. Prepare For Inspection
- Wear old clothes, gloves, and a dust mask.
- Bring a flashlight or headlamp.
- Take a notepad or phone for photos and notes.
2. Check For Moisture And Mold
Look for:
- Pooled water or damp soil
- Mold on wood or insulation
- Rust on metal parts
3. Examine Floor Joists And Beams
- Check for sagging, cracks, or rot.
- Press a screwdriver into wood: If it feels soft, it’s probably rotten.
- Look for gaps between beams and piers.
4. Inspect Support Piers
- Are they straight and solid?
- Are any sinking, crumbling, or shifting?
- Is there space between the pier and the beam above?
5. Scan For Pest Damage
- Small holes, sawdust, or tunnels in wood
- Presence of insects or droppings
6. Look For Foundation Cracks
- Check piers and the perimeter wall.
- Note any new or growing cracks.
Common mistake: Homeowners often check only the floor above, not the crawl space itself. Most problems are easier to spot from below.
Tools And Materials Needed
If you’re planning to fix a sagging crawl space floor, gather your tools and materials first. The right supplies make the job safer and faster.
Basic Tools
- Tape measure
- Level (4 feet or longer is best)
- Hammer and nails
- Screwdriver set
- Cordless drill
- Flashlight/headlamp
- Work gloves and safety goggles
For Structural Repair
- Hydraulic jack (for lifting beams)
- Steel support posts or concrete blocks
- Treated lumber (for sistering joists or replacing beams)
- Joist hangers and bolts
- Construction adhesive
For Moisture Control
- Heavy-duty plastic sheeting (6-20 mil vapor barrier)
- Dehumidifier (for long-term moisture control)
- Sump pump (if water collects under your home)
- Pipe insulation (if plumbing is exposed)
Pro tip: Use treated lumber for any wood that touches the ground or is exposed to moisture. Regular wood will rot quickly.
How To Fix Sagging Floor In Crawl Space: Step-by-step
Different problems need different solutions. Here’s a comprehensive guide covering all the main fixes.
1. Control Moisture Before Structural Repairs
No repair will last if your crawl space is still wet. Fix moisture first.
Steps:
- Install a vapor barrier: Lay thick plastic sheeting over the soil, overlapping seams by at least 12 inches. Run it up the walls and secure with tape.
- Improve drainage: Make sure gutters direct water away from the home. If needed, add a French drain or sump pump.
- Seal vents and openings: Use foam or caulk to block gaps, but allow for some ventilation if local codes require.
- Add a dehumidifier: This keeps the crawl space dry year-round.
Non-obvious insight: Many repairs fail because people skip moisture control. Even if the wood looks dry now, humidity can return every season.
2. Replace Or Sister Damaged Joists
If your joists are rotten, cracked, or sagging, you can either replace them or strengthen them by “sistering” (adding a new board alongside the old one).
Steps:
- Assess damage: Mark joists that are soft, cracked, or show pest damage.
- Cut and remove bad sections: Use a reciprocating saw.
- Install new joists or boards: Place new, treated lumber alongside the old joist, matching length and thickness.
- Secure with bolts and construction adhesive: Fasten every 16-24 inches.
- Check for level: Use a long level to make sure everything is flat before fully securing.
Tip: Sistering is usually enough unless the joist is completely rotten.
3. Add Or Replace Support Piers
Support piers keep your beams and joists from sagging. If they’re sinking or missing, new piers are needed.
Steps:
- Plan pier placement: Measure current spacing. Most homes need a pier every 6-8 feet.
- Dig a new footing: At least 12 inches deep and 18 inches square.
- Pour concrete footing: Let it cure for 24-48 hours.
- Install pier: Use a precast concrete block or adjustable steel jack post.
- Position under beam: Make sure the top of the pier is tight against the beam.
- Adjust for level: Use a hydraulic jack to gently lift the beam, then insert the new pier.
Common mistake: Lifting beams too quickly can crack walls or tiles above. Move slowly—no more than 1/8 inch per day.
4. Install Crawl Space Jacks (adjustable Posts)
If you need to add support or lift a sagging area, adjustable crawl space jacks are a popular solution. These are steel posts that can be raised over time.
Steps:
- Place footing: Use a solid concrete pad under each jack.
- Install jack: Position beneath beam or joist.
- Turn jack to lift: Raise slowly, checking the floor above for movement.
- Lock in place: Once level, secure the jack. Check every few months for settling.
Practical insight: Jacks allow for gradual lifting, which is safer for the house structure.
5. Repair Termite Or Pest Damage
If pests have attacked your wood, replacing or sistering is the only option. But you must solve the pest issue first.
Steps:
- Hire a pest control expert: Get rid of termites or other pests.
- Remove damaged wood: Even if the wood looks okay, it may be hollow inside.
- Replace with treated lumber: Use only wood rated for ground contact.
Extra tip: Even after repairs, schedule yearly pest inspections.
6. Reinforce Subfloor If Needed
Sometimes, the subfloor above the joists is also damaged, especially from moisture or pests.
Steps:
- Inspect subfloor from below: Look for soft spots or visible rot.
- Cut out damaged area: Use a saw to remove bad wood.
- Install new plywood: Match the thickness of the old subfloor.
- Screw into joists: Every 6-8 inches for a solid connection.
7. Address Foundation Or Soil Problems
If the piers keep sinking, you might have a soil or foundation issue.
Solutions:
- Soil stabilization: Inject grout or use piers that extend down to stable soil.
- French drains: Move water away from crawl space.
- Professional evaluation: For major issues, call a structural engineer.
Non-obvious insight: Many crawl space problems return because the soil under the home was never fixed. Watch for new cracks or settling after heavy rain.
Comparison: Repair Methods For Sagging Crawl Space Floors
Choosing the right method can be confusing. Here’s a comparison of main solutions:
| Method | Best For | Cost (Typical) | DIY-Friendly? | Longevity |
|---|---|---|---|---|
| Sistering Joists | Minor rot, cracks | $300-$1,500 | Yes (with tools) | 10-20 years |
| Replace Joists | Severe rot or pests | $500-$2,500 | Challenging | 20+ years |
| Add Support Piers/Jacks | Sagging, weak beams | $800-$3,000 | Yes | 25+ years |
| Soil Stabilization | Ongoing sinking | $3,000-$10,000 | No | Permanent |
Insight: DIY repairs can save money, but never ignore safety. Some jobs, like lifting main beams or fixing foundation issues, are best left to professionals.
Real-life Example: Fixing A 1950s Home With A Sagging Floor
Consider a real case from North Carolina. A homeowner noticed sloping floors and sticking doors. Inspection showed:
- Rotten joists (from moisture)
- Sinking brick piers
- Mold growth
Repair steps taken:
- Installed a vapor barrier and dehumidifier to control moisture.
- Sistered five joists with treated lumber.
- Removed two brick piers and replaced with adjustable steel jacks.
- Lifted the floor slowly over two weeks.
- Monitored for three months—no further settling.
Result: Floors were level, doors worked, and the crawl space stayed dry. Total cost: $4,200 (including materials and labor). The homeowner saved $2,000 by doing some prep work.
How To Prevent Future Sagging
Fixing your floor is just the beginning. Protect your investment by taking these prevention steps:
- Keep crawl space dry: Check gutters, use a vapor barrier, run a dehumidifier if needed.
- Inspect yearly: Look for new cracks, soft spots, or water leaks.
- Control pests: Treat for termites and rodents regularly.
- Don’t overload floors: Heavy furniture or appliances can stress weak joists.
- Fix small problems early: A soft spot today is a big repair tomorrow.
Pro insight: Many homes have minor crawl space issues for years before anything happens. Early prevention is much cheaper than waiting for major sagging.
Cost Breakdown: Diy Vs Professional Repair
Wondering how much you’ll spend? Here’s a quick breakdown:
| Repair Type | DIY Cost | Pro Cost | Time Needed |
|---|---|---|---|
| Vapor Barrier Installation | $200-$600 | $1,000-$2,500 | 4-8 hours |
| Sistering Joists | $300-$1,500 | $1,500-$4,000 | 6-24 hours |
| Install Support Jacks | $800-$2,000 | $2,500-$5,000 | 1-3 days |
| Major Foundation Repair | Not advised | $5,000-$20,000 | 1-2 weeks |
Insight: DIY projects save money but require tools, time, and physical work. Large repairs may need permits and must meet local building codes.
When To Call A Professional
Some crawl space problems are too complex or risky for DIY. Call a contractor if:
- The main beam is cracked or broken
- Piers are sinking fast or unevenly
- You see large foundation cracks
- The crawl space is very tight or dangerous
- You’re not comfortable lifting heavy beams
Expert tip: Get at least two bids. Ask for references and proof of insurance. Good contractors will explain their plan and answer all your questions.

Credit: oldhousecrazy.com
Safety Tips For Crawl Space Work
Crawl spaces can be dirty, tight, and sometimes dangerous. Always:
- Wear a dust mask and gloves
- Watch for nails, sharp objects, or asbestos insulation
- Test for mold or air quality if you see heavy mold
- Never work alone—have someone check on you
- Use a strong flashlight and bring a phone
Hidden risk: Some older homes have electrical wiring in the crawl space. Watch for exposed wires and turn off power if needed.
Useful Resources
If you want to dig deeper, check out the International Association of Certified Home Inspectors for more crawl space repair and safety advice: InterNACHI.

Credit: www.healthybasementsystems.com
Frequently Asked Questions
What Is The Best Way To Level A Sagging Floor In A Crawl Space?
The best way is to combine moisture control, repair or sister any damaged joists, and install adjustable support jacks or piers. This gives your floor solid, long-term support. Always lift the floor slowly to avoid damaging the structure above.
How Much Does It Cost To Fix A Sagging Crawl Space Floor?
Costs can range from $300 for a simple DIY sistering job to $20,000 or more for major professional foundation repairs. Most common repairs (vapor barrier, joist sistering, and jacks) cost $2,000–$7,000 if done by a contractor.
Can I Fix A Sagging Crawl Space Floor Myself?
Many repairs, like adding a vapor barrier or sistering a joist, are DIY-friendly with basic tools. Lifting main beams or repairing foundations should be left to professionals. Always follow safety rules and local building codes.
How Long Do Crawl Space Repairs Last?
If done right, most repairs (sistering, new piers, vapor barriers) will last 10–25 years. Permanent solutions like steel jacks or foundation piers can last the life of the home.
Will Fixing My Crawl Space Floor Increase Home Value?
Yes. A level, solid floor improves your home’s value and makes it easier to sell. Buyers are often scared by sagging floors, so fixing them is a smart investment.
Your crawl space may be out of sight, but it should never be out of mind. By understanding the causes, inspecting carefully, and taking the right steps, you can fix a sagging floor and keep your home safe for years to come.
Don’t wait for the problem to get worse—act early, and your home will thank you.