A bathroom should be a safe and comfortable space, but if the floor has the wrong slope, it can lead to many problems. Water might not flow into the drain as it should. Instead, it can pool in corners, cause slippery surfaces, grow mold, and even damage your home. Many people do not realize how important the bathroom floor slope is until they see water staying in one spot after a shower. Fixing this issue is not always easy, but understanding the steps and details can make a big difference.
In this guide, you’ll learn how to check your bathroom floor, what causes a bad slope, and how to correct it. We’ll look at both small fixes and complete solutions, so you can choose what fits your problem and budget.
Even if you are new to home repairs, this article will help you understand what to do, the tools you need, and some hidden challenges you might face.
Why Slope Matters In A Bathroom Floor
Many people think the floor just needs to be flat, but in a bathroom, it’s different. The floor must have a slight slope towards the drain. This small angle, usually around 1/4 inch per foot, helps water flow away quickly. Without the right slope, water can stay on the surface. This leads to:
- Slippery floors: Even a small puddle is dangerous.
- Mold and mildew: Water stuck in corners creates a perfect place for mold.
- Damage over time: Water can seep into cracks or under tiles, causing the floor to weaken.
- Unpleasant smells: Standing water can smell bad and affect the whole bathroom.
It’s important to fix a bad slope as soon as you notice it. The longer you wait, the more damage can happen.
Signs Your Bathroom Floor Slope Needs Correction
Not all problems are easy to see. Sometimes, issues start small and grow over time. Here are common signs that your bathroom floor slope needs fixing:
- Puddles remain after a shower: Water doesn’t move to the drain.
- Stains or dark spots: Signs of water sitting in one area.
- Tiles lifting or grout cracking: Water getting under tiles can cause this.
- Musty smell: Mold can grow where water stays.
- Visible slope away from the drain: The floor tilts the wrong way.
If you see these signs, it’s time to check the slope and plan for repairs.
What Causes A Bad Bathroom Floor Slope?
Understanding the cause helps you choose the right fix. Some common reasons include:
- Poor installation: The floor was not built with the correct angle.
- Shifting foundation: Over time, homes settle and floors can change shape.
- Water damage: Leaks can weaken the subfloor, making it sag.
- Renovations: Sometimes, repairs or changes to plumbing affect the slope.
Each cause may need a different solution. For example, fixing a new home’s mistake is different from repairing a floor damaged by years of leaks.
Tools And Materials You Will Need
Before starting, gather the right tools and materials. This will save time and avoid mistakes.
Basic Tools
- Level (4-foot spirit level or laser level) – to check the slope
- Measuring tape
- Buckets (for mixing materials)
- Trowel (for spreading mortar or leveling compound)
- Rubber float (for grout, if re-tiling)
- Sponge (for cleaning tiles or grout)
- Hammer and chisel (for removing tiles if needed)
- Screwdriver
- Safety gear (gloves, goggles, mask)
Materials
- Self-leveling compound or floor screed – for minor corrections
- Tile adhesive (if re-tiling)
- Grout
- New tiles (if replacing old ones)
- Waterproof membrane (for wet areas)
- Primer (helps new material stick to old surface)
- Sealant (for edges and joints)
Not every job needs all these items. Minor fixes may only need the compound and a trowel, while a full re-tiling needs more.
How To Check The Slope Of Your Bathroom Floor
Before you fix anything, you need to know the current slope. Here’s how to check:
- Clean the floor: Remove all water, dirt, and objects.
- Place the level: Put your level on the floor, pointing from the wall towards the drain.
- Check the bubble: If the bubble stays in the center, the floor is flat. If it moves away from the drain, the slope is wrong.
- Measure the difference: For a standard bathroom, the floor should drop about 1/4 inch for every foot towards the drain.
- Mark problem areas: Use chalk or tape to show where water does not flow.
If you don’t have a level, you can pour a small amount of water and watch where it goes. If it stays put, you have a slope problem.
Planning Your Slope Correction
Fixing a bathroom floor slope is not just about pouring new material. You need a plan.
Decide The Level Of Repair
- Minor fixes: For small dips or bumps, a self-leveling compound may be enough.
- Major slope correction: If the whole floor is wrong, you may need to remove tiles and redo the base.
Check For Hidden Problems
Before starting, look for signs of water damage, loose tiles, or weak subfloor. If you find these, be ready for extra repairs.
Estimate Time And Cost
- Minor fix: 1-2 days, $100-$300
- Major re-tiling: 3-5 days, $500-$2000
Prices depend on your location and tile choice. If you hire a professional, costs will be higher.
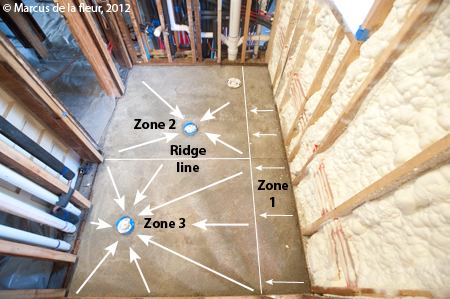
Credit: blog.delafleur.com
Step-by-step Guide: Correcting Bathroom Floor Slope
Now, let’s go through the main ways to fix the floor, from simple to more complex.
1. Using Self-leveling Compound For Small Areas
If you have small dips or uneven spots, this is the easiest fix.
Steps:
- Clean the area: Remove dust, old adhesive, and loose material.
- Prime the floor: Use a primer to help the compound stick.
- Mix compound: Follow the package instructions.
- Pour and spread: Pour the compound into the low spot. Use a trowel to spread it evenly.
- Check with level: As you work, keep checking the slope.
- Let it dry: Most compounds need 4-24 hours to set.
- Test the slope: After drying, check again with the level.
Pro tip: Self-leveling compound is great for small areas, but not for creating a full slope. It finds its own level, so you’ll need to guide it with a trowel.
2. Re-tiling And Creating New Slope
For large areas or when the whole floor is wrong, you need to remove tiles and build a new base.
Steps:
- Remove old tiles: Use a hammer and chisel. Wear gloves and goggles.
- Check the subfloor: Make sure it’s strong and dry. Replace any soft or damaged wood.
- Apply waterproof membrane: Especially for showers or wet rooms.
- Mix floor screed or mortar: Use enough to cover the area and build the needed slope.
- Spread mortar: Start at the drain, making the floor higher as you move away.
- Use screed guides: Small strips of wood or metal can help you keep the right angle.
- Check slope: Use your level often. Aim for a 1/4 inch drop per foot.
- Let it cure: Mortar needs at least 24-48 hours.
- Install new tiles: Use tile adhesive, starting at the drain and working out.
- Grout and seal: Fill the gaps and seal edges.
Hidden challenge: Getting the right slope is not easy. Take your time and double-check each section before the mortar dries.
3. Fixing Slope In A Shower Pan
Showers need a perfect slope, or water will not drain. Sometimes the shower pan itself is the problem.
Steps:
- Remove the old pan: Cut out the silicone or grout, then lift the pan.
- Inspect the base: Check for rot, mold, or weak spots.
- Install a new pre-sloped pan: These are made with the right angle built in.
- Seal the edges: Use waterproof sealant to stop leaks.
- Re-tile if needed: Some pans come ready for tile, others are already finished.
Pro tip: Always test for leaks before using the shower. Pour water and watch how it flows.
4. Building A New Mortar Bed
Some bathrooms, especially older ones, have a mortar bed under the tile. If the slope is wrong, you may need to rebuild it.
Steps:
- Remove tiles and old mortar: This is dusty work, so wear a mask.
- Set up screed guides: Place them at the right height for the slope.
- Mix new mortar: Follow the package for the correct mix.
- Spread and shape: Use a trowel to create a smooth slope.
- Check slope often: Use your level every few feet.
- Let it dry: Mortar needs up to 48 hours.
- Install new tiles and grout.
Expert tip: Building a mortar bed takes skill. If you’re unsure, it’s better to get help or watch several tutorial videos before starting.
5. Using Floor Leveling Systems
Some modern systems use adjustable supports under the tiles. This is common in raised floors.
Steps:
- Remove old tiles and check subfloor.
- Install adjustable pedestals: Place them at regular intervals.
- Set each pedestal height: Adjust until you get the perfect slope.
- Lay tiles on top: Some systems don’t use mortar.
- Seal joints and edges.
Note: This method is more expensive and not common in small bathrooms, but it’s very precise.
6. Professional Help Vs Diy
Some slope problems are easy to fix. Others need expert work, especially if plumbing or waterproofing is involved. Consider:
- Skill level: Are you comfortable with tile and mortar?
- Tools: Do you have the needed equipment?
- Budget: Can you afford a contractor?
- Warranty: Professional work often comes with a guarantee.
If the floor is badly damaged, or you have leaks and mold, it’s safer to hire a pro.
Comparison: Diy Vs Professional Slope Correction
Here’s a look at the differences:
| Factor | DIY | Professional |
|---|---|---|
| Cost | $100 – $700 | $500 – $3000+ |
| Time | 2-7 days | 1-3 days |
| Skill Needed | Medium to High | Low |
| Tools Required | Many | Few (they bring their own) |
| Quality Guarantee | No | Yes |
Key insight: DIY saves money but risks mistakes. Professionals cost more but work faster and offer guarantees.

Credit: austin-tile-pro.com
Common Mistakes When Correcting Bathroom Floor Slope
Even experienced DIYers make errors. Avoid these:
- Not checking the whole floor: Fixing just one spot can make water pool somewhere else.
- Using too much self-leveling compound: It can create a flat floor, not a sloped one.
- Ignoring waterproofing: Skipping the membrane can lead to leaks.
- Not checking for leaks: Always test before finishing the tiles.
- Bad mixing: Mortar or compound that’s too wet or dry will crack.
Practical tip: Take your time with each step, and check your work as you go.
How To Choose The Right Method
Your situation decides the best fix. Here’s a quick guide:
| Problem | Best Solution | Skill Level |
|---|---|---|
| Small dips | Self-leveling compound | Beginner |
| Whole floor sloped wrong | Re-tiling with new mortar bed | Intermediate/Advanced |
| Shower pan issue | Replace pan | Intermediate |
| Mold or rot | Full floor rebuild | Advanced/Professional |
Non-obvious insight: Sometimes, fixing the slope also solves other hidden problems like weak subfloors or old waterproofing.

Credit: www.reddit.com
How To Prevent Slope Problems In The Future
Once you fix the slope, you want the floor to stay safe and dry. Here’s how:
- Check for leaks: Inspect your bathroom regularly for signs of water under tiles or around drains.
- Seal grout and edges: Every year, add fresh sealant to keep water out.
- Clean drains: Hair and soap can block drains, causing water to back up.
- Ventilate: Use a fan or open a window to keep humidity low.
- Don’t overload the floor: Heavy storage can cause the floor to sag over time.
Pro tip: Take a few minutes after each shower to squeegee water towards the drain. This keeps the floor dry and shows you if slope problems return.
The Role Of Waterproofing
Slope is only part of the solution. Bathrooms are wet places, and waterproofing is just as important. A good membrane under the tiles keeps water from getting into the subfloor, walls, or below the bathroom. This prevents mold and expensive damage.
How To Add Waterproofing
- Liquid membrane: Paint on before tiling.
- Sheet membrane: Roll out and stick down, especially in showers.
- Seal all joints: Use waterproof tape or extra membrane at corners and edges.
Expert advice: Even the best slope cannot fix a bathroom without good waterproofing. Always combine both for best results.
Real-life Example: Fixing A Sloped Bathroom Floor
Let’s look at a common situation.
Problem: A homeowner found water pooling near the wall in their shower. The floor looked fine, but water didn’t reach the drain. After checking, they found the floor was almost flat.
Solution: They removed the old tiles and mortar, installed a waterproof membrane, and created a new mortar bed with a 1/4 inch slope per foot. After re-tiling, water flowed perfectly to the drain.
Result: No more puddles, no more mold, and the bathroom smelled fresh again.
Non-obvious insight: The homeowner also fixed old grout cracks, which stopped leaks into the room below.
How To Work Safely
Bathroom repairs use sharp tools, heavy materials, and sometimes chemicals. Safety is key.
- Wear gloves and goggles: Protect your hands and eyes from tile chips and dust.
- Use a mask: Especially when removing old mortar or tiles.
- Ventilate: Open windows when using adhesives or sealants.
- Lift with your legs: Tiles and buckets are heavy—protect your back.
- Turn off water: Before working near plumbing.
Serious advice: If you find mold or rot, wear a good mask and call a professional if it’s a large area.
Slope And Accessibility
Good slope is not only about water flow. It also matters for people with disabilities or older adults. Too much slope makes walking or rolling a wheelchair hard. The best practice is to keep the slope gentle—just enough for water to drain, but not so steep that it’s hard to stand or walk.
According to the Americans with Disabilities Act (ADA), shower floors should slope between 1/8 and 1/4 inch per foot. Always check local codes if you are remodeling for accessibility.
Environmental Impact: Water Damage And Resource Use
A bathroom with poor slope can waste water and energy. Mold growth means more cleaning and chemicals. Water leaks can damage wood, leading to repairs and wasted materials.
Sustainable tip: Fixing the slope early saves money and resources. Choose eco-friendly tiles and waterproofing when possible.
When To Call A Professional
Some problems are too big for DIY. Call a pro if:
- Water damage is deep (into the subfloor or walls)
- Mold covers a large area
- Plumbing needs major changes
- The floor feels soft or bounces
- You are not sure how to fix the slope
A good contractor can diagnose and repair problems quickly. They also know local building codes.
Where To Learn More
If you want more details on floor slope standards and building methods, the National Tile Contractors Association is a trusted source for best practices.
Frequently Asked Questions
What Is The Ideal Slope For A Bathroom Floor?
The ideal slope is 1/4 inch per foot towards the drain. This is enough to move water without making the floor feel steep.
Can I Use Self-leveling Compound To Create A Slope?
No, self-leveling compound is designed to make a surface flat, not sloped. For slope, you need to shape the compound with a trowel or use a mortar bed.
How Do I Know If My Bathroom Floor Slope Is Correct?
Place a level on the floor towards the drain. If it drops by about 1/4 inch for every foot, the slope is correct. Water should flow easily and not pool.
Do I Need To Remove Tiles To Fix The Slope?
For small dips, you can sometimes fix the surface. For major slope problems, you need to remove tiles and rebuild the base. This ensures the fix is long-lasting.
What Happens If I Ignore A Bad Bathroom Floor Slope?
Ignoring the problem leads to water pooling, mold, slippery floors, and damage to your home. It’s better to fix it early to avoid bigger repairs.
—
A well-sloped bathroom floor keeps your space safe, clean, and easy to use. Whether you tackle the fix yourself or hire a pro, understanding the steps and details helps you avoid mistakes and get the best results. With the right slope and good waterproofing, your bathroom will be worry-free for years to come.