Building a loft bed ladder is more than just a handy DIY project—it’s about adding safety, convenience, and style to your space. Whether you’re designing a cozy bedroom for your child, maximizing a small apartment, or simply upgrading your current setup, a well-built ladder makes all the difference.
But, making a ladder that is safe, comfortable, and beautiful isn’t as simple as screwing a few boards together. To get it right, you need smart planning, reliable materials, and careful assembly.
In this guide, you’ll learn everything you need to know about building a loft bed ladder, even if you’re new to woodworking. We’ll cover choosing materials, measuring and designing, step-by-step construction, finishing touches, safety upgrades, and more. You’ll find clear instructions, pro tips, and practical tables for comparing your options.
By the end, you’ll feel ready to build a ladder that’s sturdy, safe, and fits perfectly with your loft bed.
Why Build Your Own Loft Bed Ladder?
A loft bed often transforms a room, giving you extra space underneath for a desk, sofa, or storage. But not all loft beds come with a ladder, and many store-bought ladders don’t fit your needs or style. Building your own ladder lets you:
- Customize height and angle for a perfect fit
- Choose materials that match your room
- Control safety features to protect children or adults
- Save money compared to buying a custom ladder
Most importantly, you get the satisfaction of creating something useful with your own hands.
Key Decisions Before You Start
Before you pick up a saw or drill, it’s vital to plan your project. Rushing or guessing often leads to mistakes or unsafe ladders. Take time to answer these questions:
1. Who Will Use The Ladder?
If the ladder is for kids, safety is your top concern. Thicker, wider steps and handrails are often best. For adults, you might prefer a steeper angle or a slimmer design to save space.
2. What Is The Bed Height?
Measure from the floor to the top of the mattress, not just the bed frame. Most loft beds are between 60–72 inches high, but always check your own.
3. What Space Is Available?
Is the room small? A vertical ladder takes less space, but an angled ladder is easier to climb. Think about where the ladder will sit—side, end, or corner.
4. What Materials Suit Your Needs?
Wood is classic and easy to work with, but metal or even strong plastic can work in some cases. Consider the look, price, and your tools.
5. What Is Your Skill Level?
If you’re new to woodworking, choose a simple design with basic joints. More advanced builders might add curves, handrails, or built-in storage.
Tip: Draw a simple sketch and write down your answers. This will help guide your decisions throughout the project.
Tools And Materials You’ll Need
Building a loft bed ladder doesn’t require a full workshop, but you’ll need a few basic tools and supplies. Here’s a breakdown of what most DIY builders use:
Essential Tools
- Measuring tape (at least 8 feet)
- Pencil and square for marking
- Saw (circular saw, miter saw, or hand saw)
- Drill and bits for pilot holes and screws
- Screwdriver or drill driver
- Sanding block or electric sander
- Clamps (helpful for holding boards steady)
- Level to check for straightness
Materials
- Lumber (see table below for options)
- Wood screws (2.5–3 inches long)
- Wood glue for extra strength
- Wood filler for covering holes
- Finish (paint, stain, or polyurethane)
- Optional: Non-slip tape, handrail, felt pads for the bottom
Comparing Common Ladder Woods
Here’s how popular woods compare for loft bed ladders:
| Wood Type | Strength | Price | Workability | Best For |
|---|---|---|---|---|
| Pine | Medium | Low | Easy | Kids, painting |
| Oak | High | High | Moderate | Adults, natural finish |
| Maple | High | Medium | Moderate | Modern look |
| Poplar | Medium | Medium | Easy | Budget projects |
Insight: While pine is popular for cost and easy cutting, it dents more easily than oak or maple. If the ladder will see a lot of use by adults, harder woods are worth the investment.
Design Choices: Types Of Loft Bed Ladders
Not all ladders are the same. Your room layout, user needs, and style will influence your choice.
Vertical Vs. Angled Ladders
- Vertical ladders save space but are harder to climb, especially for small children or nighttime use.
- Angled ladders are easier and safer to climb. They need more floor space but work well for kids and adults.
Fixed Vs. Removable Ladders
- Fixed ladders attach permanently to the bed for maximum stability.
- Removable ladders can be moved or stored, which is useful for small rooms or cleaning.
Ladder With Or Without Handrails
- Handrails offer extra safety, especially for children or older users.
- No handrails look simpler and save space.
Step Vs. Rung Style
- Steps (like small shelves) are more comfortable, especially with bare feet.
- Rungs (round or square bars) are faster to build but can hurt feet over time.
Non-obvious insight: If you plan to climb while carrying items (like laundry), steps and an angled ladder make it much safer.
Measuring And Planning Your Ladder
Getting your measurements right is the foundation of a safe, comfortable ladder. Here’s how to do it step-by-step.
1. Measure The Bed Height
Use your tape to measure from the floor to the top of the mattress. Write this number down.
2. Choose Your Ladder Angle
A comfortable ladder angle is usually 60–70 degrees from the floor. Steeper than that, and climbing becomes tricky. Shallower, and the ladder takes up too much room.
Quick calculation: For a 70-inch bed height, an angled ladder at 70 degrees will stick out about 24 inches from the bed.
3. Determine Ladder Length
Use the Pythagorean theorem if you want to be precise. For most builds:
- Ladder length = bed height / cosine of the angle (in radians)
Or, use an online calculator for quick results.
4. Decide Step Spacing
Typical step spacing is 10–12 inches apart, measured vertically. For safety, avoid steps more than 12 inches apart.
5. Sketch Your Ladder
Draw your side rails, steps, and note where the ladder will attach to the bed. Mark any handrails or special features.
Pro tip: Double-check all measurements before buying materials. Small errors here lead to big problems later.
Cutting And Preparing Your Lumber
With a solid plan, it’s time to turn boards into ladder parts.
1. Cut Side Rails
Side rails are the long pieces the steps attach to. Cut two pieces to your calculated ladder length. For most ladders, 1.5″x3.5″ (2×4) boards are strong and easy to work with.
2. Cut Steps Or Rungs
Steps are usually 1″x3″ or 1″x4″ boards, or sturdy dowels for rungs. Cut each step to the width you want—typically 16–18 inches is comfortable for adults.
3. Sand All Edges
Smooth all cut edges with sandpaper. This prevents splinters and gives a finished look.
4. Mark Step Locations
Lay the side rails flat, side by side. Use your square and pencil to mark each step position—make sure both rails match exactly.
Non-obvious insight: Slightly rounding the front edge of each step improves comfort and reduces stubbed toes.
Assembling The Ladder
Building the ladder is where your project takes shape. Work slowly and double-check your alignment.
1. Pre-drill Holes
Drill pilot holes for screws at each step location. This prevents wood from splitting and keeps screws straight.
2. Attach Steps To Side Rails
Apply wood glue to the ends of each step before screwing them in. Drive two screws through the side rail into each end of the step. Repeat for all steps.
3. Check For Square
After attaching the first and last steps, use your square to check that everything is even. Adjust before adding the remaining steps.
4. Add Handrails (optional)
If your design includes handrails, attach them now. Use sturdy brackets or screw them directly to the side rails for strength.
5. Fill Holes And Sand Again
Use wood filler to cover screw holes. Once dry, sand the entire ladder again for a smooth finish.
Ladder Attachment Methods
How you secure the ladder to the bed affects both safety and convenience.
Comparison: Ladder Attachment Options
Here’s a look at popular ways to attach your ladder:
| Attachment Type | Stability | Ease of Removal | Best For |
|---|---|---|---|
| Bolted Bracket | Very High | Low | Permanent ladders |
| Hook Over Rail | Medium | High | Removable ladders |
| Flush Mount | High | Medium | Clean look |
| Freestanding | Low | High | Temporary use |
Tip: For children’s beds, always choose a method that locks the ladder in place. Removable ladders are best for adult spaces.
Finishing Touches
A well-finished ladder is safer, looks better, and lasts longer.
1. Sand All Surfaces
Go over the ladder with fine sandpaper (150–220 grit). Pay special attention to edges and corners.
2. Apply Paint Or Stain
Choose a finish that matches your room. Use non-toxic paint or sealant, especially for children’s ladders. Apply 2–3 coats, allowing each to dry fully.
3. Add Non-slip Features
For extra safety, add non-slip tape to each step. This is especially helpful if the ladder will be climbed in socks.
4. Protect Floors
Attach felt pads or rubber feet to the bottom of the ladder. This prevents scratches and keeps the ladder from slipping.
5. Inspect For Safety
Check that all screws are tight, steps are solid, and there are no sharp edges. Shake the ladder gently to test stability.
Pro tip: If the ladder wobbles, check that both side rails are the same length and that steps are all level.
Safety Upgrades And Maintenance
A ladder is only as good as its safety. Don’t skip these steps, especially if kids will use the ladder.
Key Safety Upgrades
- Handrails: Add one or both sides, especially for young children.
- Wider Steps: A 4-inch wide step is much safer than a narrow rung.
- Rounded Edges: Prevents injuries from bumps.
- Non-slip Surfaces: Especially important for nighttime use.
- Secure Attachment: The ladder should never move unexpectedly.
Routine Maintenance
- Check screws and bolts every few months.
- Reapply non-slip tape as needed.
- Inspect for cracks in the wood, especially after moving the bed.
Non-obvious insight: Humidity changes can cause wood to shrink or swell, loosening screws. Regular checks prevent surprises.
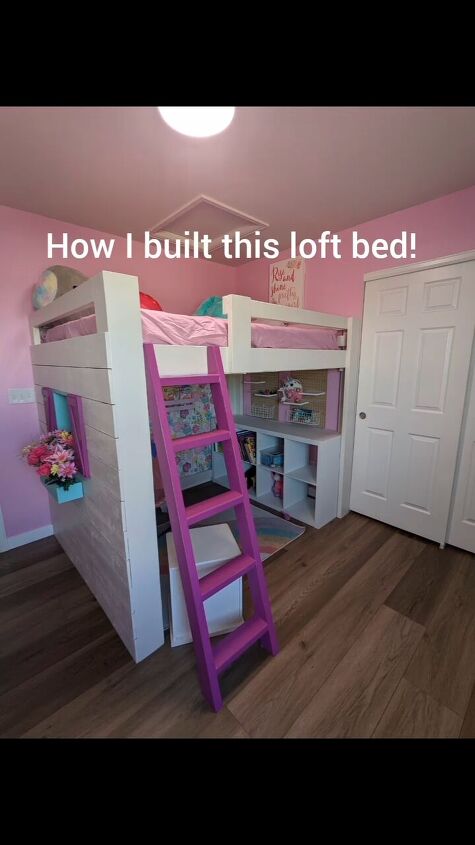
Credit: www.hometalk.com
Example: Step-by-step Simple Loft Bed Ladder
To tie it all together, here’s an example build for a standard loft bed (70 inches high), using pine wood and simple tools.
Materials
- 2 pieces of 2×4 pine, 80 inches long (side rails)
- 5 pieces of 1×4 pine, 18 inches long (steps)
- 20 wood screws, 3 inches
- Wood glue
- Sandpaper
- Non-slip tape
- Paint or stain
Steps
- Cut side rails to 80 inches (this fits a 70-inch bed at about a 65-degree angle).
- Cut steps to 18 inches each.
- Sand all pieces.
- Mark step locations on side rails, spacing steps 12 inches apart, starting 8 inches from the bottom.
- Pre-drill holes at each step mark.
- Glue and screw steps in place, checking for square as you go.
- Fill holes and sand again.
- Paint or stain and allow to dry.
- Add non-slip tape to each step.
- Attach ladder to bed with hooks or brackets.
- Inspect for safety.
This project takes about 3–4 hours, plus drying time for finish.
Comparing Loft Bed Ladder Designs
If you’re still deciding, here’s a quick look at three common ladder styles:
| Design | Space Needed | Comfort | Best For |
|---|---|---|---|
| Vertical Rung | Very Low | Low | Tight spaces, adults |
| Angled Step | Medium | High | Kids, frequent use |
| Removable Handrail | Medium | Very High | Safety-focused, kids/elderly |
Tip: If you have room, an angled step ladder with handrails is the safest and most comfortable option.
Common Mistakes And How To Avoid Them
Even careful builders can make errors. Here’s how to steer clear of the most frequent problems:
- Wrong Measurements: Always measure twice, and cut once. Write down every number.
- Insecure Steps: Use two screws and glue per step for strength.
- Skipping Sanding: Rough wood causes splinters and looks unfinished.
- Ignoring Ladder Angle: Too steep or too shallow makes climbing unsafe.
- Poor Attachment: A wobbly ladder is dangerous. Use brackets or strong hooks, not just screws through the side rail.
- Overloading: Don’t build with thin wood to save money. Safety comes first.
- Forgetting Non-Slip Features: Even adults can slip on smooth wood, especially at night.
Non-obvious insight: Pre-drilling holes not only prevents wood splitting, it also helps keep your screws perfectly straight, which increases the ladder’s overall strength.
Personalizing Your Ladder
Once the basics are done, consider adding features that make your ladder unique:
- Colorful paint or decals for kids
- Glow-in-the-dark strips for nighttime safety
- Built-in hooks for hanging bags or clothing
- Carved initials or fun shapes on the side rails
These touches turn a simple ladder into a special part of the room.

Credit: www.bibliotecaoscura.com
When To Call A Professional
Most people can build a simple loft bed ladder with patience and the right tools. But if you need a ladder for a very heavy user, a complex design, or want it to meet building codes (like for rental properties), consider hiring a carpenter.
A pro can also help if you want a metal ladder or a custom curved design.
Where To Learn More
If you want to go deeper, the Wikipedia entry on ladders covers types, safety, and history in more detail. There are also many step-by-step video guides online to suit every skill level.

Credit: plankandpillow.com
Frequently Asked Questions
How Much Weight Can A Homemade Loft Bed Ladder Hold?
A well-built ladder using sturdy wood (like 2×4 pine or oak) and proper screws can usually hold at least 250 pounds. For extra safety, use thicker wood and double-check all attachments. Always test your ladder before regular use.
What Is The Safest Angle For A Loft Bed Ladder?
A ladder angle of 60–70 degrees is safest for most users. Steeper angles are harder to climb, especially for kids. Use an online angle calculator or a phone app to check your ladder during setup.
Can I Build A Ladder Without Power Tools?
Yes, but it will take more time and effort. A handsaw, screwdriver, and sandpaper are enough for a basic ladder. Power tools make cutting and drilling faster and more precise.
How Can I Make My Ladder More Comfortable To Climb?
Wider steps (at least 3.5–4 inches), smooth edges, and an angled design all help. Adding non-slip tape or a handrail increases comfort and safety, especially for children or nighttime use.
Is It Safe To Build A Removable Ladder For Kids?
Removable ladders are less secure than fixed ones. If the ladder is for children, always use a locking bracket or hook system that keeps the ladder from slipping or moving while in use.
Creating your own loft bed ladder is a rewarding project that combines function and creativity. With careful planning, quality materials, and attention to safety, you’ll build something that lasts—and fits your space perfectly.