If you live in a hurricane-prone area, you might worry about how to protect your home’s most vulnerable points. Sliding glass doors are beautiful and let in natural light, but during storms, they can be a weak spot. Sometimes you also need to board up for security, like before a long trip or after a break-in. Whatever your reason, boarding up a sliding glass door the right way can prevent major damage, keep your family safe, and give you peace of mind.
Many people underestimate how much force wind or flying debris can have. Even a small branch can shatter glass if it hits at high speed. And if the glass breaks, wind and rain can rush inside, causing more destruction. But with the right materials and steps, you can make your sliding door much stronger against storms or threats.
Let’s walk through everything you need to know—from tools and materials, to measuring, to expert tips that most guides leave out. This guide will help you avoid common mistakes and make sure your home is as safe as possible.
When And Why You Should Board Up A Sliding Glass Door
Boarding up isn’t just for hurricanes. Here are the main reasons people do it:
- Hurricanes and Severe Storms: High winds and flying debris can easily break large glass doors.
- Security During Vacations: If you leave home for weeks, boarding up can prevent break-ins.
- After a Break-In: If your door is already damaged, boarding prevents further entry until it’s repaired.
- Wildfires: Sometimes, authorities advise boarding up glass to block embers and heat.
- Renovations: If your home will be unoccupied during work, boarding protects from theft or vandalism.
In each case, the goal is to add a strong barrier that keeps out wind, objects, or people. But the method changes slightly depending on your reason. For storms, the focus is strength against impact and wind. For security, you want to stop forced entry.
For wildfires, it’s about blocking heat and embers.
If you live in a coastal area, for example, hurricanes are a real threat every year. During certain seasons, you may have just a few days’ notice to prepare. Boarding up your sliding glass door should be part of your storm checklist, just like stocking water and batteries.
Even inland areas can be hit by tornadoes or unexpected wind storms—so if your home has a large glass door facing the wind, it’s at risk.
For homeowners worried about security, boarding up can add a visible layer of defense. Thieves look for easy targets—when they see a solid board over your door, they often move on. This is especially important if your area has had recent break-ins, or if your neighborhood is empty for a holiday.
Boarding up is also useful if your door has been damaged but can’t be replaced right away, as it helps you avoid further problems until repairs are done.
Wildfires are another situation where boarding up makes sense. If you’re asked to evacuate, adding boards can stop embers and radiant heat from breaking your glass. In some cases, this can mean the difference between returning to a damaged home or finding your house still standing.
Finally, during renovations or when leaving a home vacant, boarding up prevents both weather and theft from causing problems. Even a day of exposure can let rain or pests in, so a quick board-up can save you repair costs later.
Essential Tools And Materials
Before you start, gather all tools and supplies. Many hardware stores sell storm panels and plywood, but quality matters. Here’s what you’ll need:
- Plywood (5/8” thick or greater): Thicker is better for storms.
- Measuring tape: For accurate sizing.
- Circular saw or handsaw: To cut plywood.
- Drill and drill bits: For making holes.
- Screws (2.5” or longer): Galvanized is best; won’t rust.
- Plastic sheeting or tarp: Optional, for extra water protection.
- Screwdriver (manual or powered): To drive screws.
- Pencil/marker: Mark cutting lines.
- Safety gear: Gloves, safety glasses, dust mask.
- Ladder: If your door is off the ground.
- Anchors or masonry screws: If screwing into concrete or brick.
- Tape (painters or masking): To label panels for future use.
Pro tip: If you plan to board up regularly, buy reusable storm panel anchors. These make future setups much faster.
Don’t forget small details, like having the right extension cord if you’re using power tools outside, or a helper to hold the board while you drill. It’s easy to overlook these until you’re halfway through the job.
Another overlooked item is sealant or caulk. If you want a truly weather-tight seal—especially for wildfires or strong rain—apply a bead of caulk along the edges before installing the board. This helps block wind-driven water or embers, adding another layer of protection.
And while it might seem simple, always double-check that your screws or fasteners are long enough. If they’re too short, they won’t grip the wall or frame deeply, making the board much weaker.
Choosing The Right Material: Plywood Vs. Polycarbonate Vs. Metal Panels
Not all materials work the same way. Let’s compare three popular choices for boarding up:
| Material | Strength | Cost | Weight | Reusable? |
|---|---|---|---|---|
| Plywood (5/8”+) | High | Low | Heavy | Sometimes |
| Polycarbonate Panels | Very High | High | Light | Yes |
| Metal Storm Panels | Very High | Very High | Medium | Yes |
Most homeowners use plywood because it’s widely available and affordable. For better security and easier reuse, polycarbonate and metal panels are excellent but cost more. If you live in a hurricane area, investing in polycarbonate might make sense. For most people, thick plywood is enough if installed well.
Plywood is easy to find and cut, but it is heavy and can become even heavier if it gets wet. Make sure you have help to move large pieces safely. Polycarbonate panels are lighter and much stronger for their weight.
They’re also clear, which means you can still get some light inside your home during a storm. Metal storm panels are the strongest but require special tracks or anchors, and they can be sharp on the edges. These are more common in commercial buildings or homes built after 2000.
If you want to reuse your boards year after year, take the time to store them flat and dry. Warped plywood is much harder to fit next time. Polycarbonate and metal panels last much longer, but the price is higher—sometimes three to five times the cost of plywood.
Measuring And Cutting The Boards
Proper fit is critical. A board that’s too small leaves gaps. Too large, and it won’t fit flush. Here’s how to measure and cut:
- Measure the Opening: Start on the outside of the sliding door. Measure the width and height of the frame, not just the glass. Add 4 inches to each side for overlap. For example, if your door is 72” x 80”, cut your board at 80” x 88”.
- Check for Obstacles: Look for handles, locks, or tracks that stick out. Your board must cover these but still sit flat.
- Mark Cutting Lines: Lay the plywood flat and use a pencil to draw your measurements.
- Cut the Board: Use a circular saw for straight lines. Always wear safety glasses and a mask to avoid dust.
- Dry Fit: Hold the board against the door to check fit. Trim any spots that don’t sit flush.
Non-obvious tip: Label each board (e.g., “Back Door”) for faster installation next time.
It’s a good idea to use a square or straight edge when drawing your lines. This ensures your boards fit together neatly, especially if you’re covering more than one door. If your door is extra wide or tall, you may need to join two pieces of plywood with a batten (a strip of wood screwed across the seam) to cover the whole area.
Another tip: always measure twice before cutting. Lumber stores often won’t accept returns on cut plywood, and mistakes can be costly. If you have a sliding door with a fixed and moving panel, measure to cover both—even if one doesn’t move, it’s still vulnerable.
Types Of Boarding Methods
There are two main ways to attach boards:
1. Direct Mount (screw Into Frame Or Wall)
- Place the board over the sliding door frame.
- Drill pilot holes through the plywood and into the wall every 12-16 inches.
- Use long, galvanized screws for wood frames or masonry screws for brick/concrete.
- Drive screws in until the board is tight.
Strengths: Most secure and best for storms or security.
Downsides: Leaves small holes in the frame or wall. Usually not a problem for most homes.
With direct mount, it’s important to drill straight and not over-tighten screws, which can crack the plywood or strip the hole in your wall. For added security, use washers with your screws—these spread out the force and make it harder for the board to pull through.
2. Clip Or Anchor Systems
- Install reusable anchors around the door frame (permanent).
- Boards attach to these anchors with wing nuts or clips.
- Faster to put up and take down; less damage to wall.
Strengths: Good for frequent use. No repeated drilling.
Downsides: Higher upfront cost. Some systems can be seen when not in use.
For anchor systems, carefully follow manufacturer instructions for placement. Misaligned anchors make installation difficult. Once installed, you only need to line up the board and twist on the fasteners, making storm prep much faster.
Comparison: Direct Mount Vs. Anchor Systems
| Method | Installation Time | Damage to Wall | Security Level | Best For |
|---|---|---|---|---|
| Direct Mount | Medium | Low (small screw holes) | High | Storm prep, one-time use |
| Anchor System | Fast after first install | Very low | High | Frequent use |
If you’re boarding up every hurricane season, anchor systems will save a lot of time and effort. If you only do it for rare emergencies, direct mounting is fine.
Step-by-step Guide: How To Board Up A Sliding Glass Door
Now, let’s go through the process from start to finish.
Step 1: Clear The Area
Remove any patio furniture, planters, or decorations near the door. You need room to work and want nothing to become a flying hazard during a storm.
Take a few minutes to look up for low-hanging branches or overhead wires as well. These can become dangerous if knocked loose.
Step 2: Clean The Door And Frame
Wipe down the glass and the door frame. This helps the board sit flush and lets you spot any weak spots or damage.
Use a damp cloth to remove dust, spider webs, and loose paint. If you see cracks or rot in the frame, note these for repair later.
Step 3: Measure And Mark
Use your measuring tape to check the width and height. Double check! Mistakes here mean wasted plywood.
- Add at least 4 inches to each side for proper overlap.
Mark your lines clearly on the plywood.
If your sliding door has a raised track at the bottom, include that in your measurements so the board sits flat.
Step 4: Cut The Plywood
Set the plywood on sawhorses or a sturdy surface. Use a circular saw to cut along your lines. Always follow safety rules.
- Wear gloves and eye protection.
- Cut slowly to avoid splinters.
If you don’t have a saw, some home centers will cut plywood for you—just bring your measurements.
Step 5: Drill Pilot Holes
Lay the board flat. Mark where your screws will go: one every 12-16 inches around the edge. Drill pilot holes through the plywood. If you’re using anchors, mark and drill holes to match the anchor positions.
Pilot holes stop the plywood from splitting and make it easier to drive screws straight.
Step 6: Position The Board
With help (if possible), hold the board over the sliding door from the outside. Make sure it’s centered and covers all glass.
Use a pencil to quickly mark screw positions on the frame or wall, especially if you need to pre-drill into masonry.
Step 7: Attach The Board
- For direct mounting, drive screws through the pilot holes into the frame or wall. Use masonry screws if drilling into brick.
- For anchor systems, align the holes and secure with wing nuts or special clips.
Tighten until the board feels firm and does not move.
If your wall is stucco or brick, start screws slowly to avoid cracking the surface. For wood frames, don’t overtighten—you want the screw snug but not buried.
Step 8: Seal The Edges (optional)
If you want extra water protection, run a line of heavy-duty tape or staple plastic sheeting over the edges. This keeps out wind-driven rain.
If you live in a fire-prone area, consider fire-resistant tape or wrap. These can add a little more time and cost, but they help block embers.
Step 9: Inspect Your Work
Push on the board to check for movement. Walk around and look for gaps. If you see any, add more screws or trim the board.
Hidden insight: Don’t forget the sliding track—if debris can get under the door, add a board or sandbags below.
Also, step back and make sure the board covers every bit of glass—missed corners are common.
Step 10: Store Supplies For Future Use
If you remove the boards after a storm, label and store them flat in a dry place. Save screws and hardware for next time.
If you have multiple doors or windows, stack boards in order, and make a small diagram to speed up future installation.
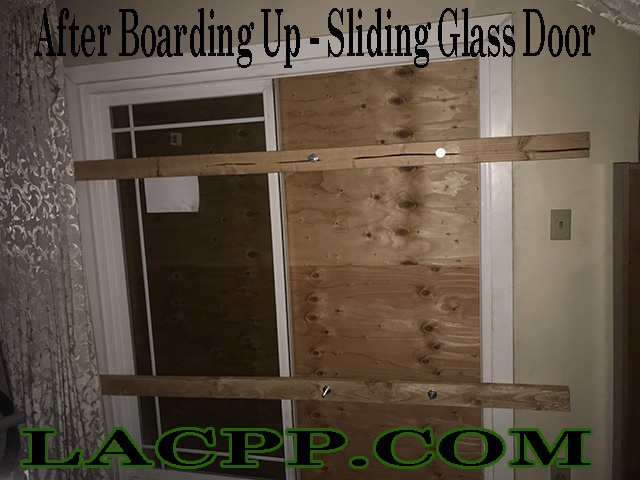
Credit: lacpp.com
Additional Tips Most People Miss
- Paint or Seal Plywood: Raw plywood absorbs water and warps. A quick coat of paint or sealer adds years of life.
- Check Local Building Codes: Some areas have special requirements, like using bolts instead of screws, or certain board thickness. Always follow these rules.
- Don’t Block Emergency Exits: If this is your only way out, consider other options. You must be able to escape if needed.
- Cover Both Doors: Sliding glass doors often have two panels. Board up both, even if one doesn’t move.
- Pre-drill Into Concrete: If attaching to brick or concrete, use a hammer drill and masonry bit for best results.
Another tip: If you have a security alarm, let your monitoring company know before and after boarding up. Some sensors may not work with boards in place, and you don’t want false alarms.
And don’t wait until the last minute. During storm warnings, stores may run out of plywood or fasteners. Prepare your boards before hurricane season or fire season, and do a practice run.
Mistakes To Avoid
- Using Thin Plywood: Anything less than 5/8” is weak and can split.
- Forgetting About Water: Wind-driven rain can sneak in. Seal edges or use plastic sheeting.
- Not Overlapping Enough: The board must cover the frame, not just the glass.
- Loose Screws: If screws are too short or spaced too far apart, boards can rip off.
- Not Labeling Boards: If you remove and reuse them, labels save time and confusion.
Another mistake is only boarding up the most obvious side. If your sliding door faces a covered patio, you might think it’s safe, but wind can shift direction and push debris under the patio roof.
Also, don’t use nails instead of screws—nails pull out more easily, especially under strong wind pressure.
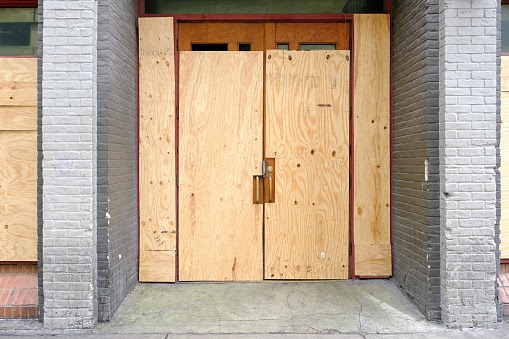
Credit: www.riotglass.com
Safety Precautions
- Always wear gloves, glasses, and a mask when cutting or drilling.
- Get help lifting large boards—plywood is heavy and awkward.
- Secure ladders before climbing.
- If a storm is very close, don’t risk injury. Sometimes it’s safer to leave than to board up last minute.
Think ahead about pets or children—keep them away from your work area, and make sure they can’t get trapped behind boarded doors in an emergency.
If you’re using a ladder, have someone hold it steady, and don’t stand on the top two rungs.
How Boarding Up Compares To Other Protection Methods
Some homeowners use hurricane shutters or special storm windows. Here’s how boarding up compares:
| Method | Cost | Time to Install | Protection Level | Reusability |
|---|---|---|---|---|
| Plywood Boarding | Low | Medium | High | Maybe |
| Hurricane Shutters | High | Very Fast | Very High | Yes |
| Impact Glass | Very High | None (permanent) | Very High | Yes |
Hurricane shutters and impact glass are faster and easier but cost thousands of dollars. Boarding up is the most affordable way to get strong protection, especially for rare storms.
Another non-obvious point: impact glass and shutters must be installed before you need them. If you’re renting or planning to move, temporary plywood boards are a smart, low-cost solution.
What To Do After The Storm
When it’s safe to go outside, check your sliding door and boards:
- Inspect for cracks, leaks, or damage to the frame.
- Remove boards carefully. Don’t use power tools if boards are under tension.
- Dry and store the boards in a clean, safe place.
- If you find damage, call a glass repair specialist before using the door.
Extra insight: Take photos of any damage for insurance claims. Some policies require proof of storm prep.
Check for water stains or soft spots in the floor near your door—these can mean hidden leaks. If you notice the frame is loose or out of square, strong winds may have shifted the wall, so have it checked by a contractor.
Also, air out your home after removing boards, as boarded-up doors can trap moisture inside.
Frequently Asked Questions
How Thick Should The Plywood Be To Board Up A Sliding Glass Door?
For most homes, 5/8 inch plywood is the minimum recommended. Thicker (3/4 inch) is better for high-wind areas or repeated use. Thin plywood (under 1/2 inch) can split or break, especially under impact.
Can I Board Up From The Inside Instead Of The Outside?
It’s possible, but outside mounting is much stronger. Pressure from wind or flying debris can push boards off from inside. If you have no choice, use long screws into solid framing, and reinforce edges as much as possible.
How Long Does It Take To Board Up A Sliding Glass Door?
If you have all materials ready, it usually takes 1 to 2 hours for one person. With help, it can be done in less time. First-time setups are always slower. Mark and save your boards for faster future use.
Will Boarding Up Ruin My Door Or Wall?
Properly installed boards leave only small screw holes, which can be filled later. High-quality anchor systems cause almost no damage. If you use the right fasteners and drill carefully, there’s little long-term effect.
Where Can I Find More Information About Storm Protection?
For more details, safety guidelines, and local codes, check the official National Hurricane Center resources. They provide up-to-date advice for all US regions.
—
Boarding up a sliding glass door is one of those jobs where doing it right can make all the difference. With strong materials, careful measuring, and proper installation, you can protect your home from storms, break-ins, or even wildfires. Remember to plan ahead, label and store your boards, and always check local building codes.
Taking these steps gives you peace of mind, knowing your home and family are better protected—no matter what comes your way.
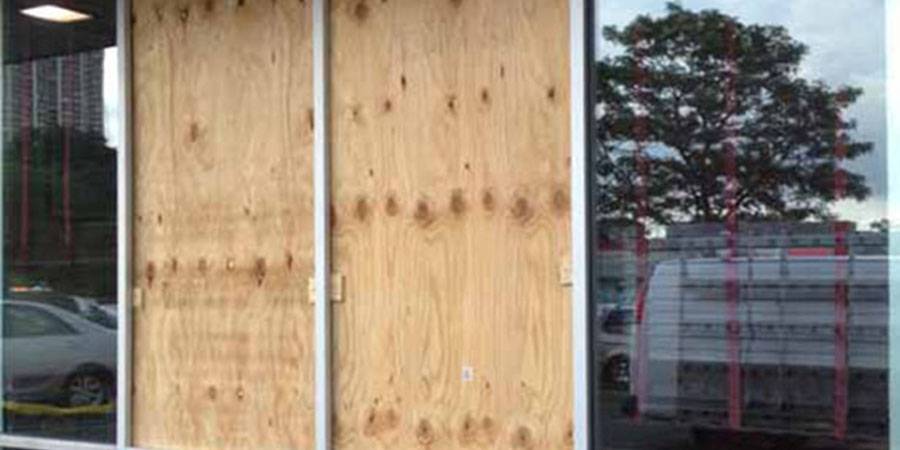
Credit: abobsglass.com