
A kitchen island is more than just a stylish centerpiece; it’s a functional workspace, storage solution, and social hub in modern homes. But have you ever wondered how such a heavy structure remains stable, even with constant use and movement?
The secret lies beneath the surface—literally. Understanding how a kitchen island is attached to the floor is crucial for homeowners, DIY enthusiasts, and even curious renters. This knowledge helps you plan renovations, ensure safety, and make informed decisions about your kitchen’s design and functionality.
Installing a kitchen island is not a simple process of placing cabinets in the middle of your kitchen. A secure attachment is necessary, especially when the island includes appliances, sinks, or heavy countertops like granite or quartz. A poorly anchored island can shift, tip, or even cause accidents.
In this guide, we’ll explore every aspect of how a kitchen island is attached to the floor, from the materials and techniques used to the challenges faced during installation. Whether you’re planning a new kitchen or simply want to understand the construction behind your existing island, this article will give you a complete, step-by-step look at the process.
Why Secure Attachment Matters
A kitchen island is a major investment. Most islands weigh between 200 and 1,500 pounds, depending on size and materials. Without proper anchoring, this weight can become a hazard. Imagine leaning on the countertop, only for the island to tip slightly, or a child pushing against it during playtime—both scenarios can lead to injuries or damage.
Safety is the top reason for securely attaching an island, but there are others:
- Stability for Appliances: Many islands house heavy appliances like dishwashers or cooktops. Without solid anchoring, vibrations and movement could damage both the island and the appliances.
- Protection for Flooring: A shifting island can scratch or dent wood, tile, or vinyl floors.
- Long-Term Durability: A well-attached island resists loosening over time, even with years of use.
Most building codes require islands to be anchored to the floor, especially if they include plumbing or electrical connections. Local inspectors may check the attachment during renovations or new builds.
Types Of Kitchen Islands And Their Attachment Needs
Not all kitchen islands are created equal. The method of attachment depends on the type and purpose of the island:
1. Stationary (fixed) Islands
These are the most common type, permanently attached to the floor. They often include cabinets, drawers, and sometimes appliances.
- Attachment is mandatory for safety.
- Usually connected with brackets, blocking, or direct screwing.
2. Portable (rolling) Islands
These islands have wheels and are meant to move. They are not attached to the floor, but often have brakes to prevent movement during use.
- No attachment required, but not suitable for heavy appliances.
3. Semi-permanent Islands
Some designs use locking mechanisms to fix the island in place but allow for future repositioning.
- May use floor brackets that can be unscrewed.
4. Peninsula-style Islands
These are attached at one end to a wall or cabinet bank, with the other end projecting into the room.
- Often anchored at the base and wall joint.
Key Insight: Fixed kitchen islands, especially those with utilities or heavy countertops, require the most robust floor attachment. Portable options trade stability for flexibility.
Materials Used In Floor Attachment
The choice of attachment materials depends on your floor type (concrete, wood, tile, etc.) and the weight of the island. Here are the most common materials used:
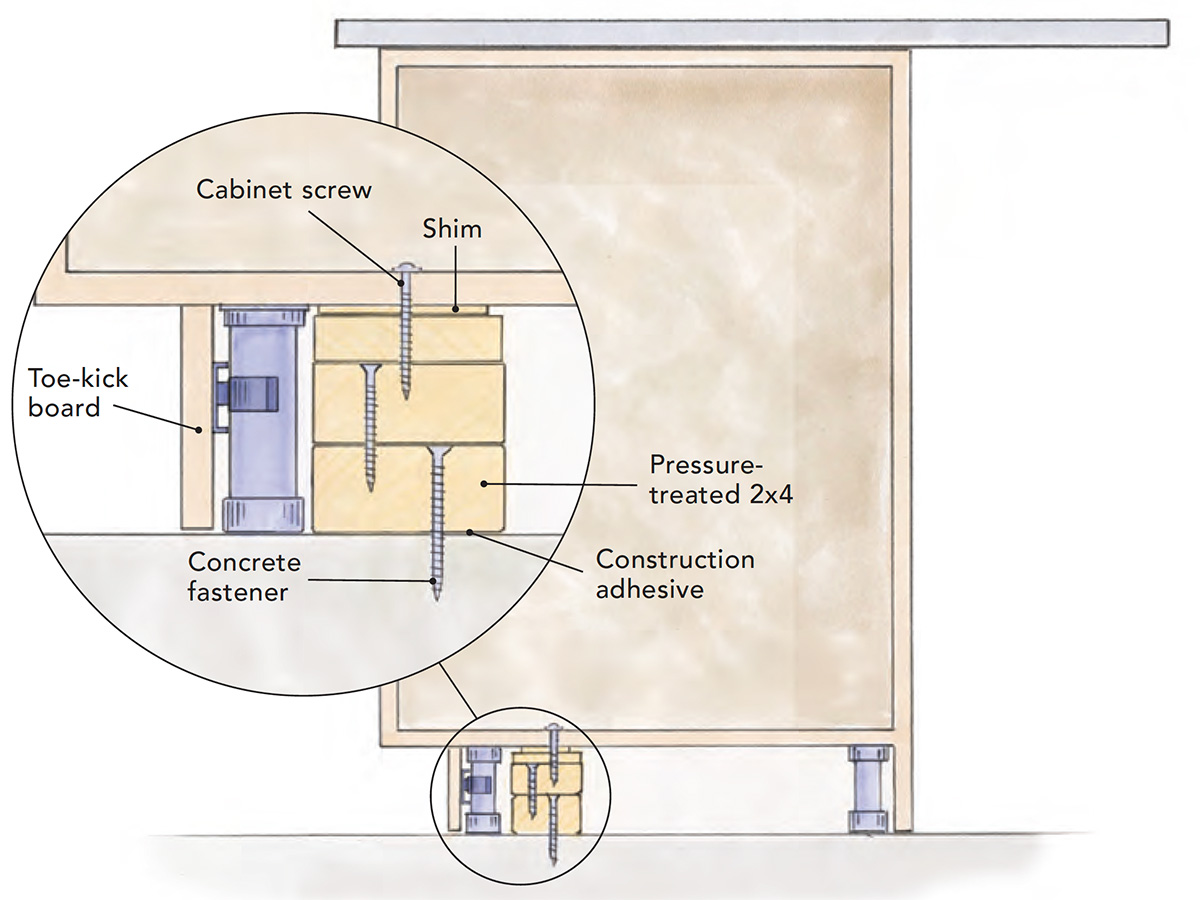
- Wood blocking (cleats): Solid wood strips, usually 2x4s, secured to the floor. The island cabinet is then anchored to these blocks.
- Metal brackets (L-brackets): Steel or aluminum right-angle brackets screwed into both the floor and the cabinet base.
- Heavy-duty screws or lag bolts: Used to fix the base of the island directly to the floor, especially with wood subfloors.
- Construction adhesive: Sometimes used with screws for extra hold, particularly on concrete floors.
- Concrete anchors: Special bolts or sleeves for anchoring into concrete slabs.
- Toggle bolts or expansion anchors: For some tile or stone floors where screws alone might crack the surface.
Non-obvious insight: The choice of fastener is not just about strength—it’s also about the ability to remove or reposition the island in the future. Overly permanent solutions can complicate repairs or renovations.
Preparation: What Happens Before Attachment
Attaching a kitchen island is not the first step—preparation is key to a safe and lasting installation. Here’s what usually happens before the island meets the floor:
1. Locating The Island
Precise placement is critical. Installers use measuring tapes, chalk lines, and laser levels to ensure the island is centered, aligned with other cabinets, and leaves enough walkway space (at least 36-42 inches is standard).
2. Marking The Floor
Once the location is set, the perimeter of the island base is marked on the floor. This outline guides where to place blocks or brackets.
3. Checking For Utilities
If the island will include plumbing or electrical outlets, installers check for pipes or wires under the floor. Holes are cut for these utilities before the island is fixed in place.
4. Assessing The Subfloor
Different floors require different fasteners. Installers check if the subfloor is wood, concrete, or tile, and whether it is level and structurally sound.
Practical tip: Always check for radiant floor heating before drilling! Accidentally damaging these systems can be costly and dangerous.
Main Methods For Attaching A Kitchen Island
Let’s dive into the actual techniques used to secure an island to the floor. Each method has advantages, and the best choice depends on your kitchen’s construction.
1. Wood Blocking (cleat) Method
This is the most common way to anchor a kitchen island, especially on wood subfloors.
How it works:
- Installers cut 2×4 wood blocks (called cleats) slightly shorter than the length of the island’s base.
- The blocks are screwed into the floor, inside the perimeter marks.
- The island cabinet is then placed over the blocks and screwed through its base into the blocks.
Benefits:
- Strong, stable, and relatively easy to remove if needed.
- Distributes the island’s weight evenly.
- Can be adjusted slightly during installation for perfect alignment.
Example: Most stock cabinets from big-box stores are designed with a recessed base (toe kick), allowing blocks to fit inside and be hidden from view.
2. Metal Bracket Method
For tile or concrete floors, metal L-brackets offer a secure and minimally invasive option.
How it works:
- Brackets are attached to the floor, with the short side screwed into the cabinet base.
- Brackets can be placed at corners or every 24-36 inches for long islands.
- For tile, installers use masonry screws or expansion anchors to avoid cracking the surface.
Benefits:
- Brackets are strong, but can be less visible if painted or recessed.
- Suitable for heavy countertops.
Non-obvious insight: Some professionals use low-profile brackets inside the cabinet, so there are no visible screws on the outside.
3. Direct Screw Or Lag Bolt Method
For especially heavy islands or when wood blocking isn’t possible, direct attachment is preferred.
How it works:
- The base of the island is drilled and long screws or lag bolts are driven through into the subfloor.
- For concrete floors, concrete anchors are used.
- For wood, regular wood screws are sufficient.
Benefits:
- Extremely strong; ideal for islands with stone countertops.
- No additional materials required.
Drawback: Removal is more difficult and may damage the floor.
4. Adhesive And Mechanical Fastener Combination
In some cases, installers use construction adhesive (like Liquid Nails) in addition to screws or brackets.
How it works:
- Adhesive is applied to the bottom of the blocking or cabinet base.
- Screws are added after, ensuring an even stronger bond.
Benefits:
- Extra security, especially on uneven surfaces.
- Reduces movement and creaking.
Practical tip: Adhesive alone is not enough for safety—always combine with mechanical fasteners.
5. Specialized Anchoring For Concrete Slabs
Concrete floors require special anchors:
- Expansion bolts: These expand as they are tightened, gripping the concrete.
- Sleeve anchors: Inserted into a pre-drilled hole, then expanded to lock in place.
Installers must use a hammer drill to create holes in the concrete.
Non-obvious insight: Concrete anchors require precise placement, as repositioning is difficult. Careful measuring is critical before drilling.
Step-by-step: Typical Island Attachment Process
Let’s walk through a typical installation using the wood blocking method, the most common approach in US homes with wood subfloors.
Step 1: Plan And Mark The Location
- Measure and mark the island’s footprint on the floor.
- Double-check alignment with other cabinets and appliances.
Step 2: Install Wood Blocking
- Cut 2×4 blocks to fit inside the outline.
- Place blocks about 2 inches from the inside edge of the outline.
- Screw blocks securely into the subfloor, using at least two screws per block.
Step 3: Prepare Utilities
- If there are plumbing or electrical lines, cut holes in both the floor and cabinet base.
- Ensure all pipes and wires are ready before placing the island.
Step 4: Position The Island
- With help, lift the island cabinet over the blocking.
- Adjust so the base fits snugly around the blocks.
Step 5: Attach The Island To The Blocking
- Screw through the base of the cabinet into the wood blocking.
- Use at least four screws per side for a standard-size island.
Step 6: Final Checks And Adjustments
- Ensure the island is level; use shims if needed.
- Double-check all fasteners are tight.
- Connect utilities as needed.
Real-world example: In a recent remodel, a homeowner with a 7-foot island used six 2×4 blocks, each with three screws, and added four L-brackets for extra security because the island had a granite top.
Attachment Differences By Floor Type
Your kitchen floor material changes the attachment method. Here’s a handy comparison:
| Floor Type | Recommended Attachment | Special Considerations |
|---|---|---|
| Wood Subfloor | Wood blocking, screws, or lag bolts | Easy to drill, but check for joists |
| Tile | L-brackets with masonry screws or anchors | Drill carefully to avoid cracking tile |
| Concrete | Concrete anchors, expansion bolts | Hammer drill required, precise placement needed |
| Vinyl/Laminate | Wood blocking to subfloor below surface | Do not anchor only to vinyl/laminate; will not hold |
Challenges And Common Mistakes
Attaching a kitchen island isn’t always straightforward. Here are some common mistakes and how to avoid them:
- Ignoring Floor Structure: Attaching to just the finished floor (like tile or vinyl) is not enough. Fasteners must reach the solid subfloor or concrete below.
- Misalignment: Skipping careful measuring can lead to an island that’s crooked or too close to other cabinets.
- Damaging Utilities: Failing to check for pipes or wires can lead to expensive repairs.
- Using Weak Fasteners: Drywall screws or small nails are not strong enough for heavy islands.
- Skipping Permits: Local building codes may require inspections, especially if plumbing or electrical work is involved.
- Overtightening Screws: This can crack tile or strip screw holes, reducing holding power.
Practical tip: Always use screws at least 2.5 inches long for wood blocking, and expansion anchors rated for at least 100 pounds each for concrete floors.

Credit: www.youtube.com
Building Codes And Safety Standards
Most US municipalities follow the International Residential Code (IRC), which requires permanent fixtures like kitchen islands to be securely anchored if they include plumbing, gas, or electrical connections. Some areas also have rules about minimum walkway space around islands and the use of anti-tip devices for large countertops.
Key points:
- Permits may be needed if you plan to add electrical outlets or sinks.
- The island must not block emergency exits or create a tripping hazard.
- Electrical outlets on islands must have GFCI protection (ground fault circuit interrupter).
If you’re unsure, consult your local building department or a licensed contractor.
Cost Factors And Professional Vs. Diy Installation
The cost of attaching a kitchen island varies widely, depending on size, materials, and floor type.
- DIY installation (materials only): $50–$200
- Professional installation (labor and materials): $300–$1,000+
- Complex installations (with plumbing/electrical): $1,000–$3,000
Non-obvious insight: Labor costs rise significantly if the floor is concrete, as drilling and anchoring take longer and require special tools.
DIY vs. Professional: If your island is small and does not include appliances, a confident DIYer can usually handle the attachment. For heavy islands, or those with plumbing or electrical, hiring a professional is safer and ensures compliance with codes.
Credit: www.finehomebuilding.com
How Different Countertop Materials Affect Attachment
The weight and overhang of your countertop change how the island should be anchored.
| Countertop Material | Average Weight (per sq. ft.) | Special Attachment Needs |
|---|---|---|
| Granite | 15-18 lbs | Extra blocking or brackets, anti-tip hardware |
| Quartz | 20-25 lbs | Reinforced base, more fasteners |
| Laminate | 3-5 lbs | Standard attachment sufficient |
| Wood | 6-10 lbs | Check for seasonal movement, allow for expansion |
Practical tip: If your countertop overhangs more than 12 inches, use hidden steel supports or corbels attached to the island base.
What If You Need To Move Or Remove The Island?
Sometimes, homeowners want to relocate or remove their kitchen island. Here’s what to expect:
- Wood blocking: Unscrew the fasteners inside the cabinet, then remove the blocking from the floor. Some holes may need patching.
- Metal brackets: Remove screws and brackets; fill any visible holes.
- Concrete anchors: Removal is harder and may leave holes in the slab.
- Adhesive: Expect minor floor damage if construction adhesive was used.
Non-obvious insight: If you plan to move the island in the future, consider using brackets or blocking instead of adhesives and avoid over-tightening fasteners.
Advanced Options: Islands With Plumbing And Electrical
Islands with sinks, dishwashers, or outlets need extra steps:
- Plumbing: Flexible hoses or pipes run from the floor up into the island. Joints must be accessible for future repairs.
- Electrical: Cables are routed through floor conduits and up into the island cabinet. Outlets must be GFCI-protected.
- Attachment: All blocking and brackets must avoid damaging wires or pipes. Some installers add metal plates to protect utilities from screws.
In these cases, attachment is even more critical, as movement can break connections, cause leaks, or create fire hazards.
Practical tip: Always have an electrician or plumber check the work before closing up the island base.
Future-proofing Your Kitchen Island
If you might remodel in the future, or anticipate changes, plan your attachment method with flexibility in mind:
- Use brackets or blocking instead of permanent adhesives.
- Run utilities through accessible conduits.
- Avoid cutting large holes in the floor whenever possible.
This makes updates, repairs, or even resale easier.
Real-life Examples And Case Studies
Here’s how different homes handled island attachment:
Example 1: New Build with Concrete Slab
A family in Texas installed a 10-foot island with a quartz top. Installers used eight concrete expansion anchors, each rated for 400 pounds. Electrical outlets were run through a floor conduit. The island has never shifted, even with heavy use.
Example 2: Remodel in a Historic Home
A homeowner in New England wanted to avoid damaging 100-year-old wood floors. Contractors used long wood screws through the base, but only into existing seams between boards. This required precise measuring and custom blocking, but the floor remained intact.
Example 3: DIY Upgrade with Tile Floor
A couple added a stock cabinet island to a tiled kitchen. They used four L-brackets at the corners, attached with masonry screws. The installation took a weekend, and the island has stayed secure for five years.
Maintenance And Inspection
After installation, it’s wise to check your island’s stability every year:
- Open the base cabinets and check that all screws and brackets are tight.
- Inspect for any signs of movement, especially after moving appliances or replacing countertops.
- Listen for creaks or shifting sounds, which can indicate loosening.
If you notice any changes, retighten fasteners or consult a professional.

Credit: shoemakesnew.com
Frequently Asked Questions
What Is The Strongest Way To Attach A Kitchen Island To The Floor?
For most homes, using wood blocking anchored into the subfloor, combined with long screws through the island base, offers the best balance of strength and removability. For concrete floors, expansion anchors are strongest.
Can I Install A Kitchen Island On Top Of A Finished Floor Like Tile Or Vinyl?
Yes, but the fasteners must go through the finished floor into the solid subfloor or slab below. Attaching only to tile or vinyl is not safe, as these surfaces cannot support heavy loads.
Do I Need A Permit To Install A Kitchen Island?
You often need a permit if your island includes plumbing or electrical work. Simple, non-utility islands may not require a permit, but always check with your local building authority or see guidelines on the National Association of Home Builders website.
How Do I Hide The Attachment Hardware For A Cleaner Look?
Most installers place blocking or brackets inside the cabinet base, so no screws are visible on the outside. Low-profile brackets can also be painted to match the cabinet interior.
What Should I Do If My Island Becomes Wobbly?
First, check all fasteners inside the base cabinet and retighten if loose. If the floor attachment is damaged, consult a contractor. Do not use the island heavily until it is secure, as movement can damage flooring and utilities.
A well-attached kitchen island is a lasting, safe, and beautiful part of any home. By understanding the details behind its installation, you can ensure your kitchen remains both functional and secure for years to come.