Smart homes are growing in popularity. Nest Thermostats are leading this trend.
Adding multiple Nest Thermostats can improve comfort and save energy. Managing your home’s temperature can be challenging. Installing more than one Nest Thermostat helps. This blog post will guide you through the benefits and steps. You’ll learn why multiple thermostats are useful and how to set them up.
By the end, you’ll understand how to optimize your home’s climate. Whether you have a large home or want precise control, multiple Nest Thermostats are the answer. Keep reading to make your home smarter and more efficient.

Credit: www.reddit.com
Introduction To Nest Thermostats
Nest Thermostats are smart devices that help you manage home temperature. They make your home more comfortable and energy-efficient. Nest, a brand by Google, offers various models. These thermostats learn your schedule and adjust settings automatically. With Nest, you can control the temperature from your phone.
Benefits Of Smart Thermostats
Smart thermostats offer many advantages:
- Energy Savings: They reduce energy bills by adjusting settings based on your habits.
- Remote Control: Manage your home’s temperature from anywhere with your smartphone.
- Learning Capability: They learn your schedule and preferences over time.
- Integration with Smart Home: Compatible with other smart devices for a seamless home experience.
- Reports and Insights: Provide data on energy usage to help you save more.
Overview Of Nest Products
| Model | Features |
|---|---|
| Nest Thermostat E | Simple design, basic features, budget-friendly |
| Nest Learning Thermostat | Advanced learning, auto-schedule, remote control |
| Nest Thermostat | Affordable, energy-saving, app control |
Each model offers unique features. Choose based on your needs and budget. Nest Thermostat E is great for basic use. Nest Learning Thermostat is for those who want advanced features. Nest Thermostat is a balance of price and functionality.
Preparing For Installation
Before adding multiple Nest Thermostats, it’s important to prepare properly. This ensures a smooth installation process and optimal performance. Below are key steps to get ready for the installation.
Choosing The Right Location
Start by selecting the best location for each thermostat. The location should be in a room where you spend a lot of time. Avoid placing the thermostat near windows, doors, or direct sunlight. These can affect temperature readings and efficiency.
Consider the height as well. Mount the thermostat at eye level for easy access. Ensure it is away from any heat sources like stoves or radiators. This helps the thermostat get accurate temperature readings.
Gathering Necessary Tools
Gather all the tools needed for the installation. This makes the process quicker and easier. Below is a list of common tools you might need:
- Phillips head screwdriver
- Flat head screwdriver
- Drill and bits
- Level
- Wire stripper
- Needle-nose pliers
Having these tools ready ensures you are well-prepared. You can avoid interruptions during the installation.
In some cases, you may need a voltage tester. This tool helps ensure the power is off before you begin wiring. Safety first!
Installing Your First Nest Thermostat
Installing your first Nest Thermostat can feel overwhelming at first. With the right guidance, the process becomes simple and straightforward. This step-by-step guide will help you get your Nest Thermostat up and running in no time.
Step-by-step Installation Guide
Start by turning off the power to your heating and cooling system. This ensures safety while you work. Next, remove the cover from your old thermostat. Note the arrangement of the wires before disconnecting them. Label each wire with the provided stickers.
Mount the Nest Thermostat base on the wall. Use the built-in level to ensure it’s straight. Connect the wires to the Nest base according to the labels. Once the wires are connected, attach the display to the base. Turn the power back on to your system.
Connecting To Wi-fi
After installing the thermostat, connect it to Wi-Fi. This allows you to control the temperature from your phone. On the thermostat screen, select your Wi-Fi network. Enter the password and wait for the connection to complete.
Once connected, the thermostat may update its software. This ensures you have the latest features. Follow the on-screen instructions to complete the setup. Your Nest Thermostat is now ready to use.
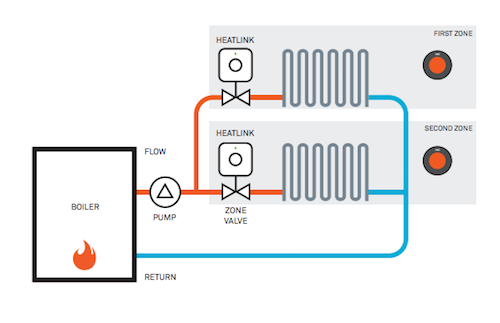
Adding Additional Nest Thermostats
Adding additional Nest Thermostats can enhance comfort and energy savings in your home. By installing multiple units, you can control different zones independently. This setup ensures optimal temperature throughout your living space.
Identifying Additional Zones
First, identify the zones needing individual temperature control. These zones could be different floors, rooms, or areas with varying heating or cooling needs. Consider spaces with varying sunlight exposure or insulation. Proper zoning ensures each area maintains a comfortable temperature.
Installation Process For Multiple Units
Once zones are identified, proceed with installing additional Nest Thermostats. Begin by selecting a location for each thermostat. Ensure it’s in a central spot within the zone. Avoid placing it near heat sources or drafty areas.
Next, turn off power to your HVAC system. Remove the old thermostat and label the wires. Install the Nest base plate and connect the labeled wires. Attach the Nest display and follow the on-screen instructions for setup.
Repeat this process for each zone. Once all units are installed, connect them to the same Wi-Fi network. Use the Nest app to configure each thermostat. Ensure they are set up as part of a multi-zone system.
Syncing Multiple Thermostats
Adding multiple Nest Thermostats to your home can greatly enhance your comfort and efficiency. Syncing multiple thermostats allows you to create a seamless heating and cooling experience. This means your home will always be at the perfect temperature in every room. Below, we’ll explore the steps to achieve this.
Creating A Unified System
To create a unified system, start by ensuring all your Nest Thermostats are connected to the same Wi-Fi network. This is crucial for syncing.
Next, use the Google Home app to add each thermostat. Follow these steps:
- Open the Google Home app.
- Tap the “Add” button.
- Select “Set up device.”
- Choose “New devices.”
- Follow the on-screen instructions.
Repeat these steps for each thermostat. This will ensure all devices are on the same system.
Managing Settings Across Devices
Once all thermostats are added, you can manage settings across devices. This helps you maintain a consistent temperature throughout your home.
In the Google Home app, go to each thermostat’s settings. Here, you can set temperatures, schedules, and preferences. Make sure to:
- Set a consistent schedule for each thermostat.
- Adjust temperature settings to your liking.
- Enable features like Home/Away Assist for energy saving.
This way, all your Nest Thermostats work together harmoniously.
Credit: support.google.com
Optimizing Home Climate Control
Adding multiple Nest Thermostats to your home can significantly improve climate control. With the ability to manage different zones, you can ensure every room is at the perfect temperature. This not only enhances comfort but also boosts energy efficiency.
Using The Nest App
The Nest app is your control center for all your Nest Thermostats. It allows you to manage settings from anywhere. This is especially useful for busy lifestyles. The app provides a user-friendly interface. You can see the status of each thermostat at a glance.
To start, download the Nest app from the App Store or Google Play. Once installed, follow the on-screen instructions to add your thermostats. Make sure each thermostat is connected to your Wi-Fi network. This ensures seamless control.
With the app, you can:
- Adjust temperatures remotely
- Monitor energy usage
- Set schedules for each thermostat
- Receive alerts and notifications
Setting Up Schedules
Setting up schedules for your Nest Thermostats can save you money. It also ensures your home is comfortable when you need it to be. Schedules allow you to automate temperature settings based on your routine.
Here’s how to set up schedules:
- Open the Nest app and select the thermostat you want to schedule.
- Tap on the Schedule tab.
- Choose Add to create a new schedule.
- Set the desired temperature and time for each period of the day.
- Repeat for other days if needed.
You can create different schedules for weekdays and weekends. This flexibility allows you to cater to different routines. For example, you might want a cooler temperature during the night and a warmer one in the morning.
Here is a simple example of a weekday schedule:
| Time | Temperature |
|---|---|
| 6:00 AM | 68°F |
| 9:00 AM | 60°F |
| 5:00 PM | 70°F |
| 10:00 PM | 65°F |
With these schedules, you can ensure optimal comfort and energy savings. The Nest Thermostat learns over time. It can even suggest changes to improve efficiency.
Energy Savings And Efficiency
Adding multiple Nest thermostats to your home can significantly enhance your energy savings and overall efficiency. These smart devices provide better control over your heating and cooling systems. They ensure that each room maintains the ideal temperature, reducing energy waste and lowering your utility bills.
Monitoring Energy Usage
One of the key features of Nest thermostats is their ability to monitor energy usage in real-time. You can view detailed reports on your energy consumption. These reports help you understand which rooms or zones are using more energy.
With multiple Nest thermostats, you can break down energy consumption by each thermostat. This can provide insights into areas where you can save more. Below is a simple table to illustrate how energy usage data can be segmented:
| Thermostat Location | Energy Usage (kWh) |
|---|---|
| Living Room | 150 |
| Bedroom | 100 |
| Kitchen | 80 |
Adjusting For Maximum Efficiency
With Nest thermostats, you can adjust settings for maximum efficiency. Each thermostat can be programmed to suit the specific needs of its location. This means you can set different temperatures for different times of the day.
- Lower temperatures at night in bedrooms
- Comfortable temperatures in living areas during the day
- Reduced heating or cooling in unused rooms
Such adjustments help in optimizing the energy usage. Here is an example of how you might set your thermostats:
- Morning: Increase temperature in the kitchen for a warm start.
- Afternoon: Maintain a moderate temperature in the living room.
- Night: Lower temperature in bedrooms for better sleep.
By fine-tuning these settings, you can achieve significant energy savings. Multiple Nest thermostats make this process easier and more effective.
Troubleshooting Common Issues
Adding multiple Nest Thermostats to your home can enhance comfort and efficiency. However, you may face some common issues that can disrupt the smooth functioning of your devices. This section will help you troubleshoot these problems.
Connectivity Problems
Weak Wi-Fi signals can cause Nest Thermostats to lose connectivity. Ensure your router is close enough to the thermostat. A Wi-Fi extender can help if needed. Check your network settings. Make sure the thermostat connects to the right network. Restarting your router can sometimes resolve connectivity issues. Also, ensure the thermostat’s software is up-to-date.
Calibration And Sensor Issues
Incorrect temperature readings can result from calibration issues. Check the thermostat’s placement. It should not be near heat sources or drafts. Nest Thermostats have built-in sensors. Ensure the sensors are clean and unobstructed. If the readings seem off, recalibrate the thermostat through the settings menu. Follow the on-screen instructions carefully.
Advanced Features
Adding multiple Nest Thermostats to your home brings advanced features that make managing your climate even easier. These features help you create a smart home ecosystem.
Integrating With Other Smart Devices
Nest Thermostats can connect with other smart devices in your home. These devices can include smart lights, security cameras, and smart locks. This integration helps create a seamless living experience.
| Device | Function |
|---|---|
| Smart Lights | Adjust brightness based on room temperature |
| Security Cameras | Monitor home and adjust temperature when you are away |
| Smart Locks | Lock doors and adjust temperature when you leave |
With these integrations, your home becomes more efficient. You save energy and enhance security with ease.
Utilizing Voice Control
Voice control is another great feature of Nest Thermostats. You can use assistants like Google Assistant or Amazon Alexa. This feature makes it simple to adjust your thermostat settings.
- Change temperature with voice commands.
- Set schedules without touching your device.
- Check current temperature through voice inquiries.
By using voice control, you gain hands-free convenience. This can be useful when you are busy or have your hands full.
In summary, adding multiple Nest Thermostats with these advanced features creates a smarter home. Integrating with other smart devices and utilizing voice control are key benefits. They bring convenience, efficiency, and ease to your daily routine.
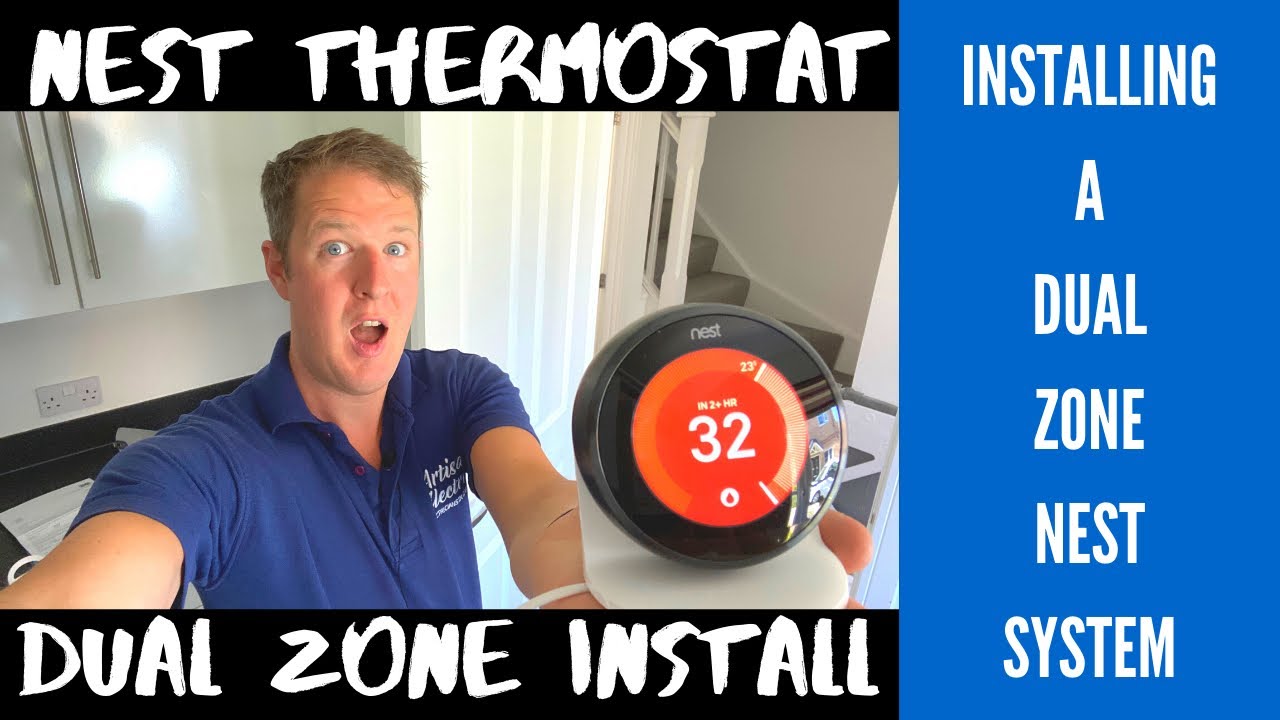
Credit: www.youtube.com
Frequently Asked Questions
How Do I Add Multiple Nest Thermostats?
Go to the Nest app. Tap “Settings”. Select “Add product”. Follow the instructions.
Can I Control Multiple Nest Thermostats From One App?
Yes, you can. The Nest app allows control of multiple thermostats from one account.
Do I Need Separate Accounts For Each Nest Thermostat?
No, one account is enough. You can manage all your Nest Thermostats from a single account.
Will Adding Multiple Nest Thermostats Affect Wi-fi?
It might. Ensure you have a strong Wi-Fi signal to support multiple devices.
Can Each Nest Thermostat Have Different Settings?
Yes, each thermostat can have unique settings. Customize them based on each room’s needs.
Conclusion
Adding multiple Nest Thermostats can greatly improve your home’s climate control. Each room gets its own perfect temperature. Installation is straightforward and user-friendly. You’ll enjoy the convenience and efficiency it brings. Managing your energy use becomes simpler. Plus, Nest’s smart technology learns your preferences.
This makes your home more comfortable and energy-efficient. Consider adding multiple Nest Thermostats for a smarter, cozier home.