Installing a smart thermostat can seem tricky, especially with only 2 wires. But it’s simpler than you might think.
Smart thermostats can save energy and make your home more comfortable. Many people believe you need a complex wiring setup to install one. But that’s not always true. You can set up a smart thermostat even if your system has only 2 wires.
In this guide, we’ll show you how to do just that. You’ll learn the steps to get your smart thermostat working in no time. No need to call a professional. Just follow our simple instructions and enjoy the benefits of smart technology in your home. Ready to make your home smarter? Let’s get started!
Gather Tools And Materials
Before you start installing a smart thermostat with only 2 wires, you need to gather the necessary tools and materials. Proper preparation will make the installation process smooth and efficient. Make sure you have everything ready before you begin.
Essential Tools
Having the right tools on hand is crucial for a hassle-free installation. Here’s a list of essential tools you will need:
- Screwdriver: A flathead or Phillips screwdriver, depending on your thermostat model.
- Drill: For making holes if needed.
- Wire Stripper: To strip the insulation from the wires.
- Level: To ensure your thermostat is straight.
- Voltage Tester: To check for live wires.
Required Materials
Gathering the right materials is just as important as having the correct tools. Here’s what you will need:
- Smart Thermostat: Ensure it is compatible with 2-wire systems.
- Wall Anchors: For mounting the thermostat securely.
- Wire Nuts: To connect wires safely.
- Mounting Plate: Provided with most thermostats for easy installation.
- Batteries: If your thermostat requires them.
By gathering all the necessary tools and materials, you will be well-prepared to install your smart thermostat. This will save you time and effort during the installation process.
Credit: www.onehoursmarthome.com
Turn Off Power
Before installing a smart thermostat, ensure the power is off. This step is crucial for safety. It protects you from electrical hazards. Follow these steps to safely turn off the power.
Safety Precautions
- Wear rubber gloves to avoid electric shocks.
- Use insulated tools for extra safety.
- Notify others in the house about the power shutdown.
- Have a flashlight ready in case of poor lighting.
Locating Circuit Breaker
Locate the main circuit breaker panel in your home. It’s usually found in the basement, garage, or utility room.
| Step | Action |
|---|---|
| 1 | Open the breaker panel door. |
| 2 | Identify the switch labeled “HVAC” or “Thermostat”. |
| 3 | Switch it to the “OFF” position. |
Once the power is off, proceed with installing the smart thermostat. Always double-check the power is off using a voltage tester. Safety first!
Remove Old Thermostat
Removing the old thermostat is the first step in installing a smart thermostat with only 2 wires. This process is straightforward but requires careful attention to ensure a smooth transition. Follow these steps to safely remove your old thermostat.
Disconnecting Wires
Begin by turning off the power to your HVAC system. This is crucial for safety. You can do this at the circuit breaker. Next, remove the cover of the old thermostat. You might need a screwdriver for this. Once the cover is off, you will see the wires connected to the terminals.
Use a screwdriver to loosen the terminal screws. Gently pull the wires away from the terminals. Be careful not to let the wires fall back into the wall. This could make them hard to retrieve.
Labeling Wires
Labeling the wires is important to avoid confusion later. Use small pieces of masking tape or wire labels for this task. Mark each wire with the letter of the terminal it was connected to. For example, if a wire was connected to the ‘R’ terminal, label it as ‘R’.
This step ensures that you know where each wire goes when installing the new thermostat. It helps to take a photo of the wiring configuration. This can serve as a reference.
Once the wires are labeled, you can remove the old thermostat from the wall. You may need to unscrew the mounting plate to do this. Keep all screws and parts together. You might need them for the new thermostat.
Install New Thermostat Base
Installing a smart thermostat with only 2 wires can seem tricky. But with the right steps, it is quite simple. You need to install a new thermostat base first. This base holds the thermostat in place. It also connects the wires to the thermostat. Follow these steps to get started.
Mounting Base
First, turn off the power to your HVAC system. Use a screwdriver to remove the old thermostat from the wall. Keep the wires visible. Next, take the new thermostat base and place it against the wall. Use a level to ensure it is straight. Mark the screw holes with a pencil.
Drill small pilot holes where you marked. Use screws to attach the new base to the wall. Make sure it is secure. If your wall is uneven, use wall anchors for extra support. This step ensures the base stays in place. Now, you are ready to connect the wires.
Connecting Two Wires
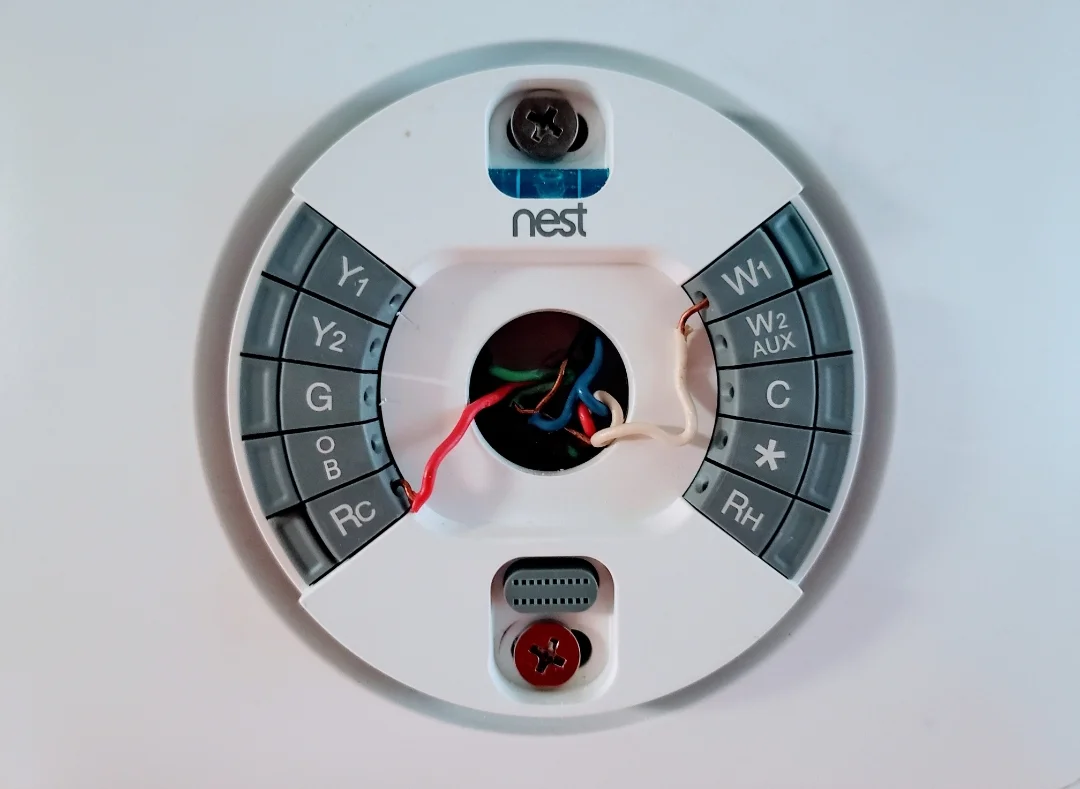
Look at the two wires coming from the wall. Each wire should have a different color. Usually, one wire is red and the other is white. Take the red wire and connect it to the ‘R’ terminal on the new base. Tighten the screw to hold the wire in place.
Next, take the white wire and connect it to the ‘W’ terminal. Again, tighten the screw to secure the wire. Make sure there are no loose ends. Double-check your connections. The wires must be secure. Now, your new thermostat base is installed and ready for the next steps.
Install Power Extender Kit
Are you ready to make your home smarter? Installing a smart thermostat with only two wires can be tricky. But with a Power Extender Kit (PEK), you can make it work. This guide will help you to install the Power Extender Kit correctly.
Locating Furnace Control Board
First, you need to locate the furnace control board. It is usually inside the furnace. Remove the panel covering the furnace control board. You should see a bunch of wires connected to the board.
Find the terminals labeled R, C, W, G, and Y. These are the connections you will work with. Make sure to turn off the power to the furnace before you start working. Safety first!
Wiring Power Extender
Now, it is time to wire the Power Extender Kit. Here is a step-by-step guide:
- Connect the red wire from the PEK to the R terminal on the control board.
- Connect the white wire from the PEK to the W terminal on the control board.
- Connect the green wire from the PEK to the G terminal on the control board.
- Connect the yellow wire from the PEK to the Y terminal on the control board.
- Connect the black wire from the PEK to the C terminal on the control board.
Make sure each wire is securely connected. Double-check your connections to avoid any issues. Once all wires are connected, close the panel of the furnace. Turn the power back on.
Your Power Extender Kit is now installed. The smart thermostat should now have the power it needs to function. Enjoy the convenience and comfort of your new smart thermostat!
Credit: www.reddit.com
Attach Thermostat Display
Attaching the thermostat display is a crucial step in installing your smart thermostat. This part ensures that your new device is securely mounted and ready to control your home’s temperature. Follow these steps to attach the display properly and avoid any issues later.
Securing Display
First, align the display with the base plate. Make sure the connectors are in place. Press the display gently until you hear a click. This sound means the display is securely attached. Check that the display sits flush against the wall. Any gaps can affect the thermostat’s performance.
Powering On
Once the display is secure, you need to power it on. Return to your circuit breaker and turn the power back on. The thermostat should light up. If it doesn’t, recheck the connections and ensure the display is correctly attached.
Follow the on-screen instructions to complete the setup. This may include connecting to your Wi-Fi and setting your preferences. Congratulations! Your smart thermostat is now ready to use.
Configure Thermostat
Configuring your smart thermostat is a crucial step. It ensures your home maintains the perfect temperature. Follow these steps to get your thermostat up and running.
Setting Up Wi-fi
First, connect your thermostat to your home’s Wi-Fi network. This allows you to control it from your smartphone. Here’s how to do it:
- On the thermostat screen, select Settings.
- Choose Wi-Fi and wait for the list of networks to appear.
- Select your home network from the list.
- Enter your Wi-Fi password and press Connect.
- Wait for the confirmation message that shows a successful connection.
Connecting to Wi-Fi lets you control your thermostat remotely. It also ensures you receive updates and alerts.
Creating Schedules
Creating schedules is essential. It saves energy and ensures comfort. Follow these steps:
- Open the thermostat app on your smartphone.
- Go to Schedule or Program settings.
- Set different temperatures for different times of the day.
For example, set the thermostat lower during the night. Raise the temperature just before you wake up. This ensures you are comfortable when needed.
Many smart thermostats offer an Auto-Schedule feature. This learns your preferences over time. Enable this feature for even more convenience.
Credit: www.reddit.com
Test Installation
After successfully connecting your smart thermostat with the two wires, it’s essential to test the installation. This ensures everything works as it should. Testing helps you identify potential issues before using the device regularly. Let’s break down the steps involved.
Checking Functionality
First, ensure that the thermostat is securely mounted on the wall. Turn on the power to the HVAC system. The thermostat should light up or display a screen. This indicates that it’s receiving power.
Follow these steps to check functionality:
- Set the thermostat to a desired temperature.
- Wait for the HVAC system to respond.
- Listen for the sound of the system starting up.
If the system responds correctly, the installation was successful. If not, proceed to troubleshooting.
Troubleshooting Issues
Sometimes, things don’t go as planned. Here are common issues and their solutions:
| Issue | Possible Solution |
|---|---|
| Thermostat screen is blank | Check power supply and ensure wires are connected properly. |
| HVAC system doesn’t start | Verify that wires are in the correct terminals. |
| System runs continuously | Ensure the thermostat settings are configured correctly. |
Double-check all connections if issues persist. Consult the thermostat’s manual for more specific troubleshooting tips.
Frequently Asked Questions
Can I Install A Smart Thermostat With Only 2 Wires?
Yes, you can install a smart thermostat with only 2 wires. It’s common in older homes.
Do I Need A C-wire For A Smart Thermostat?
No, some smart thermostats work without a C-wire. They use power-stealing technology.
How Do I Identify The 2 Wires For My Thermostat?
The 2 wires are usually red (R) and white (W). Check your thermostat manual.
Will My Hvac System Work With A 2-wire Thermostat?
Yes, most HVAC systems will work. Always verify compatibility with your thermostat model.
Are There Specific Smart Thermostats For 2-wire Setups?
Yes, there are smart thermostats designed for 2-wire setups. Check the product specifications.
Conclusion
Installing a smart thermostat with only 2 wires is possible. Follow the steps carefully. Ensure your thermostat is compatible with your system. Use a power extender kit if needed. This can make the process easier. Enjoy better control of your home’s temperature.
Save energy and reduce costs. Remember to consult the manual for specific instructions. Your home comfort is now in your hands. Happy installing!