Installing a plywood subfloor is a project that can completely change the feel and quality of your home. If your floor squeaks, feels soft, or you want to lay new flooring, starting with a strong, flat subfloor is key. Many homeowners see this as a tough task, but with careful steps and the right tools, it is possible for most people with basic DIY skills. This guide will walk you through everything you need to know—from the first idea to the final screw—so you can install a plywood subfloor that lasts for years.
A subfloor is not just a base for your carpet or hardwood. It’s the layer that holds the weight of your furniture, absorbs movement, and keeps your home safe and quiet. The right subfloor prevents problems like floor sagging, cracked tiles, and water damage. Many people make mistakes by skipping steps or using the wrong materials, which can lead to expensive repairs later. Here, you’ll learn not just the “how”, but also the “why” behind each step.
If you’re ready to take on this project, let’s look at the tools, materials, and detailed process to install a strong and reliable plywood subfloor.
Understanding Plywood Subfloors
A plywood subfloor is a sheet of engineered wood, usually 4 feet by 8 feet, that sits on the floor joists. Its job is to create a flat, stable surface for your finished floor. Plywood is made from thin layers of wood glued together. This makes it strong and less likely to move or warp compared to solid wood.
There are different grades and thicknesses of plywood. For most homes, 3/4-inch tongue-and-groove plywood is the standard choice. Thinner plywood (like 1/2-inch) may be used for second layers or in some older homes, but it is not strong enough alone on joists spaced 16 inches apart.
Plywood is popular because:
- It is strong and stable
- It resists changes in moisture better than solid wood
- It is easy to cut and install
Some people use oriented strand board (OSB) instead of plywood. OSB is cheaper, but plywood handles water better and holds nails tighter.
Planning And Preparation
Before you start, proper planning will save time and money. Skipping this step is a common mistake that leads to poor results.
Measuring Your Space
Begin by measuring the length and width of your room. Multiply these to get the total square footage. Always buy at least 10% more plywood than you need to cover mistakes or odd corners.
Example: If your room is 12 feet by 15 feet, you need 180 square feet. Add 10% (18 sq ft), so buy enough plywood to cover about 198 sq ft.
Choosing The Right Plywood
Plywood comes in various grades and thicknesses:
| Grade | Best For | Notes |
|---|---|---|
| CDX | Subfloors | Strong, affordable, rough surface |
| BC | Under vinyl/carpet | Smoother, more expensive |
| OSB | Budget projects | Less water-resistant |
For most homes, 3/4-inch CDX plywood is ideal.
Gathering Tools And Materials
You will need:
- Tape measure
- Chalk line
- Circular saw or table saw
- Drill or screw gun
- Pry bar (if removing old flooring)
- Construction adhesive
- Plywood sheets (usually 4×8 ft)
- Subfloor screws (2 to 2-1/2 inches)
- Safety gear (gloves, eye protection)
- Level
Optional but useful:
- Reciprocating saw (for tough old nails)
- Jigsaw (for cutting around vents)
Checking Floor Joists
Before you begin, inspect your floor joists for damage, rot, or sagging. Use a level to check for flatness. If you see any problems, fix them now, or your new subfloor will not be flat.
A pro tip: If your joists are more than 16 inches apart, you may need thicker plywood or add extra blocking between joists for strength.
Removing The Old Flooring
You cannot install new plywood over damaged or unstable flooring. The old flooring must come out down to the joists.
- Remove baseboards and trim carefully. Save them if you want to reuse them.
- If your old floor is carpet, pull it up and remove all padding and staples.
- For tile or hardwood, use a pry bar and hammer. Be careful not to damage the joists underneath.
- Remove any old subfloor that is soft, moldy, or water-damaged. This often means removing nails or screws.
- Clean the area. Sweep and vacuum. The surface should be free of all debris.
Common mistake: Leaving small nails or bits of old flooring. These can make the new plywood sit unevenly.
Preparing The Subfloor Area
Taking time to prepare your space makes the rest of the job much easier.
Inspecting Joists And Structure
Look for:
- Rot or water damage: Replace any bad wood.
- Loose joists: Tighten with screws or brackets.
- Uneven joists: Plane down high spots or shim low spots.
A long straight edge or level will help you find uneven areas. Joists should be clean, dry, and solid.
Adding Blocking
If your joists are more than 16 inches apart, or the edges of plywood will not be supported, add blocking. This means adding short pieces of 2×6 or 2×8 wood between joists where plywood sheets meet. It prevents sagging and squeaks.
Laying Out The Plywood
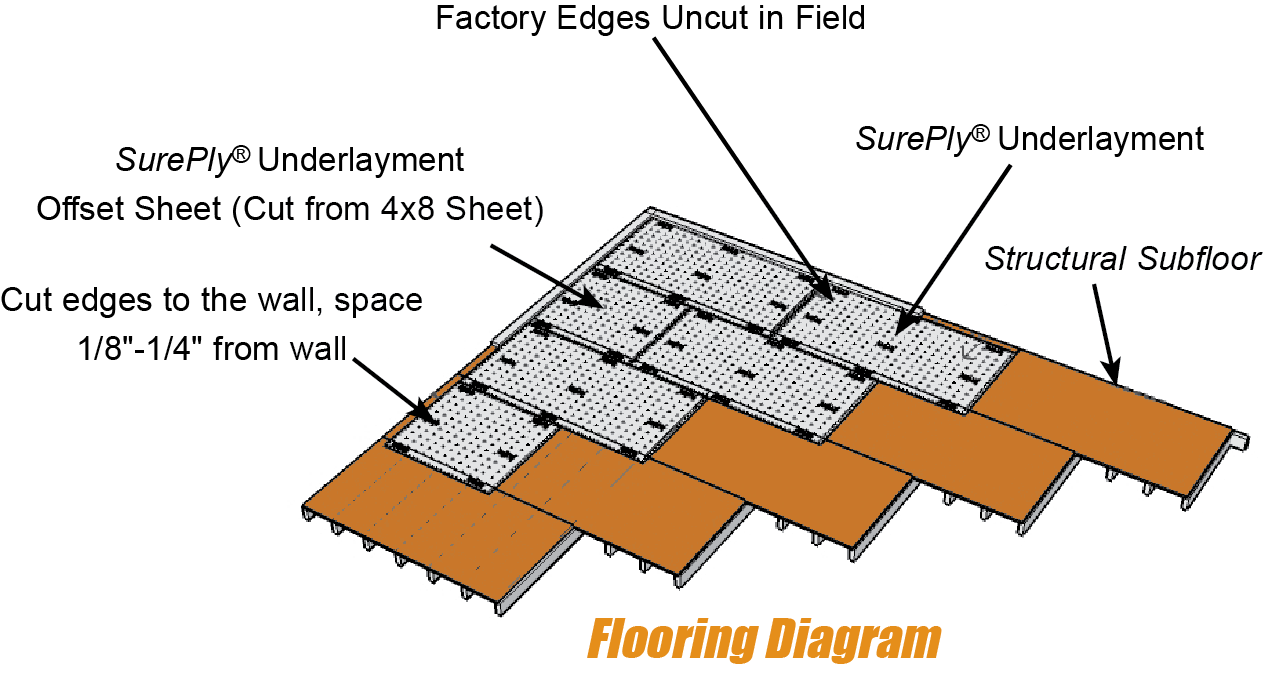
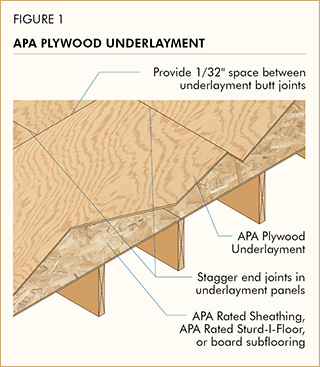
Before cutting any wood, lay out your plywood sheets on the floor to see how they fit. Stagger the joints so that no four corners meet. This adds strength.
Mark where the sheets will go. Use a chalk line to snap straight lines across the joists. This shows where to place screws later.
Cutting And Fitting Plywood Sheets
Plywood sheets rarely fit perfectly without some cutting. Measure twice, cut once.
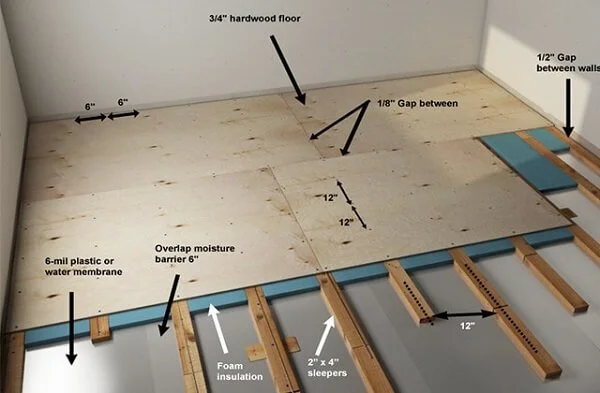
- Measure the area for each sheet. Leave a 1/8-inch gap between sheets for expansion. This gap is important—if you skip it, the plywood may buckle when humidity changes.
- Use a circular saw to make straight cuts. For curves or vents, use a jigsaw.
- Dry-fit each piece before installing. Make sure edges land in the middle of joists or blocking.
An insight many beginners miss: Small gaps are normal and even good! Tight seams can cause problems later.
Installing The Plywood Subfloor
This is the main part of the project. Take your time—rushing leads to mistakes.
Using Construction Adhesive
Apply a line of construction adhesive on top of each joist before laying down the plywood. This glue stops squeaks and makes the floor stronger.
Do not use too much—just a steady bead along each joist.
Positioning Sheets
Lay your first sheet in a corner, with the long edge across the joists. Make sure the tongue (if using tongue-and-groove plywood) faces out, groove faces in.
Push the sheet against the wall, leaving a 1/4-inch gap at the wall for expansion.
Fastening The Plywood
Use subfloor screws (not nails) every 6 to 8 inches along the edges, and every 8 to 12 inches in the field (the middle of the sheet).
Screws hold better and don’t pop out over time.
| Fastener Type | Spacing (Edges) | Spacing (Field) | Best For |
|---|---|---|---|
| Subfloor screws | 6-8 in | 8-12 in | Most projects |
| Ring-shank nails | 6 in | 10 in | Budget jobs |
Drive screws so they are just below the plywood surface, but do not break through.
Staggering The Joints
The short edges of plywood sheets should not all line up. Stagger seams by at least 2 feet from row to row. This is very important for floor strength.
Cutting Around Vents And Pipes
Mark where any floor vents, heat registers, or pipes are. Cut out these shapes with a jigsaw before installing the plywood sheet.
Always dry-fit and check your cuts. It’s easier to adjust before the sheet is screwed down.
Continuing The Process
Repeat this process for each sheet:
- Apply adhesive
- Lay plywood
- Screw down securely
- Stagger joints
If you have a large room, work in small sections. Double-check measurements as you go.
A common beginner mistake: Rushing through the fastening step or missing screws. This can lead to squeaks or loose spots.
Credit: www.kaltimber.com
Dealing With Special Cases
Some rooms and situations need extra care.
Installing Over Concrete
If you have a concrete slab, you must add a moisture barrier (plastic sheeting) under the plywood. Use special concrete screws or a floating subfloor system.
Second Layers
Sometimes, you add a second layer of plywood for extra strength or to raise the floor height. Lay it perpendicular to the first layer and offset seams. Use shorter screws that do not reach the joists.
Uneven Or Old Joists
If your floor joists are old or uneven, add leveling compound or shims before laying plywood. This prevents bouncy spots.
Checking Your Work
Before moving on, inspect the entire subfloor.
- Walk over every part. The floor should feel solid, with no movement or squeaks.
- Check that all screw heads are below the surface.
- Fill any deep gaps with wood filler.
If you find a loose spot, add more screws.
Moisture Protection And Insulation
Plywood is strong, but water is its enemy. Protect your new subfloor from moisture.
- Make sure any crawl space or basement below is dry and well-ventilated.
- In damp areas, install a vapor barrier under the plywood.
- In cold climates, add insulation between the joists before laying the subfloor. This keeps your home warmer and saves energy.
A non-obvious tip: If you are installing tile, use a layer of cement backer board over your plywood for extra water resistance.
Preparing For The Finish Floor
After installing your plywood subfloor, you are ready for the finish floor—carpet, tile, hardwood, or vinyl.
- Sweep and vacuum the subfloor to remove all dust and debris.
- Check for any high spots or bumps. Sand them down.
- Mark the locations of joists on the wall with tape or pencil. This makes it easier to install the finish floor later.
If you plan to glue down flooring, check that the plywood surface is clean and dry. Paint or seal the subfloor if recommended by your flooring manufacturer.
Common Mistakes To Avoid
Many DIYers run into problems by making these mistakes:
- Not leaving expansion gaps. Wood moves with humidity; gaps prevent buckling.
- Using nails instead of screws. Nails can work loose and cause squeaks.
- Laying plywood in the wrong direction. Always lay sheets perpendicular to joists.
- Not staggering seams. This weakens the floor.
- Forgetting to support plywood edges. Gaps without blocking can cause soft spots.
- Not using adhesive. Glue plus screws is much stronger.
- Ignoring moisture problems. Always fix leaks or dampness before installing plywood.
- Skipping inspection of joists. Weak joists lead to problems no subfloor can fix.
- Failing to sweep and clean. Dirt under the plywood makes the floor uneven.
- Rushing the job. Care at every step leads to a longer-lasting, quieter floor.
Cost And Time Estimates
A typical plywood subfloor project for a 200 sq ft room costs:
- Plywood (3/4″ CDX): $40 per sheet, about 7 sheets ($280)
- Screws: $30
- Adhesive: $20
- Tool rental (saw, if needed): $40
Total: About $370 (not Including Insulation Or Vapor Barrier)
Time needed: 1-2 days for one person, or 1 day with help.
Pros And Cons Of Plywood Subfloors
Here’s a quick comparison to help you decide if plywood is right for your project:
| Pros | Cons |
|---|---|
| Strong and stiff Widely available Holds screws well | Heavier to handle Higher cost than OSB Can swell if wet |
Practical Tips For Success
- Store plywood sheets indoors for 24-48 hours to let them adjust to room moisture. This prevents warping.
- Mark the location of joists on the wall as you go—this helps when installing the finish floor.
- If working alone, use plywood lifters or have a helper. Sheets are heavy and awkward.
- Wear knee pads to protect your knees during installation.
- Keep a small gap around pipes and vents to allow for movement.
- Label the order of sheets if you need to remove them before final installation.
- If you have pets, keep them out of the area. Their nails can damage the plywood before it is covered.
Credit: www.patriottimber.com
Real-world Example
Imagine a family with an old, squeaky floor in their living room. They remove the carpet and find a warped, thin subfloor. By following these steps, they:
- Remove the old subfloor and check joists (finding and fixing a small water leak)
- Add blocking to support plywood edges
- Lay new 3/4-inch CDX plywood, using adhesive and screws
- Stagger all seams and cut carefully around vents
- Finish with a clean, solid base for new hardwood flooring
Afterward, their floor is quiet, strong, and ready for years of use. No more squeaks or soft spots—just a smooth, reliable foundation.
Frequently Asked Questions
What Thickness Of Plywood Is Best For A Subfloor?
For most homes, 3/4-inch plywood is the best choice. It provides strength and resists flexing between joists spaced 16 inches apart. Thinner plywood is only suitable as a second layer or where joists are closer together.
Can I Install A Plywood Subfloor Over An Existing Floor?
It depends. If the old floor is flat, dry, and solid, you can sometimes add a second layer of plywood. However, if the old floor is damaged, soft, or uneven, it’s best to remove it down to the joists for best results.
How Do I Prevent My New Subfloor From Squeaking?
Use construction adhesive on joists and screws instead of nails. Make sure the plywood fits tightly to the joists, and add blocking to support all edges. Walk the floor as you install—if you hear a squeak, add more screws.
Do I Need A Moisture Barrier Under Plywood?
If you are installing over concrete or above a damp space (like a crawl space), you need a moisture barrier (plastic sheeting) under the plywood. For upper floors in dry homes, it is not usually needed. Always check local building codes.
What Is The Difference Between Plywood And Osb For Subfloors?
Plywood is stronger, handles water better, and holds screws tighter than OSB. OSB is cheaper and sometimes used for budget projects, but plywood is the better choice for most homes. For more details, see this guide from Family Handyman.
A solid plywood subfloor is the foundation of a great floor. By following each step carefully, you’ll create a floor that feels strong, quiet, and ready for whatever finish you choose next. If you take your time and avoid shortcuts, you’ll enjoy the results for years to come.
Credit: www.apawood.org