A warm floor feels like luxury, especially on a cold morning. But when water starts pooling, or you notice your heating bills rising, a leak in radiant floor heating can quickly turn comfort into a headache. Fixing this problem takes more than just patching a pipe—it’s about understanding your floor’s unique system, finding the leak, and making the right repair for lasting results. If you’re dealing with a leak or want to be prepared, this guide will walk you through each step, from detection to final checks, using simple, clear language. Even if you’re not a plumbing expert, you’ll learn what matters, what can go wrong, and how to make smart choices.
How Radiant Floor Heating Systems Work
Before you fix a leak, it helps to know how radiant floor heating actually works. These systems use hot water pipes (hydronic) or electric wires (electric) installed under your floor to heat a room from the ground up. The most common type in homes is hydronic radiant heating. Warm water flows through a network of flexible tubing, often called PEX pipes, spreading heat evenly.
Because these pipes are under your floor—sometimes under concrete or wood—a small leak can be hard to spot. Over time, even a pinhole leak can cause water damage, mold, and high energy bills.
Hydronic radiant heating has three main parts:
- Boiler or water heater: Heats water for the system.
- Pump: Moves hot water through the pipes.
- Network of pipes (tubing): Carries water under the floor.
If one part fails, the whole system can be affected. That’s why finding and fixing leaks quickly is so important.
Common Signs Of A Leak In Radiant Floor Heating
Early detection is key. Many leaks start small and get worse over time. Here are the most common signs:
- Unusual wet spots: You find damp areas, puddles, or persistent wetness on your floor.
- Unexplained increase in water bills: Your usage climbs even though your habits haven’t changed.
- Drop in heating efficiency: The floor feels colder than usual, or your system runs longer to keep up.
- Boiler loses pressure: You have to add water to the system more often.
- Warped or stained flooring: Wood floors may buckle; tiles might loosen.
- Mold or mildew odors: Musty smells can signal hidden water damage.
Beginners often miss that a leak can be far from where the water shows up. Water may travel along the tubing or under the flooring before it becomes visible.

Credit: flowmastersplumbing.com
Safety First: What To Do When You Suspect A Leak
If you think you have a leak, act quickly but safely:
- Turn off the heating system. Running the pump or boiler with a leak can cause more damage.
- Shut off the water supply to the radiant system if possible.
- Unplug electrical parts if you have an electric radiant system or if water is near outlets.
- Clear the area. Move furniture and valuables away from the wet spot.
Never attempt repairs if you are unsure about safety. Water and electricity are a dangerous mix. If in doubt, call a professional.
Tools And Materials Needed For Leak Detection And Repair
Having the right tools makes finding and fixing leaks much easier. Here’s what you may need:
- Infrared thermometer or thermal camera
- Moisture meter
- Pressure gauge
- Pipe cutter
- PEX tubing and fittings (if you have PEX pipes)
- Pipe repair clamps
- Epoxy putty (for temporary fixes)
- Utility knife
- Wrenches
- Bucket and towels
- Protective gloves and eyewear
Some of these tools, like thermal cameras, can be rented from hardware stores.
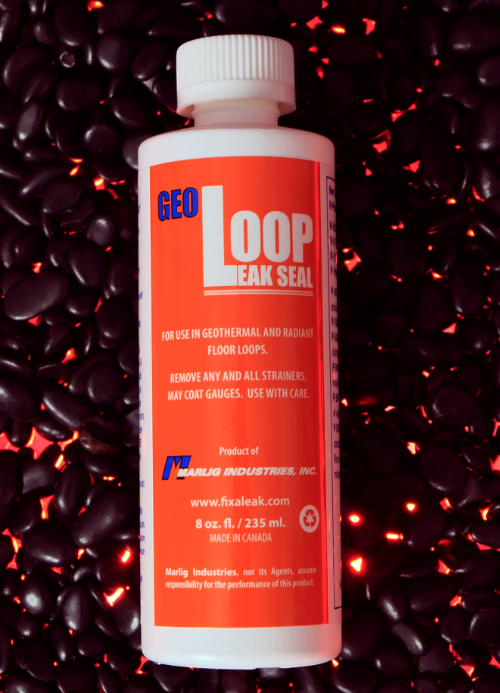
Credit: www.fixaleak.com
How To Find The Leak: Step-by-step
Finding the exact spot of a leak is the hardest part. Here’s how to do it:
1. Visual Inspection
Start simple. Look for visible signs of water, stains, or floor damage. Check around the boiler and exposed pipes for drips or puddles.
2. Monitor System Pressure
If your boiler has a pressure gauge, note the reading. A slow drop often means a leak. Refill the system and see if the pressure falls again after a few hours.
3. Use A Moisture Meter
A moisture meter can help you find damp spots under carpet or wood. Move the meter in a grid pattern. High readings mean water is present.
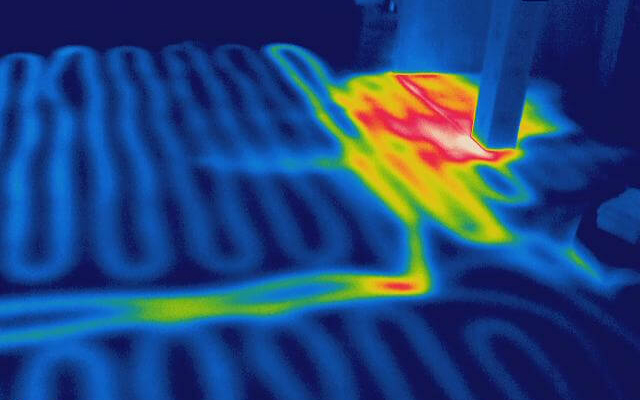
4. Infrared Thermography
An infrared thermometer or thermal camera can spot cold areas where water is leaking and cooling the floor. Aim for a cool morning after the system’s been on, as leaks show up as cold spots.
5. Section-by-section Isolation
If you have multiple zones (different areas controlled separately), turn off all but one. See if the leak continues. Move through each zone to narrow down the location.
6. Pressure Testing
A plumber can use a pressure test to isolate sections of pipe. If you’re handy, you can close valves to test each loop. A drop means the leak is in that section.
7. Acoustic Leak Detection
In some cases, listening devices can pick up the sound of water escaping under the floor. This is usually for professionals.
Insight: Many beginners focus only on wet spots, but thermal cameras and pressure tests are much more reliable, especially with hidden leaks.
Choosing The Right Repair Method
How you fix the leak depends on the type of pipe, the size of the leak, and where it is under the floor.
Main Repair Options
1. Pipe Clamps
For small leaks in accessible spots. Clamp around the pipe to stop the leak. Fast and easy, but often a temporary fix.
2. Epoxy Putty
Useful for small cracks or pinholes. Mold the putty over the leak. It hardens and seals the hole. Best for quick, emergency repairs.
3. Pex Pipe Replacement
For PEX tubing, the best fix is usually to cut out the damaged section and replace it with new pipe using push-fit or crimp connectors.
4. Spot Repairs In Concrete
If the leak is under concrete, you may need to break up a small section of floor, repair the pipe, and patch the concrete.
5. Pipe Lining Or In-place Curing
For some larger or difficult leaks, pros can insert a liner into the pipe to seal leaks from the inside. This is less common for small home systems.
6. Full Loop Replacement
If the leak is large or the tubing is old and brittle, replacing an entire loop (one circuit of pipe) may be the safest choice.
Non-obvious tip: Not all PEX pipes use the same connectors. Check if you have PEX-A, PEX-B, or PEX-C. Using the wrong fitting can cause future leaks.
Credit: www.acsunderground.com
Step-by-step Repair For Pex Tubing
Most modern radiant systems use PEX tubing, which is flexible and fairly easy to fix. Here’s how to repair a typical leak:
1. Locate And Access The Leak
Once you’ve found the leak, you’ll need to expose the pipe. For wood or tile floors, carefully remove flooring and underlayment above the spot. For concrete, use a hammer drill to break a small area—only as big as needed.
2. Shut Off And Drain The System
Turn off the water and heat. Open a drain valve (often near the boiler) and let water out of the loop. Catch water in a bucket.
3. Cut Out Damaged Section
Use a pipe cutter to remove the damaged part. Make sure you have at least 2 inches of good pipe on either side.
4. Prepare New Pex And Fittings
Cut a replacement piece of PEX tubing to the right length. Clean the ends of old and new pipe.
5. Attach Fittings
Use the correct connectors—crimp rings, clamp rings, or push-fit. Follow the fitting instructions for your PEX type. Make sure connections are tight.
6. Test The Repair
Before closing the floor, turn the water back on and check for leaks. You can use a pressure gauge to confirm the fix.
7. Close Up The Floor
Once you’re sure there are no leaks, patch the floor. For concrete, use a patching compound. For wood or tile, replace underlayment and finish flooring.
Beginner’s mistake: Rushing to close the floor before fully testing the repair can lead to repeat work. Always check for leaks after the fix.
Repairing Leaks In Concrete-slab Radiant Floors
Fixing leaks under a concrete slab is more challenging. Here’s how it’s done:
1. Pinpoint The Leak
Use thermal imaging or professional leak detection to find the exact spot. Mark the area.
2. Remove The Concrete
Cut a small square in the slab with a concrete saw. Use a chisel and hammer to lift out the piece.
3. Repair The Pipe
Clean and dry the area. Cut out the bad section and install new PEX or copper tubing with connectors.
4. Pressure Test
Before patching, test the system at normal operating pressure for at least 30 minutes.
5. Patch The Concrete
Replace the concrete with a fast-setting patch. Allow it to cure fully before turning the system back on.
Pro tip: Always use a vapor barrier when patching concrete to prevent moisture migration.
Temporary Vs. Permanent Repairs
Not all repairs are equal. Sometimes you need a quick fix until a professional can help.
Temporary Repairs
- Epoxy putty
- Pipe clamps
- Silicone tape
These can stop a leak for a few days or weeks. But they are rarely enough for long-term peace of mind.
Permanent Repairs
- Section replacement with new tubing and proper connectors.
- Professional pipe lining for inaccessible leaks.
- Full loop replacement for old, brittle, or corroded pipes.
Insight: Temporary fixes are good for emergencies but should not be relied on for more than a short period. Water under your floor can cause expensive damage if left too long.
When To Call A Professional
Some repairs are best left to licensed plumbers or radiant heating specialists. Call for help if:
- The leak is under a large area of concrete.
- You can’t locate the leak.
- There are multiple leaks, or you suspect widespread pipe failure.
- The system uses copper or older materials, not PEX.
- You are not comfortable with tools or system pressure.
Professionals have access to specialized tools, like electronic listening devices, and can perform advanced repairs.
Cost Comparison: Diy Vs. Professional Repair
Here’s a look at typical costs for fixing a leak in radiant floor heating:
| Repair Type | DIY Cost (USD) | Pro Cost (USD) | Time Needed |
|---|---|---|---|
| Small Clamp or Putty Fix | $10–$40 | $150–$300 | 30–60 min |
| PEX Section Replacement | $30–$100 | $300–$800 | 1–3 hrs |
| Concrete Slab Repair | $100–$300 (tools/materials) | $800–$2,500 | 4–8 hrs |
| Full Loop Replacement | $200–$500 | $2,000–$5,000 | 1–2 days |
DIY repair saves money, but mistakes can cause bigger problems later. Always balance cost with your confidence and skill.
Comparing Repair Materials
Which materials are best for your fix? Here’s a simple comparison:
| Material | Use Case | Durability | DIY Friendly |
|---|---|---|---|
| PEX Tubing | Section replacement | High | Yes |
| Epoxy Putty | Pinholes, cracks (temporary) | Low–Medium | Yes |
| Pipe Clamps | Small leaks (temporary) | Low–Medium | Yes |
| Copper Tubing | Older systems | High | No (needs skills) |
| Push-Fit Connectors | Quick repairs | Medium–High | Yes |
Tip: Always use materials rated for hot water and pressure.
How To Prevent Future Leaks
Once you’ve fixed a leak, protect your system from future problems:
- Monitor system pressure weekly during heating season.
- Flush the system every 2–3 years to remove debris and scale.
- Check for signs of corrosion around the boiler and pumps.
- Use correct water chemistry. Hard water can damage pipes.
- Add leak detection sensors under the floor for early warning.
- Never use nails or screws in the floor without knowing pipe locations.
Many leaks are caused by old age, poor installation, or water chemistry. Regular maintenance can double the life of your system.
Common Mistakes To Avoid
Some errors can turn a small leak into a big headache:
- Ignoring early signs: Small wet spots or pressure drops should not be overlooked.
- Using the wrong connectors: Not all PEX fittings are universal.
- Rushing repairs: Not pressure testing before closing up the floor.
- DIY beyond your skill: Complex repairs often need a pro.
- Skipping maintenance: Neglecting your system leads to more leaks.
Expert insight: If your system is over 20 years old and leaks keep happening, replacing large sections may be smarter than many small repairs.
Example: Real-world Radiant Floor Leak Fix
Let’s look at a typical home repair:
Sarah, a homeowner, noticed her bathroom floor felt cold and saw a wet spot near the wall. She checked her boiler and found the pressure was low. Using a moisture meter, she found a damp patch under the tile. With a thermal camera from her local tool rental, she saw a cold line—right where her PEX tubing ran.
She turned off her system, drained the line, and carefully cut out a small section of floor. Inside, she found a tiny puncture from a lost nail. Sarah cut out 8 inches of pipe and used push-fit connectors to install new PEX.
After filling and testing the system for leaks, she patched the floor and reinstalled the tile. The repair cost under $100 and took one afternoon.
Lesson: Correct tools and careful steps make a big difference. Sarah avoided bigger damage by acting quickly.
The Role Of System Design In Leak Risk
Not all radiant floors have the same risk. Key factors:
- Older copper systems are more likely to corrode and leak.
- Tightly spaced PEX can be more vulnerable to nails or screws.
- High water pressure can stress pipes.
- Poor installation (kinks, sharp bends, bad fittings) often leads to early leaks.
If you’re building or renovating, ask your installer about pipe layout, pressure ratings, and warranties.
Useful Resources For Radiant Floor Repair
Learning more can help you make smart choices and talk with professionals. Good sources include:
- The Radiant Professionals Alliance
- Manufacturer websites (Uponor, Viega, Watts)
- Wikipedia: Radiant floor heating
These resources offer guides, diagrams, and troubleshooting tips.
Frequently Asked Questions
What Is The Most Common Cause Of Leaks In Radiant Floor Heating?
The most common causes are punctures from nails or screws, poor installation (like sharp bends), and old or corroded pipes. Over time, water chemistry can also degrade tubing. Regular inspection and careful installation help prevent these problems.
Can I Fix A Radiant Floor Leak Myself, Or Should I Call A Professional?
Small leaks in PEX tubing above accessible floors can often be fixed by experienced DIYers. But if the leak is under concrete, if the system uses copper, or if you’re not confident with tools, it’s best to call a professional.
How Do I Find The Exact Location Of A Leak Under The Floor?
Use a combination of thermal cameras, moisture meters, and system pressure tests. Visual signs (like wet spots) can help, but advanced tools give more precise results. For deep or hidden leaks, professional leak detection services may be needed.
Is Epoxy Putty A Permanent Solution For Leaking Pipes?
Epoxy putty is usually a temporary fix. It can seal small cracks or holes quickly but is not as durable as replacing the damaged section. For long-lasting results, cut out and replace the leaking pipe.
How Can I Prevent Leaks After Repairing My Radiant Floor System?
Regular maintenance is key: monitor system pressure, flush the system, check for corrosion, and avoid damaging pipes during home projects. Installing leak sensors under the floor gives early warning and helps prevent major damage.
Fixing a leak in radiant floor heating takes patience and the right approach. By following the steps above, you can restore warmth and comfort to your home—and avoid costly repairs down the road. If in doubt, don’t hesitate to seek expert help.