Installing a new thermostat in a car usually takes 1-2 hours. The time can vary based on the car model and your mechanical skills.
A car’s thermostat regulates the engine’s temperature, ensuring it runs efficiently. Replacing a faulty thermostat can prevent overheating and potential engine damage. While the task is not overly complex, it does require some basic mechanical knowledge and the right tools.
This guide will help you understand the steps involved and the time you might need to complete the job. Whether you’re a seasoned DIYer or a beginner, this information will prepare you for a smoother thermostat replacement process. Let’s dive in and learn how to get it done efficiently.
Credit: www.youtube.com
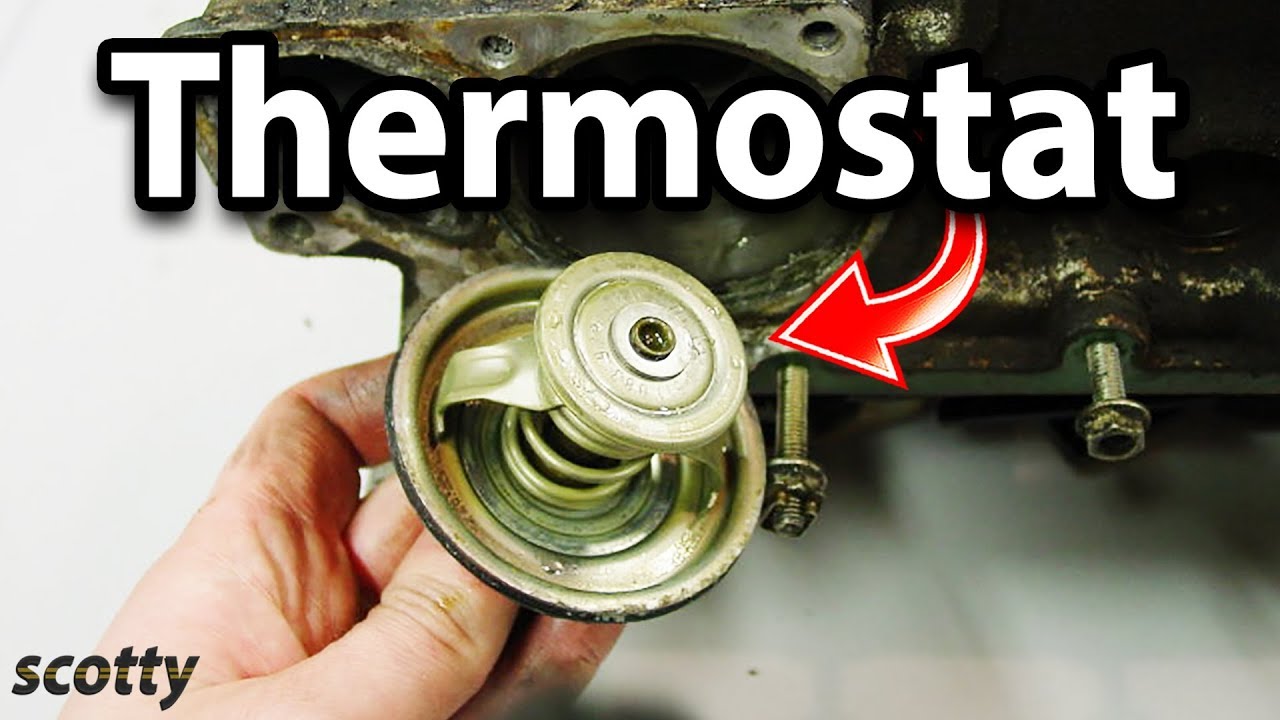
Introduction To Thermostat Installation
Installing a thermostat in a car typically takes about one to two hours. This depends on the car model and the complexity of the system. Make sure to follow the manufacturer’s instructions for accurate results.
Installing a thermostat in your car can seem daunting. But with the right information, it becomes manageable. The thermostat is a critical part of your car’s cooling system. It regulates the engine’s temperature. This guide will help you understand its purpose and the importance of timely replacement.Purpose Of The Thermostat
The thermostat controls the flow of coolant in the engine. It ensures the engine heats up quickly. Then, it keeps the engine at an optimal temperature. This prevents overheating and maintains fuel efficiency. Without a working thermostat, your engine could overheat or run too cold. Both conditions can cause serious damage.Importance Of Timely Replacement
Replacing the thermostat on time is crucial. A faulty thermostat can lead to engine overheating. Overheating can cause expensive engine repairs. Early replacement can prevent these issues. It also ensures your car runs smoothly and efficiently. Regular checks can help you catch problems early. This saves you time and money in the long run. “`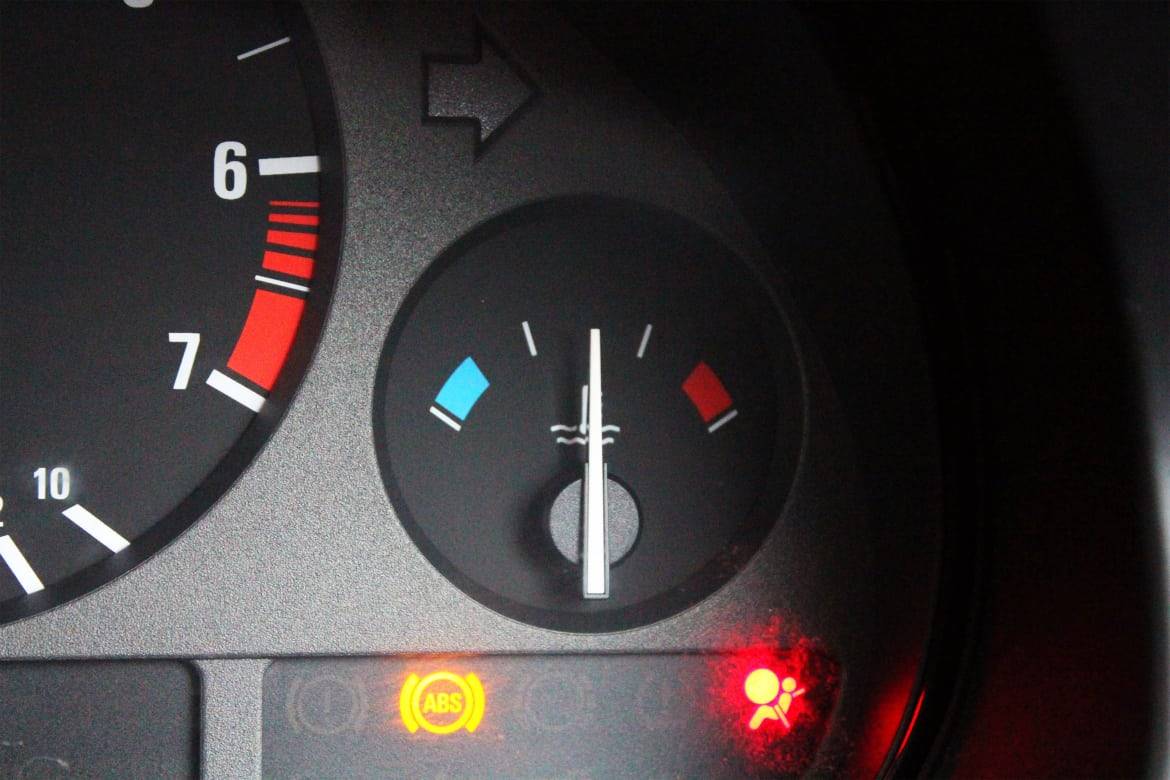
Credit: www.cars.com
Tools And Materials Needed
Installing a thermostat in your car may seem like a daunting task. But with the right tools and materials, the job becomes much easier. Proper preparation ensures a smooth process and a successful installation.
Essential Tools
Several tools are necessary for installing a thermostat in your car. These include:
- Screwdrivers: Both flathead and Phillips are needed.
- Wrenches: A set of socket wrenches is useful.
- Pliers: Needle-nose pliers help with small parts.
- Drain pan: To catch any coolant that may spill.
- Gasket scraper: For removing the old gasket material.
Recommended Materials
In addition to tools, you’ll need specific materials for the thermostat installation. These include:
- New thermostat: Ensure it matches your car’s specifications.
- Gasket: A new gasket is crucial for a proper seal.
- Coolant: Fresh coolant is needed to replace any lost during the process.
- Sealant: Gasket sealant can help prevent leaks.
- Rags or towels: Useful for cleaning up spills and messes.
Having these tools and materials on hand will make the thermostat installation process smoother and faster. Preparation is key to success.
Preparation Steps
Installing a thermostat in a car typically takes about 1-2 hours. This depends on the car model and your experience. Prepare necessary tools and consult the car’s manual before starting.
Before installing a new thermostat in your car, preparation is essential. Proper preparation ensures a smooth and efficient process. Follow these steps to make sure you are ready to start the installation.Safety Precautions
Working on your car can be dangerous. Always prioritize safety. Wear protective gloves to avoid burns and cuts. Safety glasses are important to protect your eyes from debris. Ensure the car is turned off and the engine is cool. Disconnect the battery to prevent any electrical shocks.Vehicle Preparation
Make sure your vehicle is on a flat surface. Use wheel chocks to prevent the car from moving. Raise the front of the car with a jack and secure it with jack stands. This gives you enough space to work under the hood. Locate the thermostat housing by consulting your car’s manual. Gather all necessary tools and parts before you start. This includes a new thermostat, gasket, and a set of wrenches.By following these preparation steps, you set yourself up for success. Safety first, then vehicle prep. Now, you are ready to replace the thermostat. “`Locating The Thermostat
Finding the thermostat in your car can seem tricky. But with the right steps, it’s manageable. Follow this guide to locate the thermostat and get your car back on the road.
Engine Layout
The engine layout plays a big role in finding the thermostat. The engine could be inline, V-shaped, or flat. Here’s how each layout affects the thermostat location:
- Inline engines: The thermostat is often on the front or top of the engine.
- V-shaped engines: It’s usually between the cylinder banks.
- Flat engines: The thermostat can be on either side of the engine.
Finding The Thermostat Housing
Once you understand your engine layout, the next step is to find the thermostat housing. This housing is where the thermostat sits. To locate it:
- Find the upper radiator hose. It’s the thick hose running from the radiator to the engine.
- Trace the hose to where it connects to the engine.
- The connection point is the thermostat housing.
The housing is typically secured with bolts and may have a gasket to ensure a tight seal.
Locating the thermostat is the first step in replacing it. Once you know where it is, you can move on to removing and replacing it.
Removing The Old Thermostat
Removing the old thermostat is a crucial step in replacing it. This task involves several stages. Let’s break down the process to make it easier.
Draining The Coolant
First, you need to drain the coolant. Locate the drain plug on your radiator. Place a container beneath it to catch the old coolant. Carefully open the plug and allow the coolant to flow out. This prevents spills when you remove the thermostat.
Detaching The Thermostat Housing
Next, you need to detach the thermostat housing. Find the housing near the engine block. It’s usually connected to the upper radiator hose. Use a wrench to remove the bolts holding the housing. Gently pull the housing away from the engine. Now, you can see the old thermostat. Remove it and clean the surface before installing the new one.
Installing The New Thermostat
Installing the new thermostat in your car is a crucial step. It ensures the engine stays at the right temperature. Let’s break down the process into simple steps.
Placing The Thermostat
First, locate the thermostat housing on your engine. It usually sits near the top radiator hose. Remove the old thermostat carefully. Note its position and orientation. Place the new thermostat in the same position. Make sure the spring side faces the engine. This placement allows for proper coolant flow.
Securing The Housing
Next, align the thermostat housing with the engine. Ensure a snug fit without forcing it. Insert the bolts through the housing. Tighten them by hand first to avoid stripping. Use a wrench to secure the bolts firmly. Avoid over-tightening to prevent damage.
Reassembling And Refilling
Reassembling and refilling are the final steps in changing a car thermostat. After installing the new thermostat, you’ll need to put back all the components you removed. Then, you’ll refill the coolant to ensure the engine stays cool. Let’s break down these steps.
Reconnecting Components
First, reconnect the hoses you removed earlier. Make sure they are tight and secure. Loose connections can cause leaks. Check the clamps and tighten them if needed.
Next, reconnect any wires or sensors. These components are crucial for the thermostat’s operation. Ensure they are plugged in correctly. Double-check everything before moving on.
Refilling The Coolant
Now, it’s time to refill the coolant. Open the radiator cap and pour in the coolant slowly. This helps prevent air bubbles. Fill it until the coolant reaches the maximum level.
Start the engine and let it run for a few minutes. This helps circulate the coolant. Check the coolant level again and add more if needed. Be careful, as the engine may be hot.
Finally, close the radiator cap and check for leaks. Make sure everything is working properly. Your car is now ready to hit the road.
Testing The New Installation
Testing the new thermostat installation is a crucial step. It ensures your car runs smoothly and efficiently. This process involves checking for leaks and ensuring proper function.
Checking For Leaks
First, start the engine and let it run for a few minutes. Look under the car and around the thermostat housing. Check for any signs of coolant leaks. Even small drips can indicate a problem. Use a flashlight to get a better view. If you spot any leaks, you may need to tighten the bolts or replace the gasket.
Ensuring Proper Function
Next, observe the temperature gauge on your dashboard. It should gradually rise to the normal operating range. If it stays low or climbs too high, there might be an issue. Feel the upper radiator hose. It should get warm as the engine warms up. This indicates the thermostat is opening properly. Also, check if the heater is blowing warm air inside the car. This confirms the coolant is circulating correctly.
Common Mistakes To Avoid
Putting a thermostat in a car might seem simple. But, common mistakes can cause problems. These errors can lead to overheating or other issues. Learn about these mistakes to avoid them.
Incorrect Installation
One common mistake is incorrect installation. Many people rush this part. They might not follow the instructions. This can lead to the thermostat not working. Always read the guide before starting.
Also, make sure the thermostat is the right way around. Some thermostats have a specific direction. If installed backward, they won’t work. Double-check the position before tightening the bolts.
Inadequate Coolant Levels
Another mistake is not checking the coolant levels. Coolant is vital for the thermostat. Without enough coolant, the engine can overheat. Always top up the coolant after installing a new thermostat.
Make sure to bleed the cooling system. Air bubbles can get trapped inside. These bubbles can cause overheating. Bleed the system to remove any air pockets. This ensures the thermostat works correctly.

Credit: www.howacarworks.com
Frequently Asked Questions
How Long Does It Take To Replace A Car Thermostat?
Replacing a car thermostat typically takes about 1 to 2 hours.
Can I Replace A Car Thermostat Myself?
Yes, with basic tools and a guide, you can replace it yourself.
What Tools Are Needed To Change A Car Thermostat?
You’ll need a wrench, screwdriver, and a new thermostat.
Is It Expensive To Replace A Car Thermostat?
It usually costs between $100 and $300, including parts and labor.
What Are Signs That My Car Thermostat Is Bad?
Overheating, fluctuating temperature gauge, and poor heater performance are common signs.
Conclusion
Installing a thermostat in a car is straightforward. On average, it takes about one to two hours. Preparation and the right tools help speed up the process. Always consult your car’s manual for specific instructions. If unsure, seek professional assistance to avoid mistakes.
Regular thermostat maintenance ensures your car runs smoothly. A well-functioning thermostat prevents engine overheating. This small effort saves time and money in the long run. Keep your car in top shape with timely repairs and check-ups. Happy driving!