Is your Richmond water heater giving you trouble just when you need it the most? You’re not alone.
Many homeowners face unexpected issues with their water heaters, especially when the weather turns chilly. But before you start worrying about cold showers and high repair bills, take a deep breath. Understanding some simple troubleshooting steps can save you time, money, and frustration.
In this guide, we’ll walk you through the most common Richmond water heater problems and provide easy-to-follow solutions. By the end of this article, you’ll feel confident and empowered to tackle those pesky issues head-on. Ready to bring back those warm, comforting showers? Let’s dive in!
Common Issues
Richmond water heaters are reliable, but issues can arise. Understanding common problems helps in troubleshooting effectively. Let’s explore some frequent issues faced by Richmond water heater users.
No Hot Water
No hot water is a common complaint among users. This issue often relates to the power source. Check if the circuit breaker has tripped. Reset it if necessary. Ensure the thermostat is set correctly. Sometimes, the heating element may fail. Testing it with a multimeter can confirm its condition.
Inconsistent Temperature
Temperature fluctuations can frustrate anyone. This usually occurs due to a faulty thermostat. Inspect the thermostat settings. Adjust them for consistency. Sediment buildup also leads to temperature issues. Draining the tank can remove sediment. Regular maintenance prevents this problem.
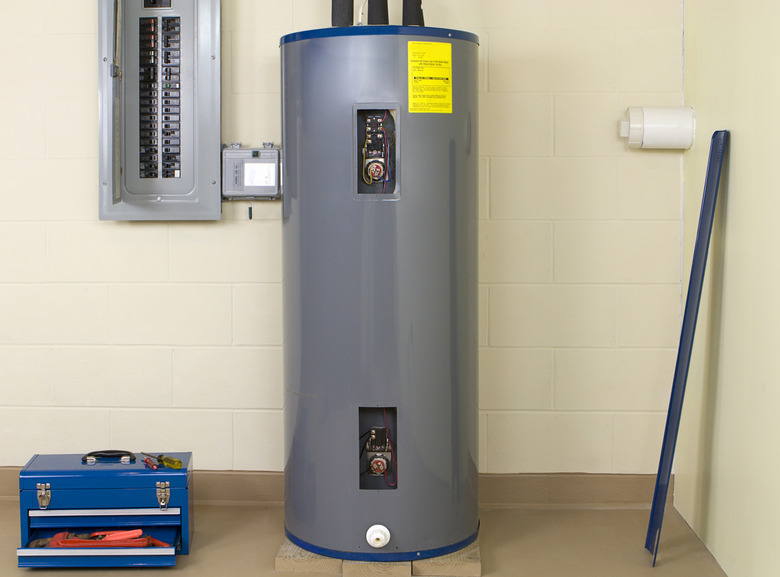
Credit: www.hunker.com
Diagnostic Tools
Effective troubleshooting of a Richmond water heater requires the right tools. Diagnostic tools help pinpoint issues, ensuring accurate repairs. Two essential tools stand out. The multimeter and keen observation skills. These tools aid in identifying common problems. Let’s dive into these diagnostic tools.
Multimeter Usage
A multimeter is essential for testing electrical components. It measures voltage, current, and resistance. Start by setting the multimeter to the correct setting. For voltage, use the AC setting. Attach the probes to the terminals. Check if the heater gets power. A lack of power means an electrical issue.
Test the thermostat and elements. Set the multimeter to resistance. Place probes on the thermostat terminals. The reading should be consistent. A zero or infinity reading signals a problem. The same process applies to heating elements. This step identifies faulty components.
Visual Inspection Tips
Begin with a thorough inspection of the heater. Look for obvious signs of damage. Rust, leaks, and burns signal issues. These signs indicate wear or malfunction. Inspect connections and wires. Loose or frayed wires affect heater performance.
Check for unusual noises or vibrations. These could mean sediment buildup. Regular cleaning can prevent blockages. Inspect the pressure relief valve. Ensure it is not leaking. A malfunctioning valve affects safety.
By using these tools, diagnosing heater issues becomes straightforward. Multimeters and visual checks are invaluable. They simplify troubleshooting and ensure efficient repairs.
Thermostat Problems
Richmond water heaters often face thermostat problems. Issues like incorrect temperature settings can lead to hot water shortages. Regular checks help identify and resolve these issues efficiently.
Thermostat problems in your Richmond water heater can often lead to inconsistent water temperatures, making your daily routine frustrating. You might have noticed your showers suddenly turning cold or your taps failing to deliver hot water. Tackling thermostat issues can seem daunting, but with a little guidance, you can troubleshoot and resolve these problems effectively.Checking Settings
Start by examining the thermostat settings on your Richmond water heater. Ensure the temperature dial is set to your desired heat level, typically between 120°F and 140°F. If someone else in your household has adjusted it, this could be the root of your heating woes.Next, check if the thermostat is correctly calibrated. Use a thermometer to test the water temperature. If the reading is significantly off, recalibrate your thermostat to align it with the actual water temperature.Make sure the unit is receiving power. A tripped circuit breaker or a blown fuse could be the culprit. Reset the breaker or replace the fuse if needed, and see if this restores proper function.Replacing Faulty Thermostat
If checking the settings doesn’t solve the problem, your thermostat might be faulty and in need of replacement. Before you begin, ensure the power supply to the water heater is completely shut off to avoid any accidents.Remove the access panel to locate the thermostat. Carefully disconnect the wires, noting their original positions. This is crucial for the correct installation of the new thermostat.Install the new thermostat by connecting the wires in the same configuration. Secure it in place, replace the access panel, and restore power to the unit. Test the water temperature to confirm the issue is resolved.Have you ever had to replace a thermostat yourself? It can seem intimidating, but with patience and attention to detail, you can save both time and money. If you’re uncomfortable with electrical components, it might be wise to call a professional. Safety should always come first.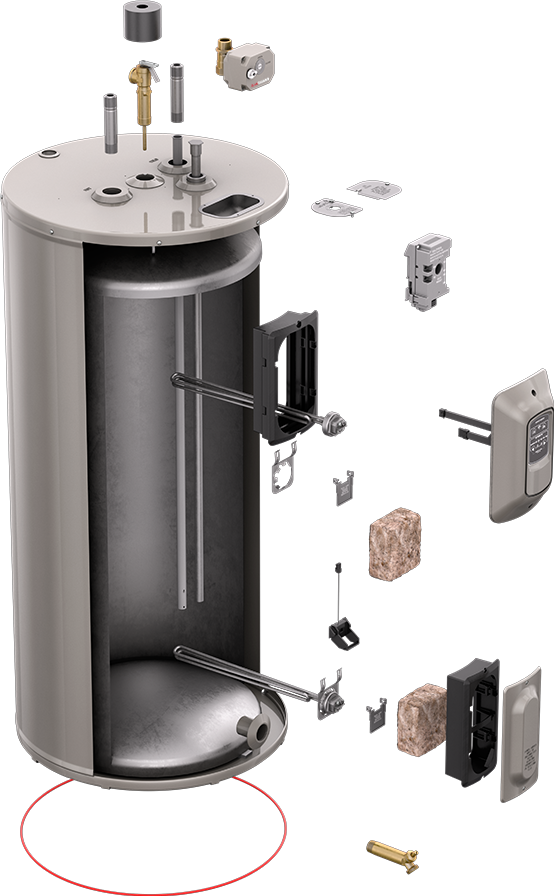
Credit: www.richmondwaterheaters.com
Heating Element Issues
Heating elements in water heaters are crucial. They ensure your water heats properly. Sometimes, these elements face issues. This can lead to cold showers and frustration. Understanding and fixing these problems is essential. It saves time and money. Let’s explore heating element issues and solutions.
Identifying Burned Out Elements
Burned out elements often cause water heater problems. First, check for cold water. This is a common sign. Also, listen for strange noises. Noises may indicate a faulty element. Use a multimeter to test the element. This tool measures electrical flow. If readings are low, the element might be burned out.
Steps For Replacement
Replacing a heating element is straightforward. Begin by turning off power to the heater. This ensures safety. Next, drain the heater. Removing water prevents spills. Unscrew the access panel using a screwdriver. Locate the burned element inside. Detach wires from the element. Carefully remove it from its slot.
Insert the new element into the slot. Secure it tightly to prevent leaks. Reattach the wires. Ensure they are connected firmly. Replace the access panel. Lastly, refill the heater with water. Turn the power back on. Test the heater by running hot water. If it heats well, the replacement is successful.
Pilot Light Troubles
Pilot light troubles in Richmond water heaters can be frustrating. A common issue, it affects the heater’s ability to produce hot water. Without a steady pilot light, the system struggles to function properly. Understanding the root of these issues is crucial. It helps in maintaining the heater’s efficiency and prolonging its lifespan.
Ignition Failures
Ignition failures often cause pilot light troubles. A faulty ignition prevents the pilot light from staying lit. This can result from a defective thermocouple or gas valve. Checking these components is essential for troubleshooting. Regular inspection helps identify issues early. It ensures the water heater operates smoothly.
Cleaning And Maintenance
Proper cleaning and maintenance prevent pilot light problems. Dust and debris can block the pilot light opening. This blockage can hinder the flame’s ability to stay lit. Cleaning the area around the pilot light is vital. It keeps the pathway clear and ensures smooth operation. Regular maintenance checks are important for long-term reliability.
Sediment Build-up
Sediment build-up in a water heater can lead to several issues. This is a common problem many homeowners face. Sediments are small particles that settle at the bottom of the tank. Over time, these particles accumulate, affecting your heater’s performance. Understanding how sediment affects your system is crucial. Let’s explore its impact and how to manage it efficiently.
Effects On Efficiency
Sediment build-up reduces your water heater’s efficiency. The layer of sediment acts as an insulator. It prevents heat from reaching the water quickly. This means the heater works harder to warm water. It can increase energy bills significantly. Sediments can also cause strange noises. Banging or popping sounds indicate sediment presence. Ignoring these signs can shorten the heater’s lifespan.
Flushing Techniques
Regular flushing helps remove sediment from the tank. It is a simple process you can do yourself. Begin by turning off the water heater. Attach a hose to the tank’s drain valve. Place the other end in a safe drainage area. Open the valve to let water and sediment flow out. Once done, close the valve and remove the hose. Refill the tank with water. Doing this yearly can prolong your heater’s life. It also ensures optimal performance.
Leaks And Drips
Richmond water heaters can often face leaks and drips. Identifying the source is essential for effective troubleshooting. Regular maintenance helps prevent common issues and ensures efficient performance.
Dealing with leaks and drips in your Richmond water heater can be frustrating. They can lead to increased water bills and potential damage to your home. Addressing these issues promptly not only saves you money but also extends the life of your water heater.Identifying Leak Sources
Before you can fix a leak, you need to find where it’s coming from. Start by inspecting the water heater’s connections and fittings. Look for any loose parts or signs of water pooling around the base.Check the temperature and pressure relief valve. This component can sometimes release water if it’s faulty or if the pressure inside the tank is too high.Another common source is the drain valve, located at the bottom of the tank. If you spot water around it, tighten the valve or consider replacing it.Repair Methods
Once you’ve identified the source, it’s time to fix it. For minor issues like loose connections, tightening the fittings might do the trick.For a leaking temperature and pressure relief valve, test it by lifting the valve lever. If it still leaks after reseating, replacement is necessary.A faulty drain valve may require more attention. If tightening doesn’t help, replacing it with a new one is often the best solution.Have you ever ignored a small drip, only to find it worsened over time? Taking swift action can prevent larger, costlier problems down the line.Have any tips or experiences you’d like to share? We’d love to hear how you handled your water heater leaks.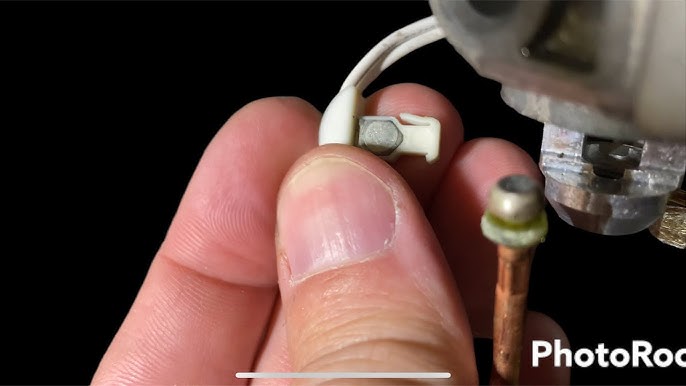
Credit: m.youtube.com
Safety Precautions
Ensuring safety during your Richmond water heater troubleshooting is crucial. Neglecting precautions can lead to accidents or damage. By taking the right steps, you protect yourself and your home.
Have you ever felt uneasy working around electrical components or gas lines? You’re not alone. It’s essential to approach these tasks with care and knowledge.
Below are some practical insights to help you navigate safely.
Handling Electrical Components
Start by turning off the power to your water heater. This simple action prevents electric shocks, which can be life-threatening.
Use insulated tools to avoid any contact with live wires. You wouldn’t want a screwdriver to become a conductor.
Always check the wiring for signs of wear or damage. Frayed wires can lead to short circuits or fire hazards.
Are you unsure about the wiring? It’s wise to consult a professional. Better safe than sorry.
Avoiding Gas Leaks
Gas leaks are silent but dangerous. Regularly inspect the connections and fittings for any signs of corrosion or wear.
Consider using a gas leak detector spray. It bubbles upon contact with leaking gas, offering a quick visual cue.
Do you notice a rotten egg smell? That’s a warning sign. Shut off the gas supply immediately and ventilate the area.
Sometimes, seeking expert help is the best decision. Would you risk your safety over saving a few bucks?
Remember, safety doesn’t happen by accident. Stay cautious and informed during your water heater troubleshooting.
Your vigilance can prevent mishaps and ensure your comfort and peace of mind.
Maintenance Tips
Maintaining your Richmond water heater is crucial to ensure it works efficiently and lasts longer. Without proper care, you might find yourself facing cold showers unexpectedly. Regular upkeep not only helps in avoiding costly repairs but also keeps your water heater performing optimally. Here, we delve into some essential maintenance tips that every Richmond water heater owner should know.
Regular Cleaning Schedule
Establishing a regular cleaning schedule is vital for your water heater’s health. Sediment buildup can lead to reduced efficiency and even damage the tank. Aim to flush the tank every six months. This process involves draining the water to remove sediment. It’s surprisingly easy, and you might find it satisfying to see the grit wash away.
Consider the benefits: smoother operation and lower energy bills. Have you ever noticed your heater making strange noises? Sediment could be the culprit. Keeping a cleaning schedule prevents these issues and ensures your heater runs quietly.
Professional Inspection Advice
While regular cleaning is essential, don’t underestimate the value of a professional inspection. Experts can spot issues you might miss, such as worn-out parts or minor leaks. Schedule an annual check-up to ensure everything is functioning correctly.
Why rely solely on DIY methods when professional advice is available? Imagine discovering a minor issue early and fixing it before it turns into a major problem. A professional inspection could be the difference between a quick fix and a costly replacement.
Think about this: Would you rather catch a problem early or deal with an emergency repair? Investing in an expert’s opinion might save you from unexpected expenses down the line.
Frequently Asked Questions
How Do I Reset My Richmond Water Heater?
Locate the reset button on the heater. Press it. Check if the heater starts working.
What Causes My Water Heater To Leak?
Leaks often come from loose connections or damaged parts. Inspect the heater for any visible leaks.
Why Is My Water Heater Not Heating?
Check the thermostat settings. Also, ensure power supply is connected. Faulty heating elements might need replacement.
How Can I Fix A Noisy Water Heater?
Sediment buildup causes noise. Flush the tank to remove sediment. This often solves the noise issue.
Is Regular Maintenance Needed For My Heater?
Yes, regular maintenance helps prevent problems. It ensures efficient operation and prolongs heater lifespan.
Conclusion
Fixing a water heater can seem hard. But with the right steps, it’s manageable. Always start with the basics. Check the power source and settings first. Listen for strange noises. Look for leaks or rust. These signs help spot issues early.
Regular checks prevent major problems. Remember, safety first. Turn off power before inspecting. A well-maintained water heater lasts longer. Save money and stress by troubleshooting early. If unsure, consult a professional. They offer expert help. Keep your water heater running smoothly.
Enjoy hot water without hassle.