Are you struggling with a leaky kitchen faucet or just looking to upgrade your sink’s aesthetic? If your Moen kitchen faucet spout is giving you trouble, you’re in the right place.
Whether you’re a seasoned DIY enthusiast or a beginner tackling your first plumbing project, removing a Moen kitchen faucet spout is simpler than you might think. Picture this: a kitchen free from annoying drips and a sleek, new faucet ready to enhance your space.
Imagine the satisfaction of knowing you’ve tackled this task yourself. This guide will walk you through the steps, ensuring you feel confident and empowered. Ready to take control of your kitchen’s functionality and style? Let’s dive in and get started!
Credit: terrylove.com
Tools And Materials Needed
Removing a Moen kitchen faucet spout might seem daunting at first. With the right tools and materials, the task becomes straightforward. This guide will walk you through what you need. Following these steps will help ensure a smooth removal process.
Tools Required
Gather these essential tools before starting. A screwdriver is a must. It helps to loosen screws that secure the faucet. You will need an adjustable wrench. This tool is vital for handling nuts and bolts. Have a pair of pliers ready. Pliers assist in gripping parts firmly.
Materials Needed
Prepare some basic materials to aid the process. A towel or cloth is useful. It helps protect surfaces from scratches. Have a bucket or container nearby. It is handy for catching any water spills. A lubricant spray can be beneficial. It eases the removal of tight fittings.
Safety Gear
Safety should always be a priority. Wear gloves to protect your hands. Gloves provide a better grip and prevent injuries. Safety goggles are advisable. They shield your eyes from debris. Ensure you have a clear workspace. A clutter-free area minimizes accidents.
Preparation And Safety Tips
Removing a Moen kitchen faucet spout might seem daunting, but with the right preparation and safety tips, it can be a straightforward task. Whether you’re upgrading your kitchen or fixing a leak, ensuring that you have the proper setup and understanding of safety precautions is crucial. Let’s dive into how you can prepare effectively and keep safe while tackling this project.
Gather Your Tools
Before you start, make sure you have all the necessary tools. A basic set might include an adjustable wrench, pliers, and a screwdriver. Having these tools handy will save you from mid-project frustrations and ensure a smooth workflow.
Turn Off The Water Supply
This step is vital to avoid unwanted mess and potential water damage. Locate the water valves under the sink and turn them off. Test the faucet to confirm the water is completely turned off before proceeding.
Protect Your Space
Lay down towels or a plastic sheet to catch any drips or debris. This simple act can prevent stains or scratches on your countertops and floors. Plus, it makes cleaning up afterward much easier.
Ensure Proper Lighting
A well-lit workspace is essential for safety and precision. Consider using a headlamp or a portable lamp to illuminate dark areas under the sink. This will help you see what you’re doing and avoid mistakes.
Wear Protective Gear
Gloves can protect your hands from sharp edges and dirt. Safety goggles are a good idea too, especially if you’re dealing with old and potentially corroded parts. Keeping yourself safe should be a top priority.
What are some challenges you’ve faced while handling home repairs? How did you overcome them? Share your thoughts and insights in the comments below!
Turning Off Water Supply
Turning off the water supply is a crucial step in removing the Moen kitchen faucet spout. It prevents water spills and potential damage. This task is simple yet essential for a smooth process. Follow the steps below to ensure safety and efficiency.
Locate The Main Water Valve
First, find the main water valve in your home. It is usually under the sink. It might also be near the water heater or in a basement. Knowing its location is important for any plumbing task.
Turn Off The Water Valves
Turn the valve clockwise to stop the water flow. This action stops water from reaching the faucet. Confirm that the water is off by turning on the faucet. If no water comes out, the supply is off.
Check For Residual Water
Even after turning off the water, some might remain in the pipes. Open the faucet fully to let out any leftover water. This step ensures no spills during removal.
Inspect For Leaks
Check under the sink for any signs of leaks. Look for drips or puddles around the pipes. Fix any small leaks before proceeding. This prevents future issues and keeps your kitchen dry.
Removing The Faucet Handle
Gently remove the Moen kitchen faucet spout by first taking off the faucet handle. Use a screwdriver to loosen the screws. Carefully lift the handle to access the spout and proceed with removal.
Removing the faucet handle might seem daunting, but it’s simpler than you might think. Whether you’re tackling this task for a repair or just curious about how things work, understanding the process can save you time and hassle. Let’s dive into the steps to remove the handle from a Moen kitchen faucet, focusing on accessing the set screw and loosening the handle effectively.###Accessing The Set Screw
To begin, you’ll need to locate the set screw which secures the handle to the faucet. It’s usually hidden under a decorative cap or plug on the handle itself.Use a flathead screwdriver to gently pry off this cap. Be careful not to scratch the surface. Once removed, you should see the set screw nestled inside.Have you ever struggled to find a tool in your toolbox? It’s always worth double-checking you have the right size screwdriver or Allen wrench for this screw. The wrong tool can strip the screw, turning a simple task into a headache.###Loosening The Handle
With the set screw exposed, use the appropriate screwdriver or wrench to turn it counterclockwise. A few turns should be enough to loosen the handle.You might wonder why the handle isn’t coming off immediately. Sometimes, mineral deposits can cause it to stick. Applying a little gentle pressure or wiggling the handle can help free it.Think about the last time you learned something new. Did it change how you approached a problem next time? Removing a faucet handle is no different—once you’ve done it, you’ll feel more confident with future repairs.Removing the handle gives you access to other parts of the faucet, letting you tackle the issues that are slowing down your kitchen tasks. Are you ready to try it yourself and see how easy it can be?Detaching The Spout
Removing the spout from a Moen kitchen faucet can seem tricky. It’s a task that requires patience and precision. But with the right steps, it becomes manageable. Let’s break down the process into simple actions. Follow these easy steps to detach the spout efficiently.
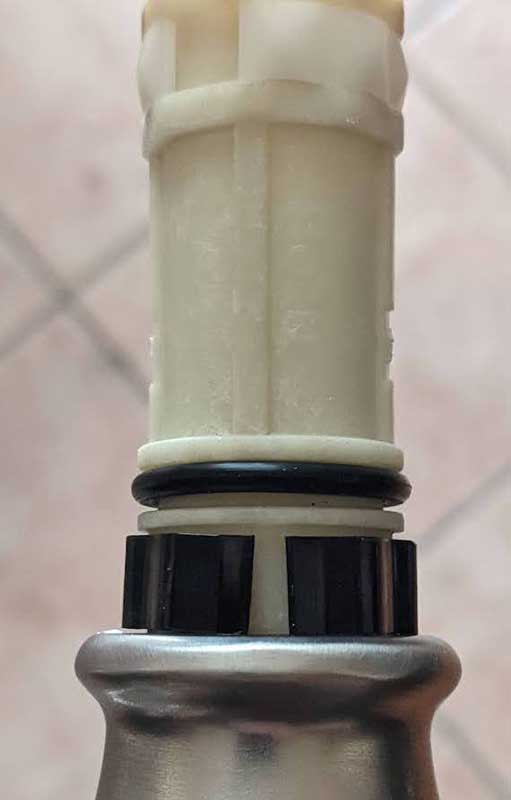
Unscrewing The Retaining Nut
The retaining nut holds the spout in place. To begin, locate the nut beneath the faucet. Use a wrench for better grip. Turn the nut counterclockwise to loosen it. Ensure the water supply is off before starting. This prevents any spills or accidents. Once loose, the nut will come off easily. This step is crucial to free the spout.
Lifting The Spout Off
With the nut removed, it’s time to lift the spout. Gently grasp the spout base. Pull upwards with steady force. Avoid using excessive pressure. The spout should lift off smoothly. Check for any remaining attachments. Sometimes, mineral deposits can make removal difficult. If stuck, wiggle slightly to loosen. Once free, set the spout aside safely.
Cleaning And Maintenance
Removing a Moen kitchen faucet spout requires basic tools and careful steps. Start by turning off the water supply. Unscrew the retaining nut and gently lift the spout from its base. This process ensures easier cleaning and maintenance, keeping your faucet in optimal condition.
Cleaning and maintaining your Moen kitchen faucet spout can extend its life and ensure it functions smoothly. A clean spout not only enhances the appearance of your kitchen but also prevents leaks and other issues. Regular maintenance is a simple yet effective way to keep your kitchen faucet in top condition.Inspecting For Damage
Start by checking for any visible signs of wear or damage. Look for cracks, rust, or any unusual discoloration. This can indicate potential problems that could lead to leaks or decreased performance.Use a flashlight to inspect hard-to-see areas. Don’t forget to check the seals and gaskets for wear and tear. If you notice any damage, consider replacing the affected parts promptly.Ask yourself: Is my faucet showing signs of aging that could affect its performance?Cleaning The Components
Begin by removing the spout from the faucet. This allows you to clean each part thoroughly. Use a soft cloth or sponge with mild soap to wipe down the spout.Scrub gently to remove any buildup or grime. For stubborn spots, a mixture of vinegar and water can work wonders. Ensure you rinse well to avoid soap residue that can attract dirt.Make cleaning a routine task. Regular cleaning prevents mineral deposits and keeps your faucet shining bright.What cleaning tips have you found most effective for maintaining your kitchen fixtures?Reinstallation Tips
Detach the Moen kitchen faucet spout with ease by first turning off the water supply. Loosen the screws holding the spout, then gently lift it off. Reinstallation ensures a clean and efficient kitchen faucet experience.
Reinstalling a Moen kitchen faucet spout can be a straightforward task when you know the right steps. Whether you’re a seasoned DIY enthusiast or tackling this for the first time, having a clear guide can make all the difference. Let’s dive into some practical tips to ensure your reinstallation is smooth and hassle-free.###Aligning The Spout
Start by ensuring the spout is properly aligned with the base. It may seem simple, but overlooking this can lead to leaks or reduced water flow. Position the spout so it sits comfortably without forcing it into place.Check that the o-ring and other seals are properly seated. This is crucial for preventing water leakage. If these components are worn out, consider replacing them before moving further.Have you considered how a misaligned spout can impact your kitchen tasks? A correct alignment not only prevents issues but also ensures a seamless experience when using your faucet.###Securing The Handle
Once the spout is aligned, focus on securing the handle. Ensure the handle is tightly fitted to avoid it loosening over time. A loose handle can lead to more significant problems, so it’s worth the extra minute to double-check.Use the correct tools for the job. A simple wrench might be all you need, but make sure it’s the right size to avoid damaging the handle.Isn’t it satisfying when a task is completed correctly the first time? Ensuring the handle is secure will save you time and effort in the future. Feel the difference when you turn the faucet on and off—smooth and steady.Reinstalling your Moen kitchen faucet spout doesn’t have to be daunting. With careful attention to alignment and securing the handle, you’ll have your faucet back in action in no time. Are you ready to tackle this project with newfound confidence?
Credit: in.pinterest.com
Troubleshooting Common Issues
Troubleshooting common issues with a Moen kitchen faucet spout can feel like tackling a tricky puzzle. When you’re faced with leaks or parts that seem impossible to budge, you’re not alone. These challenges can be frustrating, especially if you’re eager to get your kitchen back to its sparkling best. Let’s dive into some practical solutions that can help you get your faucet working smoothly again.
Leaks After Reinstallation
Leaks after reinstalling your Moen faucet spout can be a pesky problem. A simple oversight, like not tightening a connection properly, might be the culprit. Double-check each joint and ensure all washers are in place.
Consider the possibility of damaged O-rings. These small components can wear out over time. Replacing them might be your best bet to stop the leak for good.
Ask yourself: Have you used plumber’s tape? Sometimes, a little tape can make a big difference. It acts as a sealant to prevent leaks in threaded areas. A few wraps can often solve lingering drip issues.
Difficulty In Removing Parts
Encountering stubborn parts while trying to remove your faucet spout is quite common. Rust or mineral buildup can make components stick together like super glue. Applying a penetrating lubricant can be a game changer.
What if you still can’t twist it free? Try using a tool like a strap wrench. It provides extra grip without damaging the finish. Remember, patience is key; forcing parts might cause more harm than good.
If you’re still stuck, consider if you have the right tools. Sometimes, a simple swap to a more appropriate tool is all it takes to get things moving. Don’t let frustration stop you from finding the solution that works.
Troubleshooting these issues can be a learning experience. Each problem solved not only gets your faucet back in order but also empowers you with new skills. What tips would you share with someone tackling their faucet troubles? Your insights might be just what they need.

Credit: www.youtube.com
Frequently Asked Questions
How Do I Remove A Moen Kitchen Faucet Spout?
Turn off water supply. Unscrew the spout nut. Lift spout off.
What Tools Do I Need To Remove The Spout?
You need a wrench and screwdriver. Gather these tools before starting.
Can I Remove The Spout Without Professional Help?
Yes, you can. Follow simple steps. No professional skills required.
Why Is My Moen Spout Stuck?
Mineral deposits may cause sticking. Use vinegar to loosen it.
Is It Necessary To Replace The Spout O-ring?
Yes, replace it. Prevents leaks and ensures smooth operation.
Conclusion
Removing a Moen kitchen faucet spout is simpler than it seems. Follow the steps, and you’ll have it done quickly. Remember to gather all needed tools first. Turn off the water supply to avoid leaks. Carefully detach parts without forcing them.
Keep track of screws and small pieces. Reassemble properly for a secure fit. Regular maintenance can extend your faucet’s life. Understanding these basics helps with future repairs. Share this guide with friends who need help. Happy fixing, and enjoy your well-functioning faucet!