If you’re grappling with a non-functioning KitchenAid dryer, the thermal fuse might be the culprit. Imagine the convenience of getting your dryer back in action without the hassle of expensive repairs or the wait for a technician.
Understanding the thermal fuse location can empower you to fix your dryer yourself, saving you both time and money. In this guide, we’ll unveil the precise location of the thermal fuse in your KitchenAid dryer, demystifying what might seem like a daunting task.
By the end, you’ll have the confidence to address the issue head-on. Dive in, and let’s get your dryer back to work!
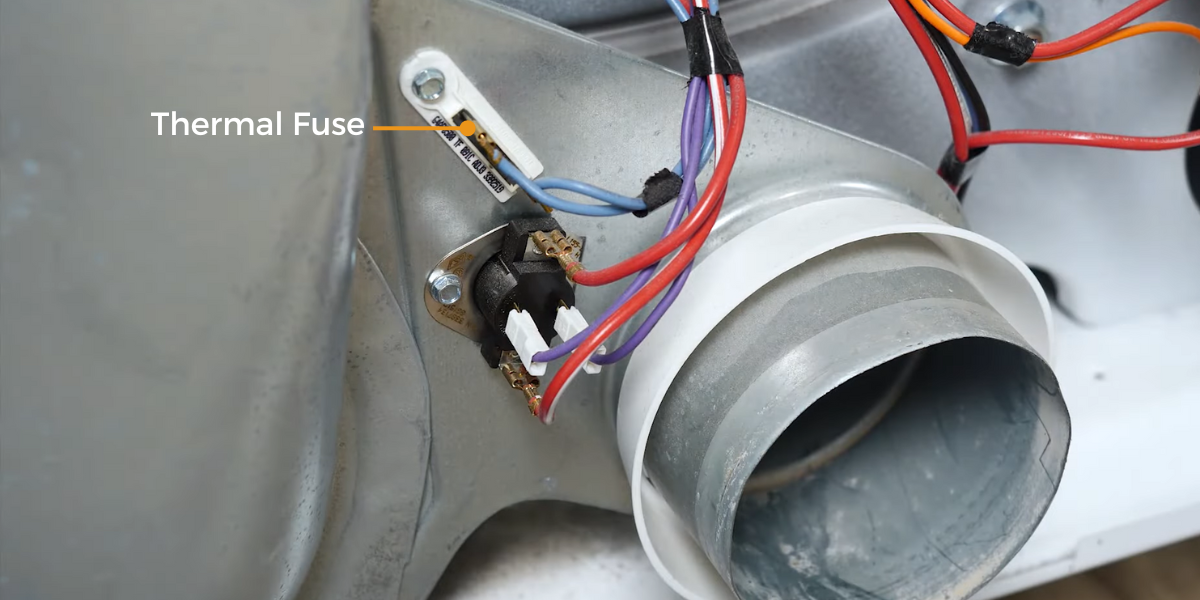
Credit: www.partselect.com
Thermal Fuse Basics
Understanding the basics of the thermal fuse in your KitchenAid dryer can save you a lot of frustration. This small device plays a crucial role in ensuring your dryer operates safely and efficiently. Knowing its purpose and signs of malfunction can help you maintain your appliance and avoid unnecessary repairs.
Purpose Of The Thermal Fuse
The thermal fuse is a safety component that prevents your dryer from overheating. It acts like a watchdog, monitoring the temperature inside the dryer. If the temperature exceeds a safe level, the fuse blows, cutting off power to the dryer.
This feature is essential because it protects your appliance from potential damage. It can also prevent fires, keeping your home safe. Think of it as your dryer’s built-in guardian, always on the lookout for trouble.
Many people might not realize the importance of this tiny part until their dryer stops working. But once you know its purpose, you might wonder how you missed it before.
Signs Of A Blown Fuse
Imagine loading your dryer with wet clothes, hitting the start button, and nothing happens. Frustrating, right? A blown thermal fuse might be the culprit. If your dryer won’t start, it’s one of the first things to check.
Another tell-tale sign is if the dryer runs but doesn’t heat up. This could indicate the fuse has blown, preventing the heating element from working. Do any of these sound familiar?
It’s also worth noting that a blown fuse might result in unusual dryer behavior, like stopping mid-cycle. Have you experienced this before? These signs are your cue to inspect the fuse, usually found on the dryer’s back panel.
Checking the fuse isn’t just about getting your dryer working again. It’s about understanding your appliance and taking charge of its maintenance. Are you ready to roll up your sleeves and take a closer look?
Tools And Safety
Understanding the tools and safety measures is crucial for any repair task. This is especially true for fixing a Kitchenaid dryer. The thermal fuse’s location and repair require specific tools and careful handling. Proper preparation ensures a smooth and safe repair process.
Essential Tools
First, gather all necessary tools. A Phillips screwdriver is a must-have. You also need a multimeter to test the fuse. Needle-nose pliers can help with tight spaces. A putty knife will ease the removal of panels. Keep a flashlight handy for better visibility.
Safety Precautions
Begin by unplugging the dryer. This step prevents electrical shocks. Wear safety gloves to protect your hands. Avoid loose clothing that might catch on parts. Ensure the work area is well-lit. Ensure good ventilation to avoid dust inhalation.
Accessing The Dryer
Locate the thermal fuse on your Kitchenaid dryer by accessing the back panel. It is near the exhaust vent. Ensure the dryer is unplugged before you begin. This small component is crucial for safety, preventing overheating.
Accessing your KitchenAid dryer might seem daunting at first, but with a bit of guidance, it can be a straightforward task. You might be wondering why you would need to access your dryer in the first place. Perhaps it’s not drying clothes as efficiently as before, or maybe it’s not turning on at all. Often, the culprit is a small component called the thermal fuse. Knowing its location is vital for troubleshooting. Let’s dive into how you can access this component and get your dryer back in action.Removing The Dryer Panel
To start, unplug your dryer to ensure safety. Next, you need to remove the dryer panel. This typically involves unscrewing a few screws.Keep a small container handy for screws to avoid losing them. Once the screws are out, gently lift or slide the panel off.Have you ever felt like a detective uncovering clues? Removing the panel feels a bit like that. It reveals the inner workings of your dryer, bringing you one step closer to solving the mystery.Locating Key Components
With the panel removed, you can now see the dryer’s key components. The thermal fuse is often located near the blower housing or the heating element.Check your dryer’s manual for specifics, as the location can vary between models.Have you ever opened something up and wondered where to begin? That’s how you might feel here. But remember, you’re looking for a small, typically white or silver component.Knowing where to look is half the battle. Once you spot the thermal fuse, you’re on your way to fixing your dryer. Does it feel empowering to troubleshoot your own appliances? You bet it does!Locating The Thermal Fuse
Locating the thermal fuse in a KitchenAid dryer can be a simple task. This small component plays a crucial role in the dryer’s safety and operation. A faulty thermal fuse can cause the dryer to stop working. Knowing its location helps in troubleshooting and repair.
Common Locations
The thermal fuse is often found on the dryer’s blower housing. This location allows it to monitor the temperature effectively. Another common spot is the dryer’s exhaust duct. Here, it checks for overheating issues. It may also be near the heating element. In each spot, the fuse ensures safe dryer operations.
Visual Indicators
The thermal fuse resembles a small, white or silver component. It usually has two wires connected to it. Its size is similar to a small coin. Look for a flat, rectangular shape. These visual cues help in identifying the fuse quickly. Always ensure the dryer is unplugged before inspecting.
Replacing The Thermal Fuse
Finding the thermal fuse in a Kitchenaid dryer is crucial for repairs. It is usually located on the blower housing. Accessing it requires removing the dryer’s back panel.
Replacing the thermal fuse in your Kitchenaid dryer can seem daunting, but it’s an essential task for maintaining its efficiency. If your dryer stops heating, the thermal fuse might be the culprit. Understanding its location and how to replace it can save you time and money. Let’s dive into the steps to replace it and ensure your dryer functions properly again.Steps To Replace
First, ensure your dryer is unplugged for safety. Locate the back panel of your dryer, which is usually held in place by several screws. Remove these screws to access the internal components.Next, find the thermal fuse. It typically resembles a small, rectangular piece with two wires connected to it. If you’re unsure, refer to your dryer’s manual for a diagram. Disconnect the wires carefully, noting their positions for reattachment.Once disconnected, remove the faulty fuse. You can usually do this by unscrewing it from its mount or gently pulling it off. Replace it with a new fuse, ensuring it’s secured firmly. Reattach the wires as they were, then put the back panel back in place.Testing After Replacement
After replacing the fuse, it’s crucial to test your dryer to confirm everything is working. Plug your dryer back into the power source and start a cycle. Listen for the familiar hum and check if it’s heating properly.If your dryer operates as expected, you’ve successfully replaced the fuse. However, if it’s still not heating, there might be another issue at play. Consider whether other components need checking, or if professional help is required.Could it be that small tasks like these empower you with confidence for future repairs? Knowing how to handle simple fixes can make a world of difference in managing home appliances.
Credit: www.youtube.com
Preventive Maintenance Tips
Maintaining your KitchenAid dryer is essential for its long life. Regular care prevents costly repairs and ensures efficient operation. A critical component to check is the thermal fuse. It protects the dryer from overheating. Understanding preventive maintenance is crucial.
Regular Inspections
Inspect your dryer at least once a month. Look for any lint buildup in the lint trap. Excess lint can cause overheating and fire hazards. Check the vent and exhaust for blockages. Ensure the dryer drum moves freely. Listen for unusual noises during operation. These inspections help identify issues early.
Avoiding Overheating
Overheating can damage the thermal fuse. Don’t overload the dryer. Follow the recommended load size. Clean the lint trap after every use. This improves airflow and reduces overheating risks. Ensure the dryer is in a well-ventilated area. Poor ventilation can cause heat buildup. Keep the surrounding area clutter-free. This allows proper air circulation.
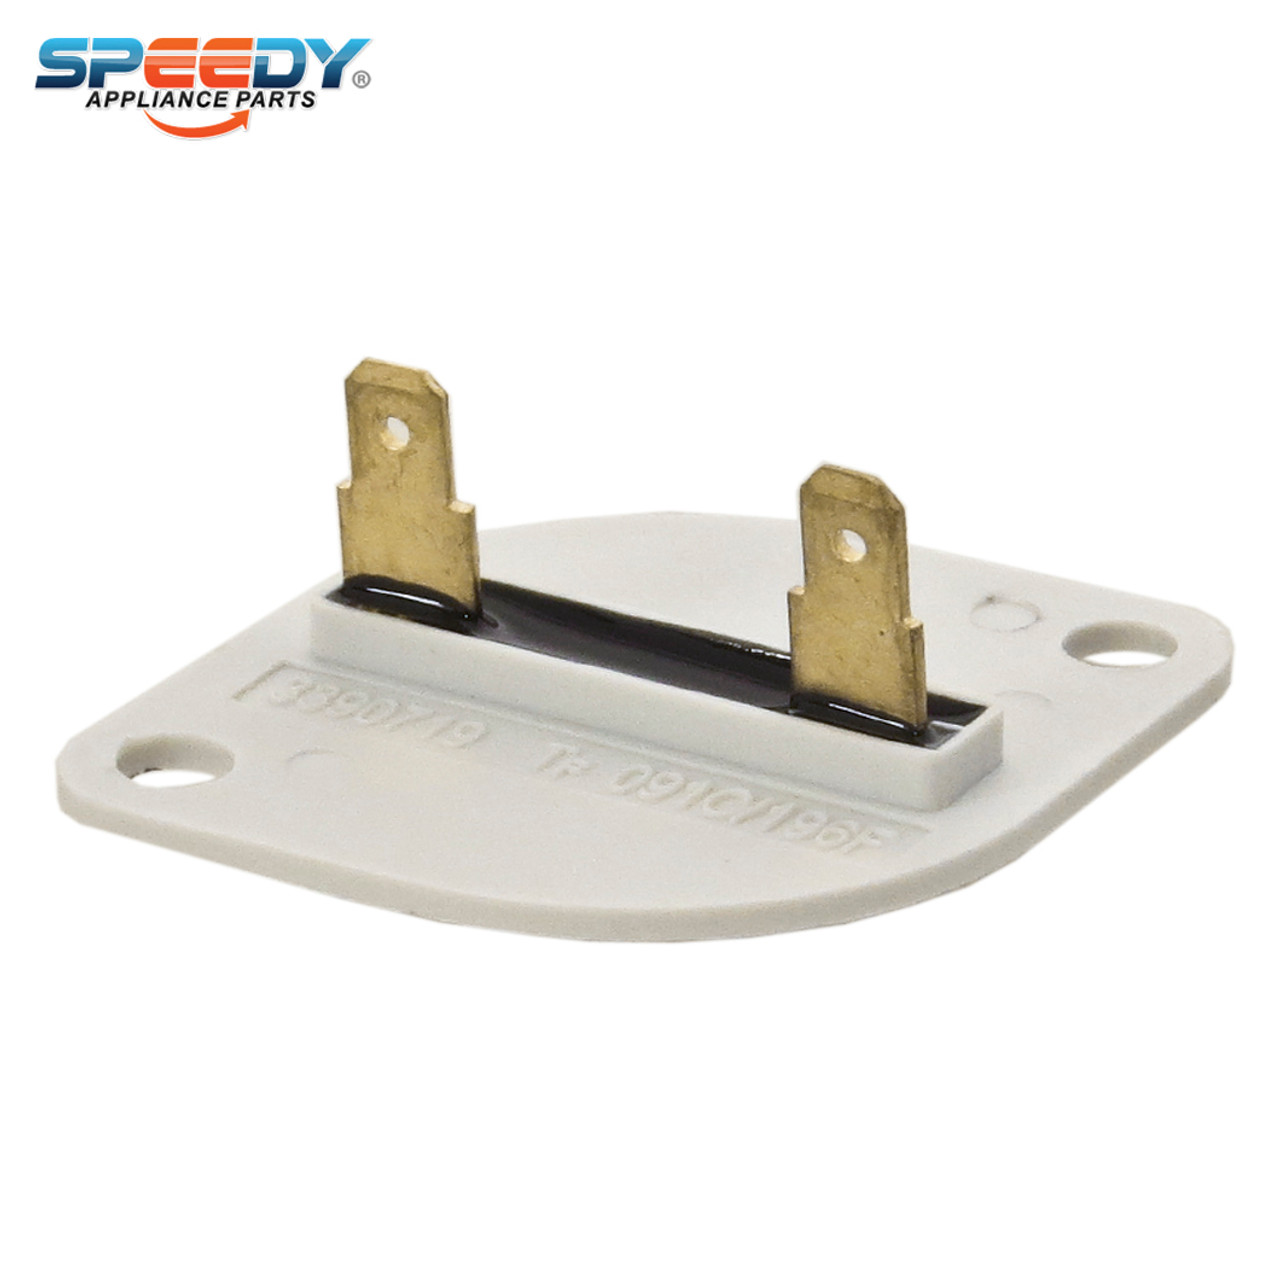
Credit: www.speedyapplianceparts.com
Frequently Asked Questions
Where Is The Thermal Fuse On A Kitchenaid Dryer?
The thermal fuse is located on the dryer’s blower housing. Access it by removing the back panel.
How Can I Access The Thermal Fuse?
To access the thermal fuse, unplug the dryer and remove the back panel. It’s near the blower housing.
What Tools Do I Need To Replace The Fuse?
You’ll need a screwdriver to remove the back panel. A multimeter can help test the fuse’s functionality.
How Do I Know If The Thermal Fuse Is Blown?
If the dryer won’t start, the fuse might be blown. Check the fuse with a multimeter for continuity.
Can I Replace The Thermal Fuse Myself?
Yes, replacing it is simple. Ensure the dryer is unplugged before starting. Follow safety precautions.
Conclusion
Locating your Kitchenaid dryer’s thermal fuse is simple now. This guide helps you identify it without stress. Always ensure safety by unplugging the dryer first. Follow the instructions step-by-step for best results. A functional dryer boosts your laundry routine’s efficiency.
No more guessing or confusion. Understanding your appliance saves time and avoids costly repairs. Share this knowledge with friends who might need it. Happy drying!