Wiring a Honeywell Pro Series Thermostat isn’t complicated. You can do it yourself with some guidance.
Many people find installing a thermostat tricky. But with the right steps, it becomes easy. This guide helps you wire your Honeywell Pro Series Thermostat. You’ll learn how to connect wires correctly. Safety tips will also be included. Whether you’re a beginner or have some experience, this post will assist you.
Save money and time by doing it yourself. Let’s get started!
Tools And Materials Needed
Wiring a Honeywell Pro Series Thermostat requires some specific tools and materials. Having these ready will make the process smoother. This section will guide you through the essential tools and required materials you need.
Essential Tools
You’ll need a few basic tools for wiring your thermostat. First, a screwdriver is essential. A Phillips head screwdriver is usually needed. A flathead screwdriver may also come in handy.
Next, wire strippers are important. They help you remove the insulation from the wires. A wire cutter can also be useful for cutting wires to the right length.
A voltage tester is another necessary tool. It ensures that there is no electricity running through the wires. This is important for safety.
Lastly, having a drill with drill bits can be helpful. It is needed if you need to mount the thermostat on the wall.
Required Materials
Make sure you have all the materials before starting. You will need the Honeywell Pro Series Thermostat itself. This is obvious but important to note.
Next, you will need thermostat wires. These are usually included with the thermostat. If not, you can buy them separately.
Wall anchors and screws are also necessary. These help to secure the thermostat to the wall. They often come with the thermostat but you may need extras.
Finally, having a set of batteries is crucial. Some thermostats require batteries to function. Always check the thermostat’s manual to be sure.
Credit: www.youtube.com
Safety Precautions
Installing a Honeywell Pro Series Thermostat can improve home comfort. Before starting, it’s crucial to follow safety precautions. This will prevent accidents and ensure a smooth installation process.
Turn Off Power
First, you need to turn off the power. Go to your home’s circuit breaker box. Switch off the power to your HVAC system. This prevents electric shocks.
Verify that the power is off. Use a voltage tester. Check the thermostat wires. There should be no power running through them.
Check For Live Wires
After turning off the power, check for live wires. Use a non-contact voltage tester. Hover it over the wires. This tool will alert you if any wire is live.
If you find any live wires, stop immediately. Go back to the circuit breaker. Ensure the correct breaker is off. Safety must always come first.
Removing The Old Thermostat
Removing the old thermostat is a crucial step in installing your new Honeywell Pro Series Thermostat. This process requires careful attention to detail. Safety first. Ensure the power to your HVAC system is off. This step prevents electrical shocks and keeps you safe. Now, follow the steps below to remove your old thermostat.
Label Wires
Before you start, take a picture of the current wiring. This helps you remember where each wire goes. Use labels to mark each wire. Most thermostats have labels for wires like R, RC, W, Y, and G. Write these letters on small pieces of tape. Attach the tape to the corresponding wires. This makes the next steps easier.
Detach The Unit
Next, detach the old thermostat from the wall. Most models have a cover or faceplate. Gently remove this cover. You might need a screwdriver. Once the cover is off, you’ll see the wires connected to the base plate. Carefully unscrew the wires from the terminals. Keep the screws safe for later use. Finally, unscrew the base plate from the wall. Your old thermostat is now removed.

Credit: thermostat.guide
Preparing The New Thermostat
Preparing the new Honeywell Pro Series Thermostat is an essential step. It ensures a smooth installation process and optimal performance. This section will guide you through the initial steps before wiring. Let’s start by unboxing the thermostat and then review the manual.
Unboxing The Thermostat
First, find a clean, flat surface to unbox your new thermostat. Open the package carefully to avoid damaging any components. Inside, you will find the thermostat unit, a wall plate, and screws. There might also be labels for your wires and a user manual. Make sure all items are present before proceeding. Check the contents against the list in the manual.
Reviewing The Manual
The manual is your best friend during installation. It contains step-by-step instructions and important safety information. Take a few minutes to read through the manual. Familiarize yourself with the parts of your new thermostat. Pay attention to the wiring diagrams. These diagrams will help you identify which wires connect to which terminals.
Keep the manual handy as you will refer to it often. Understanding the manual ensures you avoid common mistakes. This preparation step saves you time and effort later.
Mounting The Thermostat
Mounting your Honeywell Pro Series Thermostat is a crucial step. It ensures the device works efficiently. You need to follow a few simple steps. This guide will help you mount the thermostat correctly.
Install The Backplate
First, install the backplate. This is the part that holds the thermostat to the wall. Find a good spot, away from drafts and direct sunlight. Hold the backplate against the wall. Use a level to make sure it is straight. Mark the screw holes with a pencil.
Secure To The Wall
Now, secure the backplate to the wall. Drill pilot holes where you marked. Insert wall anchors if needed. Use the provided screws to attach the backplate. Make sure it is tight and secure. The backplate should not move or wobble. This step is important for the thermostat to function well.

Credit: www.reddit.com
Connecting The Wires
Connecting the wires correctly is crucial for the proper functioning of your Honeywell Pro Series Thermostat. This step ensures that your thermostat communicates effectively with your HVAC system. Follow the steps below to match and attach the wires securely.
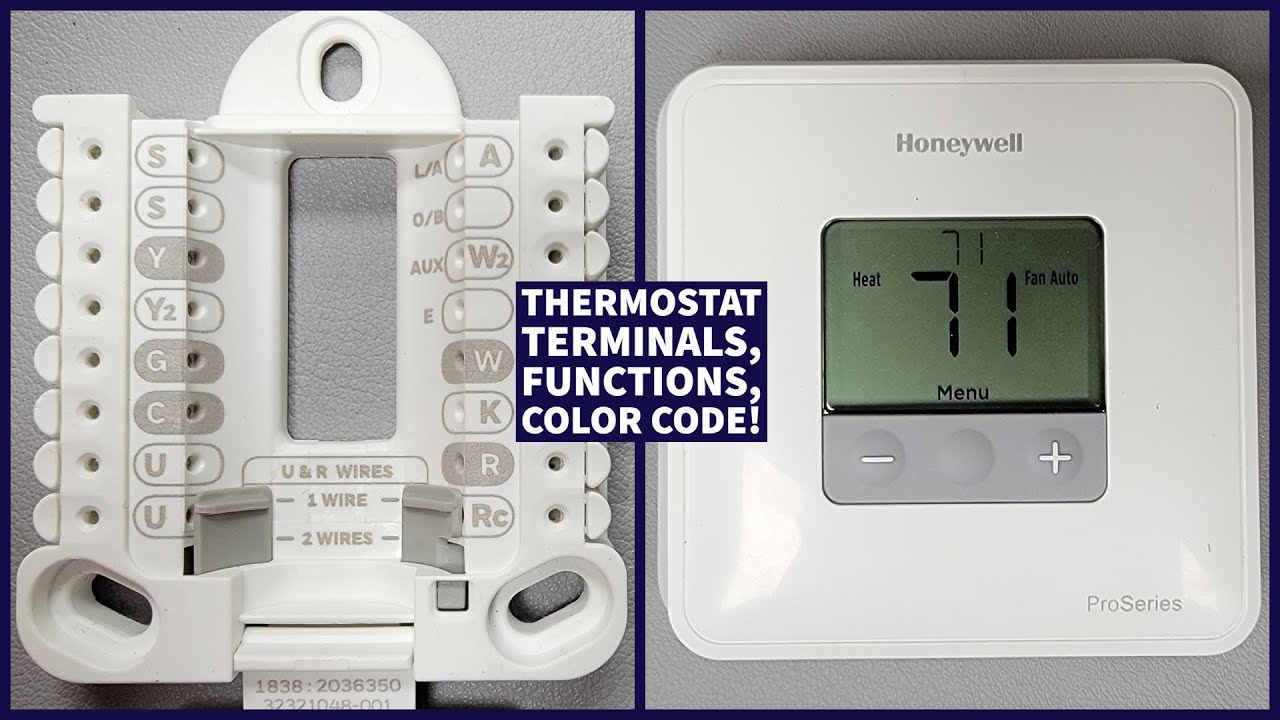
Match Wire Terminals
Each wire needs to go into the correct terminal. Here’s a simple guide:
- Red Wire (R): Connects to the R terminal.
- White Wire (W): Connects to the W terminal.
- Yellow Wire (Y): Connects to the Y terminal.
- Green Wire (G): Connects to the G terminal.
- Blue Wire (C): Connects to the C terminal.
If your system uses a different color coding, refer to the user manual. The manual will provide specific instructions for your setup. Here is a table for quick reference:
| Wire Color | Terminal |
|---|---|
| Red | R |
| White | W |
| Yellow | Y |
| Green | G |
| Blue | C |
Attach Wires Securely
After matching the wires, attach them securely to the terminals. Follow these steps:
- Strip about 1/4 inch of insulation from each wire.
- Loosen the terminal screws on the thermostat.
- Insert each wire into its corresponding terminal.
- Tighten the screws to secure the wires.
- Ensure no wires are loose or touching each other.
Check each connection twice. Loose connections can cause the thermostat to malfunction. Properly attached wires ensure the thermostat works correctly.
Powering On And Testing
After successfully wiring your Honeywell Pro Series Thermostat, the next step is crucial. Powering on and testing ensures everything works perfectly. This section will guide you through these steps to verify your thermostat is functioning correctly.
Restore Power
First, go to your circuit breaker. Locate the switch controlling your HVAC system. Turn it back on. Ensure the switch is fully flipped to the ‘on’ position. This action restores power to your thermostat and HVAC system.
Check Thermostat Functionality
Once power is restored, check if your thermostat screen lights up. If the screen remains blank, check the wiring connections again. Make sure every wire is secured tightly.
Next, set your thermostat to a desired temperature. Wait for the HVAC system to respond. You should hear the system start. Feel for warm or cool air, depending on your settings.
- If the system does not start, double-check the wiring.
- Ensure the power source is stable.
- Consult the user manual for troubleshooting tips.
Testing your thermostat ensures it controls the temperature correctly. Always ensure the system responds to your settings promptly.
Document any unusual behavior. It can help with future troubleshooting. A properly functioning thermostat improves comfort and efficiency in your home.
Programming The Thermostat
Programming your Honeywell Pro Series Thermostat can help you save energy and maintain a comfortable home. In this section, we will guide you through the steps of setting the time and date, and configuring the temperature settings.
Set Time And Date
First, ensure your thermostat displays the home screen. Press the “Menu” button. Use the “arrow” buttons to navigate to “Date and Time”. Press “Select”.
Use the “arrow” buttons to set the correct hour. Press “Select” to move to minutes. Repeat the process for day, month, and year. Confirm all settings by pressing “Done”.
Configure Temperature Settings
To set the temperature, start from the home screen. Press the “Menu” button. Use the “arrow” buttons to find “System”. Press “Select”.
Choose “Heat”, “Cool”, or “Auto” mode using the “arrow” buttons. Press “Select” to confirm.
For each mode, set the desired temperature. Use the “arrow” buttons to adjust the temperature. Press “Done” to save settings.
Here is an example of temperature settings:
| Mode | Temperature (°F) |
|---|---|
| Heat | 68 |
| Cool | 75 |
Remember, you can always adjust these settings as needed.
Troubleshooting Common Issues
Wiring a Honeywell Pro Series Thermostat can be straightforward. However, you may encounter some common issues. This section covers troubleshooting common problems to ensure your thermostat works flawlessly.
Display Problems
Sometimes, the thermostat display may not turn on. This could be due to power issues or incorrect wiring. Follow these steps to fix the display problems:
- Check if the thermostat is securely connected to the wall plate.
- Ensure the power switch on the circuit breaker is turned on.
- Inspect the wiring connections. Make sure they are tight and secure.
- Replace the thermostat batteries if needed.
If the display is still not working, consult the Honeywell support for further assistance.
Temperature Inaccuracies
Temperature inaccuracies can be frustrating. They may occur due to sensor issues or incorrect settings. Here’s how to troubleshoot temperature problems:
- Verify that the thermostat is installed in a central location, away from direct sunlight and vents.
- Check the temperature calibration settings. Adjust if necessary.
- Ensure the wiring is correctly connected to the temperature sensor.
- Clean the thermostat to remove any dust that may affect its performance.
Consider resetting the thermostat to its default settings if temperature issues persist. This can often resolve calibration problems.
Maintenance Tips
Maintaining your Honeywell Pro Series Thermostat ensures it works efficiently. Regular upkeep extends its lifespan and saves energy. Below are some practical maintenance tips.
Regular Cleaning
Dirt and dust can accumulate on your thermostat. Clean it often to keep it functioning well. Use a soft, dry cloth to wipe the screen and buttons. Avoid using water or cleaning sprays. Dust inside the device can cause malfunctions. Gently vacuum the vents and openings to remove debris. This simple step ensures accurate temperature readings.
Software Updates
Check for software updates regularly. These updates improve performance and add new features. Visit the Honeywell website to see if updates are available. Download and install updates following the provided instructions. Keeping the software up-to-date ensures your thermostat runs smoothly.
Frequently Asked Questions
How Do I Install A Honeywell Pro Series Thermostat?
First, turn off power. Then, remove old thermostat. Connect wires to new thermostat. Mount and power on.
What Wires Do I Need For Honeywell Pro Series?
You need R, C, Y, W, and G wires. Check your thermostat manual for details.
Can I Install Honeywell Thermostat Myself?
Yes, you can. Follow the manual instructions. Take it step by step.
How Do I Reset My Honeywell Pro Series Thermostat?
Press the Menu button. Scroll to Reset. Select the reset option and confirm.
Why Is My Honeywell Thermostat Not Working?
Check power supply. Ensure wires are connected correctly. Refer to the manual for troubleshooting tips.
Conclusion
Wiring a Honeywell Pro Series Thermostat can seem challenging. Yet, with the right guide, it becomes manageable. Follow each step carefully to ensure proper installation. Check connections to avoid any errors. Your home comfort depends on precise wiring. With this guide, you can confidently set up your thermostat.
Enjoy a comfortable and well-regulated environment. For any issues, consult the user manual or seek professional help. Thank you for reading and good luck with your installation!