Replacing an existing thermostat with a smart thermostat can seem challenging. But it’s easier than you might think.
Smart thermostats offer more control over your home’s temperature and can save energy. They adapt to your schedule, learning when you are home or away. This helps keep your home comfortable while lowering energy bills. You’ll need some basic tools and a bit of time to install one.
Don’t worry; you don’t need to be an expert. This guide will walk you through the steps. By the end, your smart thermostat will be up and running, making your home smarter and more efficient. Let’s get started!
Benefits Of A Smart Thermostat
Smart thermostats have become popular in recent years. They offer many advantages over traditional thermostats. Replacing your old thermostat with a smart one can improve your home’s comfort and save you money.
Energy Efficiency
Smart thermostats help you save energy. They adjust the temperature based on your daily routines. For example, they lower the heat when you leave for work. They also raise the temperature before you get home. This reduces energy waste and can lower your utility bills.
Remote Access
With a smart thermostat, you can control your home’s temperature from anywhere. Use your smartphone or tablet to make adjustments. This means you can change settings without getting up. If you forget to turn off the heat, you can do it from your office. This convenience can also save energy.
Learning Capabilities
Many smart thermostats learn your preferences over time. They remember when you like the house warmer or cooler. They automatically adjust to match your habits. This means less manual adjusting for you. Your home stays comfortable without extra effort.

Credit: www.youtube.com
Tools And Materials Needed
To replace an existing thermostat with a smart thermostat, you need the right tools and materials. Having these items on hand makes the installation process easier and more efficient. Below is a list of essential tools and materials you will need.
Screwdriver
A screwdriver is necessary to remove the screws holding your old thermostat in place. It also helps with securing the new smart thermostat. Make sure you have both a Phillips and flat-head screwdriver, as you might need both types.
Drill
A drill is useful for creating new holes if your smart thermostat requires a different mounting setup. It ensures the new thermostat is securely attached to the wall. Use a drill with the correct bit size to match the screws that come with the thermostat.
Wire Labels
Wire labels help you keep track of the various wires connected to your thermostat. Labeling each wire before you disconnect them prevents confusion during the installation of the new thermostat. This step is crucial for ensuring correct wiring.
Level
A level ensures your smart thermostat is installed straight on the wall. A crooked thermostat can affect its functionality and appearance. Use a small level to check and adjust the position before securing the thermostat.
Safety Precautions
Replacing an existing thermostat with a smart one can be rewarding. But, it is crucial to follow certain safety precautions. This ensures that the process goes smoothly and without harm. Here, we outline important safety measures to take.
Turn Off Power
Always turn off the power to your HVAC system. This prevents electrical shock. Go to your circuit breaker and switch off the relevant breaker. Confirm the power is off by trying to turn on the thermostat. If it does not respond, you can proceed.
Use Insulated Tools
Use insulated tools for the installation. This reduces the risk of electrical accidents. Insulated tools have a rubber coating that prevents electric currents. They are safer to use when handling electrical components. Ensure all your tools are insulated before you start.
Removing The Old Thermostat
Replacing an old thermostat with a smart one can enhance your home’s efficiency. The first step is removing the old thermostat. This process involves disconnecting wires and removing the mounting plate. Follow these steps carefully to avoid issues.
Disconnect Wires
Start by turning off the power to your HVAC system. This ensures safety. Then, remove the thermostat cover to expose the wires. Label each wire with tape to remember their connections. Use small labels like “R” for red and “W” for white. Once labeled, use a screwdriver to loosen the wire terminals. Gently pull each wire out and set them aside carefully.
Remove Mounting Plate
After disconnecting the wires, focus on the mounting plate. This plate secures the thermostat to the wall. Use a screwdriver to remove the screws holding the plate. Once the screws are out, gently pull the plate away from the wall. Be careful not to damage the wires behind the plate.
Now, you have successfully removed the old thermostat. The next steps will involve installing the smart thermostat. Follow the instructions in your smart thermostat’s manual to complete the installation process.
Installing The Smart Thermostat
Replacing an old thermostat with a smart thermostat can be a great upgrade. The process involves several key steps. We will guide you through attaching the mounting plate and connecting the wires. These steps are crucial for a successful installation.
Attach Mounting Plate
Start by removing the old thermostat from the wall. You may need a screwdriver to do this. Once removed, you will see the wiring. Take a picture of the existing wires to reference later.
Next, place the mounting plate of the smart thermostat on the wall. Align it so that the wires can pass through the center. Use a level to ensure it is straight. Mark the holes where the screws will go.
Drill pilot holes at the marked spots if necessary. Insert wall anchors if the mounting plate does not align with studs. Secure the mounting plate with screws. Make sure it is firmly attached and level.
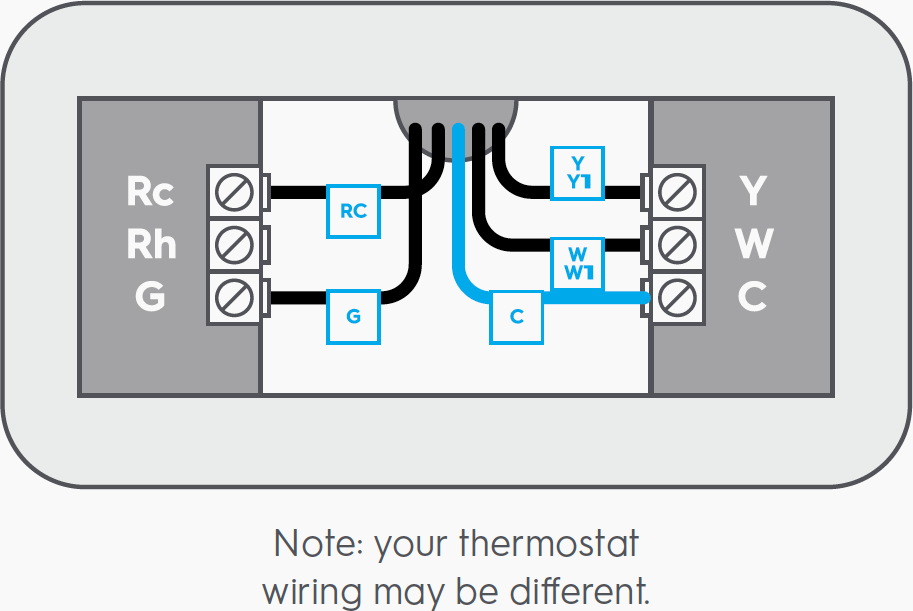
Connect Wires
Now, refer to the picture you took earlier. This will help you identify the wires. Most smart thermostats come with wire labels. Use these labels to mark each wire correctly.
Connect each wire to the corresponding terminal on the smart thermostat. Ensure the connections are snug. Loose connections can cause malfunctions. Double-check the wiring diagram in the thermostat’s manual if needed.
Once all wires are connected, gently push any excess wire back into the wall. Attach the thermostat unit to the mounting plate. Follow the manufacturer’s instructions for any final steps.
Power on your HVAC system. The smart thermostat should now light up. Follow the on-screen instructions to complete the setup. Enjoy your new smart thermostat!
Configuring The Smart Thermostat
Once you have installed your new smart thermostat, the next step is to configure it. This step ensures your thermostat connects to your home network and functions correctly. Follow these simple steps to get started.
Wi-fi Setup
First, you need to connect your smart thermostat to your home Wi-Fi network. This connection allows you to control the thermostat remotely. Follow these steps:
- Turn on your smart thermostat.
- Navigate to the Wi-Fi settings on the thermostat screen.
- Select your home Wi-Fi network from the list.
- Enter your Wi-Fi password.
- Wait for the thermostat to connect. You will see a confirmation message.
App Installation
To control your thermostat from your phone, you need to install the companion app. This app allows you to adjust settings, create schedules, and monitor energy usage. Follow these steps:
- Go to the App Store or Google Play Store on your smartphone.
- Search for the app that matches your thermostat brand.
- Download and install the app.
- Open the app and create an account if you don’t have one.
- Follow the in-app instructions to add your thermostat.
Once these steps are complete, your smart thermostat is ready to use. You can now enjoy the convenience and energy savings it brings.
Testing The System
After installing your new smart thermostat, it’s crucial to test the system. This ensures everything works correctly and your home remains comfortable. Let’s walk through the steps to power on and check functionality.
Power On
First, turn the power back on at the circuit breaker. Your smart thermostat should light up and display its startup screen. If it doesn’t, double-check the wiring and connections. Ensure all wires are secure and in the correct terminals.
Check Functionality
Once the thermostat powers on, navigate through the initial setup. Follow the on-screen instructions to connect to your Wi-Fi network. Ensure the thermostat is connected to your home’s internet.
Next, verify that the thermostat can control your heating and cooling systems. Set the temperature higher or lower than the current room temperature. Listen for the system to turn on or off accordingly.
Use the following checklist to confirm functionality:
- Thermostat powers on
- Wi-Fi connection established
- Heating system responds to thermostat commands
- Cooling system responds to thermostat commands
If all items on the checklist are confirmed, your smart thermostat is functioning properly. Enjoy the convenience and efficiency of your new device!
Credit: www.gelighting.com
Troubleshooting Common Issues
Installing a smart thermostat is an excellent way to save energy and money. However, you might face some issues during the process. This section will help you troubleshoot the most common problems you may encounter.
Connectivity Problems
Sometimes, a smart thermostat might not connect to your Wi-Fi network. Here are some steps to resolve this:
- Check if your Wi-Fi is working by connecting another device.
- Ensure your router is close enough to the thermostat.
- Restart your router and the thermostat.
- Make sure you are using the correct Wi-Fi password.
If these steps do not work, consider resetting your thermostat. Refer to the user manual for specific instructions.
Inaccurate Temperature Readings
Sometimes, a smart thermostat might display inaccurate temperature readings. This can be frustrating. Here are some possible solutions:
- Check if the thermostat is installed in a place with direct sunlight.
- Ensure it is not near heat-generating devices like TVs or lamps.
- Calibrate the thermostat. Most models have a calibration option in the settings.
- Replace the batteries if they are low.
If you continue to have issues, contacting the manufacturer for support is a good idea.

Credit: www.reddit.com
Frequently Asked Questions
What Tools Do I Need To Replace A Thermostat?
You need a screwdriver, pliers, wire labels, and a voltage tester.
How Do I Turn Off The Power To The Thermostat?
Switch off the circuit breaker for the thermostat at the electrical panel.
Can I Install A Smart Thermostat Myself?
Yes, many smart thermostats come with detailed instructions for DIY installation.
Do I Need Wi-fi For A Smart Thermostat?
Yes, Wi-Fi is needed to control a smart thermostat remotely via an app.
How Do I Know If My System Is Compatible With A Smart Thermostat?
Check the smart thermostat’s compatibility guide or consult your HVAC system’s manual.
Conclusion
Replacing your thermostat with a smart one is straightforward. Follow the steps carefully. Smart thermostats save energy and money. They offer modern features like remote control. You can adjust settings from your smartphone. Installation is simple with the right tools.
Enjoy increased comfort and convenience. Make your home smarter today.